Site Details
The site details page is the central hub for everything about a specific site. It brings together site information, hardware, monitoring policy, the contact call list, recent events, and (where the module is enabled) service jobs and billing into a single view. This is where operators and administrators go to understand a site's full setup and make changes when needed.
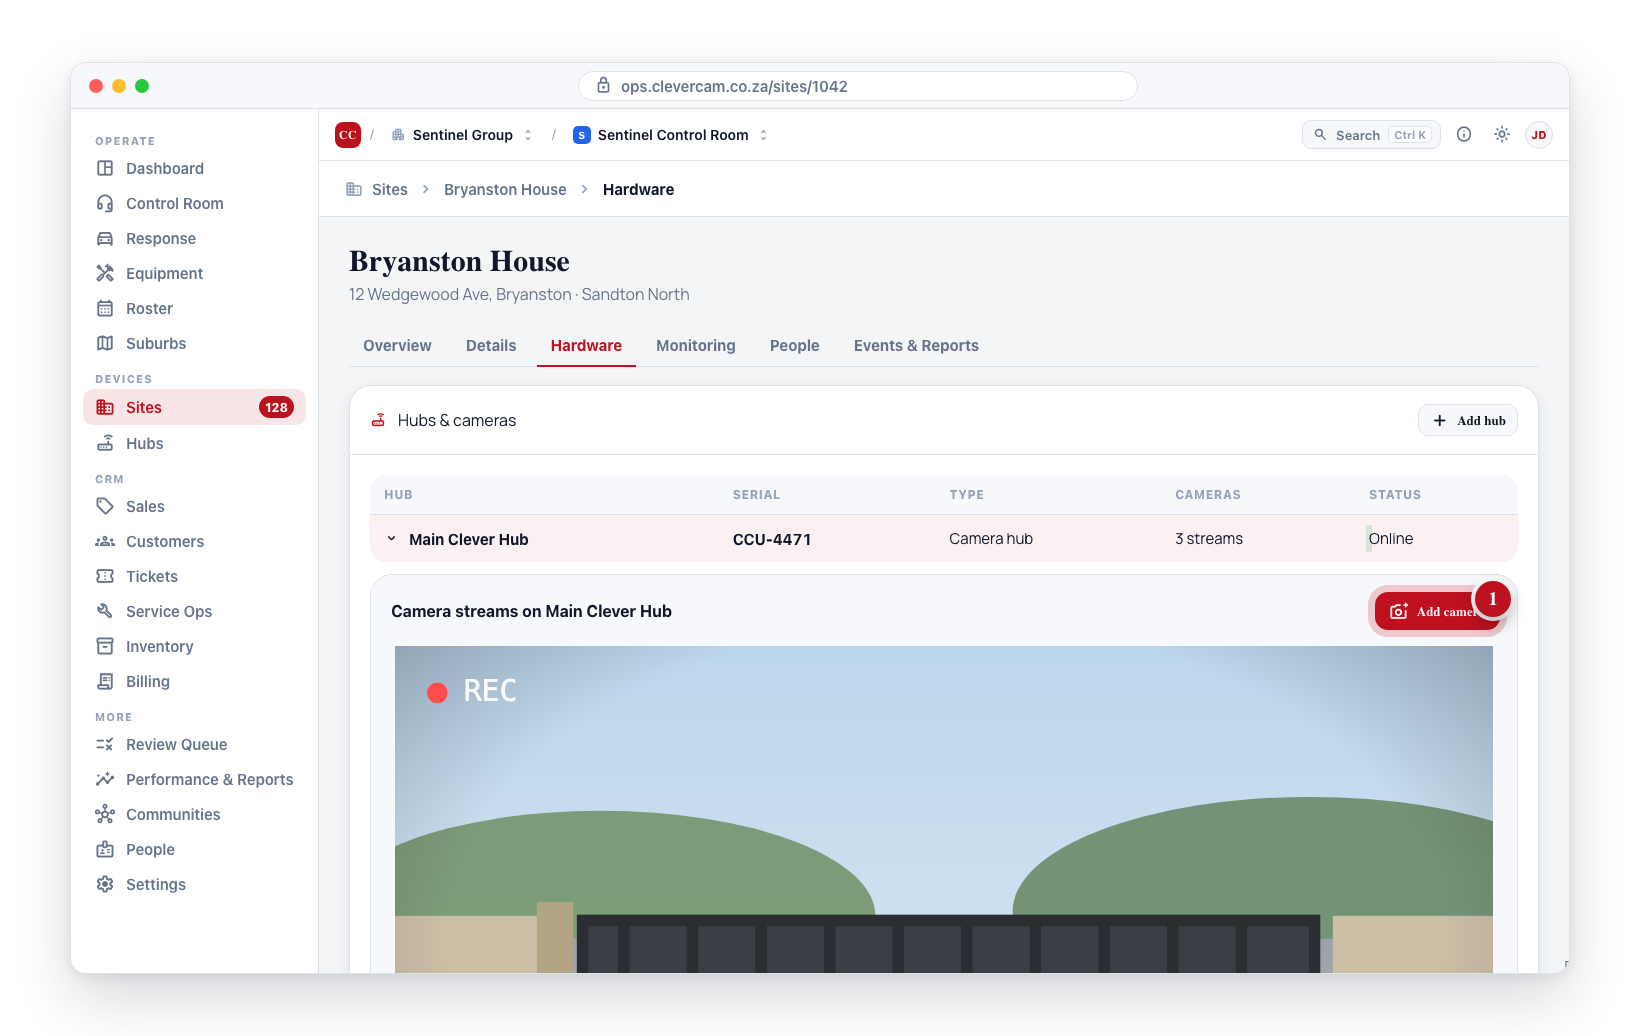
Accessing Site Details
- Navigate to Sites > Connected Sites.
- Click on any site name in the list.
- The site details page opens, showing all configuration panels for that site. The Sites / <site name> breadcrumb at the top returns you to the site list. If an onboarding journey is still active for the site, a Back to onboarding journey #N button appears below the breadcrumb and reopens that journey on the board — the way back from the journey's own Open the site page and Link a hub.
The same page also opens as an overlay from the Site column on the Hubs page, titled with the site's name. Opened that way it always starts on Overview and does not write the tab to the URL.
Setup card
The Overview tab opens on a Setup card: what the desk still needs before this site can be worked at 02:00. One line per fact, a green dot when it is in place and an amber one when it is not, and beside each open line the one button that fixes it. The card reads Ready when every line is green.
| Line | Green when | The button |
|---|---|---|
| Pinned on the map | The site has a map pin (not 0,0) | Move pin / Drop a pin → Details |
| People to call, with a word | At least one person on the call list, and either the site has a Site password or every listed person has a response word of their own. It is amber only when both the site and someone on the list have no word. With a site word the line reads challenged on the site word | Add people / Add word → People |
| Something protecting it | A hub, panel or radio is linked | Add → the Add hub wizard |
| Signal received | A linked device has reported in at least once | none — it turns green on its own |
| Belongs to a customer (CRM module) | The site is attributed to a customer | Set customer / Change — the link wizard opens here |
| Billed on a subscription (CRM module) | An active subscription bills this site | Set up billing — the subscription form opens here |
On a site you share with another control room that belongs to one of their customers, the customer line reads Belongs to a customer of another control room — green, with no button, because that customer is not yours to see or change (a Set customer there would take the site off their customer).
Control rooms without the CRM module see the first five lines. Billing never holds up monitoring: a site can be Ready to monitor and Not billed yet at the same time, and the card says so.
The same six facts appear as Setup dots on every row of the Connected sites list and in the account rail.
Account rail (CRM module)
On control rooms with the CRM module, the site page sits beside an account rail: the customer on top (name, account number, status), an Account link, then every site on the account with its Setup dots and Ready or 3 of 6, the one you are on highlighted. Sites that still need setup are listed first; past eight sites a Find a site box appears.
- Click a site in the rail and only the page swaps — the tab you were on stays open, so the same edit can be made site after site. Alt + ↑ / ↓ does the same from the keyboard.
- A site in partitioned premises mode lists its premises (the cottages, flats or units one panel protects) indented beneath it, each with its partition number — P1 HOMESTEAD, P3 NORTH COTTAGE. Premises have no page of their own: clicking one opens that site's Hardware tab, where the Zone structure card holds the premises' name, pin and photo. Find a site matches premises names too. The folded strip shows sites only.
- + Add starts the Add a site flow with the customer already filled in.
- A site with no customer shows alone in the rail with an Add customer button; it works on its own until then.
- A site you share with another control room that belongs to one of their customers also shows alone, headed Customer of another control room — no Account link and no Add customer, because that customer is not yours to open or change.
- The rail is 280px wide on full-HD and wider screens and 220px on laptops below that, so the site names stay readable either way. The fold button turns it into a 56px strip of site icons; the choice is remembered per browser. Below tablet width it folds away entirely. The rail is pinned to the screen and never grows taller than it: on an account with many sites the site list scrolls inside the rail while the customer, Account and + Add stay put, so choosing the next site never costs you the place on the page you were reading.
- Moving around the account feels instant on purpose. The account's sites and their setup are loaded once, the account record is warmed as soon as a site opens, and pointing at a site in the rail (or standing next to it) warms that site's page, so the next click paints straight away and refreshes quietly behind it.
- The tab follows you. Hop from one site's Details to the next and you land on Details; go to the account and back and you return to the tab you left. Only the Sites list and other outside links open a site on Overview.
Control rooms without the CRM module keep the full-width site page they had.
Site Header
The top section displays the site name and address. If the site has not yet been approved, a Pending site approval banner is shown and only limited information is visible.
Status chips
To the right of the site name sits a row of chips carrying the facts you most often open a site to check. They are read-only — each one is a shortcut to knowing, not a control:
- Arm status — the site's current arm state, green when disarmed and red when armed.
- Monitoring mode — Full monitoring, Self monitoring, or No monitoring (amber). Change it on Monitoring → Setup.
- Hubs — how many hubs the site has, and how many of them are offline. Amber when any are offline, green when all are up.
- Cameras — how many cameras are attached to those hubs.
- Active events — shown only when events are still open on the site.
Every chip except arm status needs an approved connection, so a pending site shows only its arm state.
Ownership badge
Next to the site name, an ownership badge shows your control room's relationship to the site (see Site ownership for the full model):
- Primary (green) — your control room holds the site's primary link. It is a company-managed site: yours to run.
- Managed by <company> (blue) — another control room holds the primary link; your control room has a secondary (event feed) connection.
- Self-managed (grey) — no company holds a primary link. The end user manages the site themselves.
The badge is informational today — ownership is not yet enforced, so it does not change what any control room can edit. Requests from other companies to connect to sites where you are primary, and ownership offers made to your control room, appear in the Site ownership queue at the top of the Sites page — see Site ownership → Approval queue.
Directly beneath the badge, an ownership row appears only when there is something to action — claim the primary role on a self-managed site, accept an offer addressed to your control room, or cancel one you have made. Handing a site you already run to someone else lives further down, on Details → Site ownership. See Site ownership → Managing ownership on a site for the full model.
Customer row (CRM module)
When your control room has the CRM module and the site opens as an overlay (from the Site column on the Hubs page), a Customer row sits between the address and the ownership row, showing which customer account this site belongs to — the same link the customer's Sites & contacts tab manages from the other side. On the site page itself that job belongs to the account rail beside it, so the row is not repeated there.
- Linked — the customer's name (click it to open the customer) and account number, with Change and Unlink for anyone who can manage customers.
- No customer linked — a Link a customer button opens the wizard below.
- Linked to a customer of another control room — the site belongs to a customer in a different company's book (a multi-company site). Shown for information only; it cannot be changed from here.
The row only appears once the site is approved — an unapproved site has no billing to attribute.
Link a customer wizard
Step 1 — Choose. Pick an existing customer from the searchable picker, or click New customer to create the account on the spot: the new customer is selected for you and the wizard jumps straight to review. Review stays disabled until a customer is chosen (and, when changing, until it is a different customer).
Step 2 — Review. Shows exactly what will change before you commit: the site, the customer (or new customer on a change), who it is currently linked to when this is a reassign, and billing — how many active subscriptions on the site will start billing the chosen customer from the next billing run, or that nothing moves because the site has none. A reassign is called out in an amber banner because both customers' statements change; its confirm button reads Reassign site rather than Link customer.
Confirming links the site and hands its subscriptions over in one step. If the billing hand-over fails — moving subscriptions needs the billing permission — the site link is undone too, so the two never disagree.
Unlink asks you to confirm first, then detaches the site and its subscriptions from the customer; the site stays in your control room and its billing is simply unattributed until it is linked again.
Active temporary notice banner
When a temporary notice is currently active and the viewer's role matches the notice's audience, an amber banner appears directly under the site header listing every active notice with its body text and end date. The banner is rendered before any tab — it stays visible no matter which tab is open — and disappears automatically the moment the notice's to date passes or a different viewer (whose role is not in the audience) opens the site. See Temporary notices below for how to create one.
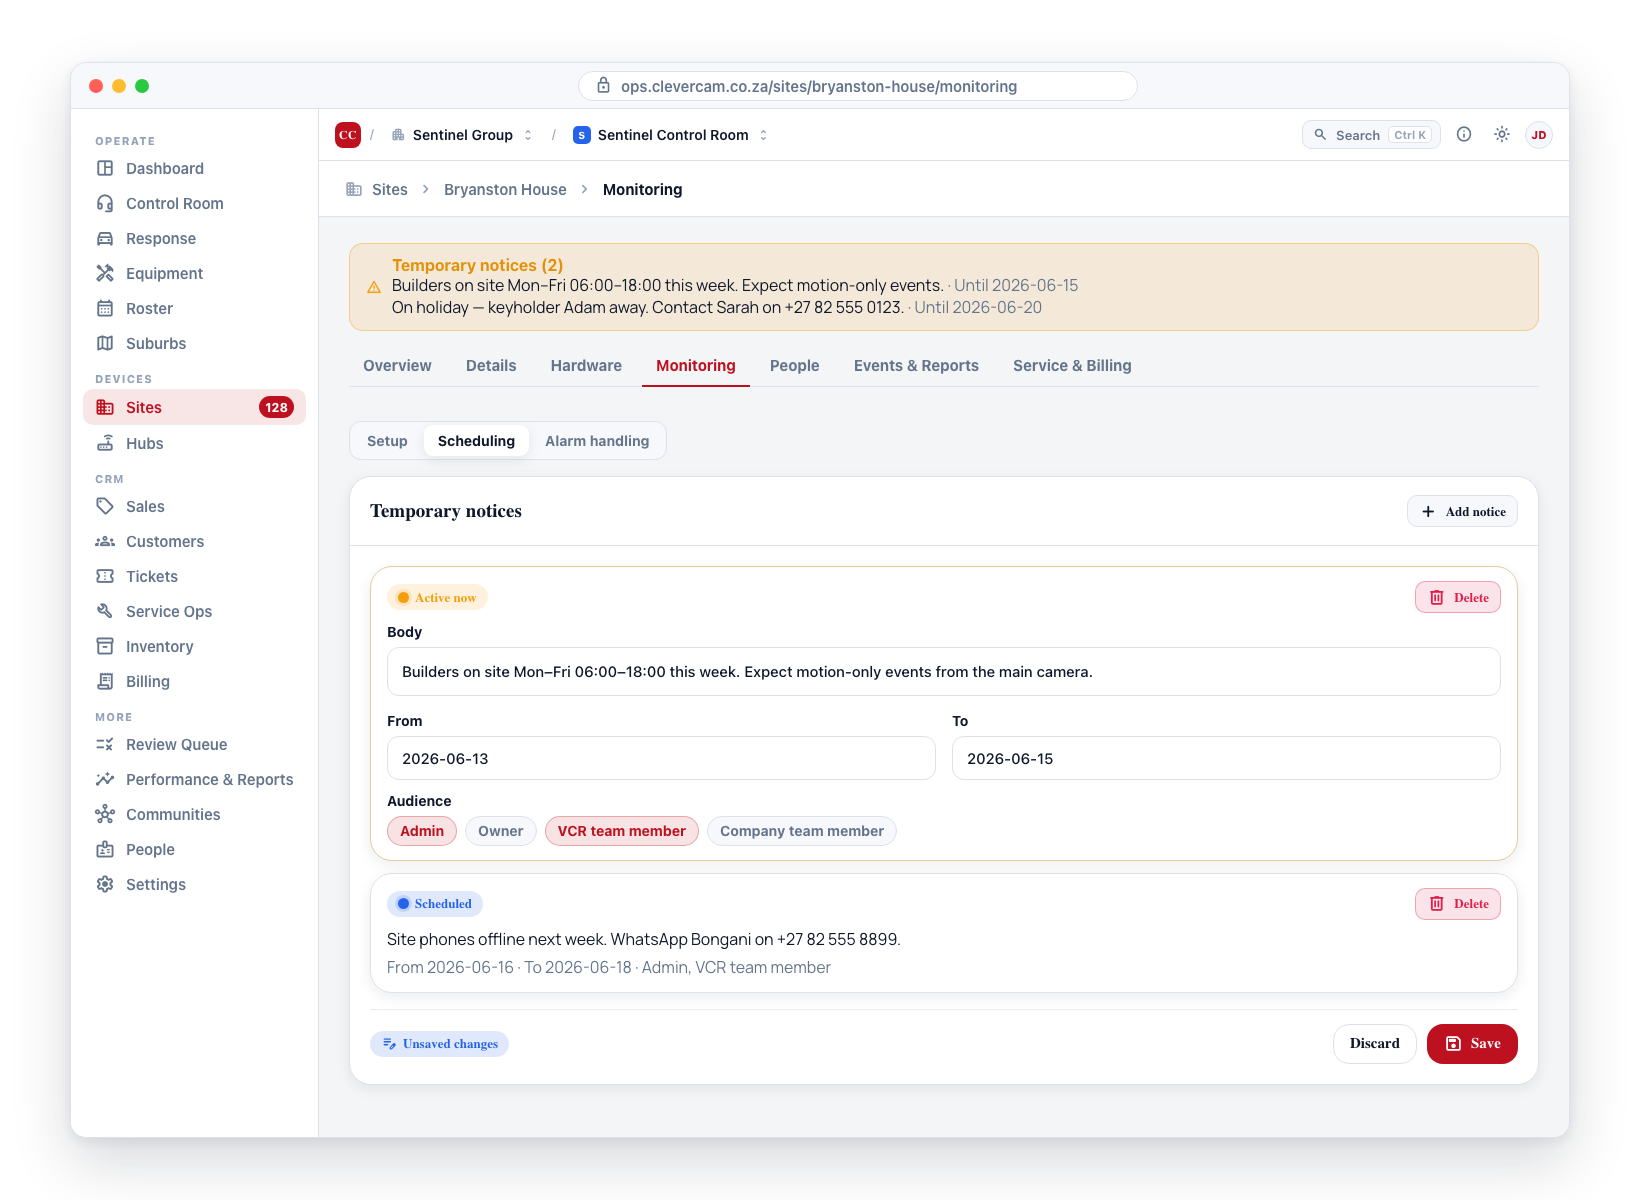
The temporary-notices editor (status pills, audience tick boxes, Save / Discard) is documented in full under Temporary notices — the mock above shows both the banner and the editor card together.
Tab Structure
The site details page is organised into eight tabs, two of them module-gated. The active tab — and the Hardware / Monitoring sub-tab — is reflected in the page URL (?tab= and ?sub=), so refreshing, bookmarking, or sharing a link keeps you on the same tab.
The tab strip stays pinned to the top of the page as you scroll, so you can move between tabs from anywhere on the record without scrolling back up — Hardware in particular runs a long way past a screen.
Three of the tabs carry a count beside their name, so you can see what a site holds without opening each one:
- Hardware — the number of hubs, shown in red as an offline count when any hub is down.
- People — how many people are on the site.
- Events & Reports — how many events are still open, in red. No badge when there are none.
If a save fails anywhere on the record, the message appears in a red banner directly under the tab strip and stays pinned there with the strip until you dismiss it — so a failure on a long tab can't scroll out of sight.
A site with a custom site type may show fewer tabs: each custom type defined under Settings → Site types can hide the tabs that don't apply to it (a Medical trailer type hiding Monitoring, for example). Overview and Details are always shown.
Overview
The Overview tab is the at-a-glance dashboard for the site. At the top sits a compact, read-only Site state summary — the current state badge (plus an until <date> hint and the next scheduled change when one exists) with a Manage in Monitoring → Scheduling link to the full Site state & scheduled changes card. Beyond that there are no editable fields on this tab — every other editable setting lives on Details or Monitoring. (On a site still awaiting approval, which has no Monitoring tab to link to yet, the full Site state card lives here on Overview instead of the summary.)
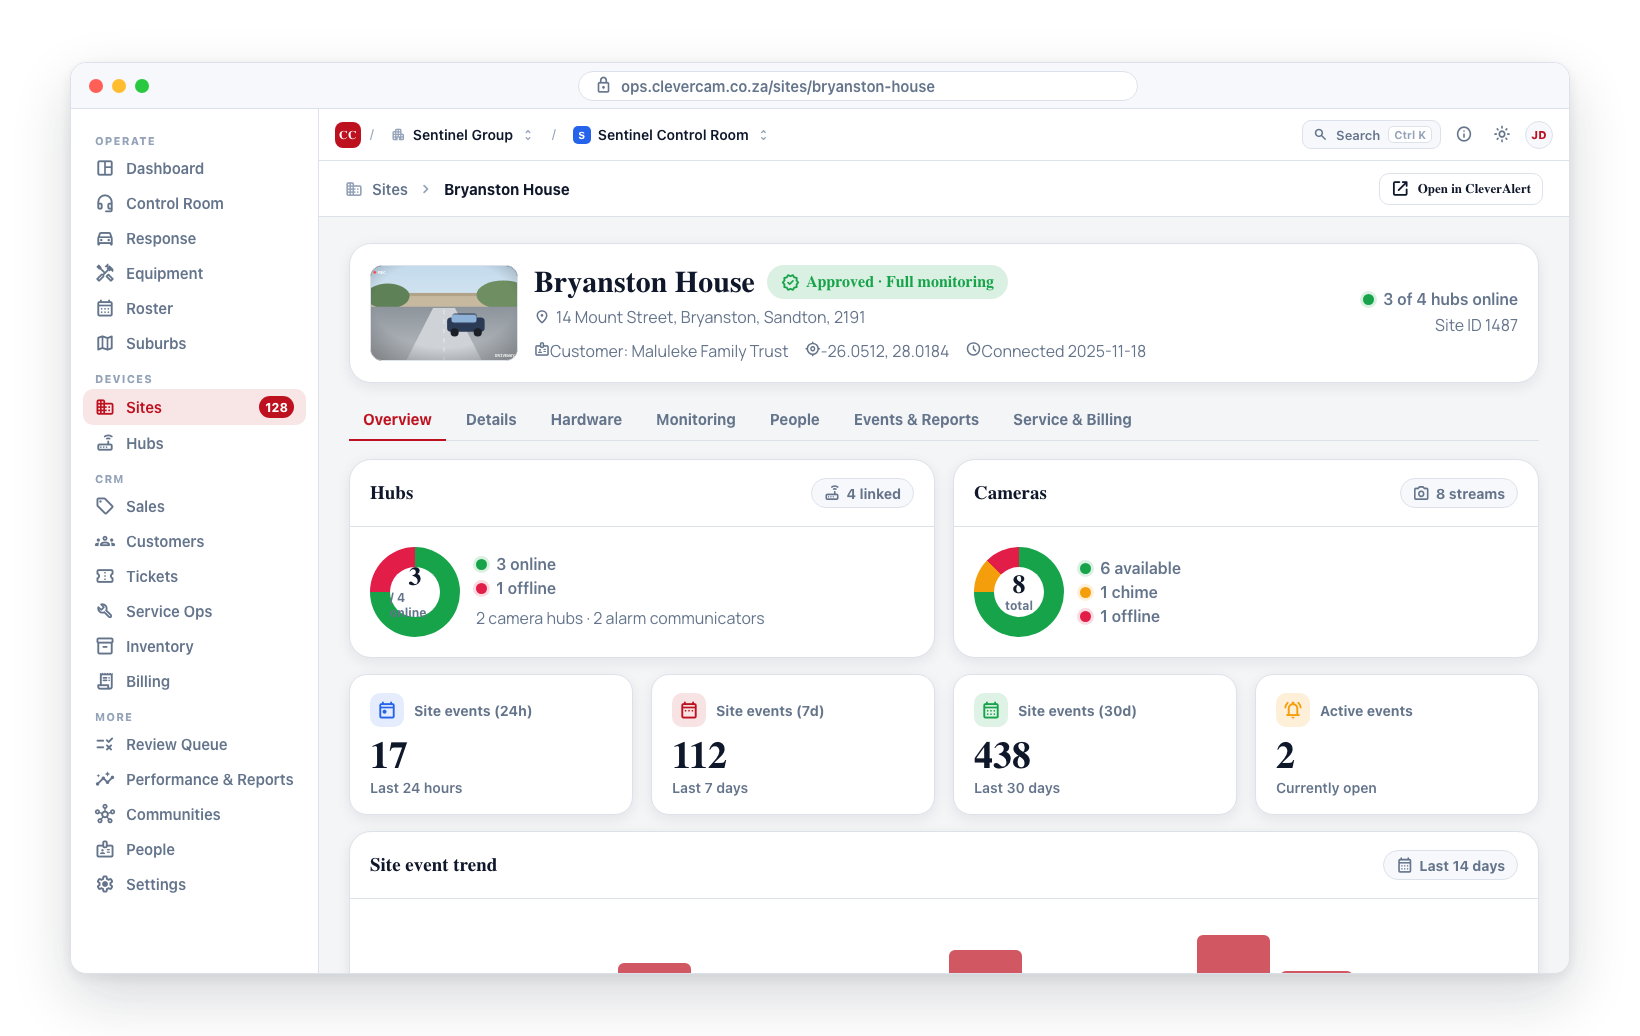
It shows:
- Site events — an area chart of daily event counts over the last 14 days, with the 24h / 7d / 30d totals beside its heading. If the counts can't be loaded, the panel says so and offers a Retry button, and the totals show – rather than a misleading zero.
The hub, camera and open-event counts are not repeated here — they are status chips in the site header, visible from every tab.
When the Service Ops / CRM module is enabled, an Activity & notes card sits below the event trend — a running timeline where managers record notes about the site (a call with the keyholder, a gate-code change, an access arrangement). Each note is stamped with its author and time. Type @ in the box to mention a colleague — they are emailed a link to the note, reminded once if they go quiet, and the note shows when they have acknowledged it. Alongside the notes, the card records what happens at the site by itself: every job opened for the site and every job completed, every quote created for it, and every ticket opened about it (including the automatic ones, such as Recurring Hub Offline) — each linking to that job, quote or ticket; hubs linked, claimed, moved here or away, unlinked, released or removed, and a hub's receiver or serial changing; the site's subscriptions started, paused (including when the account was suspended), resumed, cancelled or repriced; keyholders, owners and app users added to or removed from the site — someone joining with an invite code shows as the customer; and every change a person makes to the site — renamed, status changed or archived, address or map pin moved, customer changed, the response password, duress word, response instructions or photo edited (by whom — including an owner editing their site in the app — and never the password's value), the site put in test mode or installation mode and when that ends (also when CleverTech or the system sets it), and scheduled alarms added, paused, re-timed, edited or removed; technician access opened (by the customer in CleverAlert, the control room, or an assigned job on CleverTech), extended and ended; arming schedules added, switched on or off, skipped for today, changed or removed; zones renamed, re-typed, muted or set to log only; the equipment register — items added (and from which job), marked faulty, replaced or removed; and alarm accounts a person binds to or unbinds from the site (automatic discovery is not listed); equipment logins saved, changed (password, username or address — never the value), switched off or removed, and every time someone revealed a password (and for which job). Your control room's action plans for the site's alarm types appear when they are set, changed or removed. Changes to the shared site reach every control room connected to it; your own control room's settings for the site — connected or disconnected, the connection approved, its role, monitoring mode and package, area and account reference, and edits to its monitoring, responder and call-list notes, key / property / technician / responder instructions and site settings — appear only on your timeline. A new site starts with Site created, which stands for its setup — the approvals, notes and passwords filled in during its first five minutes are not listed one by one (its test or installation mode and scheduled alarms still are). A run of edits, zone changes or equipment changes by one person folds into one line (5 edits to the site) you can open. All · Notes · Updates chips narrow it to the notes or to that work. The log is append-only (never edited or deleted) and uses the same universal timeline as leads, tickets, quotes and jobs. These notes are internal to your control room — never shown to app users or responders — and only VCR managers can add them; each control room connected to the same site keeps its own separate notes and sees only its own work at the site. For history before 14 September 2026 the card was filled in from what CleverOps had already recorded — work at the site, and hub and subscription changes a person made (bulk imports are left out); people added or removed only appear from that date on. Changes people made to the site and its settings were filled in from 17 June 2026, when CleverOps started keeping them; a shared site's changes appear for each control room connected to it today. Technician access, action plans, the equipment register and confirmed alarm accounts were filled in from their own records; arming schedule and zone changes only appear from 14 September 2026.
While the site is still pending, the tab also carries the controls for accepting or turning down the connection:
- Approve site — hub claims that are about to expire must be claimed by the active VCR before this button enables.
- Decline request — removes the site's connection request. The site itself is not deleted; it simply stops asking to be monitored by you.
Once a site is approved, disconnecting it moves to the danger zone at the bottom of the Details tab — a red button is no longer the natural end of a scroll through the tab everyone lands on.
Site state & scheduled changes
The Site state & scheduled changes card — the first card on Monitoring → Scheduling (the Overview tab keeps only the compact read-only summary above) — shows the site's current dispatch state and lets a manager suspend or re-activate the site — now or on a future date. On a site still awaiting approval the full card remains at the top of the Overview tab instead.
- Current state — a badge reading Normal, Suspended, Maintenance, On test, Installation, or Active (forced). When an end time applies, an until <date> hint follows.
- Installation — a dedicated row below the current state for Installation mode. When off, managers see a Start installation (2 hours) button — the length is your control room's installation hold. While active, an amber Installation — expires in … chip counts down (45 min, 1 h 30 min, 3 days) with two actions: Extend (+2 hours) (pushes the expiry out by one more hold length from its current end) and End installation (returns the site to normal dispatch immediately, after a confirmation). Installation windows are always site-wide — they apply to every control room monitoring the site.
- Schedule change — managers (the Manage customers permission) click Schedule change to open the form:
- Change — Suspend, Maintenance, or Activate (force normal). Each option shows a one-line hint of what it does.
- Takes effect — the date and time the change applies. Pick now to apply immediately, or a future date to schedule it.
- Ends (optional) — when the window should close and the site return to normal. Leave blank for an open-ended change.
- Reason (optional) — free text recorded with the change (e.g. "Account on hold pending payment").
- Upcoming — any future-dated changes are listed under an Upcoming heading; active overrides appear above with an Active now badge.
- Cancel / End now — Cancel withdraws a scheduled change before it starts; End now ends an active override immediately (the site returns to normal that moment).
A Suspended, Maintenance, or Installation state stops alarm dispatch for the site while it is active — signals are still received and logged, they are just not actioned by the control room. It is non-destructive: it never changes the customer's or site's stored status, and it is applied and expired automatically by time (no overnight job). Activate (force normal) is an explicit override that returns the site to normal dispatch even if an earlier suspension is still in effect. This shares the same engine as Test Mode in CleverCommand and CleverTech.
Details
The Details tab is where you edit the site's identity and presentation:
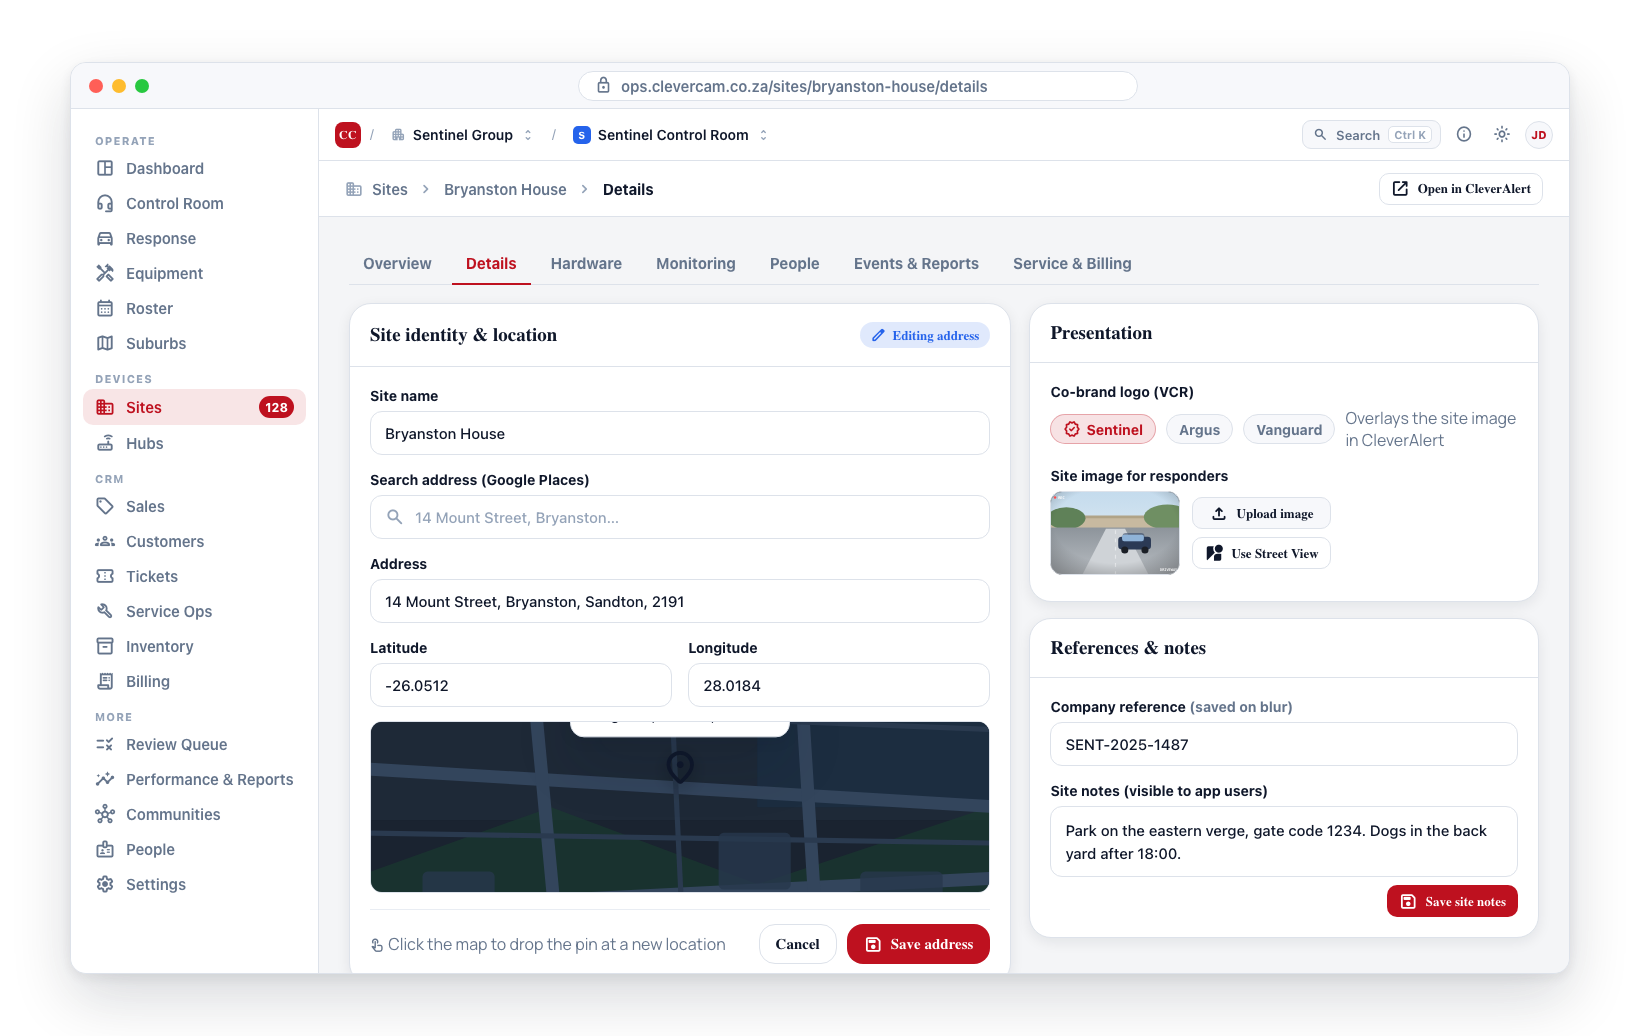
- Site name — the site's one name, and your control room's to set: the Sites list, the account rail, the site pickers, the CleverCommand alarm card and the CleverAlert app all show it. Type in the field and it saves when you leave it (blank is refused). Use the business name, the customer's name or whatever the desk knows the place by; the Add-a-site flow suggests one from the address. Once a control room monitors a site, the app user can no longer rename it from CleverAlert — they keep a private nickname for it instead, which only they see. It is a shared site field, so on a shared site only the primary control room edits it (read-only otherwise).
- Address, GPS coordinates — click Edit address to enter edit mode. A map picker opens at the top of the card, with the address fields below it (the site name is editable there too). Click Save address when done, or Cancel to discard. See Pinning the exact location below.
- Site type — what the record is: Property, Vehicle, Personal (panic), or one of your control room's custom types. Shown as a dropdown when Settings → Site types offers more than one type (changes save immediately); shown as a plain label when there is nothing to choose, or on a shared site where another control room is primary. A site whose custom type has since been deleted shows it as (retired) until re-typed.
- Co-brand logo (VCR) — the badge that overlays the site image in CleverAlert and on responder hand-overs. Pick from the VCR's preset logo set.
- Site image for responders — the photo a responder sees when they arrive at the site. Upload your own image, or fall back to the auto-loaded Street View. Uploaded site images are held in private, access-controlled storage scoped to the site and shown via short-lived signed links (never a permanent public URL). The auto-loaded Street View image and the co-brand logo remain public.
- Company reference — your internal reference for the site, saved on blur.
- Site notes (visible to app users) — free-text notes that appear in the CleverAlert app for site users. Use this for instructions like "Park on the eastern verge, gate code 1234". Click Save site notes to commit.
Site ownership
Shown only when your control room is the site's primary company, this card is where the primary role is handed over. It is here rather than in the site header because giving a site up is a rare, deliberate act, not something an operator needs in front of them on every visit.
- Offer to another company — pick one of the site's other connected companies and send it an ownership offer. Your control room stays primary until the offer is accepted. Disabled when no other company is connected to the site.
- Release primary — give the role up entirely; the site becomes self-managed and the end user runs it from the app.
Both are covered in full, including when the platform refuses them, under Site ownership → Managing ownership on a site.
Changing the site's name, type, address, pin, photo and setup fields needs the Edit sites capability — the Sites admin role grants it, and owners, admins and Administrators have it. Without it those fields are read-only and their tooltip says which role to ask for. Per-room settings — monitoring policy, notes, area assignment and schedules — follow the control-room rules they always did. See Roles and Permissions.
Danger zone
The last card on the Details tab holds the site's one irreversible action. Disconnect site — and Decline request on a pending site — need the Cancel & reinstate sites capability: owners and admins have it, anyone else gets it through the Account closures role.
-
Disconnect site — detaches the site from your control room. Use this when the site is moving to a different monitoring centre or being decommissioned. Clicking it opens a confirmation dialog that spells out the consequences: this control room stops monitoring the site; the site's notes, suburb assignment, and monitoring overrides for this control room are deleted.
Your alarm panels leave with you. Any panel on the site that your control room claims is removed from the site as part of the disconnect — the same soft removal as Remove from site, so its configuration is archived, its zone and partition mappings are dropped, and billing for it stops. The panel stays on your Hubs list as unlinked and reappears in its receiver's unrouted radios, ready to be re-used or linked to a new site. Panels claimed by a different control room are left alone, and so are CCUs — a CCU on the site is a separate question about whether the hardware is coming back, and Disconnect never answers it for you.
Whatever is still open on your desk is closed. Any event still sitting on your queue for this site is closed as part of the disconnect, and the dialog counts them before you commit. Once the link is gone nothing could ever finish them — no signal can restore the card, and no operator can open the site to work it — so they would stand on the queue forever. A card that a live dispatch, a live call, or an unanswered required checklist item still owns is left alone: finish it on the desk and it closes the normal way.
Cameras and people stay on the site, the site itself is not deleted, and it can be reconnected later — though the panels have to be linked again by hand once it is.
A site that has not been approved yet has no Details tab — turning that request down is Decline request on Overview instead.
Pinning the exact location
A site's coordinates are what a responder navigates to and what decides which suburb the site falls in. An address alone is often not enough — a plot with no street number, a complex with several entrances, or a farm gate a few hundred metres off the road all geocode to roughly the right area and the wrong spot. The map picker is how you fix that.
Click Edit address and the picker appears under the heading:
- Search on the map — type into the Search an address or place box overlaid on the map. Pick a result and the map flies there and zooms in close. In the site's Details tab, picking a result also fills the address fields (line 1, line 2, city, province, country) along with the coordinates.
- Satellite view — the picker opens in satellite imagery, which is what lets you recognise the actual building, driveway and gate. The globe button in the top-right switches between satellite and street view; + / − zoom.
- Drop the pin — click anywhere on the map, or drag the existing pin, to place it. Put it on the point responders should drive to. The map deliberately does not re-centre while you do this, so the ground stays still under the pin.
- Coordinate readout — the chip in the bottom-left shows the live latitude and longitude, with a Copy button. It reads No pin yet for a site that has never had coordinates.
- Latitude and Longitude fields — still editable directly in the grid below. Typing into them moves the pin and re-centres the map; moving the pin rewrites them. The two are always in step.
Nothing is written until you click Save address. Cancel discards the pin move along with any field edits.
When the picker shows a message instead of a map
The picker needs WebGL — the browser feature that draws hardware-accelerated graphics — and it needs to reach Mapbox. When either is missing it says which, in place of the map:
| What you see | What it means | What to do |
|---|---|---|
| This browser can't draw the map | The browser isn't providing WebGL. Most often hardware acceleration is switched off, or the session is running over remote desktop. | Turn hardware acceleration on in the browser's settings and reload. |
| Couldn't reach the map service | The map data didn't download. | Check the connection and reload. On a locked-down machine, ask IT whether api.mapbox.com is blocked. |
| The map service rejected this request | Mapbox turned the request down — the map key needs renewing, or the account is over its monthly limit. | Report it; this one is for CleverCam to fix. |
| Map picker unavailable | No map key is configured for this environment. | Report it; this one is for CleverCam to fix. |
You can still set the site's location: the Latitude and Longitude fields in the grid below stay editable and are what actually gets saved — the pin is only a way of filling them in. If you need coordinates for a spot you can only recognise visually, read them off any other mapping tool and type them in here.
Site passwords
Below the site notes sits a Site passwords card — the word an operator asks whoever answers at this site, for anyone who has no response password of their own.
- Site password — the site-wide challenge word. Leave it blank if the site has none and every person is challenged on their own password.
- Duress password — a second word that means the person is answering under coercion. If they give this one instead, carry on the call as though everything is normal and treat the alarm as real.
Click Save site passwords to commit. Both are free text, and both are yours: a control room with its own link to the same site keeps its own words and never sees these. Site passwords used to be shared across every control room monitoring the site — they were made per-control-room on 13 August 2026, and each room kept whatever word the site already had.
A site password is read aloud by an operator, and belongs to the premises rather than to a person. It is separate from both of the per-person credentials: the response password each person picks in CleverAlert, which must be one of the nine colours, and their legacy free-text password, which is the per-person equivalent of this word. Site passwords never touch either. See Response password vs legacy password for how those two work.
The site name, address, coordinates and images are shared fields — every connected control room sees the same values. Under the site ownership model these fields belong to the site's primary company; once ownership enforcement is switched on (it is off today), control rooms with a secondary link will see them read-only with a Managed by <company> hint.
Site passwords and site notes are not shared — they are per-connection, like the company reference, team notes, typed instructions and monitoring policy. All of those are always yours to edit regardless of ownership, and a secondary control room edits its own copy rather than being locked out of the primary's.
Hardware
The Hardware tab is split into two sub-tabs across the top, both under the same Hardware label in the main tab strip: Inventory (the day-to-day catalogue of everything physically installed) and Archive (historical hardware records, kept out of the way). The Inventory sub-tab is laid out as four stacked cards:
Hubs & cameras
A table of every Clever Hub and alarm communicator linked to the site, with expandable rows:
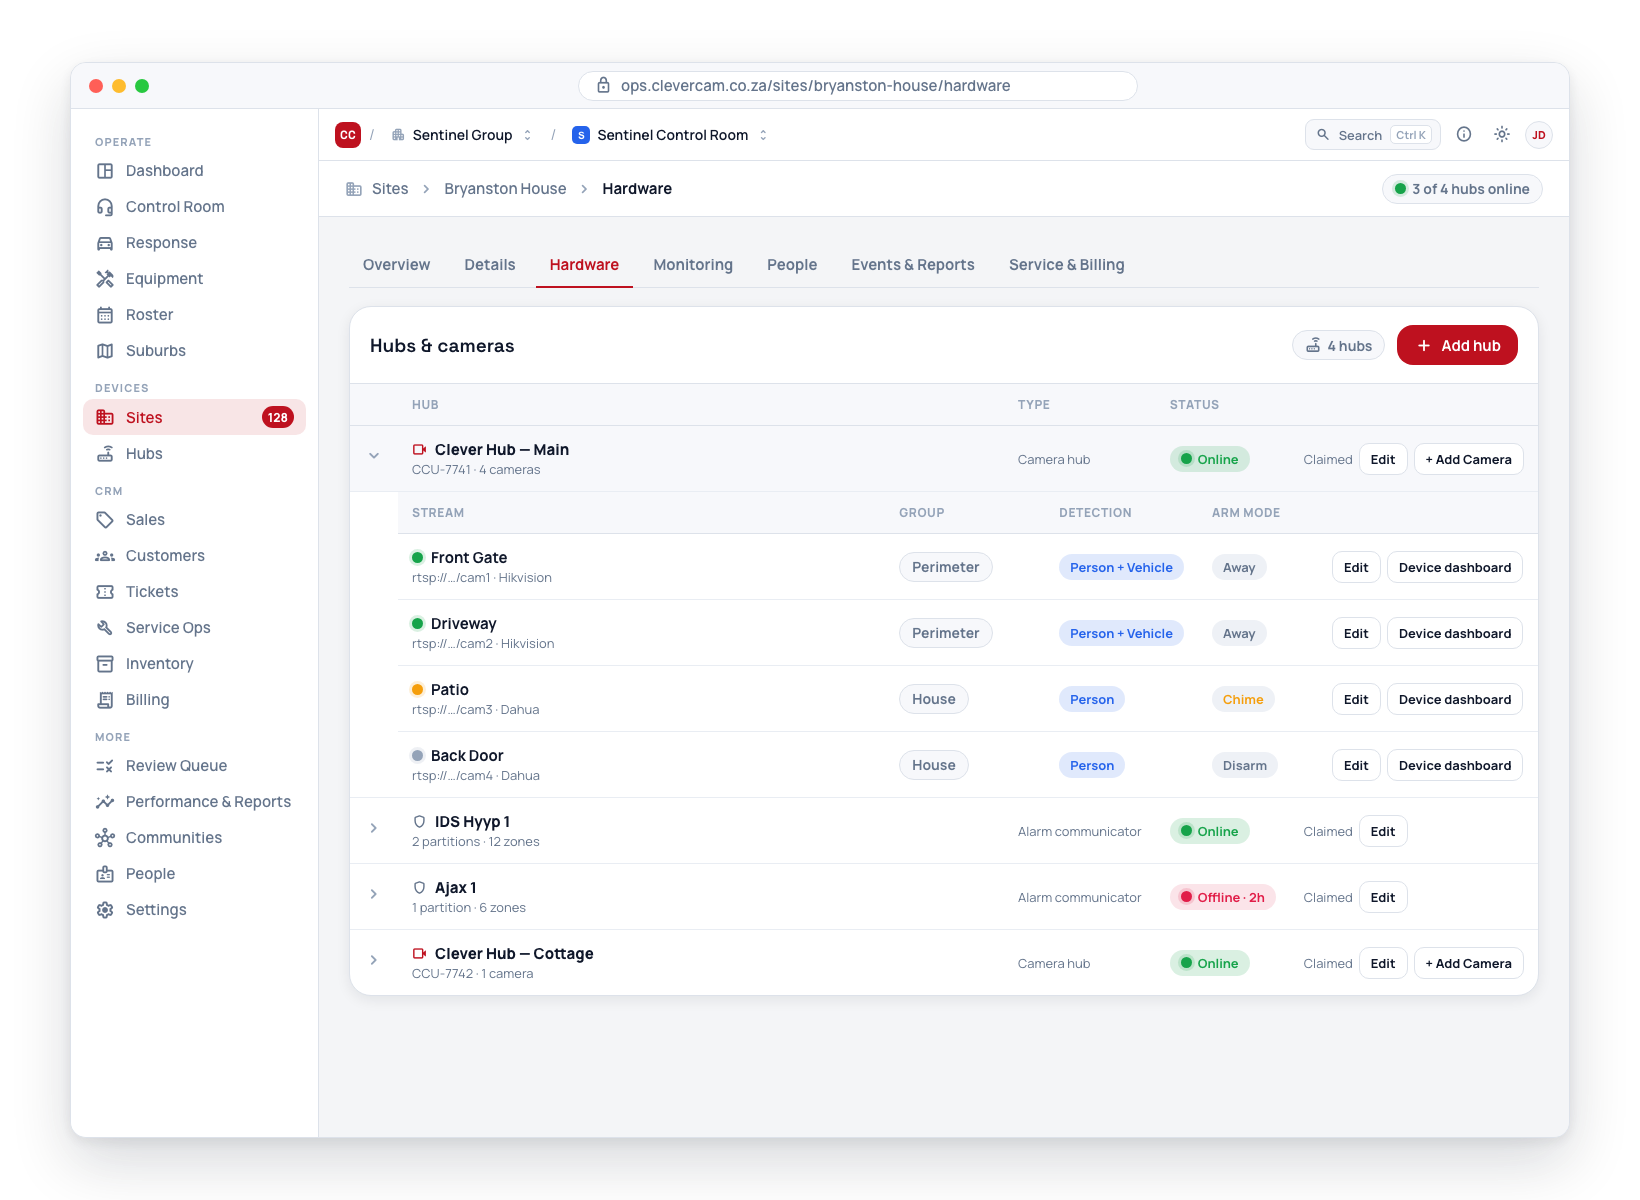
- Each row leads with the hub's name — by default its communicator type (HYYP, Olarm, FSK; a CCU is My CCU), or whatever it was renamed to in Edit hub. Names do not have to be unique. The line under it reads type · TX number · serial: the TX number (account code) the communicator transmits, then the serial — labelled IMEI on a HYYP — when the hub has one that differs from its TX number (an FSK, RDC, FOX or Ajax radio's serial is its TX number, so it is shown once). Hover the line for the full text. A panel picked from a receiver's Already reporting list carries its TX number from the moment it is linked, so the line is complete straight after Add hub closes rather than after the panel's next signal. A panel registered by its TX number on an Olarm, HYYP or Onyyx line that has not transmitted yet carries a Waiting for first signal note next to its TX number — see Waiting for first signal.
- For a camera hub — a CCU, a CleverMail Virtual CCU, a Dahua Direct or a Hikvision Direct hub — expanding shows its camera streams — labels, stream addresses, group assignment, detection class, and arm mode.
- For an alarm hub, expanding shows its partitions and zones — labels and state, with arm and disarm controls on each partition.
- The Status column shows the online/offline dot; an Olarm hub whose API key has expired additionally shows a red 🔑 Key expired badge — CleverCam can't sync, arm or disarm that panel until the key is renewed (Settings → Alarm Receivers, or the customer renews it from the hub page in CleverAlert).
- The Add hub button opens the Add Hub wizard. Its picker opens with "Choose what to connect to this site: a CleverCam hub, Dahua or Hikvision cameras that connect straight to CleverCam, a Panic App (panic button only, billed per app user), or an alarm panel that reports in through one of your receiver accounts." — a hub is a CleverCam device, an alarm panel is third-party hardware whose communicator (the add-on that sends the panel's signals) reports in through a receiver account (set up under Settings → Alarm Receivers). See Hub management. Arriving at the page with
?tab=hardware&add=hub— which is what an onboarding journey's Link a hub does — opens the wizard straight away. - The picker shows one tile per thing you can add: CCU 8 (CleverCam hardware), CleverMail Virtual CCU, Panic App, Dahua Direct (marked Beta), Hikvision Direct (marked Alpha), and one tile per configured alarm receiver. Picking Panic App creates a panic-button-only hub and links it to this site — no cameras, no detection, billed per app user. See Panic App sites. Picking Dahua Direct or Hikvision Direct opens the same billing agreement and setup as Add Dahua Direct / Add Hikvision Direct on the Hubs page, but the new hub is linked to this site as it is created, so its cameras can be ticked straight away. See Dahua Direct setup and Hikvision Direct setup. Picking an alarm receiver tile opens a TX number step for that line before its link step — see Adding an alarm panel by TX number.
- A Hyyp, Onyyx or Olarm line's link step (the step after the TX number step) has as its first control a small Monitor only / Manage switch, set to Monitor only: the panel is linked so its alarm signals route to the site, and the customer keeps their own app. Manage adds remote arm / disarm through the vendor account — the Hyyp master PIN and SYNC press, the Onyyx pairing method, or the Olarm serial + API key. The line under the switch says what the selected mode does. See Hyyp, Onyyx and Olarm setup.
- Inside an expanded camera hub, + Add Camera offers three ways in. Chat with the hub opens a conversation: you tell the hub what you need and it scans, signs in to the cameras, shows you what each one is looking at, adds them, tunes their streams for detection and can go back to a camera that has gone dark. It can also be asked about the network rather than the camera — a full report (link speed per port, loss and jitter per camera, the gateway, the hops out, name-lookup time, the largest packet the path carries and a quick speed sample), a list of everything answering on the wire with its manufacturer, a ping or a trace, and whether a Hikvision's Hik-Connect / EZVIZ Platform Access is switched on, which is the usual reason one refuses to stream on a correct password. On Hikvision and Dahua cameras and recorders it tells a wrong clock from a wrong time zone (Dahua ships on Beijing time, six hours ahead of South Africa), and, once you confirm, sets the site's time zone, switches daylight saving off, sets the clock from the hub and turns NTP on, then reads the clock back to show it took. The network report takes a few minutes; the rest answer in seconds. It appears when CleverCam has switched the Chat with the hub module on for your control room; super admins have it on every site regardless. Step-by-step setup (super admins only) is the original wizard — scan, authenticate, pick streams, name and save. If the hub signed in to cameras on the site in the last 48 hours that were never added, its scan step first offers them — Pick up where you left off says how many, when and who — and Carry on with these N goes straight to picking streams with the sign-in that worked and the hub's pictures from then; Not now lets the scan run as usual. A camera's sign-in is only called timed out when the hub stops reporting progress (it reports every few seconds, so a big recorder can take minutes), never more than 7 minutes in all, and not before the wizard has checked the hub's own record in case the live update was missed. Cancel on a camera stops the hub working on it too. Manual stream is the plain form for a stream address you already have. All three write the camera the same way, so the caps, the picture-before-you-save rule and the group's arm and chime state are identical whichever you use. The picture rule is met by the hub's own record of a frame, so a camera the hub has seen saves even when the live picture message was missed. A hub runs one camera setup at a time: if someone else is already setting up cameras on it (step by step or in a chat, from CleverOps or CleverAlert), Chat with the hub and Step-by-step setup say who and since when before they start. Take over ends that person's session and tells them who took over; Leave it backs out. Every session is recorded under Setup chats.
- On a Dahua Direct hub there is nothing on site to scan, so + Add Camera opens the hub's camera picker instead: the channels its recorder reports, or the cameras connecting by themselves, each with what it is monitored as. Tick the ones to monitor, name them and click Add; Remove stops monitoring one. The same picker is under Cameras in the hub's Edit dialog, with the device login and the connection details. See Dahua Direct setup.
- On a Hikvision Direct hub, + Add Camera opens its camera picker the same way: each device that has sent an event or picture, with its status (Online, Offline, No heartbeat or Not heard from yet) and every channel it has named. Tick channels to monitor, add a channel by number with Add channel, or add a device that has not reported yet by its MAC and LAN IP address under Add a device CleverCam has not heard from. The same picker is under Cameras in the hub's Edit dialog, with the connection details. See Hikvision Direct setup.
- Editing an alarm hub opens the panel editor, whose footer carries the panel-lifecycle actions: Archive config (snapshot now), Replace communicator (below), Replace entire system (archive the old panel and remove it from the site, then reopen the Add Hub wizard for its replacement), Remove from site, and a de-emphasised Remove permanently.
- Remove from site is the everyday way a radio or panel leaves a site. It archives the panel's partitions, zones and triggers (they appear under Archive → Hub config archives with the unlinked reason), detaches them, stops the panel billing, and keeps the panel's record — it stays in your Hubs list as Unlinked and in the receiver's Already reporting to this receiver list, so it can be added to another site (or the same one) later without losing its name, PIN or history. If the radio keeps transmitting, its signals land as unrouted rather than as alarms on the old site. The site's own zone list is left in place for the replacement panel to adopt.
- Remove permanently deletes the panel's record entirely (archived first; a Hyyp panel is also released from CleverCam's master account). Only use it for a communicator that will never report to this control room again — a radio-code identity that transmits after being deleted simply reappears as a new hub named after its communicator type (HYYP, FSK…), on no site.
- Editing a camera hub (a CCU or a CleverMail Virtual CCU) offers Move to another site… and Remove hub from site. A camera hub cannot be removed while cameras are linked to it, so moving is the everyday way it changes site — see Moving a hub to another site below.
- Editing a hub is also where its Offline supervision setting lives — inherit from the receiver / hub type, a per-hub timeout, or Unsupervised (never flagged offline). See Offline supervision.
- The editor is also where an alarm panel's TX number (account code) is corrected: the field is editable, with a Correct TX number button. The new code is checked against the receiver's TX number (account code) rule, and refused if another panel on the same line already carries it. On FSK, RDC, FOX, FinMon, Ajax and Hikvision lines only a panel that has never transmitted can be corrected here — one that has already signalled is refused ("changing its TX number would re-route live signals — use Replace communicator"), because on those lines the code is the identity its signals route on. On Olarm, HYYP and Onyyx the code is the panel's secondary identity and can be corrected at any time: the old binding is retired, the new one recorded, and the change is logged in the radio lifecycle history as account_changed.
Adding an alarm panel by TX number
The wizard always opens on the tiles — the hub type comes first. Picking an alarm receiver tile then opens a TX number step for that line before its link step, titled Add <communicator type> (Add Olarm, Add FSK…). It reads "Adding to <receiver label> · <communicator type>" and asks for the panel's TX number (account code) — labelled Serial on a SpotBot line and TX number (account code) or IMEI on a HYYP or Onyyx line. As you type, CleverOps checks every receiver line on the control room, not only the one you picked — a code is only unique per receiver line, so a panel already heard on a different line shows up here too. The code is looked up as typed and as the picked line would store it under its TX number rule, so 1766 finds a radio recorded as 01766 on a zero-padded line.
- Matches are listed under Heard on N line(s). Each row shows the code, on <receiver label> · <communicator type>, and a status: Already on this site (greyed out, not selectable), Linked to <site name> (orange), Registered — waiting for first signal (an Olarm, HYYP or Onyyx panel registered by code that has never transmitted), or Heard — last signal <ago>. A row on a line other than the one you picked carries the note On a different line — picking it adds the panel through <receiver label> instead. Picking any row jumps into that line's link step with the identity pre-filled — the IMEI on HYYP and Onyyx, the code on every other line — and Back from the link step returns to the TX number step on that line.
- No match reads "No line has heard <code> yet. Continue — it links to <receiver label> the moment its first signal arrives." On a HYYP or Onyyx line it reads "Continue and add the panel by its communicator IMEI on <receiver label>."
- Continue with <code> opens the picked line's link step with the code already in its TX number field (labelled Account code (manual) on an Ajax line; on Olarm it fills the TX number field of both the Signal Proxy and the Consumer form). On a HYYP or Onyyx line only an IMEI-shaped value carries over, into the Communicator IMEI field; a typed account code does not, because that lane adds a panel by IMEI, and the button then reads plain Continue. With nothing typed the button reads Continue without a TX number (…without a serial on SpotBot) and the link step opens blank — its own Already reporting to this receiver list is still there to pick from. Back returns to the tiles.
What the link step checks
However you reach a receiver's link step, every panel lane registers through the same server check, so the same things hold on all of them:
- The typed TX number is checked against the receiver's TX number (account code) rule. A code that breaks it is shown in red under the field with the reason — "TX number 1766 is 4 characters; this receiver expects at least 5 (a short code silently orphans the panel)" — and the Add / Link button stays disabled. If the line pads codes, the field reads "Will be saved as 01766 — this line pads codes with leading zeros."
- If the receiver is already hearing that code, the existing transmitting record is linked rather than a duplicate created.
- If the code is already linked to another site, nothing moves silently. An Already linked elsewhere box appears at the top of the step — "<code> is linked to <site>. Moving it here takes that site's panel away — its zones, partitions and signal routing come with it." — with Move panel to this site (red) and Keep it where it is. The inline check under the field reads Already linked to <site> — Add Panel will ask before moving it here.
- Picking a panel from the Already reporting to this receiver list and then typing a different code is refused on FSK, RDC, FOX, FinMon, Ajax and Hikvision lines ("Panel N transmits TX number X, not Y — use Replace communicator to change a code"). On Olarm and HYYP a different typed code is recorded as the panel's code — its secondary identity — as before.
- Ajax: the manual field is labelled Account code (manual); the receiver token is registered for you.
- Olarm — Manage (end-user API): a Panel TX number (account code) field above the device serial is required, and Link Panel stays disabled until it is filled — see Olarm setup. Monitor only (the Signal-Proxy lane) is unchanged: pick a reporting panel, or pre-register by account code.
- Done screen: when the panel was registered by code only (Olarm, HYYP or Onyyx, no device yet) it adds "Registered by TX number — it picks up its device automatically on the first signal and shows as Waiting for first signal until then."
Waiting for first signal
A panel registered by TX number on an Olarm, HYYP or Onyyx line — pre-registered from Add hub, given a typed radio code in Replace communicator, or brought in by an imported register — has no device id yet. On its first signal CleverOps attaches the device automatically: no duplicate record, and the site link stays. Until then the wizard's TX number step lists it as Registered — waiting for first signal, and its row in Hubs & cameras carries a Waiting for first signal note next to its TX number.
Moving a hub to another site
Move to another site… in a camera hub's editor moves a CCU or CleverMail Virtual CCU to a different site in one go. Events, chimes, tour results and every other record stay on the site where they happened; the hub row moves, and a short wizard asks what happens to its cameras. Every step is checked against the real rows before anything is written, and nothing is defaulted silently.
- Where is the hub going? Pick the destination from your control room's sites. The step tells you what the move means for the monitoring link — for example that your control room already monitors the destination, or that it becomes the destination's primary company — and warns when the hub is offline (it gets its new camera set when it reconnects; until then its events are dropped) or when a per-camera priced subscription sits on either site.
- Move the cameras and their groups? On by default. Lists every camera with its group. The cameras are copied onto the new site with the same stream addresses, credentials, detection settings, privacy masks and tours; camera groups come along with the same names and arm state. A group that also holds another hub's cameras is copied with only this hub's cameras — the old group keeps the rest. Switch it off for a bare move: the hub goes alone and you set cameras up on the new site afterwards (the right choice when a CleverMail recorder stays behind and a different recorder will mail the same hub).
- What happens to the originals on this site? Keep them as history (default): the camera rows stay on this site, greyed out and no longer live, so old events still show which camera they came from. Delete them: this site's events keep their pictures and descriptions but lose the camera they point at, and layout markers, playback jobs and community shares for those cameras go too. Either way the step shows each group as empties out or still holds N cameras and offers Delete the groups that empty out, which only ever removes groups left holding nothing. Community shares of the moved cameras end with the move whatever you choose.
- Move the schedules? Only asked when this site has arm, disarm or chime schedules whose targets are all groups going across. Yes moves them (the same schedules, re-homed and pointed at the copied groups). No leaves them; if their groups were deleted in the previous step they are deleted with them. Schedules that also arm groups staying behind, or that name cameras individually, always stay and are listed.
- This was the site's last hub. What about the site? Only asked when no other hub or tracker is linked to this site. Leave it (default), Archive it (the site is marked archived; the monitoring link, people and subscriptions are left alone; reversible — Cancel site remains the full customer-leaving ceremony), or Delete it, which is only enabled for a bare shell with no events, chimes, subscriptions, people, tickets, jobs, quotes or other hardware, and only when the originals are deleted too. Otherwise the option is disabled and the records that block it are listed.
- Review shows exactly what will happen, takes an optional note, and the button reads Move hub.
Afterwards the Hubs & cameras card on both sites shows the move under Hub moves (who, when, how many cameras, kept or deleted). On the old site an Undo move button sits beside it while undo is still honest — the originals were kept and the site was not deleted. Undo freezes the copies, brings the originals back live, moves the hub and any moved schedules back, drops copied groups nothing uses any more, and un-archives the old site if the move archived it. A config snapshot of the hub, its cameras (credentials stripped) and its groups is filed under Archive → Hub config archives with the moved reason.
Two things to expect on the new site: a CCU rebuilds every camera once for its new identities and re-baselines tamper, so a tamper card in the first minutes is possible; and CleverMail channels route to the new site as soon as its mailbox mirror refreshes, which is near-immediate. Moving needs the same Replace & remove site radios capability as Remove from site, plus membership on the destination site. Alarm panels are not moved this way — use Remove from site, then Add hub on the new site.
Replace communicator
Use this when the physical add-on that transmits the panel's signals — the radio, HYYP/Olarm unit, or other communicator — is swapped out but the alarm panel itself stays. Zones, partitions, triggers, the site link and event history are all preserved; a config snapshot is archived automatically first (it appears under Archive → Hub config archives with the replaced reason).
Replace communicator, Replace entire system, Remove from site and Archive config need the Replace & remove site radios capability. Remove permanently is separate: it needs Remove hubs & panels permanently, which the Radio removals role grants. Add hub and Re-register hub need Claim, add & release hubs (part of the Radio swaps and Technical coordinator roles) or Edit sites. Company owners and admins always have it; any other member gets it through the Radio swaps role — an owner or admin opens the person under People, goes to Roles & access, picks the control room and ticks Radio swaps (see Roles and Permissions). Without it the buttons are disabled, with a tooltip naming the capability.
The flow has three steps:
- Receiver — one tile per active receiver account on your control room (the same per-receiver picker as Add Hub), with the panel's current receiver marked Current receiver. Only destinations you actually have are offered; to use a communicator type with no receiver yet, create one under Settings → Alarm Receivers first. With a single receiver this step is skipped.
- New identity — tell CleverOps which device the new communicator is:
- HYYP / Onyyx: a Pick from portal search lists every device on the linked IDS-portal company — searchable by site name, IMEI, or account code, each row showing hardware, last comms, and whether it is already linked to a site (linked devices are greyed out with the site named). The hint under the field reads: Prefer the IMEI when you have it. A radio code typed here registers the panel by that code: it shows as waiting for its first signal and routes from the moment the new unit transmits it. Only app control needs the IMEI. See Waiting for first signal.
- Every type: an Already reporting to this receiver picker lists the identities the receiver hears that aren't on a site yet, most recent signal first, and a manual field takes the TX number (account code) / serial directly. The manual field applies the receiver's TX number (account code) rule: a code that breaks it blocks Review, with the reason shown under the field (a wrong code silently orphans the panel), and on a line that pads codes the padded form is shown before you continue. Videofied (Frontel GI) asks for the serial and TX number (account code) — the pair is the identity.
- Where a panel's identity is not its account code — an Olarm panel's identity is the device UUID, a HYYP's its IMEI — each row also shows the TX number (account code) that panel transmits on this receiver line, and you can search the list by it. Type
9111and the panel reporting on account 9111 comes up, however opaque its serial. Rows whose serial already is the account code (FSK, RDC, FOX, Ajax) are unchanged. A panel whose code the receiver has never carried simply shows no code. - Once an Olarm, HYYP, Onyyx, SpotBot or Checkmate unit is picked or typed, the line under the identity field names the one TX number the panel will be left with: TX number (account code) 6317 — what this unit last transmitted (the code in the unit's latest signal on this line — a unit whose signals were already being routed onto this panel by its code counts as heard). A panel with more than one partition reports one code per partition; the others are listed as (also heard with 8989) but not used. A unit that has not transmitted yet shows the code on the receiver's record for it, or — for HYYP and Onyyx picked from the portal — from the IDS portal; this unit has not transmitted yet. A unit whose signals carry
0000reads No TX number — this unit's signals carry 0000, so the panel's account code is not programmed yet. Review swap stays disabled for a moment while a newly picked or typed identity is checked. - HYYP and Onyyx share one base, so an id names its own line: a 16-character hex id is an Onyyx hub, a 15-digit IMEI a HYYP unit. Type an Onyyx id on the HYYP tile (or an IMEI on the Onyyx tile) and the swap follows it to the sibling receiver — the check and the TX number already speak of that line, Review says so under Line, and the panel becomes that communicator type. A HYYP module id such as
EAC608A108E7F1Anames no line and stays where it was typed. - As you pick or type, a live check reports what's known: already transmitting (with last-signal time and waiting-signal count), no signals yet (routing starts on the first signal), any operator notes and where the identity last lived, and — if it is still linked to another site — a hard stop naming that site (remove it there first; its zones live there).
- Review — a before/after summary of type, identity and receiver (
<serial> / acc <code>when the TX number differs from the serial, so what you confirm is something you can check against the job card), plus exactly what happens: what is kept, the automatic archive, whether the new identity's existing record and waiting signals fold into this panel (they do when it is already transmitting), what happens to the TX number, that the old identity stops routing and is released from this panel's record (a still-transmitting old device lands in Unrouted radios as its own new identity instead of being re-attached to this site), that the panel returns monitor-only (re-enable HYYP app control with Re-register hub, or Olarm control by re-adding the API key), and a billing note if the hub's current package no longer matches the new type's default. Confirm swap applies it.- TX number — on Olarm, HYYP, Onyyx, SpotBot and Checkmate the TX number is a second identity next to the device's own, and the old one belongs to the unit being taken out, so it never stays behind by default. The line reads 4996 → 6317 — the old code leaves with the old unit, stays 6317 when the new unit sends the same code, or becomes 6317 when the panel had none. When the new unit's code is not known yet it reads not known for this unit yet — 4996 is the old unit's and is cleared. It is recorded from its first signal; when its signals carry
0000, this unit sends none yet … It is recorded from the first signal that carries one. Either way the first code the unit sends becomes the panel's TX number. The old code's binding is released with the old unit, so it stops pointing signals at this site and a sibling premises on the same line can be given it. On FSK, RDC, FOX, FinMon, Ajax, Hikvision and AVLytics lines the serial is the TX number, so the code moves with it; Videofied keeps its code in its own field. - A swap onto a TX number that another panel on the same physical line already carries (a HYYP and an Onyyx receiver on one base count as one line) is refused, naming that panel, its line and its site — "TX number 1234 is already carried by another panel on "HYYP Pretoria HQ" -- hub 921 (Hyyp), on INHEP Test". Correct or remove the other panel first.
- Name — a panel still named after its old communicator type (HYYP, Olarm, FSK…) takes the new type's name when the type changes, the way the Hubs & cameras list names auto-provisioned panels; Review says so. A panel with its own name keeps it, and a label typed on the New identity step always wins.
- After the swap the confirmation says where the TX number went — TX number is now 6317, or that the old one was cleared and the first signal names the new one — and, when the id belonged to the sibling line, that the panel now reports through that receiver. A unit the receiver had already heard is bound to the panel by the swap itself, the way a link binds it, so the Hubs & cameras row and the hub editor show its TX number straight away rather than after its next signal.
- TX number — on Olarm, HYYP, Onyyx, SpotBot and Checkmate the TX number is a second identity next to the device's own, and the old one belongs to the unit being taken out, so it never stays behind by default. The line reads 4996 → 6317 — the old code leaves with the old unit, stays 6317 when the new unit sends the same code, or becomes 6317 when the panel had none. When the new unit's code is not known yet it reads not known for this unit yet — 4996 is the old unit's and is cleared. It is recorded from its first signal; when its signals carry
- The camera stream editor's Behavior section includes Health monitoring — raise a "Video loss" event when this camera stays faulty (off by default). With it on, a camera whose stream stays faulty (Issue detected / Device Offline) past the confirmation window raises an E750 "Video loss" event in the control room and escalates on the VCR's Camera issue ladder — CRM ticket, management-review reminders — until video is back (see Supervision & Escalation). Cameras on an offline hub don't fire — that is the Hub-offline ladder's job.
Live camera updates
While a site is open, its camera list keeps itself current — a camera added, renamed, disabled or moved between groups from the wizard, from CleverAlert, or by the hub itself shows up without a page reload.
If the server refuses that live feed, CleverOps retries a handful of times over roughly a minute and then stops, rather than retrying invisibly for as long as you leave the site open. When it stops you get a message — "Live camera updates are off for this site — reopen it to see further changes." — and the camera list refreshes one last time, so what you are looking at is accurate as of that moment. It will not update itself again until you close the site and open it again. See Camera list stops updating while a site is open.
Groups
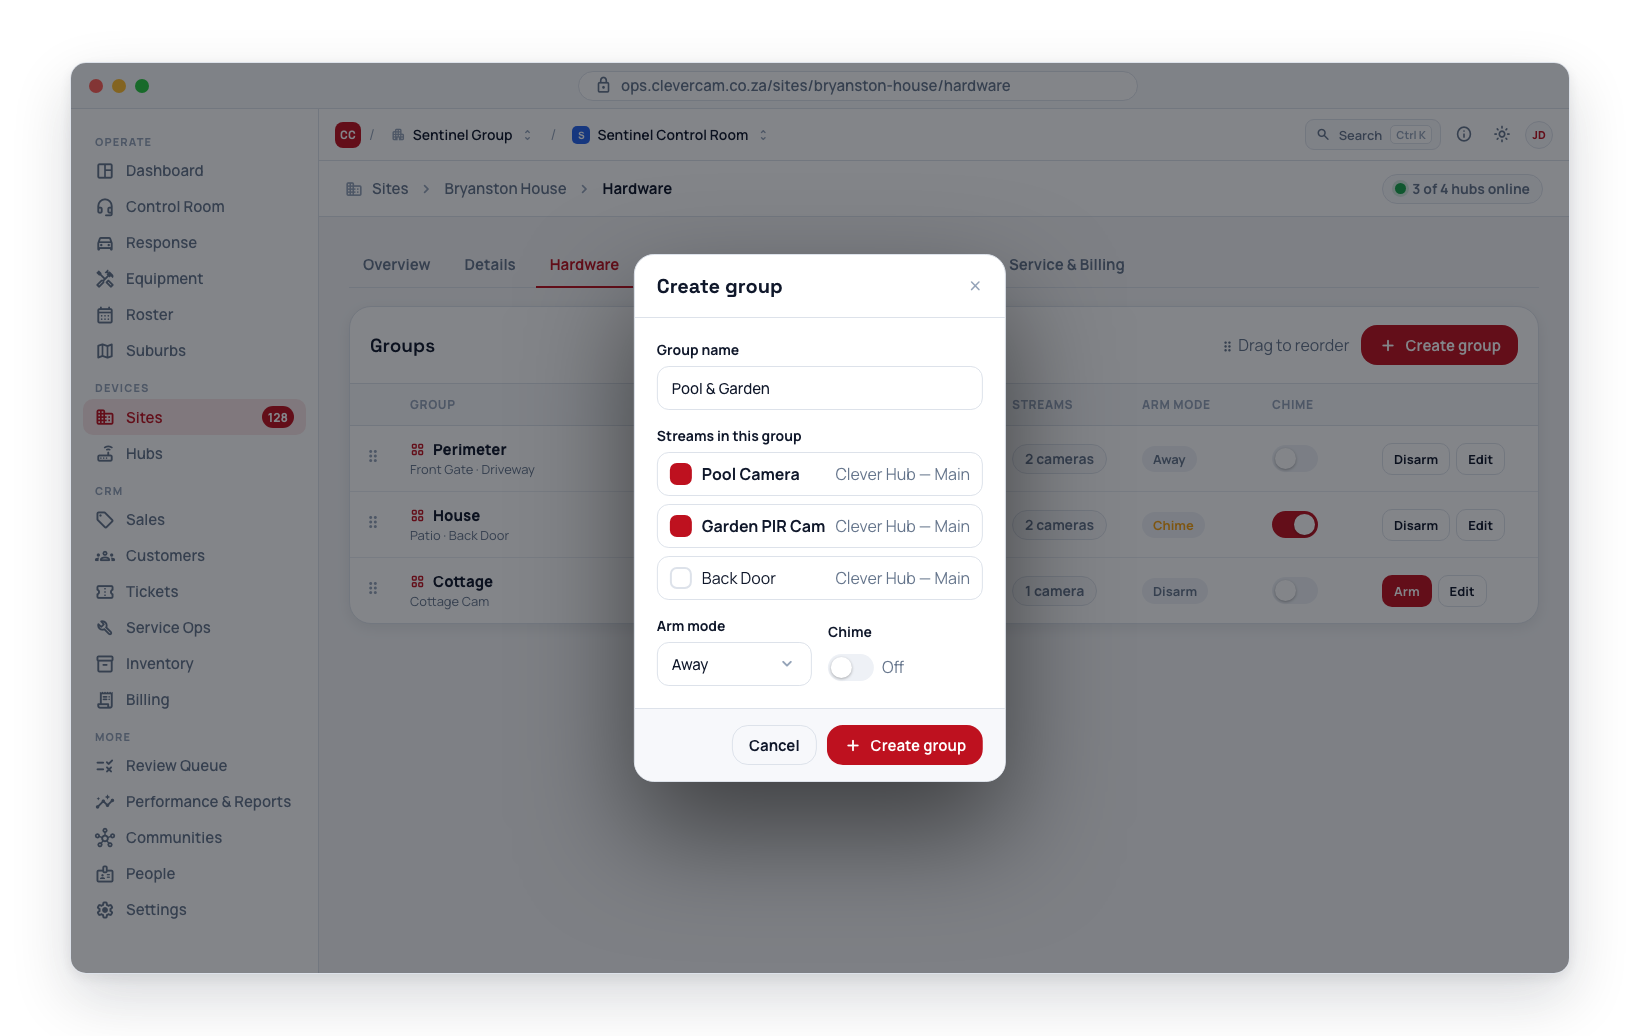
Camera groups are the unit that CleverAlert and the schedule engine operate on. Each group has its own arm mode and chime toggle. Drag rows in the group list to reorder. Create group opens the editor for naming a new group and selecting which streams to include.
Schedules
Schedules automate recurring arm, disarm, chime, and camera-config actions for the whole site or for selected groups. Each row shows the schedule's label, action, time, repeat, scope (site or N groups), next trigger, and an on/off switch. Create schedule opens the editor.
The Schedules card now lives on Monitoring → Scheduling — Hardware → Inventory keeps only a one-line pointer ("Arm/disarm schedules have moved to Monitoring → Scheduling") with a link that jumps there. Arm/disarm scheduling is a base feature, so that sub-tab is available on every approved site whatever its monitoring policy or module set.
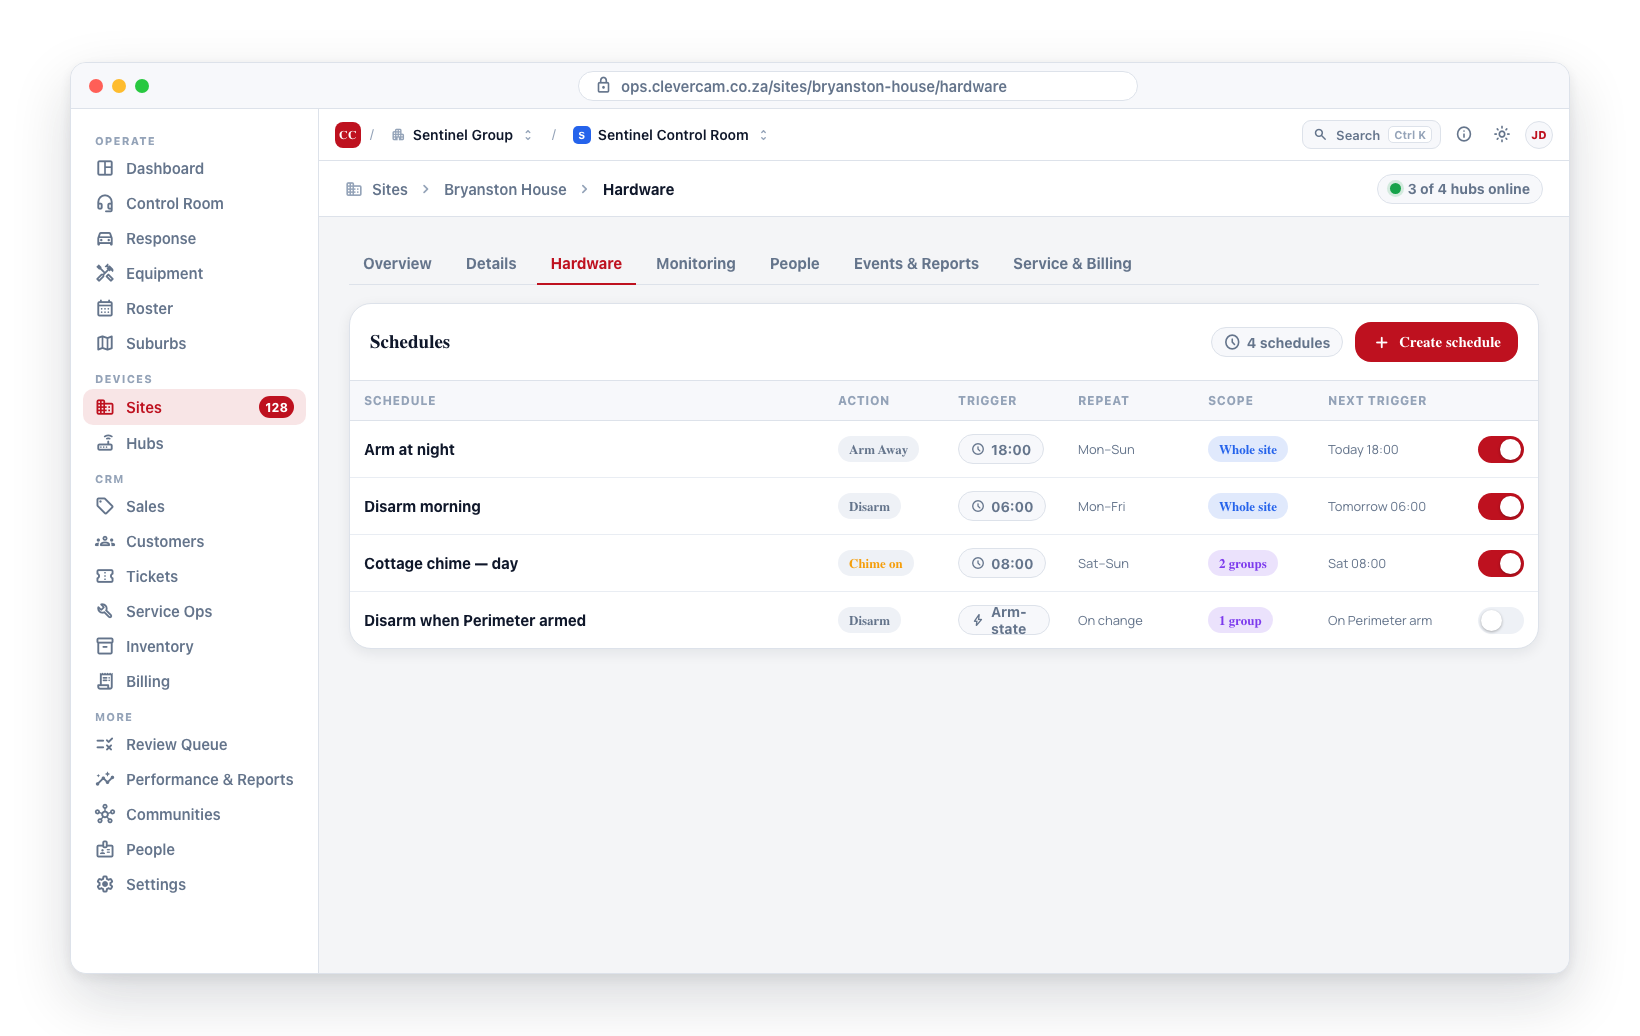
Schedules can be triggered either by clock time on selected weekdays, or by an arm-state change (for example "when group X is armed").
Zone structure
The zone-structure card hosts the SiteSecurityPanel — the site-wide editor for partitions and zones across every linked alarm hub. Rename labels inline, drag zones between partitions, and use the row menu to split a logical that fused two hubs. Operational arm, disarm, and bypass live on the per-hub rows above (inside the Hubs & cameras card) and in CleverAlert — this card is for structure only.
The card only appears when the control room has the Allow 3rd Party Alarm Receivers module on (super admins in Super-admin mode always see it) — partitions and zones come from 3rd-party alarm panels, so without the module there is nothing to structure. See Modules & Capabilities.
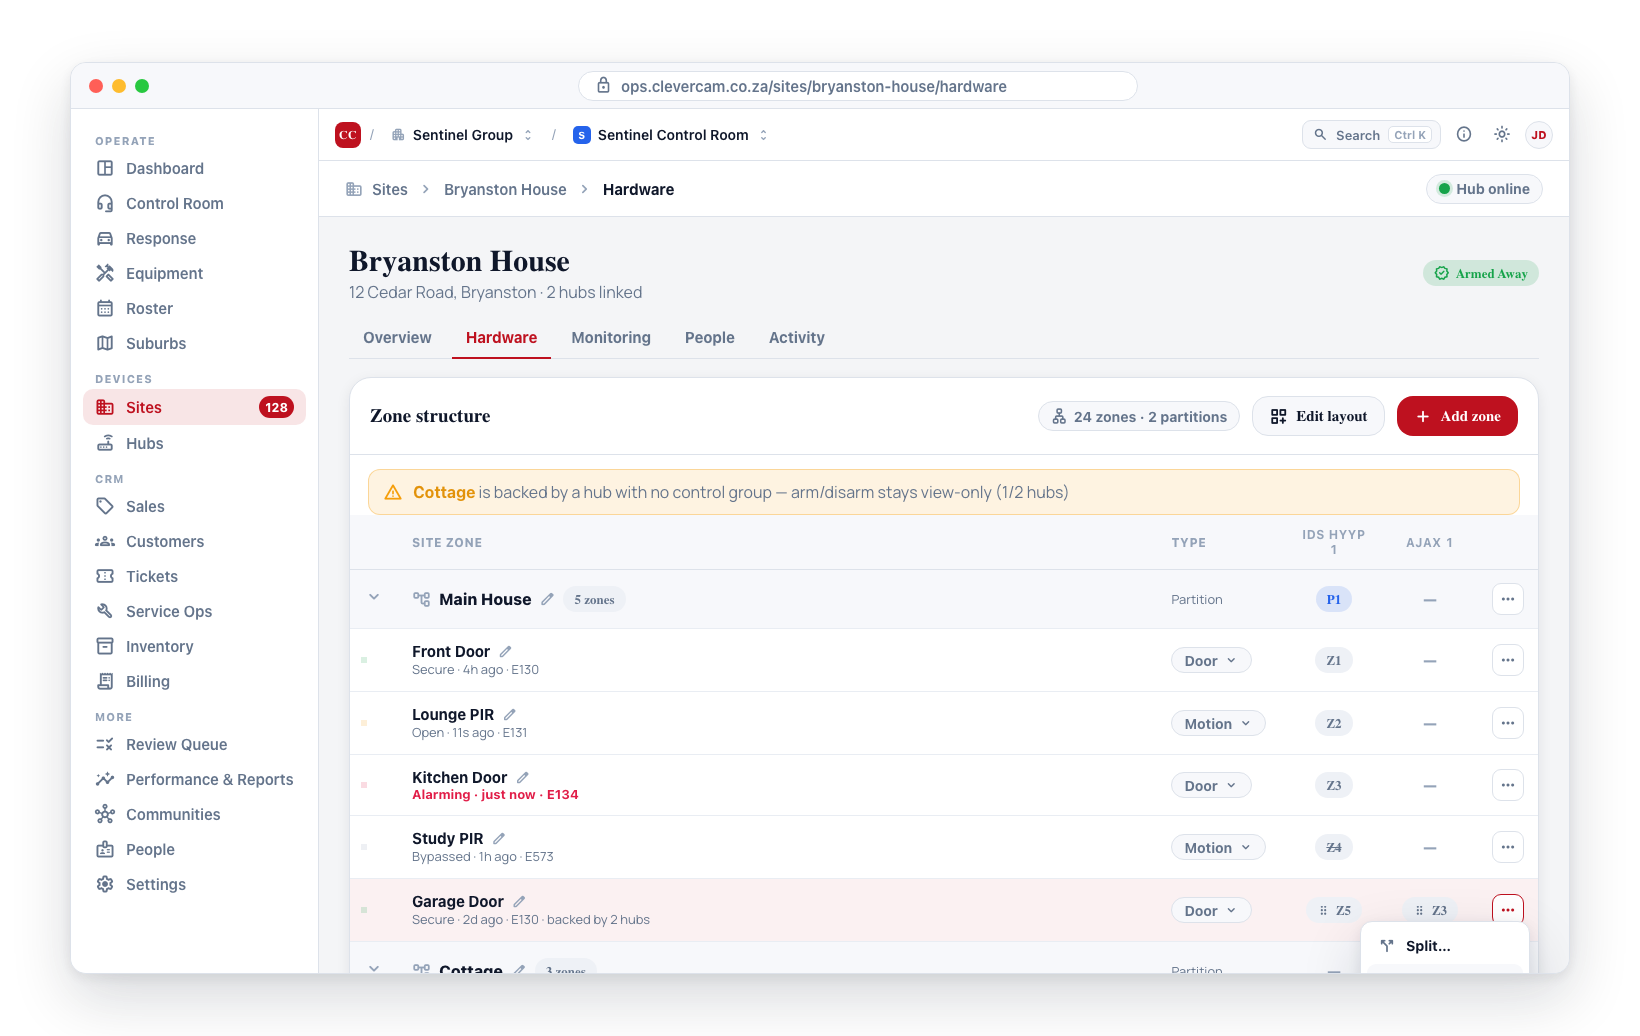
See the Alarm Zones tab page for the full reference covering rename, drag-drop reparenting, hub slot rebind, split/merge, edit-layout multi-select, and orphan cleanup. (The page predates the tab merge and still applies — only the navigation path has changed: it is now reached from Hardware → Inventory → Zone structure.)
Archive (sub-tab)
The Archive sub-tab gathers the site's historical hardware records, so the Inventory view stays focused on what's currently installed. It holds two sections:
- Radio lifecycle history — the never-lose-info audit trail of every alarm radio / panel / account ever associated with this site (serial, account code, receiver, VCR, and the lifecycle events). Snapshots are captured fail-open so the history survives even when the underlying hub or mapping is later deleted.
- Hub config archives — a table of archived hub configuration snapshots, shown only when at least one exists (the tab label includes the count). Each row shows the Date, Hub, Type, and a Reason badge (removed / replaced / manual), with a View JSON action that opens the full captured config snapshot in a new tab. Snapshots are taken automatically when a hub's config is removed or replaced, so a configuration can be recovered after the fact.
Monitoring
The Monitoring tab is split into up to three sub-tabs across the top, all under the same Monitoring label in the main tab strip: Setup (monitoring, mode, notes, ops settings — the day-to-day configuration landing), Scheduling (the single scheduling home — site state, arm/disarm schedules, patrols, test cycles, holiday notes / temporary notices), and Alarm handling (the per-site Action Plan override editor — how each alarm type is handled for this site). The per-site anti-abuse rules, SLA timers and checklists that used to sit on separate Anti-abuse SOP and Response SOP sub-tabs are now folded into the single Alarm handling editor. The one exception is the per-site Dispatch limit override, which moved to Setup instead — a monthly dispatch allowance is a per-site commercial policy, not per-alarm-type routing.
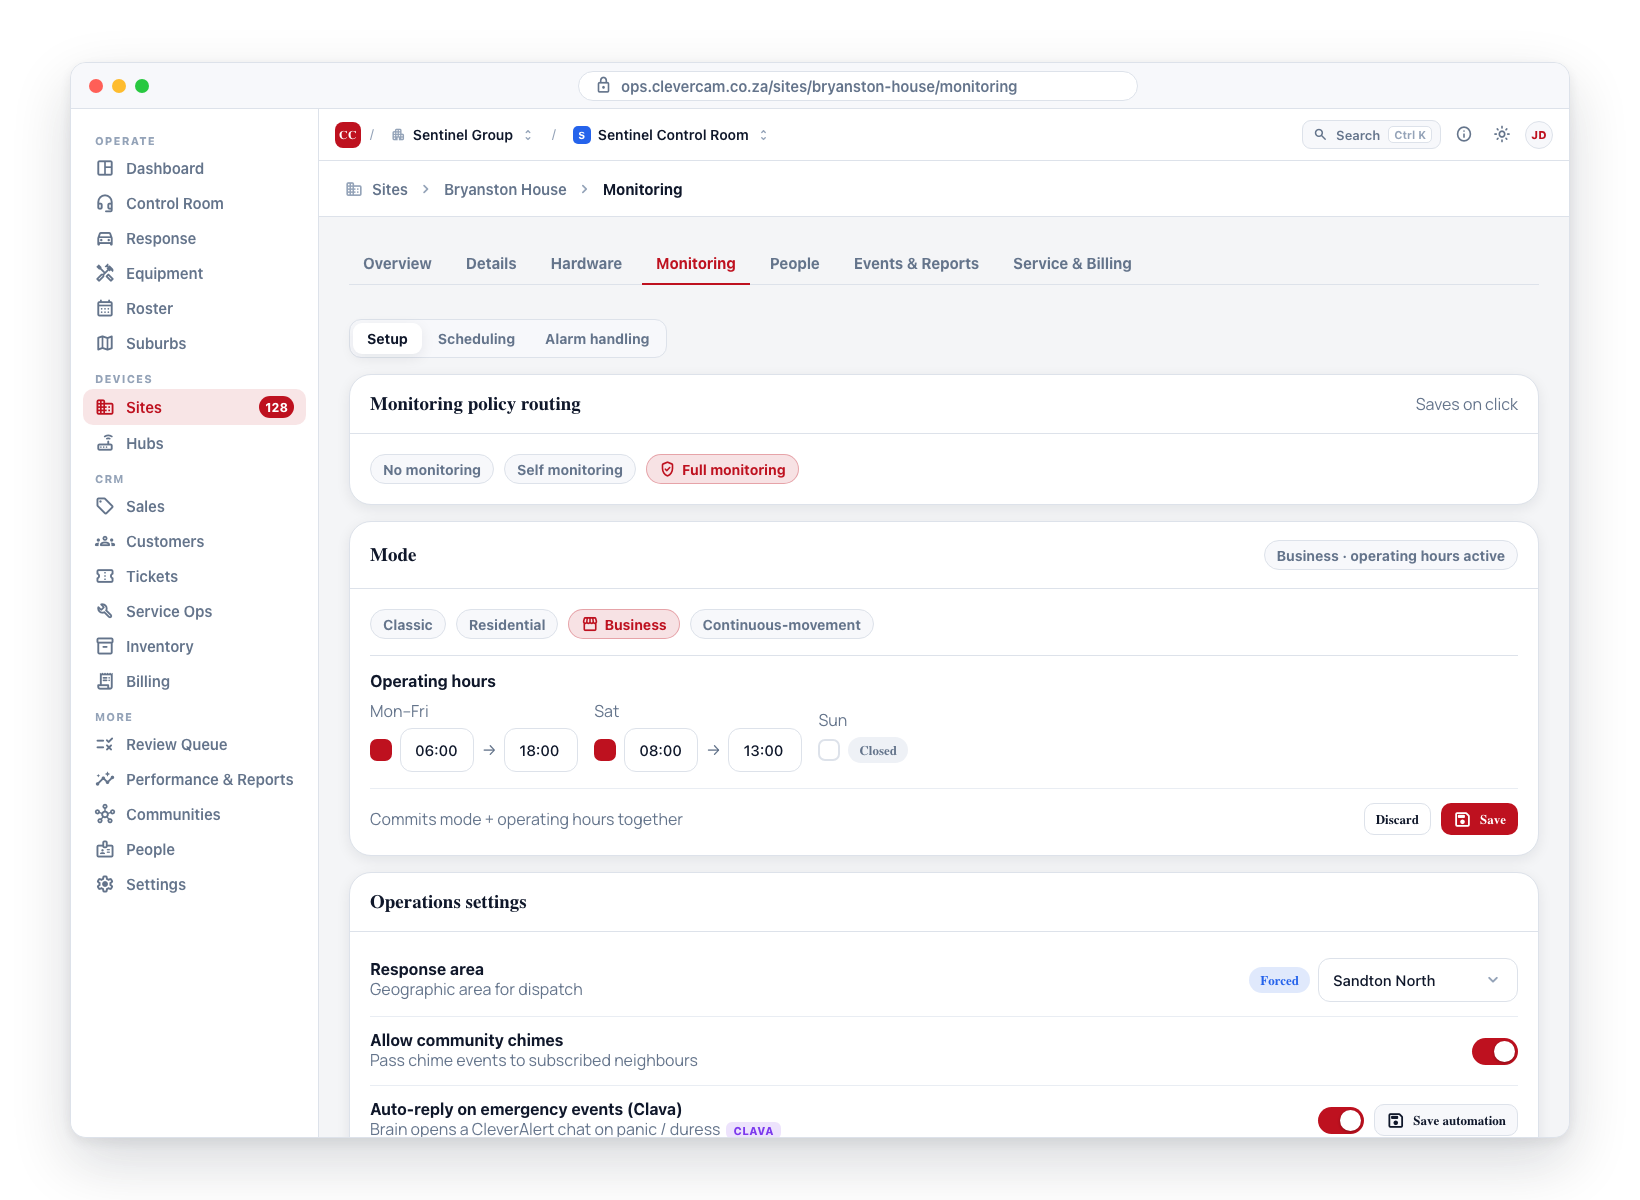
The sub-tab strip and Setup-tab contents are gated by the site's Monitoring value (the picker card at the top of the Setup tab):
| Surface | No monitoring | Self monitoring | Full monitoring |
|---|---|---|---|
| Monitoring picker | shown | shown | shown |
| Self-monitoring escalation timeout | — | shown | — |
| Mode (+ Operating hours) | hidden | shown | shown |
| Site team notes | hidden | hidden | shown |
| Operations → Suburb | hidden | hidden | shown |
| Operations → Allow community chimes | hidden | shown | shown |
| Dispatch limit | hidden | hidden | shown |
| Site context flags | hidden | shown | shown |
| Advanced actions (CID + Signal pairing + Automation signals) | hidden | hidden | shown |
| Scheduling sub-tab | shown | shown | shown |
| Scheduling → patrols, test cycle, holiday notes | hidden | hidden | shown |
| Alarm handling sub-tab | hidden from strip | hidden from strip | shown* |
* The Alarm handling sub-tab additionally requires the control room to have the Advanced Alarm Handling module on (super admins in Super-admin mode always see it) — see Modules & Capabilities. Without the module, a full-monitoring site shows Setup and Scheduling only.
The Scheduling sub-tab is never gated — arming and disarming a site on a schedule is a base feature every site gets. Only the three operator-side cards inside it (scheduled patrols, recurring test cycle, holiday notes / temporary notices) follow the monitoring policy, since they are control-room work.
The Alarm handling sub-tab lets you fine-tune a single site's Action Plan — priority, handling/routing, dispatch and contacts, SLA timers, anti-abuse rules and checklists — on top of the VCR's Site-Mode defaults. The customer notification wording is the one thing you can't change here: the message text and reply buttons are managed centrally by CleverCam (they are Meta-approved WhatsApp templates), shown read-only, and a site cannot override whether the customer is notified — that on/off is a VCR-level setting. See Action Plans → Customer copy is managed centrally.
Let the customer know. When you change a customer-meaningful field on this editor — the Handling destination or any of the anti-abuse auto-resolve rules — a prompt appears above the editor: "Alarm handling changed — let the customer know?" (on control rooms with the CRM module). Let the customer know opens a send dialog prefilled with a plain-language, diplomatic description of what now applies (e.g. "Burglary alarms occurring within 10 minutes of a power failure at your site are treated as power-related and automatically logged and closed"). The message is fully editable; pick email and/or WhatsApp/SMS recipients from the customer's saved contacts (or type a number), optionally include a secure 30-day customer-portal link, and send. Dismiss skips the notice — the change is saved either way — and every sent notice is recorded on the customer's CRM activity timeline. Texts respect the messaging consent rails (per-VCR customer texting switch + the recipient's consent; an explicit STOP is always honoured).
Under No monitoring the Setup tab also shows a short banner explaining that everything else is hidden because the site isn't being monitored. Switching the policy back to Self / Full re-surfaces the relevant cards immediately. If the operator was viewing one of the SOP sub-tabs when the policy moved to Self / No (or the module is off), the strip snaps back to Setup automatically.
Setup
The Setup sub-tab is a single scrolling landing made up of eight sections, in order:
-
Monitoring — compact pill row at the very top of the tab. Pick No monitoring, Self monitoring, or Full monitoring — hover a pill for its full description. Saves on click. When Self monitoring is active, a Self monitoring escalation card appears below the pill row with the timeout (in seconds) before unhandled events escalate to the VCR.
-
Mode — the usage-pattern picker (Classic / Residential / Business / Continuous-movement). When Business is selected, an Operating hours card appears below the mode picker with a seven-day editor (per-day Open / Closed checkbox plus Open and Close time inputs). For every other mode the operating-hours card is hidden entirely and cannot be enabled. The card has its own Save / Discard footer that commits the mode plus the operating-hours block.
-
Site team notes — two textareas (Monitoring notes for operators in CleverCommand, Responder notes that follow the event onto the responder's hand-over). The single Save notes button commits both.
-
Typed instructions — four discrete textareas — Key, Property, Responder, and Tech — for audience-specific instructions that are separate from the free-form team notes above. The single Save instructions button commits all four. Unlike the team notes (which the Brain parses for hazards), typed instructions are stored verbatim and surfaced to the right audience: Key and Property show to operators in CleverCommand and to responders; Responder is the on-scene playbook for the reaction unit; Tech is installation / device guidance for technicians.
-
Operations settings — three controls, each with its own save semantics:
-
Suburb — dropdown to assign the site to a suburb (or set to Auto / None). Manually assigned suburbs show a Forced badge. Saves on change.
-
Allow community chimes — toggle for whether community-chime events at this site are passed on to subscribed neighbours. Saves on change.
-
Alarm auto-reply (Clava) — whether an emergency alarm at this site automatically reaches the customer: an "Are you safe?" chat in the CleverAlert app, and a WhatsApp for keyholders who aren't on the app. Saves on change. Three choices:
- Use control room default — follow whatever Settings → Messaging is set to. The label shows which that currently is.
- On for this site — auto-reply here even when the control room default is off. This is how you switch it on for a couple of test sites without touching real customers.
- Off for this site — never auto-reply here even when the default is on.
It never fires on a duress event — duress is silent by design and handled by the operator directly. Each keyholder also needs their own Text messages consent on the People tab, so switching a site on never messages anyone who hasn't agreed to it. Only shown when the control room has Clava.
How a keyholder stands the alarm down. The WhatsApp carries three buttons — All is fine, Phone me, Send help. Tapping All is fine asks the keyholder to confirm it's really them, and the confirmation is always three more buttons in the same chat — nobody is asked to type anything:
- If the keyholder has a legacy password (free text) on file (see Response password vs legacy password), Clava shows that word among two decoy words of the same kind (a colour gets other colours, a name gets other names) and they tap the right one.
- If they have no word on file — the common case for imported keyholders — Clava asks for the last 4 digits of their cellphone number instead, showing the real ending among two decoy endings (for example •••• 5375), and they tap the right one.
Tapping the right button stands the alarm down. A wrong tap looks exactly the same to the person holding the phone (Clava sends the same generic acknowledgement), but the operator gets a wrong-answer alert and phones the keyholder to verify — a typo and a coerced tap are deliberately indistinguishable from the customer's side. A keyholder can also type the answer instead of tapping (the word, or the four digits); the app's colour tiles are never asked for in WhatsApp. Either way the confirmation happens inside the WhatsApp thread — the control room sees the outcome (the operator timeline records whether it was the word or the cellphone check), and an operator still verifies before any response is stood down.
The alarm WhatsApp no longer carries a browser link — every step is a tap in the chat. (The separate alarm heads-up SMS/WhatsApp from Settings → Messaging still uses its secure browser link.)
This choice belongs to your control room aloneAlarm auto-reply is stored on the connection between your control room and the site, not on the site itself. If another company also monitors this site, your setting has no effect on theirs — and theirs has none on yours.
It used to be stored on the site, which meant switching it on for one company silently switched it on for every other company connected to that site. That is fixed.
-
-
Dispatch limit — the per-site override of the control room's monthly dispatch allowance. See Dispatch limit override below for the full walkthrough. Only shown under Full monitoring — a control room that doesn't dispatch has no allowance to cap.
-
Site context flags — three checkboxes the Brain uses to weight events for this site. Each toggle auto-saves on change.
- Guards on site — expect routine motion / camera activations from guards on patrol. Lowers the weight on standalone motion events when forming clusters.
- VIP client — overrides every cost-saving SOP. Every event at this site gets the maximum-attention path: full triage, no auto-resolve, immediate operator pickup.
- Pets / livestock — known false-trigger source. The Brain weights motion-only events lower at this site and is slower to escalate single-sensor activations.
Repeat abuser used to live here but was dropped on 2026-05-24 — the per-alarm-type Anti-abuse & auto-resolve rules in the Alarm handling editor are the abuse-handling surface, so a separate boolean flag was redundant. Storage keys (
site_config.guards_on_site,vip,pets_or_livestock, plus the still-presentabuser_flagged) are untouched on existing rows. -
Advanced actions — three buttons that open editors in a modal:
- Change CID mapping — opens the full CID eligibility overrides table (over 100 CID codes — Heartbeat, Panic, Burglary, AC power, RF jam, etc.). Each row carries a Policy dropdown to override the VCR default for that signal. Save in the modal footer; Close discards unsaved changes. Signals that are logged only by default can be raised for this one site here — set Communicator offline (E369, an Olarm communicator that lost both Wi-Fi and cellular) or Ethernet lost (E351, a dual-path communicator such as FinMon or Olarm MAX that lost its wired or Wi-Fi link but is still reporting over the SIM) to Monitor and it opens on the board like a communication loss, with the same grace period and automatic close on restore. Both are logged only by default because the panel is still talking to the control room; on a site where the SIM is known to be unreliable, Monitor puts the Ethernet drop back on the board.
- Change Signal pairing — opens the Signal pair restore handling editor for the five outage-style pairs (power, hub connectivity, siren wiring, ethernet path, cellular path). Each row picks default / immediate / grace-window behaviour plus the on-restore action. Save in the modal footer; Close discards unsaved changes.
- Automation signals — for sites where alarm zones carry industrial telemetry (pump start/stop, phase failure, fan trips) instead of security contacts. Two restore signals can be switched from Default (restore is informational) to Automation (restore is an event): Burglary zone restore (E130 / R130) and Panic zone restore (E120 / R120). With automation on, the restore signal behaves exactly like its alarm counterpart — it creates its own event when none is open, stacks under an open restore event when one is, and never closes the paired alarm event. Alarm (E) and restore (R) signals form independent event stacks. Restores stay off the operator board unless the CID mapping sets them to Monitor; they do appear on the site timeline and in the customer app like any other event. When at least one signal is set to Automation, an optional zone messages table appears listing every panel zone on the site with two text fields: an Alarm message that replaces the default event text (for example "Burglary alarm — Zone 3" becomes "Pump 2 tripped") and an optional Restore message (left empty, the default restore text is used). Save in the modal footer; Close discards unsaved changes. Zones in an automation family are also exempt from the zone-state timing rules described under Zone state display: their alarm state is written regardless of the panel's restore history, is never aged out, is not cleared by a disarm, and a trip that arrives right after a restore counts as a real trip — only the zone's own restore clears it. All three buttons disappear when No monitoring is selected (nothing to map or pair when no signals are routed).
Restores never auto-close alarm eventsPlatform-wide (independent of the Automation signals opt-in), a restore of any emergency-type signal — burglary (R130), panic (R120), medical (R100), fire (R110), general alarm (R140), 24-hour (R150) — never closes or marks-restored its open alarm event. An alarm event stays open until an operator or the customer resolves it — a zone restoring is not evidence that all is in order. Zone restores only update the zone's own state on the Hardware tab / Zone structure / CleverAlert. Only the five outage-style pairs above (plus video loss and integration-key renewal) close on restore.
Scheduling
The Scheduling sub-tab is the single scheduling home for the site — everything scheduled lives here, in one place instead of being scattered across Overview, Hardware and Setup. It appears on every approved site — no monitoring policy or module switches it off, because arm/disarm scheduling is a base feature. The first two cards below always show; the last three are operator-side work and only appear under Full monitoring, so a No- or Self-monitoring site sees just Site state and Schedules. An intro line at the top says exactly what it holds. The cards, in order:
-
Site state & scheduled changes — one-off suspend / maintenance windows and forced activation. See Site state & scheduled changes above (the Overview tab keeps a compact read-only summary that links here).
-
Schedules — the recurring arm/disarm / chime / camera-config schedules. See the Schedules card reference above (Hardware → Inventory keeps a one-line pointer here).
-
Scheduled patrols — set up recurring synthetic patrol alarms for this site. A site can carry as many patrols as it needs, and each one is scheduled per day:
- Every week / One-off — a repeating weekly pattern, or a single patrol on a date & time that deactivates itself once it has fired.
- The week grid — one row per day: Monday to Sunday, and then Public holiday as the row after Sunday. Each row holds its own list of times, so a day can carry several patrols (e.g. Friday at 21:00, 23:30 and 02:30) or none at all — an empty row shows No patrol. Use Add time on a row to add another, the × beside a time to drop it, and Copy to all days to push one row's times across the whole grid.
- Public holiday — treated as an ordinary day. On a South African public holiday (the same list the roster and a site's operating hours use) the patrol runs that row instead of the weekday it falls on; leave the row empty and the patrol simply does not run on public holidays. A new patrol starts with the holiday row set to the same time as the rest, so a holiday behaves like any other day until you change it.
- Quick fill — pick a time and push it onto Every day (all eight rows, public holiday included), Mon–Fri or Sat & Sun in one click; Clear the week empties every row.
- Random window (min) — every patrol fires somewhere between its time and this many minutes after it, so the exact time stays unpredictable; 0 fires exactly on the time. If two patrols on the same day are closer together than the window, the card warns that the later one can be swallowed.
- A live read-back under the grid shows how many patrols a week the schedule comes to and spells the pattern out in words. Each saved patrol repeats that in its row, with a seven-day strip plus an H pill for public holidays (a superscript marks a day carrying more than one patrol). Patrols created before this grid existed treat a public holiday as whatever weekday it falls on; open one and its holiday row is filled in with the pattern its days already run, so saving it changes nothing unless you edit it.
A patrol carries two things the operator sees when it fires:
- Operator instruction — a single freeform note describing the overall patrol (e.g. "review all cameras, confirm gate closed").
- Patrol tasks (optional checklist) — an itemised task list you build with Add task; each task can be reordered (↑ / ↓) or removed. When the patrol fires the tasks attach to the event as a tickable checklist, with the same authoring options as the Operator Checklists: each task is assigned to the control room (operator) or a responder, and uses any response type — tick, acknowledge (gates dispatch), free text, single or multiple choice (with your own options), photo, or QR scan (photo and QR are responder-only, captured on the CleverResponder app). A task can be marked required for resolve or left optional; patrol tasks default to optional so the benign patrol never blocks. Operators tick control-room tasks on the event's checklist, and can tick a responder task on behalf (recorded as an operator override). A patrol row shows a task count badge when tasks are set. Leave the list empty to keep a patrol as instruction-only.
When it fires, a benign event appears on the operator board prompting the operator to run a camera patrol. The patrol uses a dedicated internal patrol signal (not an alarm-panel test), so it never triggers a siren, a customer push, a control-room telegram, or a responder push, and it is never counted as the site's alarm-panel heartbeat / periodic test. Use Pause / Resume to suspend a patrol without deleting it. Managed by supervisors with the manage team permission.
-
Recurring test cycle — automates a repeating test window, handy for a site under nightly maintenance or commissioning where you want dispatch suppressed on a schedule rather than clicking Test Mode by hand each time.
- Status — On or Off. When on, the configured schedule is summarised, and if a window is open right now you'll see an On test now · until <time> badge.
- Set up cycle / Edit cycle — managers (the Manage customers permission) choose a Cycle type:
- Daily window — a start and end time on selected days of the week (none selected = every day). Times are in the control room's timezone. An end earlier than the start runs overnight (e.g. 22:00 → 06:00).
- Interval — repeat every N hours, on test for M minutes (the test duration must be shorter than the repeat interval). This mirrors a classic "Test Cycle (hours)" auto-test.
- Disable cycle — turns the recurring test off (the configuration is kept so it can be re-enabled).
How the recurring test behavesWhile a cycle window is open the site reads On test, so alarm dispatch is suppressed (signals are still logged) — exactly like one-shot Test Mode, just on a repeating schedule. It is computed live (no overnight job): each window self-applies and self-expires. A deliberate site state override (Suspend / Maintenance / Activate on the Site state & scheduled changes card) always outranks the cycle, so a recurring test never overrides a manual decision.
-
Holiday notes & temporary notices — the per-(VCR + site) notice editor with its own Save / Discard footer. See Temporary notices for the full walkthrough.
Alarm handling
The Alarm handling sub-tab is the per-site Action Plan override editor. It overrides — for this one site — the per-alarm-type Action Plan the VCR sets at Settings → Alarm Handling for the site's Mode. Storage is sparse: only the fields you actually change are saved on the site, so everything else keeps tracking the VCR / Site-Mode default (change that default later and the site follows).
The panel is overrides-first — it leads with what is different about this site:
- Enforcement banner (top) — states honestly what runs today. On a VCR switched to enforced alarm handling, the control room reads most of the plan at runtime: the Handling destination (Review queue / Log only genuinely divert the signal), the Priority (stamped on the event; drives the CleverCommand queue accent and sort), operator instructions and keyholder-call behaviour (shown on the CleverCommand event page), SLA timers, the anti-abuse auto-resolve rules, auto-complete and checklists. Only a few fields are still saved for a later enforcement stage — after-hours dispatch, the customer-cancel window and the technical-ticket toggle. On a VCR that isn't enforced, nothing here changes live behaviour yet; the overrides are stored and apply the moment it's switched on. A Live / Saved legend spells out the split per field.
- Overridden on this site — a section listing only the alarm types this site changes. Each row carries a diff-chip strip: one chip per changed field, toned Live (green) or Saved (muted) following the same split as the banner's legend. The Handling and Priority chips also show their value (e.g. Handling: Review queue, Priority: Critical). When nothing is overridden, a No site-specific overrides empty state confirms the site follows its Mode defaults.
- All alarm types — the inherited types, grouped by kind (Life-safety, Intrusion, Tamper / fault, Power / comms, Technical / fault, Environmental, Open / close, Test) into category accordions, collapsed by default. Each header summarises the group: how many types inherit, a routing hint when they all resolve the same way (e.g. → review queue), and a count of any types from that group already overridden (pulled up to the section above). Open a category to reveal its rows.
Editing. Every row has one Edit plan button that expands the full Action Plan editor for that alarm type — the same editor as the VCR-level page (Handling, Priority, Operator instructions, and the profile-relevant operator-flow fields). Change any field and the row becomes an override and moves up into Overridden on this site. An overridden row's editor carries Reset — inherit the site default, which clears the override and returns the type to tracking the VCR / Site-Mode default. The customer notification wording is not site-overridable — see the callout above.
For the full Handling disposition reference (Control room / Review queue / Log & notify / Log only), the life-safety safety floor, and the per-field detail, see Action Plans (Alarm Handling).
An earlier version of this sub-tab hosted a Site SOP panel of learned-pattern "variant ladders" (site_sop_overrides). That editor has been superseded by the Action Plan editor above and is documented for reference only under Legacy SOP surfaces. Its read-only audit trail is still live and sits at the bottom of this sub-tab — see SOP History.
Anti-abuse SOP (retired sub-tab)
The Anti-abuse SOP sub-tab was removed on 2026-06-23. Its auto-resolve rules — which silence events matching known abuse-pattern fingerprints — now live per alarm type in the Anti-abuse & auto-resolve section of each alarm type's plan: set control-room-wide per Site Mode at Settings → Alarm Handling, and overridden for one site on the Alarm handling sub-tab above.
This was an upgrade, not just a move. The old sub-tab applied one set of rules to every alarm at the site; the rules are now set per alarm type, so power-glitch suppression can apply to burglary without ever touching a panic. They are also profile-gated — each rule only appears on the alarm types it makes sense for.
| Old rule (site-wide) | Now, per alarm type |
|---|---|
| Resolve event when keyholder chain unanswered | Resolve when keyholder chain unanswered — "Every contact attempted, none answered → auto-close." Applies to Burglary only. |
| Resolve alarm/panic just AFTER a power failure | Resolve just after a power failure — with its own window, entered as hours / minutes / seconds (default 30 s). |
| Resolve alarm/panic just AFTER a power restore | Resolve just after a power restore — with its own window, entered as hours / minutes / seconds (default 30 s). |
| Resolve alarm shortly after the site closes | Resolve walk-away trips after closing — "Keeps suppressing until the site is quiet for the cooldown." Window and cooldown in minutes (defaults 5 / 5). |
| Add a service-ops note each time this rule fires | Log a service-ops note when an auto-rule fires — "Keeps a paper trail for noisy sites." One toggle per plan rather than one per rule. |
All rules are still off by default, and a site can override any of them on top of the control-room default from its own Alarm handling tab.
The values on the retired sub-tab persisted but were never read at runtime; anything stored in vcr_site_connection.site_config.anti_abuse is orphaned. Nothing writes or reads that block any more — the key is kept only so older site_config rows still parse.
The replacement rules do run. On a control room with enforced alarm handling they reversibly auto-resolve a matching event — it moves to Resolved but an operator can reopen it, and it is never hard-closed. They stay inert until you switch a rule on, fail open to leaving the event with the operator, and a camera-verified or duress event is never auto-resolved. See Action Plans → Auto-resolve for the full reference.
Response SOP (retired sub-tab)
The Response SOP sub-tab was removed on 2026-06-23. It carried three things; here is where each one went:
| Was on Response SOP | Where it is now |
|---|---|
| Dispatch limit — per-site override of the monthly dispatch allowance | Monitoring → Setup, as its own card under Operations settings. See Dispatch limit override. |
| Auto-complete — per-site override of the auto-complete countdowns | Folded into the per-alarm-type Action Plan editor on Monitoring → Alarm handling, but not yet exposed in the interface. See Auto-complete override. |
| More coming soon — an empty placeholder card | Dropped. It advertised responder playbooks, dispatch escalation contacts and callout fee gates; none were built. |
People
The People tab is the alarm call list and the keypad-user-to-contact link table:
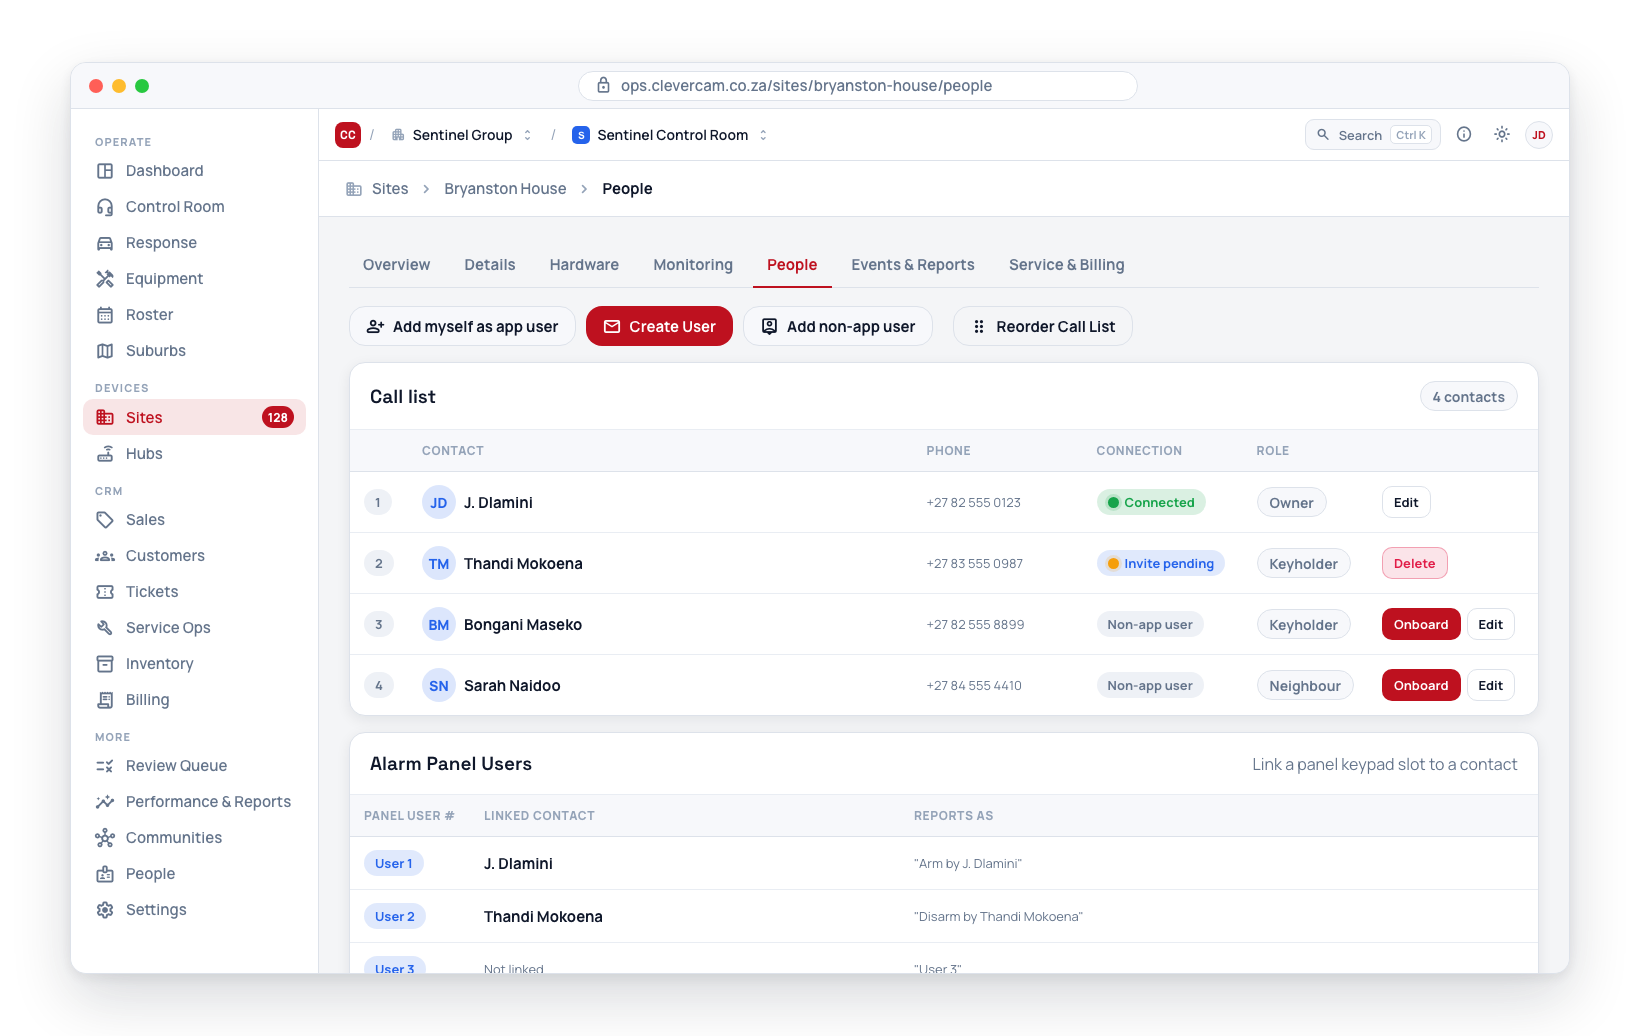
- Add myself as app user — connect your own CleverOps user to the site as an app user. Disabled once you are already connected.
- Create User — invite a CleverAlert app user to the site.
- Add non-app user — add a keyholder or external contact who will not install the app. Required: name; optional: phone, email (where an app invitation goes when sent by email), and the two credential pairs described in Response password vs legacy password below.
- Reorder Call List — drag-drop reorder of the call priority list. Only shown when there is more than one contact on the call list.
- Opening an app user shows their First name, Last name and Email read-only — that is their own CleverAlert profile, and a control room does not edit it. Name on this site and Phone are the per-site overrides you can set: leave them blank to follow the person's profile, or type a different value to override it for this site only. See Editing a contact's name and phone for the permission this needs.
- The user table shows every contact with their connection status (Connected / Invite pending / Non-app user) and role. An App column tracks each person's standing with the app: On the app for connected users, and for non-app keyholders the invitation state — Not invited, Invited (with the channel and when it was last sent), Opened, Declined (with the reason they gave), or Invite expired. A second Has the app marker appears beside that state when the keyholder's number or email already belongs to a CleverCam account on another site: the invitation still applies, but they sign in and accept rather than installing anything.
- Onboard on a non-app keyholder's row sends them an invitation to install your app and claim their row — see Onboarding a keyholder to the app below. Onboard all (N) in the header invites every not-yet-invited non-app keyholder on the site who has a number or email on file (declined people are skipped — re-inviting them is a one-by-one decision).
- The Alarm Panel Users table sits beneath the call-list table. It is where each contact's Panel user # (the keypad slot they use at the panel) is linked, so arm and disarm events report a person's name instead of "User 3". See the Alarm Zones tab page for the full reference.
- Everyone's editor carries an App panic select — Use workspace default (the normal case), Site + location panic, Site panic only, or No app panic — the per-person override of Settings → General → App panic. For a non-app keyholder it applies once they accept an app invitation: accepting converts the same record into their app user, so the setting survives. This select is how a control room runs location panic as a selected-people-only product — opt in under Settings, leave the default at Site panic only, and grant it here person by person. An override never beats the opt-in, though: a Site + location panic grant stays site-only until your control room's Offer location panic switch is on. A fifth option, Location panic only (no premises), appears on a site typed Personal (panic) and on anyone who already carries that scope — it is what Add personal cover gives someone with no fixed address, and it refuses their premises panic rather than dispatching to a placeholder pin.
- Photo & emergency medical alerts — an optional block on every person, app user or not, holding an ID photo (a face a responder can recognise on the day) and the emergency medical alerts an operator reads out to paramedics: chronic conditions, allergies, blood group, current medication, mobility, medical aid, an emergency contact and a doctor. Medical aid is asked as a plain question — Not asked, Yes or No medical aid — because “no” is an answer worth having (a state patient goes to a state hospital) and is not the same as never having asked. Answering Yes opens the scheme, plan, membership number, dependant code, the main member and their ID number, and the scheme's emergency number. Ambulance membership is asked as its own question below it — ER24, Netcare 911 and the like, with the membership number and the service's own emergency line — because carrying one and not the other is common in both directions. It is collapsed and entirely optional — adding a keyholder needs only a name, and nothing here is ever required. On Add non-app user it starts closed and the photo is left out altogether (there is no person to attach it to until you save); open the person again afterwards to add either. Internal only — never sent to the customer. Both are shown to your operators on the call list and to a dispatched responder: the medical alerts appear on the person's row in the CleverCommand call list, and CleverResponder shows them on a panic or medical event. Both are self-service too: a person who fills in My emergency profile in the app writes the same fields, and the newest save wins.
- Editing a non-app user exposes the keyholder's off-app reach: Off-app messaging (SMS / WhatsApp opt-in with consent, and which alarm categories — Burglary / Open-Close / Schedule / Power), the two credential pairs below, and an internal Notes field. The messaging opt-in decides who receives the alarm heads-up messages; being sent the event is the authorisation, so there is no separate per-keyholder "may cancel" permission (the May cancel alarms / May postpone schedules toggles were removed 2026-07-25). See Notifications & Messaging → Customer event heads-up.
- Receives alarms for — shown in the editor only when the site's partitions are separate premises (the switch on the Hardware tab's Zone structure card). Pick Whole site (default) or Only these premises: and tick the premises — each chip is the partition's name with its Pn number. Nothing ticked saves as the whole site. Panel-wide alerts (power, battery, comms, tamper) follow the site's Panel-wide alerts go to setting on the Zone structure card rather than this scope. In premises mode each person also carries a small chip in the call-list table and in the Alarm Panel Users table — Whole site, or the first two premises names and +N for the rest.
Onboarding a keyholder to the app
Onboard opens a small dialog that does three things:
- Checks there is an app to send them to. The green banner names your published white-label app; a keyholder is only ever pointed at your app, never at a generic one. If your company has no published app (not built, not live, store listing unverified), the dialog explains why — the same reasons as Settings → Customer messaging → App onboarding — and nothing is sent.
- Sends the invitation by WhatsApp (falling back to SMS when WhatsApp can't deliver) and/or email — numbers and addresses typed here are saved on the keyholder for next time — or just mints the link (Just give me the link) for you to paste into any channel. The link is valid for 14 days; sending again refreshes the same link.
The invitation describes only what that site can actually do. Not every site is managed the same way: some take arm/disarm commands, some only report alarms, and app panic can be switched off for a control room entirely. The landing page and the invitation email are written from the site's own capabilities — "invited to manage" with arm/disarm for a site whose hub takes commands, "invited to keep an eye on" with alarms only where it doesn't, and panic mentioned only where it is switched on. The WhatsApp and SMS wording stays the same for every site, because a WhatsApp template's words are fixed by Meta and cannot vary per site — so it promises nothing about arming or alarms at all. 3. Tracks what happened. The People table's App column moves through Invited → Opened → Accepted (the row becomes Connected) or Declined, and the dialog can Send again or Withdraw an open invitation.
The link opens a branded page with three steps — install (store buttons for their platform), create an account with the number your company has on file, accept in the app — plus Open the app and a Show my code instead escape hatch that mints the classic 4-character join code, valid for one hour. In the app, accepting converts the keyholder row into their app connection: call order, passwords, medical alerts and panel-user links all stay. Declining records the reason back onto the row and stops automatic nudging.
The app also finds invitations by itself: an invited person who installs the app on their own and registers with the same email the invite went to sees it immediately, and one who registers with the same phone number is first sent a one-time code to that number — so nobody can claim a site just by typing someone else's number into their profile.
Confirming who they are
How much proof the app asks for depends on how the invitation reached them:
| How they were matched | Accepting | Declining |
|---|---|---|
| They opened your link | The link is the proof — straight through | Straight through |
| Their account's verified email matches | The verified address is the proof — straight through | Straight through |
| Only the phone number on their account matches | A 6-digit code is texted to that number first | Straight through — no code |
The phone number on a CleverCam account is free text, so on its own it is not proof of who is holding the handset. Accepting hands over a site, so it needs the code. Declining only ever closes a door, so it does not — and the invitation records that the number was never verified, which is what the People tab reports.
An invitation belongs to the app it was sent for. Each white-label app shows only its own invitations, so someone who holds sites with two different security companies never sees one company's invitation inside the other's app — and if they open the link, or type the code, in the wrong app, it names the app to use instead of claiming the invitation is invalid. The unbranded CleverAlert app is the exception: it is the catch-all and shows everything.
When someone is already on the app — merge
One account cannot appear on a site twice. If a keyholder row and an app user on the same site are really the same person, the invitation can never be accepted: the person installs the app, opens the link, and is told they already have the site.
CleverOps flags this instead of leaving the invitation looking like it is still waiting on the customer. The App column reads Already on the app — merge and the row's button becomes Merge… whenever either of these is true:
- someone opened the invitation and hit the duplicate, or
- the keyholder's phone or email already belongs to an app user on that site — caught before an invitation is sent, so a doomed one need not go out at all.
Merge… names the app user it would merge into and what moves. The keyholder's call order, response passwords, medical alerts, photo and panel user are copied onto the app user only where the app user has nothing of its own — nothing already set on the app record is overwritten — and the keyholder row then comes off the call list. Where site history (events, schedules, conversations, messages) points at the keyholder row, the row is kept but hidden and muted rather than deleted, so that history stays intact.
Merging is deliberate and never automatic. Check the name in the dialog first: the account that hit the duplicate is not always the same human — a shared or demo login lands there too — and matching a phone or an email is a strong hint, not proof. If they are not the same person, withdraw the invitation instead.
The invitation stays open after a duplicate is hit, so someone who simply signed in on the wrong account can still accept it on the right one.
Response password vs legacy password
Each person on the call list carries two separate credentials, shown side by side in the editor. They are not two views of the same word — filling one does not change the other.
| Field | What it is | Who asks for it |
|---|---|---|
| Response password / Duress password | Dropdowns, limited to the nine colours. | The CleverAlert app only. Its cancel and duress sheet is a grid of colour tiles, matched exactly — a word here matches no tile, so the person could not stand down a response or signal duress. |
| Legacy password (free text) / Legacy duress (free text) | Free-text word or number. | Every human challenge: a control room operator on the phone, the AI keyholder call, a Clava WhatsApp confirmation, the alarm heads-up SMS, and the secure alarm link. |
The legacy pair is also where imported passwords land. No alarm system CleverOps migrates from — SEON, Omni, ServCraft, panel packages — has a colour concept; they all store a plain word, so an import writes the word to the legacy field and leaves the colour unset.
How they interact:
- They are independent. Filling one never fills the other, and a blank legacy field means exactly that — this person has no challenge word, not "look at their colour". Changing the colour later never touches the word, and setting a word never touches the colour.
- The colour never leaves the app (decision 2026-08-12). No human channel asks for, shows, or accepts it: with a blank legacy field the person simply has no challenge word — a calm tap on the secure alarm link or heads-up message is recorded as an operator-facing signal only, calls skip the password step, and a Clava WhatsApp All is fine asks for the last 4 digits of their cellphone number (tap-to-choose among decoys) instead of a word. The colour rail carries a database default ('red') most people never chose, so challenging on it would verify a word nobody picked.
- The legacy word is therefore the credential for every human challenge, without touching the app. The person taps their colour in CleverAlert and says their word to an operator. Password and duress resolve independently — a word duress still works for someone whose password field is blank.
Until 2026-08-10 the colour was silently copied into the legacy field whenever a person was created without a word. That made 2,313 keyholders across 48 control rooms look as though their challenge word was "red" — an operator asking for their password was handed a colour nobody had chosen. The copy has been removed and those manufactured words cleared; no real word was affected, and nobody lost a credential.
This is safe. Every surface that challenges a human reads only the word, so someone holding a colour and an unrelated word is asked for their word however they are reached: the secure alarm link, the alarm heads-up SMS, the Clava WhatsApp conversation, the AI keyholder call, and an operator on the phone. Their colour still stands down a response in CleverAlert, because the app's cancel sheet is a grid of tiles and only a colour can match a tile — the two credentials never cross.
A keyholder who arrived through a migration has a legacy word and an empty Response password. That is correct — they are phone-only. If they later install CleverAlert, the app prompts them to pick a colour, and picking one leaves the control room's word alone.
The People tab covers the alarm call list — who the control room dials. For the customer's admin or billing contacts (accounts person, who can authorise a callout fee, who receives invoices), use Customers → [customer] → Customer contacts instead. See Customer contacts for more detail.
Events & Reports
The Events & Reports tab leads with the site's events — the first page of them, loaded the moment the tab opens — with the report generators in a compact card below them.
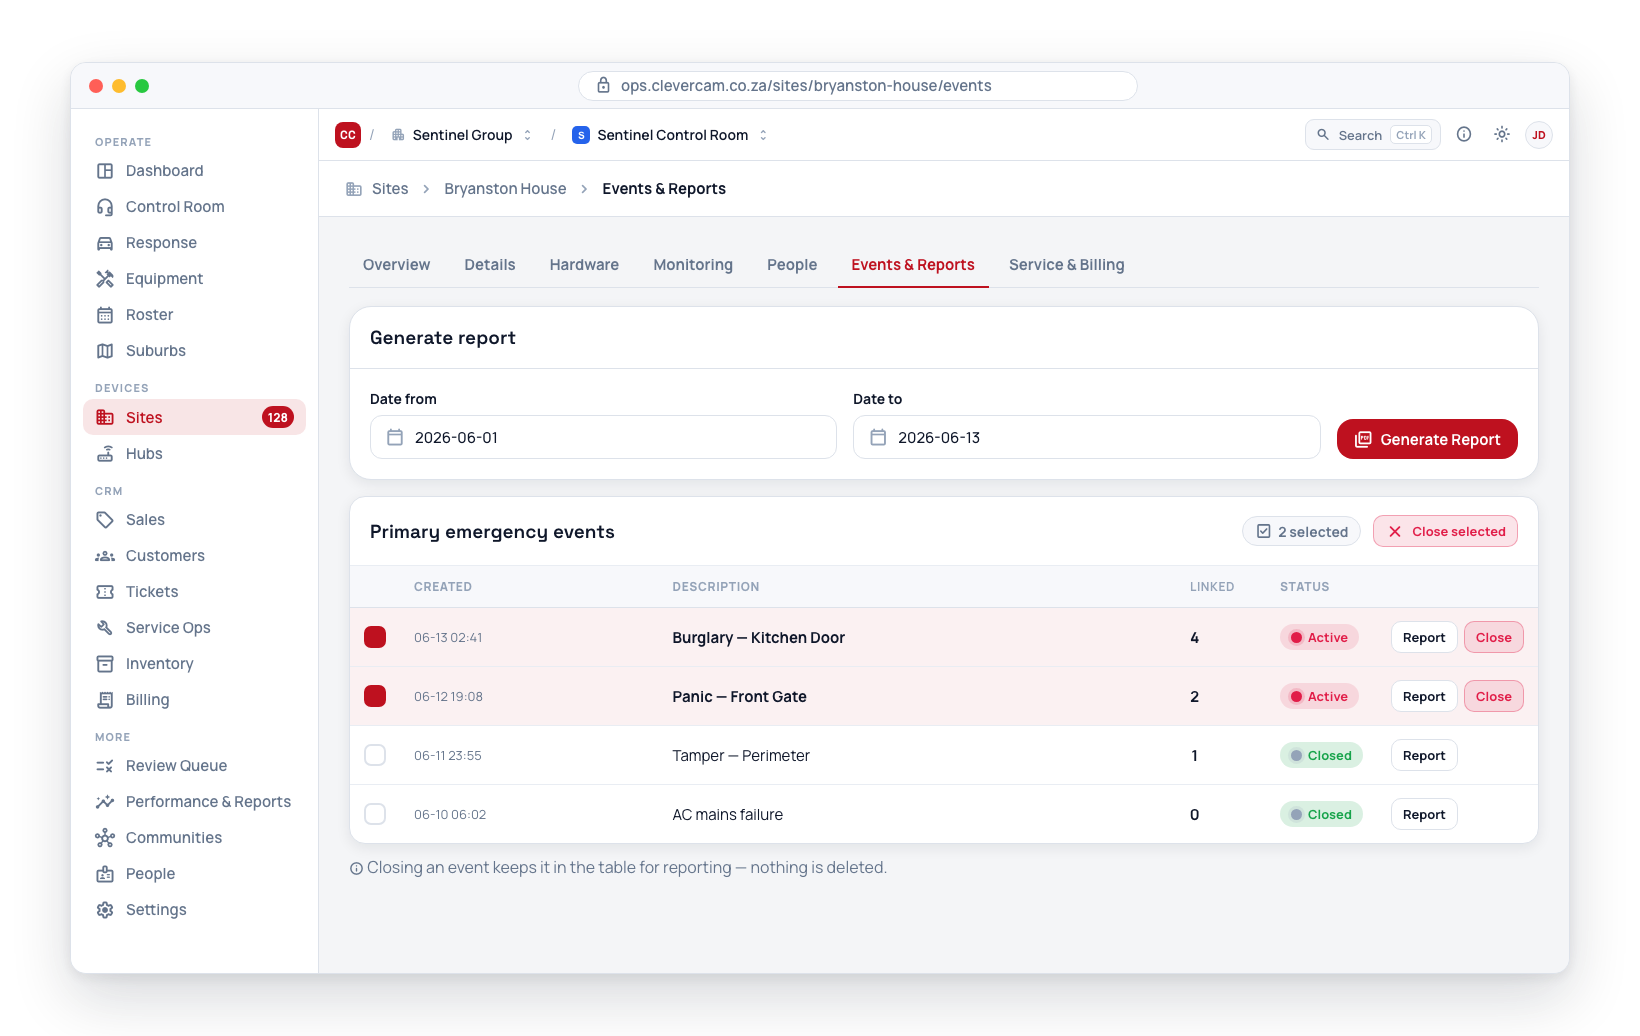
The events table
Every primary event the site raised in the last 30 days, of every type — not just emergencies — 50 to a page, plus every event that is still open, whatever its age. Open events sit pinned at the top of the list; the closed history runs newest-first below them, so an event left open months ago can never hide behind the recent noise. Two filters sit in the card header:
- Type — All types / Emergency / Routine / Malfunction / Restore. Routine covers arm/disarm and schedule activity; malfunction and restore are trouble signals and their recoveries.
- Status — Any status / Active / Closed. Active shows only open events and ignores the 30-day window entirely; Closed shows the closed events from the last 30 days.
Each row is one line: created time, a coloured type pill, the event's photo thumbnail (when it has one), its CID code and description, a Linked count of its follow-up signals, its status (an Active pill, or Closed), and its actions.
Photos and clips. A camera event shows a small thumbnail of its detection snapshot at the start of the description — click it to open the full image in a viewer; an event with a clip shows a ▶ badge and plays the video instead. Thumbnails work for the whole window, not just recent events: the stored alarm-image links expire after about 7 days, so CleverOps mints fresh short-lived links on demand as the list renders (the event_media_urls function, which only serves events the signed-in person is entitled to see). An event whose media has aged out of the platform simply shows no thumbnail.
Click a row (or its chevron) to expand it. The drawer tells the event's whole story in one merged timeline, oldest first: every follow-up signal that landed on the event (with its CID) interleaved with every control-room action — operator notes, keyholder call outcomes, dispatches, feedback, completion. Follow-up signals and actions that carry a photo show their own small thumbnail in the timeline, opening in the same viewer. A count above the timeline says how many of each there are; a very large burst is capped at the first 200 of each, and the drawer says so when it cuts. One drawer is open at a time, and what it loaded is kept, so flipping between rows is instant.
Row actions:
- Report — on emergency rows, downloads that event's PDF report (needs the reports permission below).
- Close — on active rows, closes the event and all its linked follow-ups after a confirmation. Any event type can be closed, not only emergencies.
- Bulk close — tick the checkbox on multiple active rows then use the Close selected button. Closed events stay in the table for reporting; the close action does not delete anything.
Paging. The table fetches one page of 50 at a time — the rows on screen and nothing more. The footer's count comes from the server, so it is honest about how much history sits behind the page you are on, and Prev/Next move through it.
If the list can't be loaded. The table says Couldn't load events, gives the reason, and offers a Try again button — the same treatment as the event trend on Overview. It never falls back to the no events message: a list that failed to load is not the same as a site that raised nothing, and on a monitored site the difference matters.
The Reports card
One card, below the events, holding the site's generators:
- Site event report — date fields for the window, then Generate event report for the PDF.
- Site infrastructure report — Generate infrastructure report, beside the event report button and using the same two date fields as its window, for a PDF of the site's camera feed availability (each camera marked Faulty, Watch or Healthy), the link evidence, internal network vs internet per hub, and the outage log, with rule-based recommendations. The window can be at most 92 days and a To date in the future is clamped to today. Camera-feed history began on 8 September 2026, so a window before that shows no camera data — the PDF's coverage line says where its history starts. The same PDF is filed on Performance & Reports → Reports, where it can be re-downloaded for 7 days or emailed.
- Camera image report — pick a camera and a from/to date and time, then Generate camera report for a PDF contact sheet of every detection snapshot that camera captured in the window. This row only appears on sites that have at least one enabled camera — alarm-only sites do not see it.
The event, camera and per-event reports are generated for the person who clicks the button, and the PDF footer names them. Pulling any of them — the infrastructure report included — needs the View & export reports permission in the control room the site belongs to. The Supervisor operator role carries it, as do the Auditor and Control room manager company roles; company owners and super admins hold it everywhere.
Without that permission the report controls — the Reports card and the per-row Report button — are not shown at all. The buttons and the server agree on one key, so a visible button is one you can actually use. The events table itself does not need the permission — everyone who can open the site can read its events.
Until 2026-08-27 reports were gated on owning or administering the company, not on the permission that names them. A control room manager who had been granted View & export reports was still refused every report, and the only way to unblock them was to make them a company Administrator — a role that does not carry View & export reports at all. If someone was made an Administrator purely so they could pull reports, that standing can now be narrowed back down to the roles they actually need.
Guarding
The Guarding tab is module-gated — it only appears when the VCR has the has_roster_module flag enabled (the Roster module). Super admins always see it. It is where a site's manned-guarding requirement is captured, as opposed to the Roster page where that requirement is worked.
Capturing it here matters: before this tab existed, guard posts could only be created from inside Roster, so a site could be onboarded and billed for guarding and never rostered at all — and nothing flagged it.
The tab carries:
- Guarding readiness — a rail showing what is still missing before the site can be rostered and reconciled: the guard post, its cover lines, a PSIRA grade on every line, a check-call cadence, and a link to what the client is billed. Nothing here blocks the site; it reports what is incomplete.
- What this site costs to staff — guard-hours per week, officers needed (on the 4+2 convention, with the no-overtime figure alongside), the NBCPSS wage floor per month, and the monthly value of the billing lines linked to these requirements. The wage floor is a floor, not a cost: it excludes overtime, allowances, levies and the relief officer who must be paid whether or not he is placed.
- Guard posts and their cover lines — each post (Main Gate, Back Gate, Roving) with a table of its lines: the hours, the days, how many guards, the minimum grade, whether armed, the check-call cadence, and which subscription bills it.
- Add a guard post — names the post the way the control room says it on the radio. A new post appears on the Roster board straight away.
How guards book on here
Each guard post chooses which rails it accepts a book-on from. With none selected the control room books people on, which is how posts worked before this existed.
- CleverResponder — the guard signs in on the app. Strongest identity, but it only reaches guards who have actually signed in, which today is roughly one in six.
- Link on their phone — the guard opens the same roster link they already get by SMS and taps Book me on. No app and no account, so it reaches everyone.
- WhatsApp reply — the guard messages to book on ("on post", "on duty", "okay"). Reaches everyone. A text reply proves the least on its own; if the guard then shares their location pin, that upgrades the same shift to corroboration.
A guard who messages you is picked up within two minutes. Prompting them first — sending the "time to book on" message — needs a WhatsApp template approved by Meta, which is not in place yet. Until it is, pair this rail with the roster link or an SMS so the guard knows when to send.
Only the reply is matched, and only while the guard is inside a shift on a post with this rail on. Offer replies (accept / decline / not available) are deliberately left alone so they still reach the offers queue.
When any rail is on you can also require the guard's location and a photo of themselves, and set the radius that counts as "at the post" (default 250 m).
The radius is what turns a book-on into evidence. A book-on inside the circle is recorded as corroboration; one outside it is still recorded, with the distance, but never counts as proof the guard was there. Without a location there is nothing to check the book-on against, so it can never rise above the guard's own word. See Attendance assurance.
A photo is stored with the check-in for the control room to look at. It does not raise the grade on its own — nothing is comparing faces yet.
Billed under
Each cover line can be linked to the subscription that sells it. Because subscriptions are usually recorded against the customer rather than an individual site, the picker offers the customer's active subscriptions, not just the site's.
Leaving a line unlinked is allowed — goodwill cover and trials are real — but the readiness rail keeps reporting it, so it stays visible rather than being forgotten.
Seeing subscriptions requires billing or service management access. Without it the picker is hidden, the readiness rail marks the billing step as needing someone with billing access rather than as a failure, and the rest of the tab works normally.
Service & Billing
The Service & Billing tab is module-gated — it only appears when the VCR has the has_crm_module flag enabled (the CRM module, which covers Service Ops and billing). Super admins always see it. When visible, it carries:
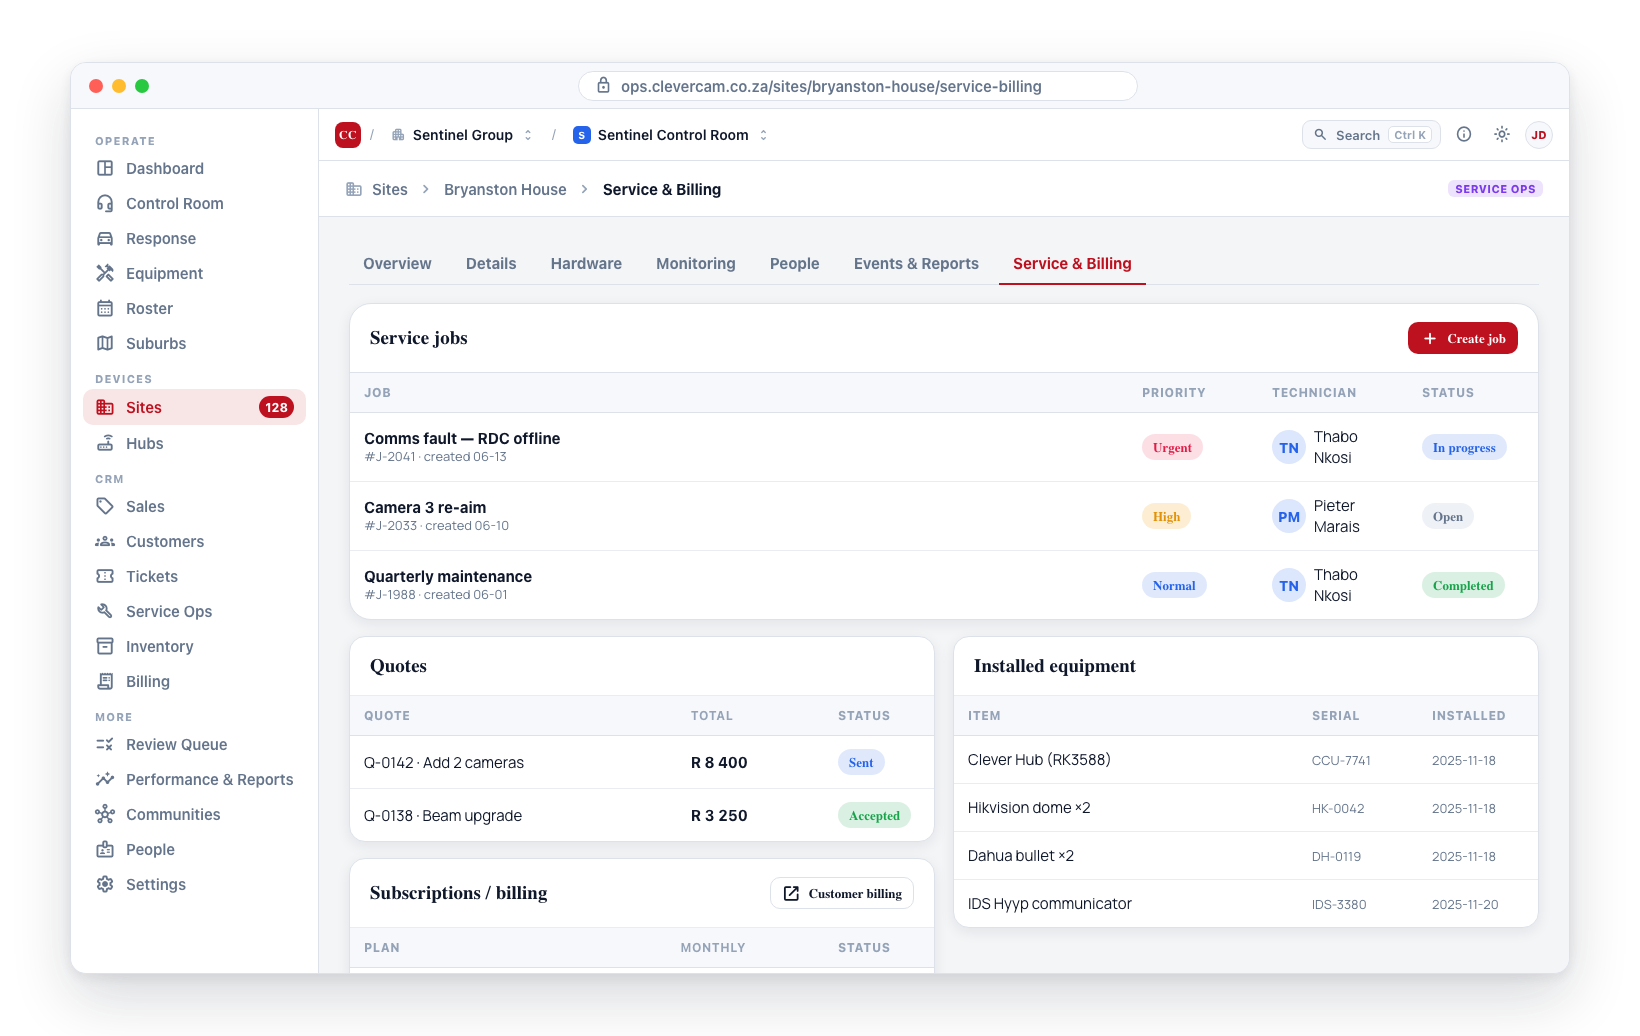
- Service jobs — every service job for the site, with status pills (Open / In progress / Completed / Cancelled / On hold), priority chips, and the assigned technician. New job opens the Service Job form.
- Maintenance plans — scheduled recurring service for the site.
- Quotes — quotes scoped to the site.
- Subscriptions / billing — recurring subscription rows scoped to the site, with link-through to the customer-level billing dashboard.
- Invoices — every invoice with at least one line item billed at this site, newest first, with its status, total and outstanding balance. Clicking a row opens the full invoice. This list is read-only: invoices are raised from the site's jobs (Send to invoice) and quotes (Bill directly), and both stamp the site onto the lines they copy. An ad-hoc invoice typed straight into the Billing page names a customer but no premises, so it appears on the customer record only.
- Installed equipment — inventory of equipment installed at the site.
Temporary notices
Also called holiday notes. Temporary notices are short-lived banners that appear at the top of the site modal to a chosen audience while the notice is within its date range. They are designed for the kind of message that only matters for a few days — "On holiday — keyholder Adam away 2026-06-01 to 2026-06-15", "Site under construction Mon–Fri this week, expect extra activity", "Phones down for the next 4 hours, contact via WhatsApp only".
Notices live per (VCR + site) — different VCRs that are connected to the same site can each maintain their own list of notices, and a notice authored by one VCR is never shown to operators of another. The list is stored on vcr_site_connection.site_config.temporary_notices as JSONB.
Where to find it
- Open the site modal.
- Go to Monitoring → Scheduling.
- Scroll to the 🏖️ Holiday notes & temporary notices card at the bottom of the sub-tab.
Holiday notes vs general notices
Every notice has a Type, and it changes how the notice is presented everywhere it appears:
| Type | Badge | Use it for |
|---|---|---|
| Holiday / away | 🏖️ | Nobody at the property — the client is away and the keyholder is likely unreachable |
| General notice | 📌 | Anything else: builders on site, phones down, guard posted |
A holiday note is prefixed On holiday — and badged 🏖️ on the CleverCommand event card, the table-view chip, the event details banner and the CleverAlert home banner. That badge is the whole point of the type: an operator triaging an alarm at 02:00 can tell "the client is away" from "there are builders on site" without reading the text.
Notices created before the Type field existed, and any notice whose type is unrecognised, read as a general notice — the type is never guessed from the body text.
Notice fields
Each notice has:
- Type — Holiday / away or General notice (see above).
- Body — free text describing the situation. Shown verbatim in the banner.
- From — the date the notice becomes visible (yyyy-mm-dd). Defaults to today on a new notice.
- To — the date the notice stops being visible. Inclusive: a notice with
to = 2026-06-15is still visible at 23:59 local time on the 15th. Defaults to 7 days from today on a new notice. - Audience — one or more of: Admin, Owner, VCR team member, Company team member. Tick every role that should see the banner. New notices default to Admin and VCR team member.
- Customer app — an opt-in toggle, Show as a banner in the CleverAlert app. When on, the notice also renders as a banner on the app home screen for the site's app users. You can narrow it to specific app roles (Owner, Admin, Members); leave all unticked to show it to every app user. This is independent of the operator Audience above — the operator audience controls who sees the notice inside CleverOps, the app roles control who sees it in the app.
Status pill
Each notice card carries a status pill in the top-left:
- Scheduled — today is before the
fromdate. The banner is not yet showing. - Active now — today is within
[from, to]inclusive. The banner is showing to viewers whose role matches the audience. - Expired — today is after the
todate. The banner is not showing; the notice moves into Past notices (see below) and stays there as a record.
Past notices
Expired notices are never deleted automatically. They collapse into a Past notices (N) disclosure below the live ones, so the current list stays readable while the history stays available.
This is deliberate: "when was this site last away?" is a question the control room asks regularly, and sites tend to go away on the same trip every year. Expired notices show nowhere else — not on the site banner, not in CleverCommand, not in the customer's app.
Each past notice has a Use again button, which copies its type, wording, audience and app settings into a new notice starting today (7-day window), ready to adjust and save. Operators in CleverCommand can read the same history by clicking the notice banner or chip on an event.
Adding, editing, deleting, saving
- Add holiday note — adds a fresh Holiday / away notice (body empty, from = today, to = today + 7 days, audience = Admin + VCR team member).
- Add notice — the same, as a General notice.
- Delete — red button on each notice card. Removes the notice from the draft list. This is also how you clear something out of Past notices.
- Discard / Save — sit at the bottom of the card. Edits, additions, and deletions are batched into the draft until you click Save, which writes the whole list in one go. Discard rolls the draft back to the last saved state.
The card shows Unsaved changes in the footer until you save.
How the banner is shown
When the site modal loads, every notice in the list is checked against:
- Date window — the notice's
fromandtoare compared against the current time. The notice is in-window from 00:00 on thefromdate through 23:59 on thetodate. - Audience — the viewer's role is resolved (super-admin → Admin, VCR team membership → VCR team member, customer-company membership → Company team member). The notice is shown when at least one of its audiences matches.
If both checks pass for at least one notice, the active notices banner appears at the top of the modal — above the tab strip — with one row per active notice showing the body text and the Until <date> end-of-window date. The heading reads "🏖️ Holiday note" when a holiday note is active ("🏖️ Holiday notes & notices (N)" for several), and "Temporary notice" / "Temporary notices (N)" otherwise.
The banner is amber-tinted and uses the standard warning colour, matching the visual weight of a fail-to-arm or comms-loss heads-up.
The Owner audience option is present in the editor so notices can be authored ahead of time, but the viewer-side role resolver does not currently expose site-owner status. Until that resolver lands, banners targeted at Owner alone will not appear for any viewer.
In the CleverAlert app
When Customer app is on, the notice also appears in the CleverAlert mobile app:
- Banner — active notices show as an amber banner on the app home screen, filtered to the app user's role (Owner / Admin / Members) and the same date window as the operator banner. A holiday note titles the banner "Holiday note" with the 🏖️ badge. Only the body, the type and the Until <date> are shown; operator-only config is never exposed to app users.
- Authored from the app — a site owner or admin can set their own away notice from the app under More → Help & service → I'm away (e.g. "On holiday — keyholder away"), choosing 🏖️ Holiday or 📌 Other notice. App-authored notices are automatically flagged Show in app and made visible to the control room (they carry the VCR team member audience) so operators see the away status. App users can only edit or cancel notices they authored from the app; operator-authored notices are read-only in the app. Their past notices stay listed in the app too, marked Ended.
Reads and writes from the app go through dedicated SECURITY DEFINER RPCs (get_active_site_notices, app_save_site_notice, app_delete_site_notice) so the app never reads site_config directly.
Use case examples
| Situation | Type | Body | Audience |
|---|---|---|---|
| Keyholder away on holiday | 🏖️ Holiday / away | "On holiday — keyholder Adam away 2026-06-01 to 2026-06-15. Contact Sarah on +27 82 555 0123 instead." | Admin, VCR team member |
| Builders on site | 📌 General notice | "Builders on site Mon–Fri 06:00–18:00 this week. Expect motion-only events from the main camera." | VCR team member |
| Phones down | 📌 General notice | "Site phones offline today. WhatsApp Bongani on +27 82 555 8899 for any contact." | Admin, Owner, VCR team member |
Dispatch limit override
The Dispatch limit card sits on the site's Monitoring → Setup sub-tab, directly below Operations settings. It lets one site opt out of, or away from, the control-room default configured at Settings → Dispatch Limits — useful for a site whose alarm rate is genuinely high, so operators aren't stopped by the over-limit consent gate on every dispatch, and without raising the allowance for every other site.
The card shows a three-way radio:
- Inherit VCR default — the site uses the control-room policy. The option includes a Currently: … hint showing what that resolves to today, e.g.
Currently: Enforce 20 included + 5 overorCurrently: Monitoring only. No keys are written tovcr_site_connection.site_config. - Monitoring only for this site — forces monitoring-only here even when the control-room default is Enforce. Operators still see the dispatch counter chip on CleverCommand cards, but the over-limit consent gate never fires for this site. Writes
site_config.dispatch_limit_mode='monitoring_only'. - Custom for this site — reveals two inputs, Included this month and Allowed over-limit. Set them independently of the control-room default; the consent gate uses these numbers for this site only. Writes
site_config.dispatch_limit_mode='enforce'plus the two integer keys.
Both inputs take whole numbers of 0 or greater; anything else shows an inline error and keeps Save dispatch limit disabled. Unlike the other cards on the Setup tab, this one does not auto-save on change — the two numbers have to be validated together, so you click Save dispatch limit to commit.
Switching back to Inherit VCR default removes the dispatch_limit_* keys from site_config so the resolver returns to the control-room default. Other keys on site_config (context flags, temporary notices, operating hours, etc.) are preserved — the save merges, it does not replace.
The card only appears under Full monitoring: a control room that isn't dispatching for the site has no allowance to cap.
Dispatch limits apply wherever the control room dispatches — Clava Mode is not required, for either this per-site override or the control-room default. (Earlier versions of this page said the panel was Clava-Mode-only; that was never true of the resolver, which has never checked Clava Mode.)
This override was removed by accident on 2026-06-23 when the Response SOP sub-tab was retired, and had no editor for about five weeks. The behaviour behind it never stopped working: any override saved before that date stayed in force the whole time, so a site you configured earlier is still honouring exactly what you set. It is now editable again on Monitoring → Setup.
Auto-complete override
The old Auto-complete panel on the Response SOP sub-tab was removed on 2026-06-23. Its replacement — per-alarm-type auto-complete inside the Action Plan editor — is built but not yet switched on in the interface, so there is currently no way to set an auto-complete override for a single site. Every site follows its control room's default at Settings → Auto-complete until that section ships.
Auto-complete is what hard-closes a resolved event so operators don't click ✓ Complete event on every routine resolve. It has two independent parts — Operator resolves (a short countdown after an operator resolves a card) and Power / comms restore (a longer think-time once power comes back).
What changed. The retired panel set one auto-complete policy for the whole site. The replacement is finer-grained: auto-complete is set per alarm type, so a panic can be left to linger while a low-battery fault closes quickly. It lives inside each alarm type's plan on Monitoring → Alarm handling, with the same three choices per part — Inherit VCR default (with a Currently: … hint), Off for this alarm, or On with custom seconds.
Why you can't see it yet. The whole auto-complete section of the Action Plan editor is hidden while the manual operator flow is built and tested — every event currently goes through an operator by design. It is hidden at both control-room and per-site level, so this isn't a gap specific to sites. When that work lands the section appears in the plan editor with no further setup.
Until then:
- Setting a control-room default still works at Settings → Auto-complete, on control rooms that don't enforce Action Plans. On control rooms that do enforce them, that tab is hidden and there is no auto-complete surface at all right now.
- Any per-site values saved before 2026-06-23 are legacy and no longer read — the resolver now works per alarm type. Unlike the dispatch limit, old auto-complete overrides are not still in force.
Legacy SOP surfaces
The Site SOP panel described below was removed on 2026-06-23 along with the Monitoring → Monitoring SOP sub-tab. Its job is now done by the per-site Alarm handling Action Plan editor. Everything in this section is retained only to explain override rows applied before that date and the variant vocabulary that still appears in SOP History — none of these cards or buttons exist in the interface today.
Rows applied earlier are still honoured by the CleverCommand resolver, which is why the audit trail stays live.
The Site SOP panel brought together everything that decided how CleverCommand routed an event from this site, laid out as three independent cards:
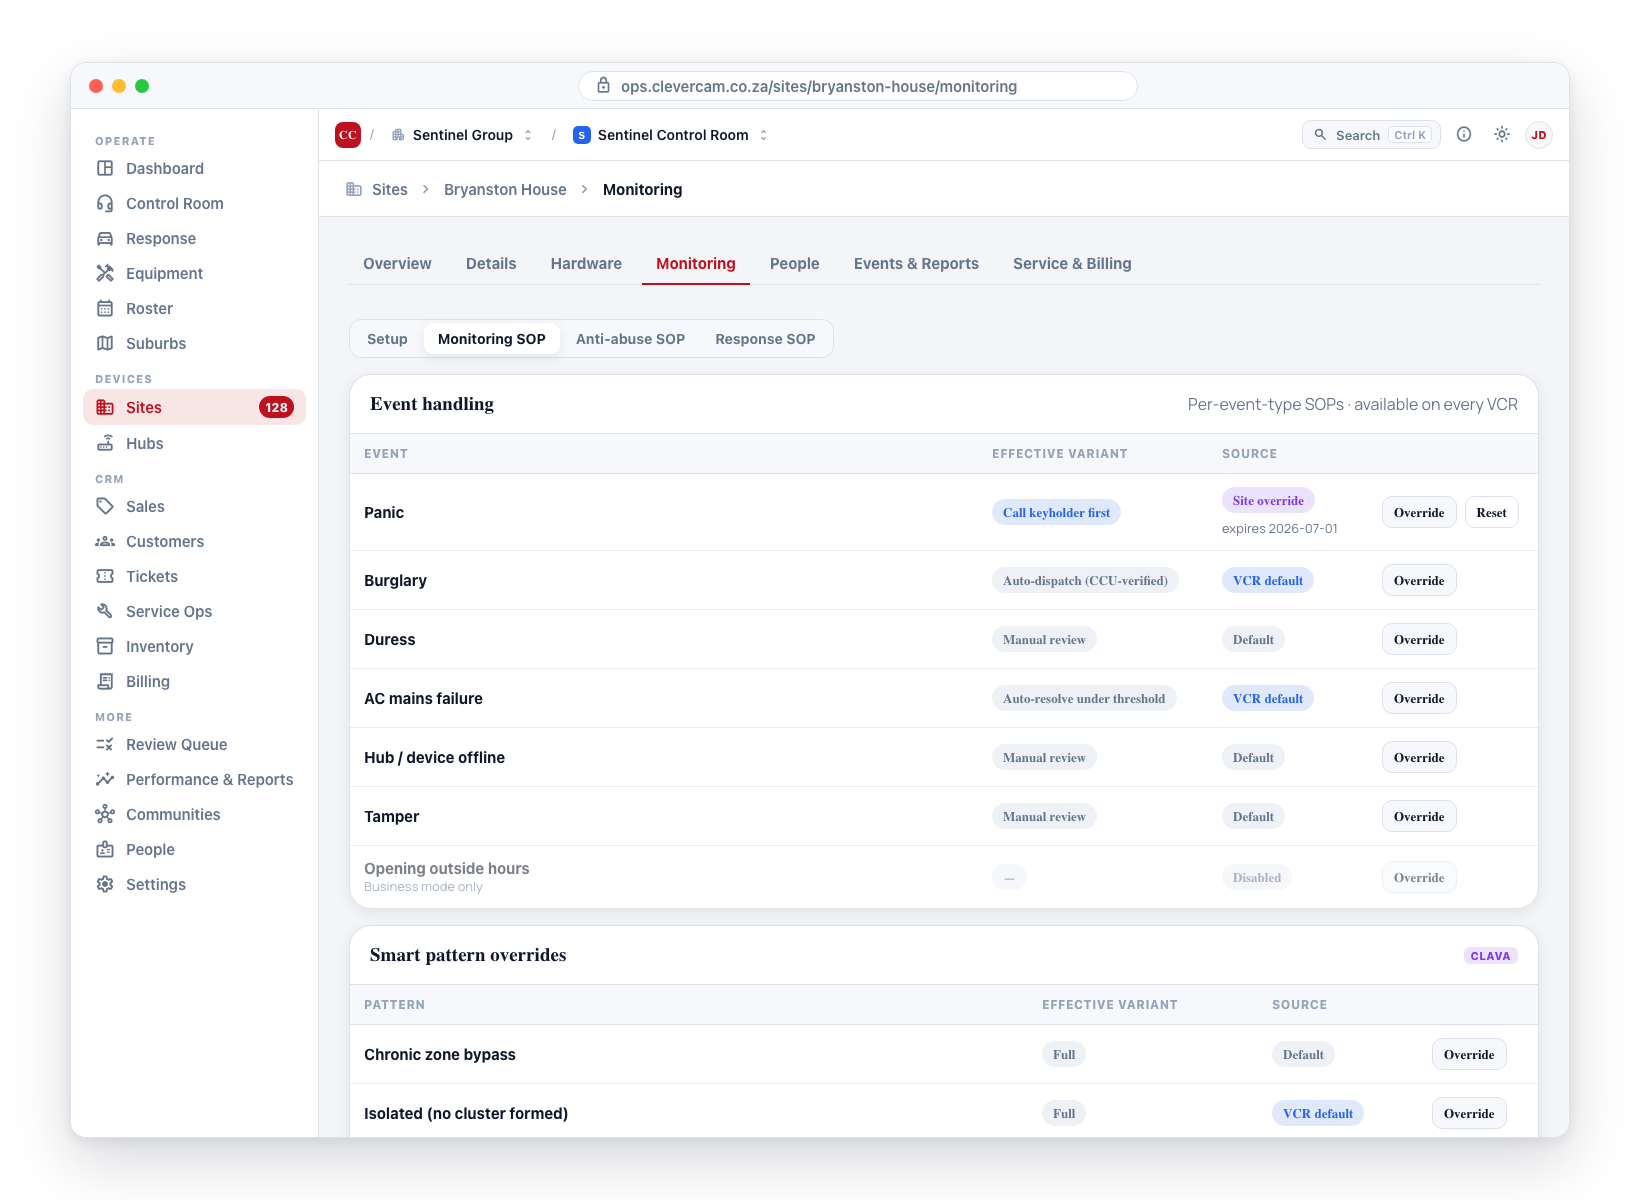
- Event handling — per-event-type SOPs (Panic, Burglary, Duress, AC mains failure, Hub / device offline / Fail to check-in, Tamper, Opening / Closing outside hours). Available on every VCR — no Clava Mode required.
- Smart pattern overrides — three remaining learned-pattern variants (Chronic zone bypass, Isolated, Stuck after area recovered). Clava Mode only. Alarm after power-fail / restore, Post-arm walkthrough, and Chronic no-answer moved out on 2026-05-24 — they now live as anti-abuse auto-resolve rules in the per-alarm-type Action Plan editor.
- Cross-cutting settings — site-wide auto-action gates and operator-context flags. Timings (photo preview, notify-before-call, power-signal wait) moved inline beneath their relevant Event handling rows on 2026-05-24.
Every row in Event handling and Smart pattern overrides shares the same visual: a strong pattern label (hover the label to see the technical pattern_type code as a tooltip), a variant chip with the human label of the currently-effective variant, a source badge explaining where that variant came from, and per-row buttons.
- Source badges:
- Site override — this site has an active row in
site_sop_overridesfor the pattern. Rendered in a louder, solid-fill style so overridden rows pop in the list. - VCR default — the VCR has a default configured (Clava patterns: Pattern Detection settings; event SOPs: any future VCR-level default for events) and no site override exists yet.
- Default — no override and no VCR default; the system falls back to Manual review (event SOPs) or Full (Clava patterns).
- Site override — this site has an active row in
- Override — opens the apply modal for the row.
- Reset — only appears when a site override is active. One click marks the active override row superseded so the row falls back to the VCR default. The historical row stays on the SOP History panel for audit.
When the resolved variant comes from a site override and an expiry was set, an expires <date> hint appears next to the badges. When a reason was captured, it shows underneath the row.
Event handling
Eight per-event-type SOPs, available on every VCR. Each row's variant ladder runs from Manual review (current CleverCommand behaviour) through to firmer or lighter branches depending on the event type. The reference table:
| Event | Variant ladder (top → bottom = lighter → firmer or vice versa) |
|---|---|
| Panic | Manual review · Auto-dispatch · Call keyholder first · Silent (log only) |
| Burglary | Manual review · Auto-dispatch (CCU-verified only) · Auto-dispatch (all burglaries) · Notify only (no dispatch) |
| Duress | Manual review · Auto-dispatch (silent) · Auto-dispatch + comms |
| AC mains failure | Manual review · Auto-resolve under threshold · Notify after threshold · Silent (log only) |
| Hub / device offline / Fail to check-in | Manual review · Auto-resolve under threshold · Escalate immediately |
| Tamper | Manual review · Auto-dispatch · Notify only (no dispatch) |
| Opening outside hours | Manual review · Notify owner · Call keyholder · Silent (log only) |
| Closing outside hours | Manual review · Notify owner · Call keyholder · Silent (log only) |
Hover any variant in the picker to see a tooltip explaining the routing.
The Event handling card is not Clava-Mode-gated — fn_apply_sop_variant skips the Clava check for event_* pattern types. The card is editable on every VCR.
The three schedule-based rows — Opening outside hours, Closing outside hours, and Late to close (fail-to-arm) — only make sense when the site has defined operating hours. They render disabled (greyed out, both Default and Override buttons unclickable) for any site not in Business mode. Hover the row for the "Only applies when the site is in Business mode" tooltip. Switch the site to Business mode in Monitoring → Setup → Mode to enable them.
Per-event timings (inside the Override modal)
Clicking Override on an event row opens a modal that — in addition to the variant picker, reason, expiry, and (where applicable) grace seconds — exposes a Timings fieldset with whichever timing knobs are relevant to that event type:
| Event | Timings shown |
|---|---|
| Panic · Burglary · Burglary with image · Duress · Tamper · Opening / Closing outside hours · Late to close (fail-to-arm) | Notify time before call (customer cancel window) |
| Burglary with image (additionally) | Photo preview time (operator review before the customer is notified) |
| AC mains failure · Hub / device offline / Fail to check-in | Power-signal wait before action |
| Fire · Medical | (no timings — life-safety events are acted on immediately) |
Each timing has a Use [mode] default checkbox; uncheck to enter custom minutes + seconds. Values are persisted on the override row at site_sop_overrides.payload.timings.{notify_seconds, photo_preview_seconds, power_wait_seconds}. The CleverCommand resolver consumes the site-wide site_config.sla.* keys today as a fallback.
Response SLA timers (inside the Override modal)
Below the Timings fieldset, every event row also exposes a Response SLA timers fieldset. These are the per-event-type response targets that drive the control-room OVERDUE counter and the per-card SLA badge in CleverCommand:
| Timer | What it does |
|---|---|
| Response target | How long the control room has to action the event before it counts as OVERDUE in the queue. |
| Reminder nudge | If the event is still open at this elapsed time, the operator gets a follow-up prompt. Usually shorter than the response target (warn before breach). |
| Auto-dispatch timeout | After this elapsed time, dispatch is pre-selected on the card (the operator still clicks; dispatch consent still applies). Shown only for dispatch-class events (Panic, Duress, Fire, Medical, Burglary, Burglary with image). |
Each timer has a Use default checkbox (the placeholder shows the built-in baseline — e.g. 60 s for life-safety, 180 s for standard alarm, 600–900 s for comms/power and schedule events). A collapsible Night-shift overrides sub-section lets you set different values for events that arrive outside the control room's day window (set on the Control room clock; each night field defaults to "same as day").
Values are persisted at site_sop_overrides.payload.timings.{response_target_seconds, reminder_seconds, auto_dispatch_timeout_seconds} (+ a night sub-object). Resolution precedence is site override → VCR default → built-in baseline, with night overrides chosen by the event's local time. Set the VCR-wide defaults on the Review Queue's Response SLAs tab.
The OVERDUE counter and SLA badges stay hidden until a VCR sets at least one response-SLA timer (per-site here, or as a VCR default). Outside-hours Opening / Closing events are not yet time-matched by the resolver — their timers are stored for future schedule-aware routing.
Smart pattern overrides
The remaining learned-pattern variants — Chronic zone bypass, Isolated (no cluster formed), Stuck after area recovered — for per-site override of the VCR-wide pattern-detection defaults set in Pattern Detection settings.
Alarm after power-fail, Alarm after power-restore, Post-arm walkthrough, and Chronic no-answer used to be editable on this card but were removed on 2026-05-24 in favour of the equivalent anti-abuse auto-resolve rules, which now live in the per-alarm-type Action Plan editor. Existing site_sop_overrides rows for those four pattern types are left in the database — the CleverCommand resolver still honours them — they are simply no longer editable here, to prevent operators configuring the same intent in two places.
When the VCR has Clava Mode off (maven_mode = false or brain_kill_switch = true), the card shows a read-only banner — "Clava Mode is not active on this VCR." — and the Override buttons are disabled. Applying an override would be rejected by the database in any case.
See the full per-variant tooltip reference on the Pattern Detection settings page.
Cross-cutting settings
One sub-card inside the Cross-cutting settings section, with its own Save / Discard footer:
-
Auto-actions — one checkbox:
- Allow auto AI call on no reply — after the notify window expires with no customer reply, fire a Vapi / Twilio call instead of waiting for the operator.
Dispatch requires client contact was removed on 2026-05-24 — the serial-no-answerer guard ships today as Resolve when keyholder chain unanswered in the Alarm handling editor. The
sla.dispatch_requires_client_contactJSONB key is left untouched on sites that already had it set; the resolver still honours it.
Site flags moved on 2026-05-24 — see Site context flags on the Setup landing tab. Repeat abuser was dropped entirely; the per-alarm-type anti-abuse rules in the Alarm handling editor are the abuse-handling surface and a separate boolean flag was redundant.
The Override modal shows a Client confirmation captured checkbox for variants that change the customer's service level. The Save button refuses until the checkbox is ticked. The confirmation flag is persisted into payload.clientConfirmed for the audit trail. High-risk variants include (non-exhaustive):
- Chronic no-answer → Explicit request only
- Alarm after power-fail → Suppress until fixed
- Alarm after power-restore → Suppress until fixed
- Isolated (no cluster formed) → Silent resolve until fixed
- Panic → Silent (log only) and Panic → Auto-dispatch
- Burglary → Auto-dispatch (all burglaries) and Burglary → Notify only
- Duress → Auto-dispatch (silent)
- Tamper → Notify only
- AC mains failure → Silent (log only)
- Opening / Closing outside hours → Silent (log only)
These variants either degrade the customer's service or change the operator's role from triage to confirm-after-the-fact. Recorded customer agreement must be on file before they can be applied.
Applying an override
Click Override on any row to open the apply modal. The form prefills with the currently-resolved variant so you can see what the engine is doing today, and lets you adjust:
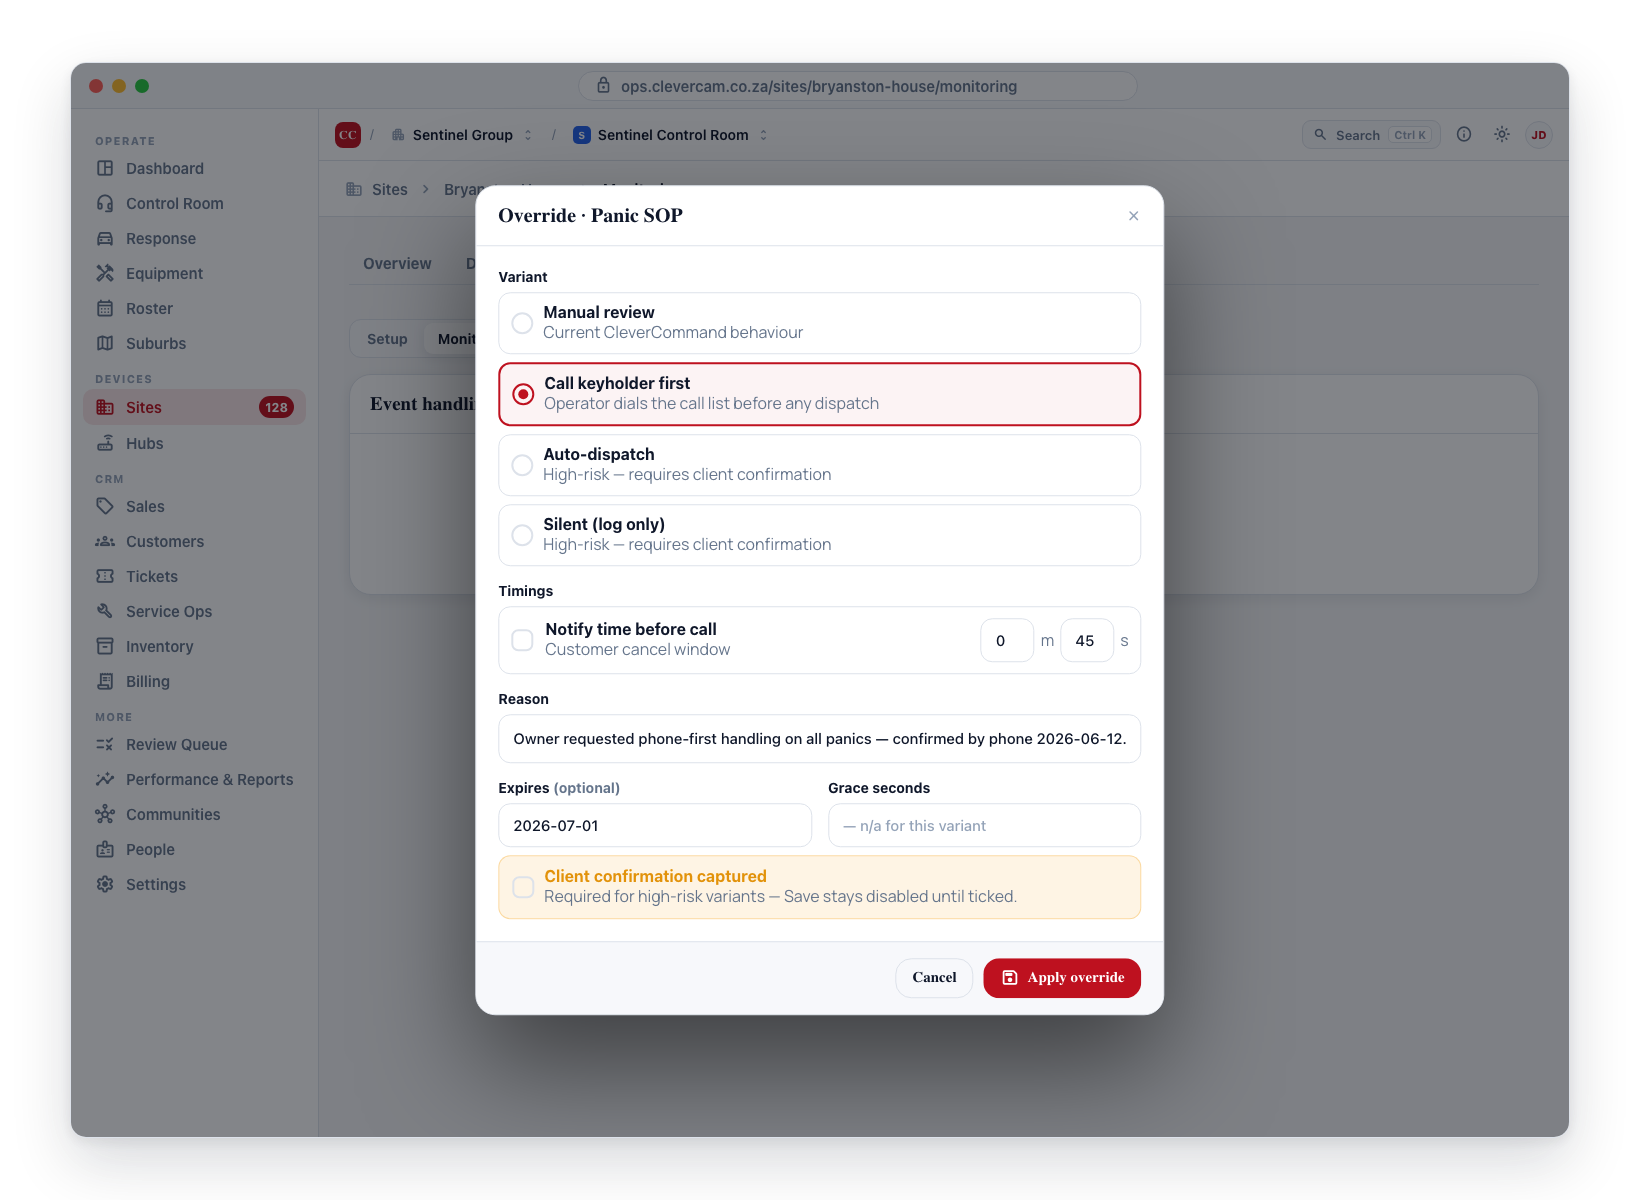
- Variant — pick a new branch from the ladder.
- Grace seconds — appears only when the chosen variant supports it (e.g. Post-arm walkthrough → Auto-resolve under grace seconds). Stored under
payload.grace_seconds. - Reason — free text up to 1000 characters, captured on the audit row.
- Expires — optional. Leave blank for no expiry; the override stays active until manually cleared (via the Reset button on the row) or superseded by a later override.
- Client confirmation captured — shown for high-risk variants (see warning above).
Saving calls the fn_apply_sop_variant RPC, which writes a new row in site_sop_overrides and atomically supersedes any prior active override for the same (site, pattern) pair.
Resetting an override
When a row's source badge is Site override, a Reset button appears next to the Override button. Click it to clear the active override in one step — the system falls back to the VCR default for that pattern. The historical override row is marked superseded (it stays visible on the SOP History panel as a permanent audit record).
Removed auto-dispatch toggles
The legacy Allow auto dispatch on emergency and Allow auto dispatch on no answer toggles have been removed from the UI. Those outcomes are now expressed via the per-event SOP variants (e.g. Panic → Auto-dispatch, Burglary → Auto-dispatch (CCU-verified only)) and the Chronic no-answer smart pattern respectively. The underlying JSONB fields are kept for backwards compatibility — the Brain still reads them as a fallback during the transition window — but they are no longer editable from CleverOps.
Permissions
Both Override and Reset buttons are gated on the Manage VCR permission. Users without that permission see the panel and every resolved variant but cannot apply or reset overrides. The database is the authoritative gate: even if the UI button is exposed, fn_apply_sop_variant and the RLS policy on site_sop_overrides reject callers that are not super-admin and lack can_manage_vcr_id for the parent VCR.
Every applied or reset override remains visible on the SOP History panel, which is still live at the bottom of Monitoring → Alarm handling.
SOP History
The SOP history panel is a read-only audit trail listing every SOP variant ever applied to this site by your control room. Both active and superseded rows are kept permanently — variants are never deleted, only superseded.
Where to find it: at the bottom of Monitoring → Alarm handling, beneath the per-site Action Plan editor. On a control room without the Advanced Alarm Handling module — which has no Alarm handling sub-tab — it appears at the bottom of Monitoring → Setup instead, and only when the site actually has history to show.
The editor for these pattern-ladder variants is retired — the Alarm handling Action Plan editor replaced it. But rows are still being written: resolving a Review Queue item with SOP changed applies a variant to the site. This panel is what makes that visible, so a change to how a site's alarms are handled always leaves a trace someone can find.
The panel was missing between 2026-06-23 and 2026-07-29, when it was removed alongside the retired SOP sub-tabs. Overrides applied in that window were still recorded and now appear here in full — nothing was lost, it just had nowhere to show.
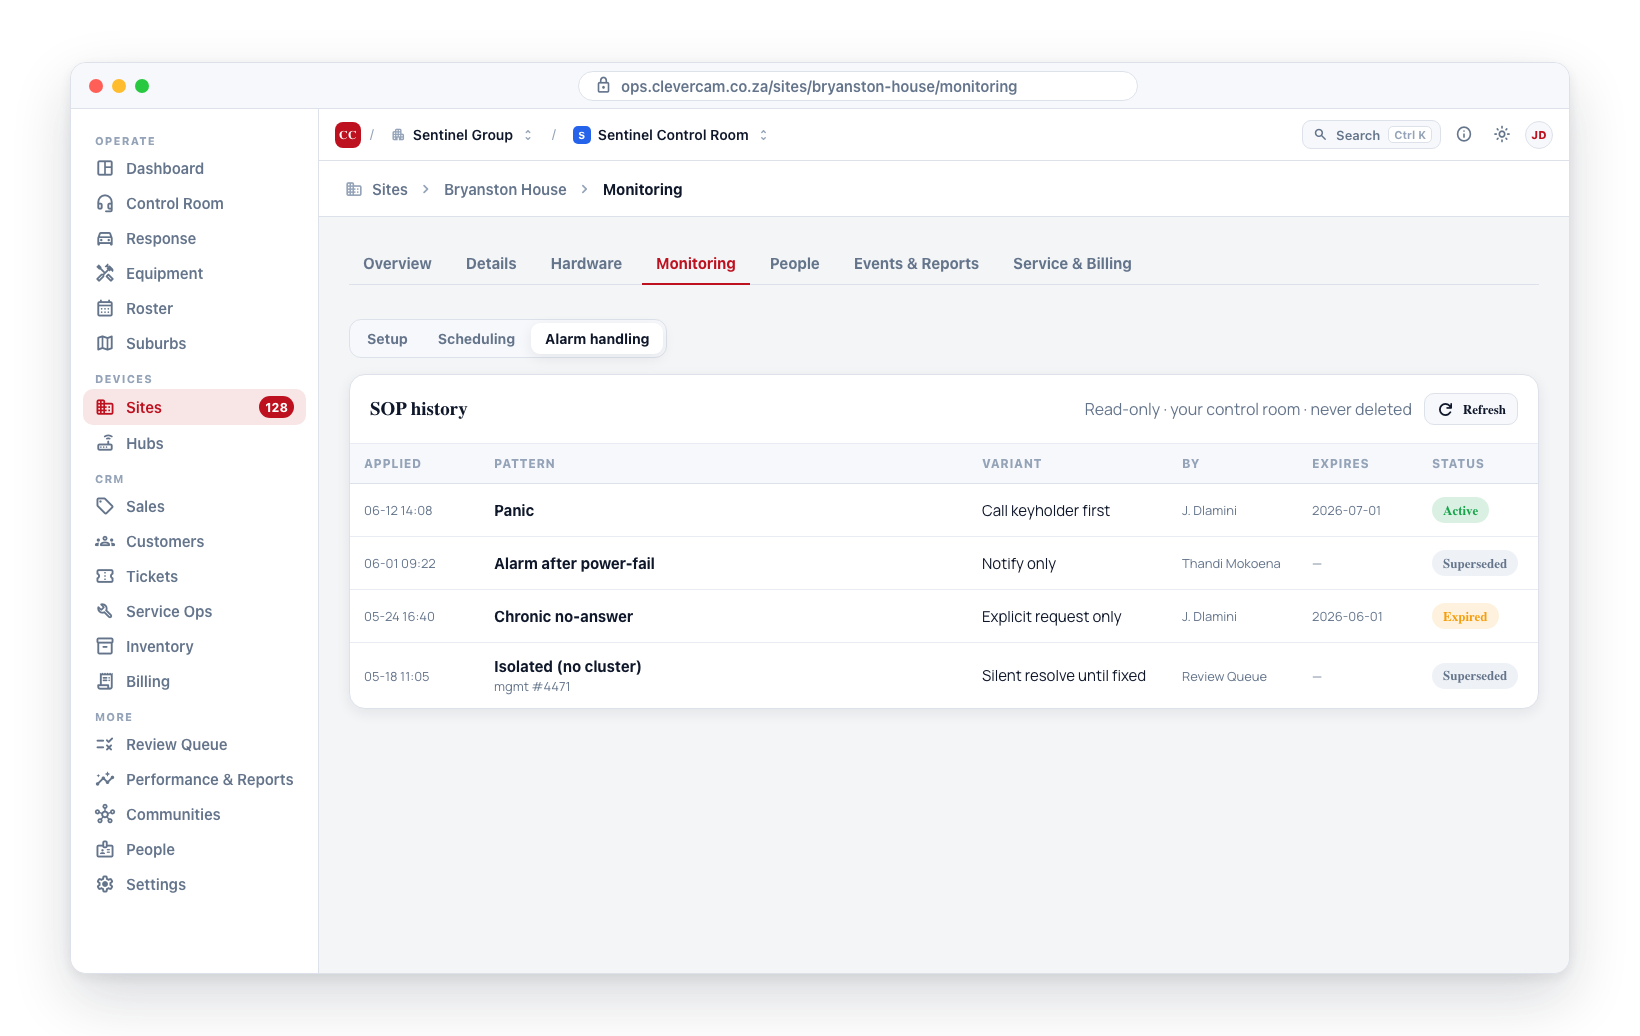
Each row in the table shows:
- Applied — when the override was written.
- Pattern — which detection pattern the override targets (e.g. Alarm after power-fail, Chronic no-answer).
- Variant — the chosen routing branch (e.g. Notify only, Auto-resolve under grace seconds).
- By — the user who applied it (their name, falling back to email or user id when the profile is unavailable).
- Reason — the free-text rationale captured at apply time.
- Expires — the optional expiry timestamp, or — when there is no expiry.
- Status — a coloured chip showing Active, Expired, or Superseded.
- Origin — when the override was applied from a Review Queue resolution, the originating
mgmt #<id>reference.
On the Alarm handling sub-tab the panel always renders, showing an empty state until the first override is captured. A Refresh button re-fetches the table without closing and re-opening the site.
The table shows only overrides applied by your control room. Where several companies monitor the same site, each keeps its own separate history — you never see another company's overrides, and they never see yours. (Earlier versions of this panel listed every override on the site regardless of who applied it.)
Overrides are written by the Review Queue's SOP changed resolution flow. The older per-site editors that also wrote them — the Site SOP panel's Event handling and Smart pattern overrides cards — are retired; see Legacy SOP surfaces below. VCR-level defaults live at Settings → Pattern Detection.