Create a Service Job
A service job is a single piece of technician work — an installation, a repair, a false-alarm callout, a remote session, or a phone triage. One job can span multiple technician visits: a persistent false alarm might need two or three callouts before the root cause is actually found and fixed. This page covers the job form, the information it captures, how multi-visit sign-off works, and how jobs move from creation through to invoicing.
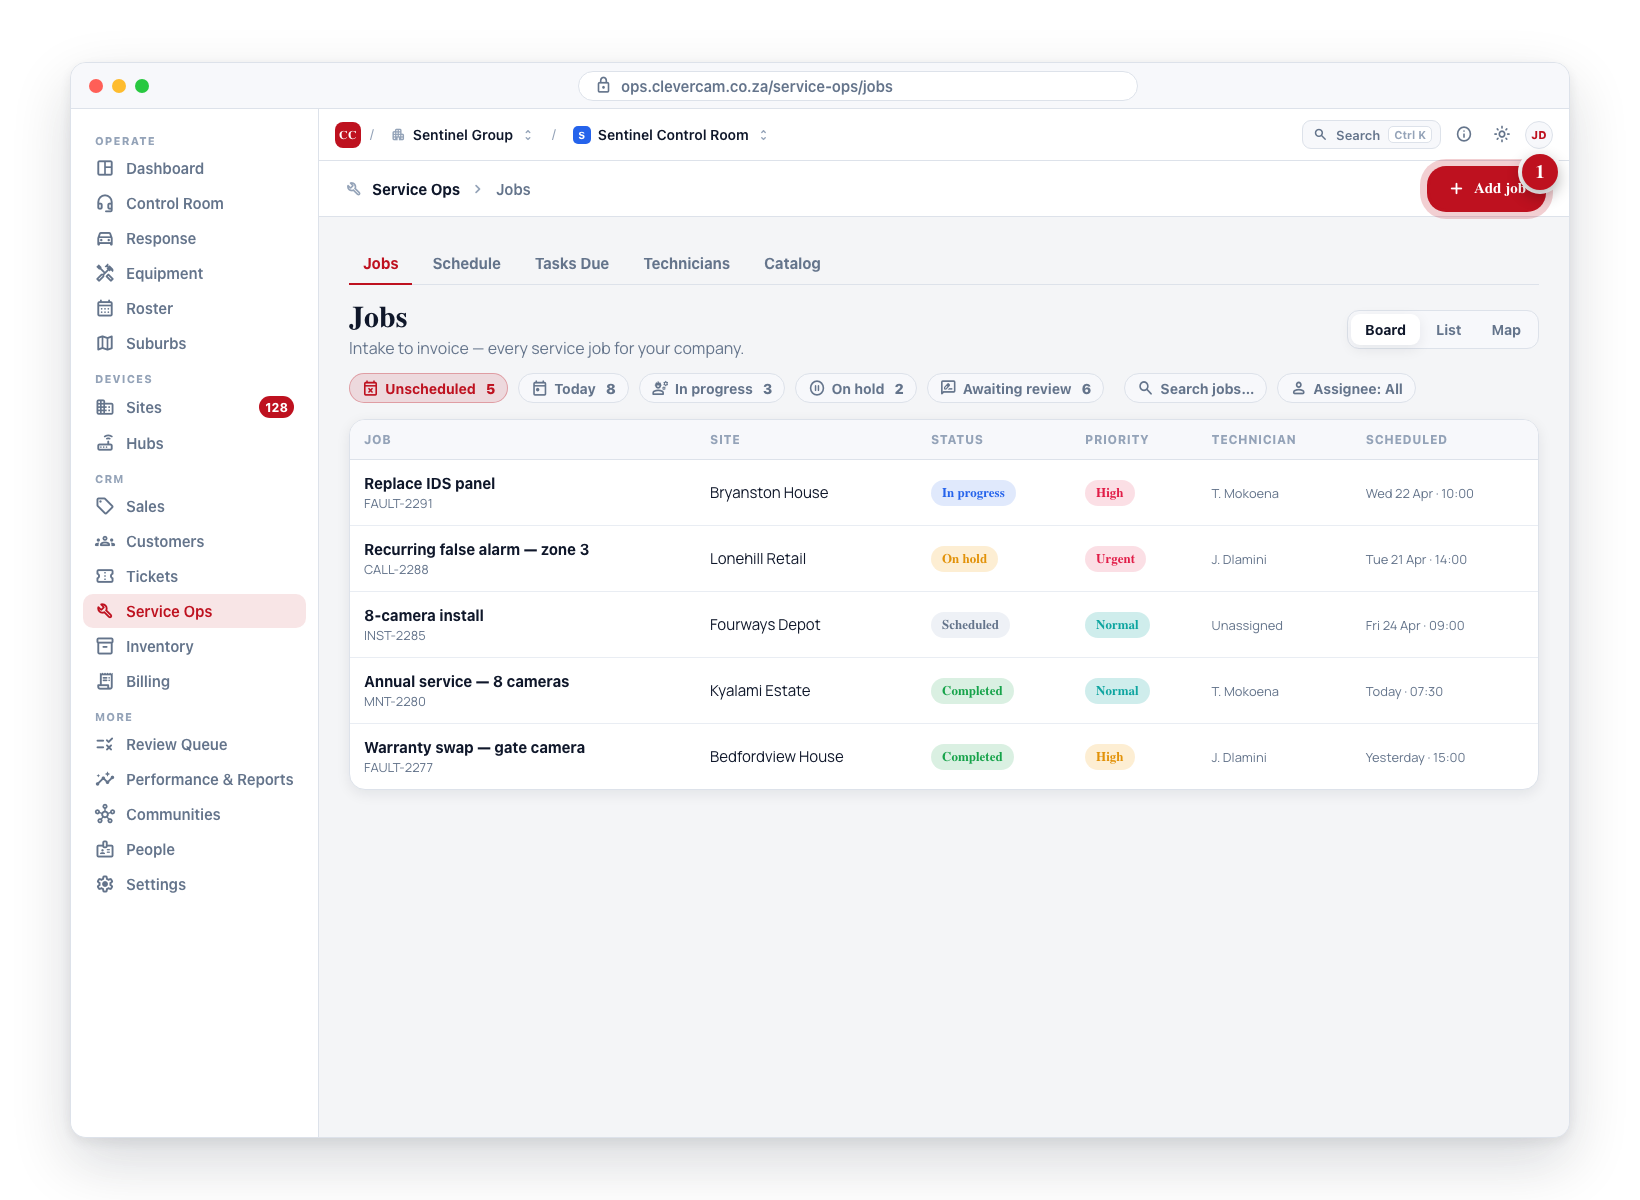
In Service Ops, click New job to start a new job.
Open the create form
From the Service Ops page, click New job in the top-right. Creating a job is a compact capture dialog titled New job; opening an existing job opens the full-screen job workspace, titled with the job's number (e.g. JOB-00027) — see The job workspace below. You can also create a job from:
- Site Details → Service tab → New job (pre-selects the site).
- Schedule board → click an empty cell on a technician's row (pre-fills the scheduled time and technician).
Pick a job type first
When you create a new job, the form opens on a "What kind of job is this?" step — a grid of tiles. Picking one pre-fills the issue type, priority, schedule type, default duration, and billable setting, and seeds a checklist onto the job. You can also choose Start blank for an empty form.
Two kinds of tiles appear:
- Your templates — the job types you've configured on the Templates page, shown first.
- Starters — six built-in types always available: Callout, New install, Maintenance, Battery replace, Fault / repair, and Quote site visit.
Editing an existing job skips this step and opens the form directly.
The job form shows a status badge (Open / In progress / On hold / Completed / Cancelled — the stored "Scheduled" status is displayed as Open everywhere), a Seen by tech / Not seen by tech chip once a technician is assigned (see Has the technician seen the job?), a read-only Stage: chip showing where the job files on the board (worked out from the status plus the assigned technician and booked time), a priority badge, and a visit count once a technician has started logging callouts. On a saved job it also shows a Next: … hint — a one-line cue for the obvious next step (for example Assign a technician, Sign off when done, Approve to bill, or Awaiting follow-up).
Alongside those badges, read-only field-telemetry chips appear when the technician uses the CleverTech app's En-route / Arrived / Departed actions: En route 09:12, then On site since 09:40 while the technician is on site, and finally Was on site 09:40–11:05 (85 min) once they depart. These are stamped by the app and cannot be edited from the form.
The job workspace (editing)
Opening a saved job is a workspace, not a long form — the same full-screen treatment deals and onboarding journeys get:
- Hero — the job title (edit it in place), the chips row described above, and a pipeline rail: Unscheduled → Scheduled → In progress → Awaiting review → Ready to invoice → Done, with the job's real dates stamped under reached steps. A job with no invoice required skips the two billing steps (Unscheduled → Scheduled → In progress → Done), and a job that is On hold or Cancelled shows a banner under the hero instead of a current step. On the right sit the job's actions: Complete & sign off, and a Documents menu (Job card, Preview / Email / WhatsApp-SMS the service report).
- Context rail (left, sticky) — the Customer & site card (summary chips by default; click Change to edit, including Suburb and Project) and a Summary card (status, priority, scheduled time, duration, technician(s), visit count, checklist progress, invoice total), always in view.
- Tabs — the work itself, split so nothing competes for attention:
| Tab | What's on it |
|---|---|
| Work (default) | The description, the customer's Access note, Dispatch (mark on the way), Visits & sign-off, and Scheduling & details — the deposit strip, the What's next? control, job type, More details, and the technician picker. |
| Checklist | The job's checklist. Progress shows on the tab itself, e.g. Checklist (3/14). |
| Stock | Where this job's parts are — reserved in the store, in transit, on the technician's van, used on site — with Reserve stock and Hand over to technician right on the job. Appears once your control room has booked any stock movement. See Stock on the job. |
| Billing & quotes | Invoicing (amount + line items), Billing status (the approval workflow), and Optional quotes. |
| Activity | Customer comms ("What did we send?"), Customer review (ask the customer how it went; their one-tap answer), Client feedback, Activity & notes, and Change history. |
| Files & tickets | The job's tickets and its attachments. |
There are no footer buttons on the workspace. Edit anything and a sticky save bar appears at the bottom — Unsaved changes · Discard · Save changes — whatever tab you are on; saving closes the workspace back to the board.
The create dialog stays deliberately compact: title, description, Scheduling & details (the What's next? control, job type, technicians — with Category, Where, and the Complicated toggle behind a More details disclosure), Invoicing, and the Summary and Customer & site cards alongside. Everything that needs a saved job — checklist, visits, dispatch, comms, documents — appears once the job exists and opens in the workspace.
Creating jobs requires service management access. Team members without this access will not see the New job button.
When you save a new job for a site that already has open job(s) (status Open, In progress, or On hold), a confirmation lists those open jobs first. Prefer updating an existing job over creating a duplicate — but you can choose Create new job anyway when the work is genuinely separate. The same check runs when you promote a note with New job from this note. (It does not run when editing an existing job.)
Core fields
| Field | Notes |
|---|---|
| Title (required) | A short summary, e.g. "Replace IDS panel". On a new job it's pre-filled from the linked customer or site (e.g. Service — Acme Foods) so you don't retype it every time — just overwrite it if you want something more specific. |
| Job number | A human-facing reference shown in the form header, e.g. JOB-00001. Assigned automatically on save (see below) — leave it blank to let CleverOps number it, or type your own. |
| Description | Full context for the job |
| Site | Links the job to a site — search runs on the server across the whole book and matches the site name, full address, the owning customer's name or account number and the site's contacts. Each result shows the full address and the owning customer. Picking a site fills the customer in automatically from the site's owning customer. A site you share with another control room can belong to one of their customers: its result reads customer of another control room (no name or account number), picking it fills in no customer, and it stays on offer beside whichever of your own customers you pick. |
| Customer | Adopted from the site. The search matches the name, account number, legal name, contact names, phone numbers (+27 or 0, any spacing), emails, the billing address and the customer's site names/addresses; each result shows the account number, primary contact and the customer's sites, with the matching part highlighted. Picking a customer first narrows the Site list to that customer's sites (plus sites with no customer of yours); switching to a different customer clears a site that belongs to another of your customers. A job can only carry one of your control room's customers — saving one that belongs to another control room is refused with "That customer belongs to another control room…". |
| Preferred contacts (optional) | Who to phone about this job — any mix of the site's keyholders (its People / call list) and the customer's contacts, ticked in the Customer & site card once a site or customer is set (click Change to edit). Saved in the order picked. The technician sees them at the top of the job in the CleverTech app, above the site's full call list; leave it empty and the app simply shows everyone. |
| Priority | Low / Normal / High / Urgent — drives the pin colour on the map and the badge in the list |
| Status | Open / In progress / On hold / Completed / Cancelled. (The stored "Scheduled" status is displayed as Open — it is the default for brand-new jobs.) The job's Started and Completed timestamps are stamped once, on the first move into In progress / Completed — later saves never re-stamp them. |
| Job type | Free-text with suggestions (alarm fault, camera install, battery replacement, callout, maintenance, new install, etc.) — used for reporting |
| Category (behind More details) | Optional structured kind: Installation / Repair / Maintenance / Inspection / Other (defaults to Not set). Picking Installation has a real effect: when the job is completed, the site is commissioned — any active installation mode window on the job's site ends at sign-off and normal monitoring rules apply. The form shows this note when Installation is selected, and the technician sees it again on the app's completion confirmation. |
| Where (behind More details) | Onsite / Remote / Phone / Other |
Job numbers
Every job carries a job number — a short, human-friendly reference for client communication. When you save a job with the number field left blank, CleverOps assigns the next one in sequence for your company automatically (JOB-00001, JOB-00002, …), so no two jobs ever share a number. The field stays editable: type your own value before saving to override the automatic one. The number appears in the form header and on the Service Job Report PDF. This mirrors how quote numbers are assigned.
Scheduling
What's next?
A job has exactly one next touch, chosen with a three-way switch at the top of the Scheduling & details section:
- Schedule a visit — books the next visit. Reveals the quick picker for a day, time, and duration.
- Follow up later — sets a reminder (a day & time) without booking a visit. The job surfaces in the Job follow-ups block of Needs attention → Reminders when the date passes, and its card reads Awaiting follow-up.
- Nothing yet — no next step; the job sits in Unscheduled until you book a visit or set a follow-up.
These are mutually exclusive — a job can't be both booked and "remind me later" at the same time, because the booked visit is the follow-through. Switching to one clears the other, so the next touch is always unambiguous. (Logged visits are separate — they're history, and a job can have past visits and a follow-up while you wait to book the next trip.)
Quick schedule picker
When Schedule a visit is selected, the time uses a quick chip-based picker — click the button, pick a day, pick a time, pick a duration, and you are done in a few clicks.
The picker shows three rows of chips plus fallback inputs:
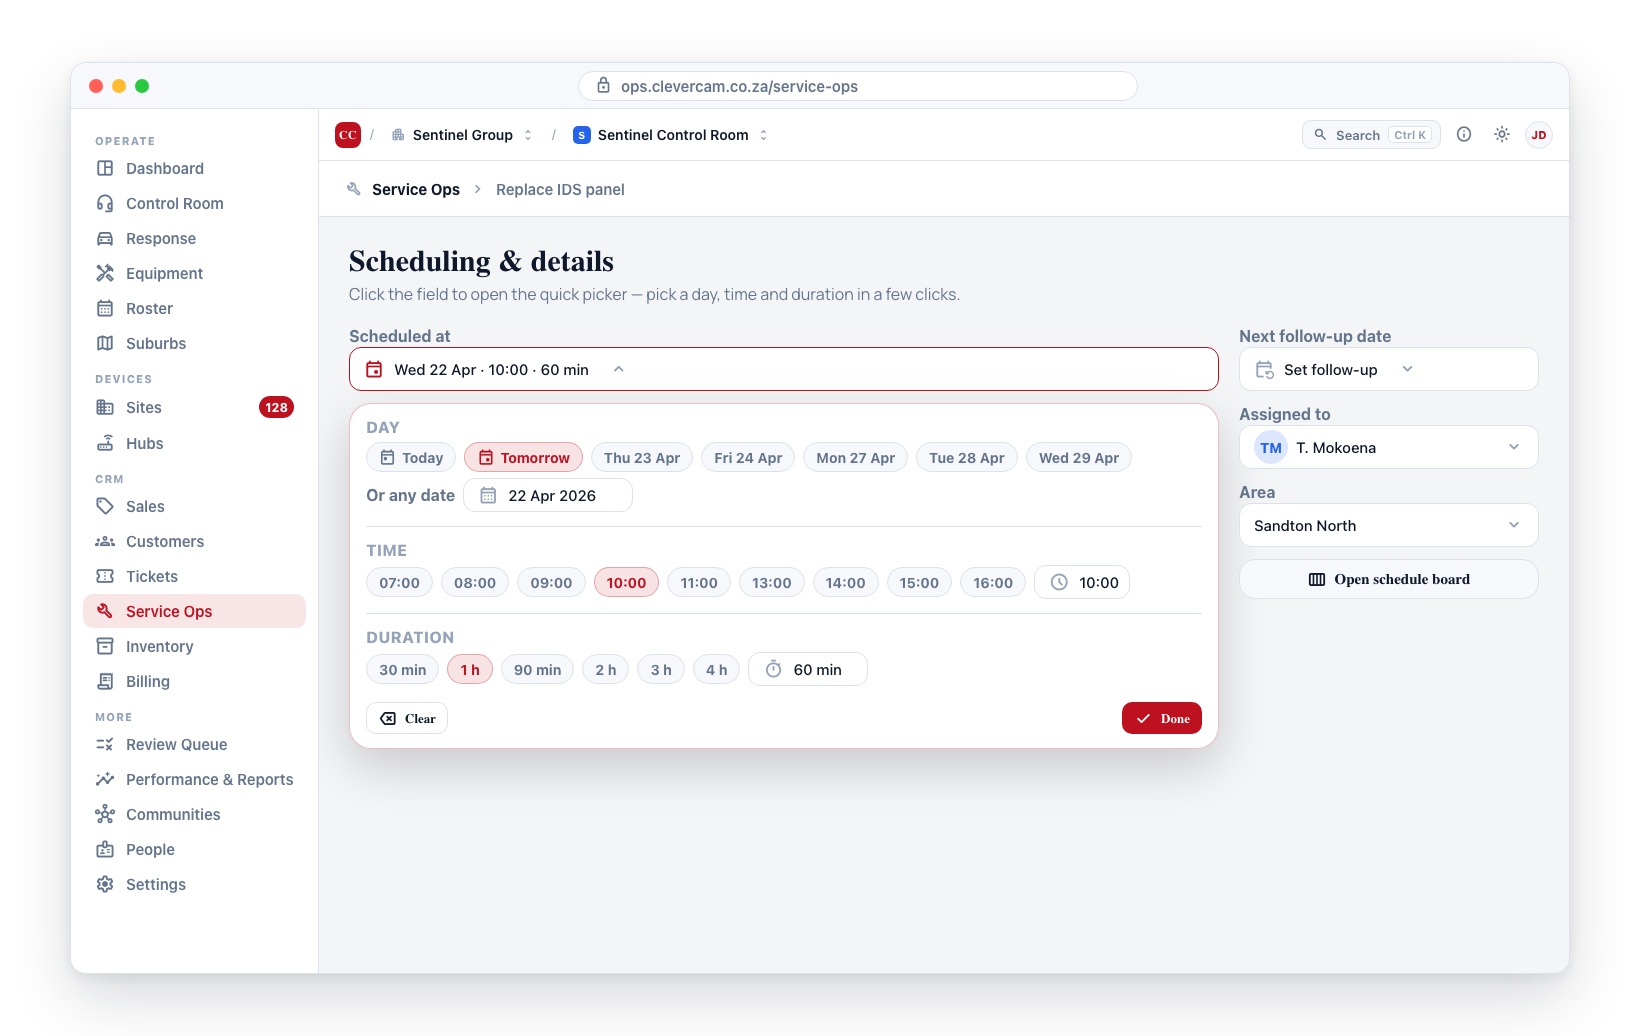
| Row | Chips | Fallback |
|---|---|---|
| Day | Today, Tomorrow, then 12 upcoming weekday presets with date labels | Any date in the calendar, up to a year ahead |
| Time | 07:00, 08:00, 09:00, 10:00, 11:00, 13:00, 14:00, 15:00, 16:00 | Any time, via a time input |
| Duration | 30 min, 1 h, 90 min, 2 h, 3 h, 4 h | Custom minutes field |
The button shows the selected value — for example, Wed 22 Apr · 10:00 · 60 min — so you can see at a glance what is set without opening the picker. A Clear button removes the value entirely. The Follow up later mode uses the same picker for the reminder date (without a duration).
The chips only cover the next two weeks. Anything further out — a radio being removed at month end, a cancellation on the 30th, next year's annual service — is picked from the calendar under Or pick any date, which runs from today up to one year ahead. Days past that are greyed out, and so is the next-month arrow once you reach the last month, so a mis-clicked year cannot quietly park a job in 2036. A job already booked beyond that horizon keeps no ceiling — you can always move it.
Past dates stay open. Jobs are often written up after the van has already been. The picker warns that the customer notice won't go out, but the save still goes through.
- Scheduled at — the job's start time. Jobs with a past scheduled time that are not completed appear as Overdue in Needs attention.
- Duration — defaults to 60 minutes. Controls the block size on the Schedule board.
- Next follow-up date — sets a reminder that surfaces in the Job follow-ups block of Needs attention → Reminders when the date passes.
- Assigned technician(s) — one or more technicians from your roster, chosen with the smart assignment picker below. The lead technician is shown on the board and in the job list; unassigned jobs show Unassigned.
- Suburb — a link to a geographic suburb. Auto-filled from the site: picking a site resolves its suburb the same way dispatch does (force-assigned, or by falling inside a drawn boundary) and fills this field; you can still change it by hand.
How firm is this time?
Right under the picker, a "How firm is this time?" dropdown sets the schedule's precision — because a technician doesn't always know exactly when they'll arrive (drive time, a prior job running long, workload not yet firmed up):
| Option | What the customer sees |
|---|---|
| Exact time (default) | The booked time as-is — "Tomorrow at 10:00" |
| Estimate | The same time, flagged as approximate — "Tomorrow, around 10:00 (estimated)" |
| Morning / Afternoon / Evening | The o'clock is hidden entirely — "Tomorrow morning" |
This only changes customer-facing copy — appointment reminders and the CleverAlert home card. Internally the job still keeps a real timestamp for the Schedule board placement and overlap detection either way, so picking "Morning" doesn't stop you from seeing where it sits against other jobs that day.
Let the customer know
When you save a job with a new or changed appointment time, CleverOps asks: "Let the customer know?" Confirming sends an appointment notice immediately — app push first, then WhatsApp or SMS as a fallback if push isn't available, and always by email in parallel. This is separate from the scheduled appointment reminders (which fire automatically the evening before and the morning of, if enabled) — this one fires once, right when you save, whether or not reminders are switched on for your VCR. Skip it for internal-only jobs or when you'd rather tell the customer yourself.
Appointments in the past are never announced. If the time you saved has already passed, CleverOps sends nothing — no email, no WhatsApp or SMS, no push — and tells you "Job saved, but no notice was sent — that appointment time has already passed." The job itself still saves normally, so back-dating a visit you're capturing after the fact keeps working; you just can't tell the customer about a visit that already happened. A booking with no o'clock (Morning / Afternoon / Evening, or a date with no time) counts as past only once its day has passed, so a job saved this morning for this afternoon still notifies.
A job linked only to a site (no customer of its own) is notified too — CleverOps resolves the customer through the site, provided that customer belongs to your control room. A site you share with another control room can be on their customer: a job there with no customer of its own has nobody to notify, so the notice reports that it failed to send until you link the job to one of your customers. The same goes for the completion and cancellation notices and for review requests.
There's a matching prompt at the other end of the job: when you complete and sign off, CleverOps asks "Let the customer know it's done?" Confirming emails the customer that the service is complete and pushes it to any connected app users. Like the appointment notice it's staff-confirmed (nothing is sent unless you confirm) and carries no reschedule link — the visit is done. The email carries your branding (logo and brand colours, like every other customer email), repeats what the technician recorded on the last visit — work done, equipment used, technician name, time on site — and includes a "How did we do?" link so the customer can rate the visit. Their rating comes back on the job's Customer review panel.
Did the customer actually hear from us?
Open a job and press What did we send? in the Customer comms panel. It lists every message sent to this customer about this job, newest first: the notice, the channel that carried it (Email / App / WhatsApp / SMS), who it went to, and what happened to it.
| Status | Meaning |
|---|---|
| Opened / Delivered / Sent | It reached them. |
| Held | Raised during quiet hours — it goes out when the window opens, and the row says when. Or held by your control room's Messaging switches — the row names the switch: Automatic messaging off or Messaging switched off. |
| Not sent — daily limit | The customer had already had their limit of automated messages that day. |
| Couldn't reach them | Every channel was tried and none was available — no app, no email, no opt-in. |
| Failed | The send itself failed, e.g. the email bounced. |
If anything didn't land, a warning line at the top says how many, so you can see it without reading the list.
This is the answer to "we did tell them". Before it, a bounced appointment email or a message stopped by the daily limit left no trace anywhere in the app — the customer simply never knew, and neither did you.
Cancelling — tell them, don't leave them waiting
Cancelling a job that has a visit still coming up asks "Let the customer know it's cancelled?" This happens whether you drag it to Cancelled on the board or change its Status to Cancelled in the job window and save. Confirming sends an appointment cancelled notice by email, SMS and app push. It names the slot that is no longer happening and says plainly that no one will be arriving.
It carries no link: there is nothing to reschedule, and re-booking is a conversation, so the notice points at your own email and phone number instead.
If there is nothing to announce, the job just cancels and you are not asked. That covers a job that never had a booked time, one whose appointment time has already passed, and one with no customer or site.
Cancelling never offers the "Let the customer know?" appointment notice. That one only confirms a new or changed booking on a job that is still open.
If a job's status is On hold and you set or change its appointment time, CleverOps automatically flips the status back to Open — a booked visit sitting On Hold is easy to lose track of, both on the board and in the customer-facing app. When you drag a job to On Hold on the Service Ops board, CleverOps offers to set a follow-up reminder (a week out by default) so a parked job resurfaces in the Job follow-ups block of Needs attention → Reminders instead of being forgotten.
Assigning technicians
The technician control is a smart picker, not a plain dropdown: it surfaces who is the right fit for this job at a glance, and lets you put a small team on one job.
Each technician row is annotated from data you already capture on each person's Field work tab:
- ★ Skill match — one of the technician's specialisations and the job's issue type contain one another, compared in lower case: a tech tagged camera matches a Camera install, and a tech tagged electric fence matches Electric fence. Specialisations are free text you type on the person, not a fixed list, so the match is only as good as the words — a tech tagged ip camera does not match camera install, because neither string contains the other. Keep the tags short and use the same words your issue types use.
- Availability flag for the booked slot — computed from the technician's working hours and days, booked time off, and the standby roster, checked against the job's scheduled time and duration:
- Available (green) — within their working hours on a working day.
- On standby (green) — on-call for that slot, even when it falls outside their normal hours.
- Outside hours / Off that day (amber) — a soft warning that the slot is outside their normal pattern.
- On leave (red) — booked off (time off, sick, training, holiday) across the slot.
- With no scheduled time set yet, no flag is shown — there is nothing to assess against.
- Load — how many other open jobs (Open, In progress, or On hold) the technician is already on, e.g. 3 in flight.
The best candidates sort to the top — a skill match and good availability lift a technician up the list, while a heavy in-flight load or inactive status pushes them down.
If your control room uses branches and staff are allocated to them, the picker also respects geography: the job takes its branch from its site, and technicians allocated to other branches are tucked behind a "Show N out-of-branch technicians" toggle with an Out of branch badge. One click reveals them — it's a soft preference, not a lockout — and technicians already on the job always stay visible. Staff with no branch allocation work everywhere and are unaffected.
The picker lists the technician duty pool — active staff whose field duties include Technician on People. Staff who carry the CleverTech app without that duty (an owner with app access only, or sales-only staff) sit behind a "Someone else…" button for the exceptional assignment. Anyone already on the job always stays visible, whatever their duties are now.
The picker only ever offers your own control room's technicians, and a job's team always stays inside the control room that owns the job. If you work in more than one control room and open a job that belongs to a different one (for example by following a link to it while another room is active), assigning a technician there is refused — switch to the control room that owns the job and assign from its roster.
Multiple technicians per job
Tick more than one technician to put a team on a single job — useful for a two-person install or a job that needs a mate. The first one selected is the lead (shown in bold with a Lead badge); use Make lead on any other row to change it. The remaining technicians are co-assignees.
The lead is the job's primary technician: it is what the Schedule board places and what customer-facing documents name. The job syncs to every team member's CleverTech mobile app — co-assignees receive it too, not just the lead — and each technician gets a push notification when the job is assigned to them or they are added to the team. Co-assignees are recorded against the job and counted in everyone's in-flight load. Dragging the job onto a different technician on the Schedule board makes that technician the lead while keeping the rest of the team. Jobs created before multi-technician assignment keep their single technician unchanged.
Open schedule board
For complex scheduling — balancing technician workloads, avoiding overlaps, placing several jobs in the same window — the Open schedule board button in the Scheduling section jumps to the full Schedule Board. Save the job first, then use the board to drag it onto any technician's day and resize its duration by dragging the card's bottom edge.
Use the quick picker for typical jobs — it is faster. Use the schedule board when you need to see how a job fits in alongside other jobs on the same day, or when you want to balance a technician's week.
Line items
Jobs can carry line items — the parts and labour that will appear on the eventual invoice. Add from catalog opens a searchable picker over the price book; clicking Add on a row closes it and highlights the new line in the table, and the picker keeps your search for the next open. Close it without adding with the ✕ in its header or Esc. Add freeform adds a blank line to fill in by hand. Each line has:
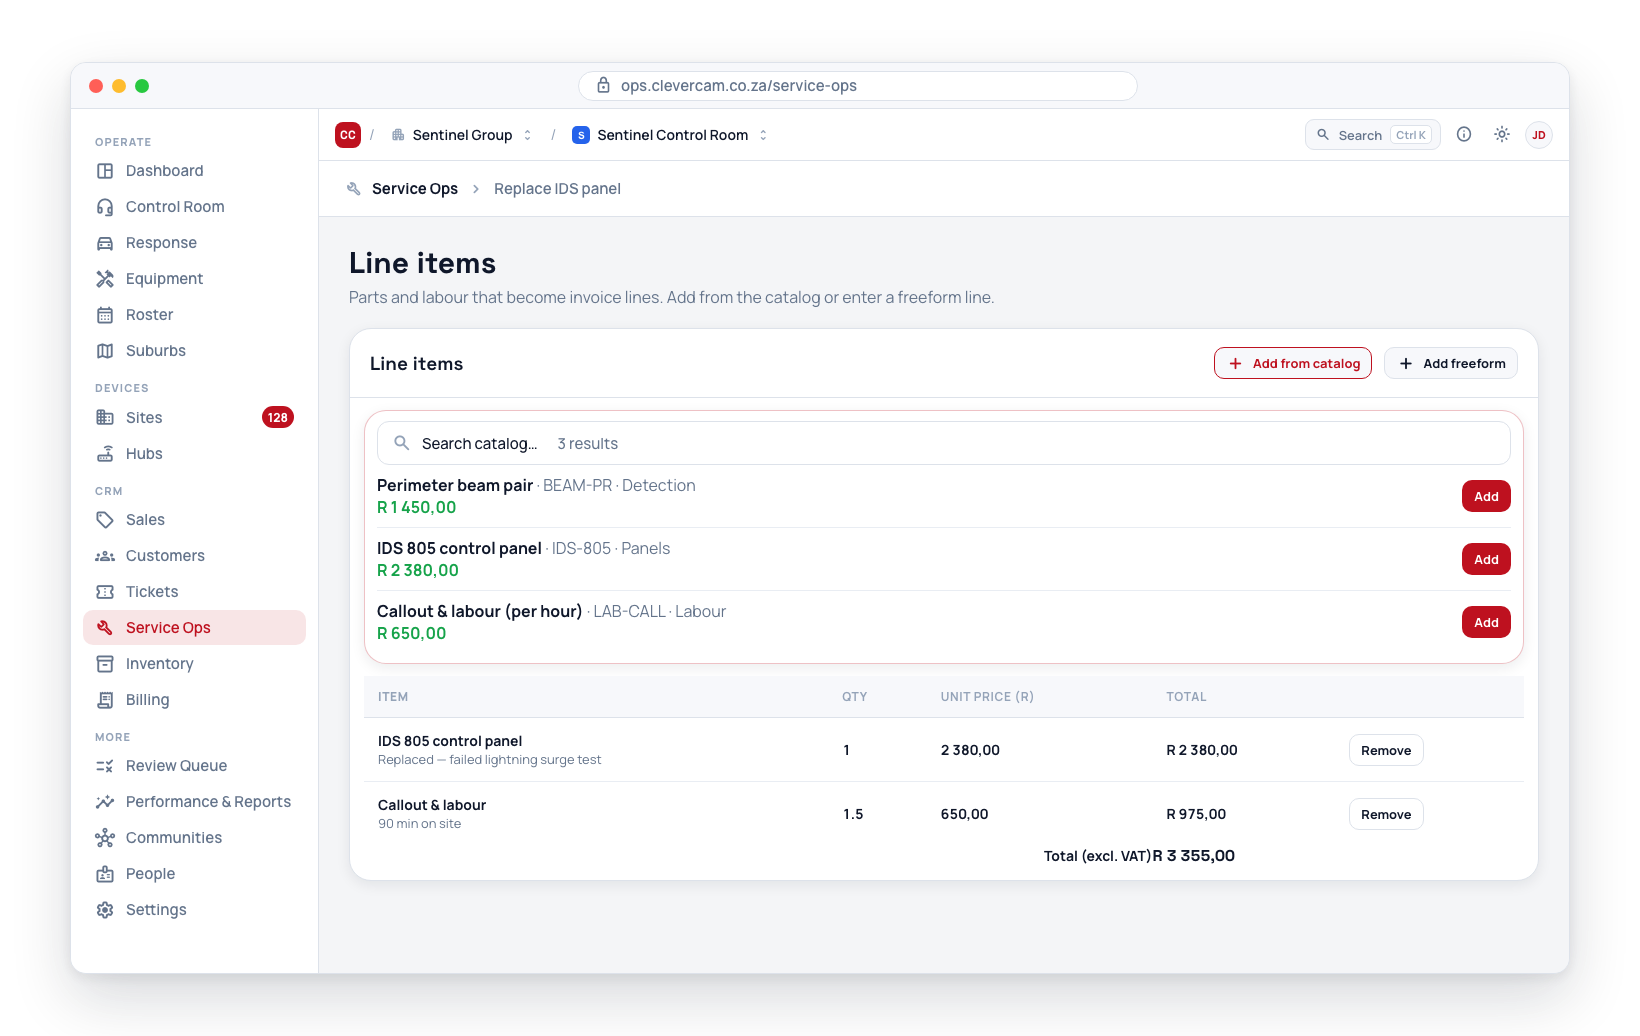
- Name (or pick from the Catalog to copy the name, description, and price)
- Description
- Category
- Quantity
- Unit cost (your cost, used for margin tracking)
- Unit price (what the customer pays)
- Item motivation — a note for the invoice line, e.g. "Panel failed lightning surge test"
A stock-tracked line also says where its parts will come from — the technician's van the stock trigger will draw from and what that van holds, under the item name. When the van cannot cover the line the note turns into an amber pill (holds 0 · 2 short at completion on an open job; 2 short on a completed one), and on a completed or cancelled job — where a line books its stock out the moment it is saved — adding a tracked item or growing a quantity first asks The van does not hold this, with Save anyway and Not yet. See Using stock on jobs.
When an invoice is generated for the job, these line items become invoice lines. If the job has no line items but has a total invoice amount set, a single line is created using the job title as the description.
On a control room with the Multiple billing entities module and more than one active entity, the Invoicing card also carries an Issued by (legal entity) picker. It sets the entity whose letterhead the job card and service report render under, and which entity the job's invoice is issued by. A job created from a quote is locked to the quote's entity; a job with no pick uses the Service jobs default from Settings → Billing entities, then the control room's default entity. Single-entity control rooms never see this picker.
Lines with no price
A line whose catalog item has no selling price shows Needs a price instead of a total, and a banner under the table says how many there are. It is left out of the job total and the job cannot be approved for invoicing or invoiced until it has one.
This distinction is deliberate. A price of R0 is a decision — goodwill, warranty, no charge — and bills fine. No price at all means nobody has decided what the part is worth. Those used to be indistinguishable: an unpriced catalog item silently became R0, so the part's full cost landed on the job with no revenue against it and the invoice went out short. Set the price on the item in the Catalog, or type 0 on the line if it really is free of charge.
Technicians see the same thing in CleverTech: scanning a part with no selling price warns "This part has no price" before it's booked, and the line shows Needs a price on their screen too. The stock movement still happens either way — what left the van left the van.
Once the job has been invoiced, its line items are locked — the editor turns read-only with the note Items are locked — this job has been invoiced. — so the billed record can't drift from the invoice. Sending the job back for rework (see Reject) clears the invoiced state and unlocks the items.
Changes after the customer signed. Signing off does not freeze the lines. Until the job is approved for invoicing, the technicians on it can still correct its parts from CleverTech (see After the customer signs); once it is approved or invoiced, a field user's change is refused and only people with Manage stock, Manage service or billing rights can change the lines — the office's own locks are unchanged. Every change to a signed job's lines — added, removed, a quantity or a price, by the technician or the office — is kept, and the lines show a Parts changed after the customer signed note above them (here and in the review drawer) with the net change per line, who and when. If the job is sent back and the customer signs again, only what changed after the new signature is listed.
Selecting a catalog item copies its name, description, part number, and unit price into the line. The copy is frozen — later changes to the catalog item do not affect this job's line items. This means quotes and invoices always reflect the price at the time they were created.
Stock on the job
The workspace's Stock tab is the job's own window into the Stock system — the same promises and handovers as Inventory → Stock, scoped to this one job so the store never has to leave it. The tab appears once the control room has posted any stock movement (stock is opt-in by using it, not a switch), and its actions follow the same Manage stock permission as the Stock page — everyone else sees the position read-only.
A line is a promise. Every stock-tracked line on the job card is promised to the store the moment it is typed — nothing leaves the shelf, and the promise follows the line as it changes. Stock leaves the shelf only by a handover, lands on a van when the technician accepts it, and is booked to the job when the job is completed, from the van that holds it. That is the whole chain, and this tab shows where each part is along it.
Where the parts are rolls the job up per item across the whole custody chain:
- Needed — the quantity on the job's stock-tracked line items (labour and call-outs don't count).
- Reserved — promised to this job and not yet used: in the store, set aside, or already with the technician.
- In transit — handed over, waiting for the technician to accept. A part the technician has sent back and the store has not yet taken in shows here too, as n coming back.
- With tech — accepted onto a technician's van, net of anything they have since sent back.
- Used — booked to the job in the ledger (with an on site count for installs): at completion, or when the technician scanned the part on the job. A return against the job line takes it down again.
- Free now — what the whole control room still has available to promise.
Under the item the tab also says what purchasing knows: n on order · PO-… · due … — the quantity still outstanding on purchase orders tagged to this job that have been approved or sent (a draft counts for nothing), with the order number linking to Purchasing → Orders. When that delivery is booked in, the job's promise is stamped with where the parts landed and the lead technician gets a push — Parts arrived for JOB-… — so nobody promises the same part twice. Orders are raised from Requests or the buying desk, not from this tab.
Reserve stock is for extras the card does not list (a part on the card is promised by itself, and the dialog says so if you try). Hand over to technician opens the same handover window pre-loaded with the job's open promises addressed to the lead technician; the stock leaves the store immediately, waits in transit, and lands on the van when the technician accepts it — by scanning or typing the counter code shown on the handover, or under My van in CleverTech (they get a push the moment it opens). Tick the technician is here — accept it for them now on the handover window when they are at the counter without a phone. An open handover on this tab shows its counter code and carries two actions: Accept for technician — the whole thing lands on their van as sent, recorded as accepted for them rather than by them, so a technician who cannot confirm never blocks the stock — and Cancel, which sends whatever is still in transit back to the store and puts only that part of the promise back on the picking list. Reservations listed on the tab can be set aside, handed over, or released while they are still in the store; once they are With the technician the actions become Used on the job and Back in the store (see When a promise outlives its stock, below).
When the lead changes. Saving the job with a different lead technician, while the old lead still holds parts for it, offers a handover from the old lead's van to the new one right there. The promise travels with the stock, so the job reads with the new lead and completion draws from their van.
Taking stock back. A row that shows anything With tech or Used also carries Take back — for the part the technician brings back to the counter because the job didn't use it. The window asks which technician it is coming from (pre-filled with whoever holds the most of it, else the lead), how many (or, for a serial-tracked item, which serials — the ones on their van and the ones booked to this job are listed), an optional note, and one decision: The job no longer needs it. Ticked (the default), the job's lines shrink by what comes back the moment the stock lands, so the invoice follows the physical truth; unticked, the line stands, the promise goes back to the store's picking list, and a replacement is handed over in the normal way. You never say where the units come from: the ledger already knows. Whatever it had booked to this job's line comes back against the line (a return movement, so Used drops), and only the remainder comes off the van — so a part that was booked out from a van that reads short can still be taken back. Under the hood it is a return handover opened from the technician and accepted by the store in the same click, and it shows under Handovers as back in the store — the technician signed for custody when they accepted the original handover, so the office is both signatures here. If the second half fails for any reason, the return stays open as coming back and Take into store on that row finishes it.
Once a line's parts are booked out — after completion, or a scan on the job — Take back is not just the tidier route; it is the only one. Editing the quantity down or deleting the line is refused for a technician (and for anyone without Manage stock or Manage service), because that would move stock without anybody booking it in. Before that, the line stays freely editable and its promise follows it.
A return the technician starts themselves — Send back to the store on the job's Stock tab in CleverTech (see the job screen) — arrives on this tab the same way: a coming back handover from them, waiting for the store's Take into store. Whether the lines shrink or stand is the technician's call on their side, and the confirmation text says which. Cancel on a return puts whatever is still in transit back on the van (and back on the job, for the part that came off the line).
Promises settle themselves, so the tab does not need tidying. Completion settles them as the parts are booked out; so does the technician's own scan on the job, and their scans out in the field — install at a site marks it Used, send back to the store closes it as returned when the store takes it in — even though the van screens never have to name a job, because the promise already names the technician. An install settles the promise for a job at that site first, so a technician carrying the same part for two jobs has it counted against the right one.
Completing or cancelling the job releases whatever is left. Completion first books out what the lines say was used, from the vans that hold it; then anything still reserved, set aside or out with the technician is closed off, so a finished job never keeps holding stock the store could sell to someone else. Cancelling books nothing out. Stock left on a van afterwards shows as unassigned on Stock → Locations, where it can be given to the next job without a physical move.
When a promise outlives its stock. A reservation that says With the technician while their van is empty can be closed off by hand: an issued row carries Used on the job and Back in the store. Both are paperwork only — nothing moves in the ledger — so reach for them when the stock has already gone into the site or been booked back in, and the job simply never heard about it. If the part is genuinely still on the van, use Take back instead, which posts the real movement.
If completion found a van short, a posting failed outright, or a serial-tracked line closed without its units named, the exception shows at the top of this tab (as well as on Stock → Exceptions) with a Resolve button. A shortage clears itself once stock lands on that van.
Optional quotes (quote extra work from a job)
A job that is itself just a call-out and labour often surfaces extra work on site — the technician notices the driveway needs two more cameras, or the perimeter beams are due for replacement. Each of those is quoted separately from the job's own billing: raise it as its own quote, linked back to the job.
On a saved job, the Billing band shows an Optional quotes card below the billing status:
- New quote opens the full quote form with the job, its customer, and its site pre-linked — add line items, save, and send it like any other quote. Raise as many as you need (e.g. one quote to add cameras, a second to replace beams).
- The card lists every quote linked to this job with its status and once-off total, updating in real time — including quotes the technician raised from the CleverTech app (see below). Click a row to open it.
These quotes never change the job's own Invoicing figures above — the call-out stays billed as the call-out. If the customer accepts a quote, convert it to its own job as usual.
From the CleverTech app
Technicians have the same flow in the field: on a job in CleverTech, Quote extra work opens a form with a heading (e.g. "Add 2 cameras, driveway side"), notes for the office, and optional line items — picked from the Catalog (priced automatically at the ex-VAT catalog price) or freeform (a line left unpriced comes through at R 0 for the office to price). Creating the quote needs a connection; it lands in CleverOps as a Draft linked to the job, with the technician recorded as the rep — review, price, and send it from the office.
Checklist
Every job can carry a checklist — the steps a technician should complete for that job type. The checklist is seeded from the template you choose when creating the job, and appears as a card on the saved job.
Steps are typed — each one is a specific kind of task, not just a tick:
| Step type | What the technician does | Can it fail? |
|---|---|---|
| Check (tick) | Ticks it off (for example Test after repair) | No |
| Photo | Attaches a photo as the evidence — Photograph the battery, Photograph the panel, Photograph the sign board outside | No |
| Pass / fail | Answers Yes / No / N-A (for example All zones walk-tested OK?). Answering No marks the step FAILED | Yes — a No |
| Reading (number) | Enters a reading (for example Panel battery voltage), with an optional unit and healthy range | Yes — outside the range |
| Text answer | Types a short answer (for example Panel model / serial) | No |
- Tick or answer items as the work is done — each records who completed it and when. Technicians work the same checklist from the CleverTech app (including fully offline); office and field updates land on the same steps.
- Required steps are tagged. Answer-type steps count as done once answered. The Needs attention → Review & invoice section shows checklist progress so you can confirm the required steps are done before approving a job for invoicing.
- Photo steps (and any step tagged Requires photo) need a photo attached before they count toward sign-off — an Attach photo control sits on the step (a camera button in the CleverTech app) and flips to Photo attached once satisfied. The photo also shows up in the job's Attachments tab, tagged with the step it satisfies. A photo step is always Required as well, so it is never a surprise blocker at sign-off.
- Failed steps (a No answer or an out-of-range reading) are highlighted in red with a FAILED tag. Depending on the step's template settings, a failed step can demand a note ("What did you find?") and/or a photo before the job can be signed off — requirements that only exist because the step failed. A note line appears under the step for the technician's finding.
- Steps can be grouped under sections — headings inside the checklist. That's also how one job carries more than one checklist: use Add from template on the checklist card to append another template's steps to a live job; they file under that template's name as their own section.
- Add ad-hoc steps to a single job (choosing their type), or remove steps that don't apply.
Follow-ups from failed checks
A pass/fail or reading step can be configured (on the template) to flag a follow-up when it fails. When a job has failed checks flagged this way, a banner appears above the checklist with a Create follow-up job button — one click creates a new high-priority job on the same customer/site, titled Follow-up: (the original job's title), whose description lists every failed check with its answer/reading and the technician's note. The follow-up is linked back to the original job, and only one follow-up is created per job (clicking again points you at the existing one).
Set the default checklist — step types, sections, healthy ranges, and what a failure demands — for each job type on the Templates page.
Tickets, Attachments, Notes & activity
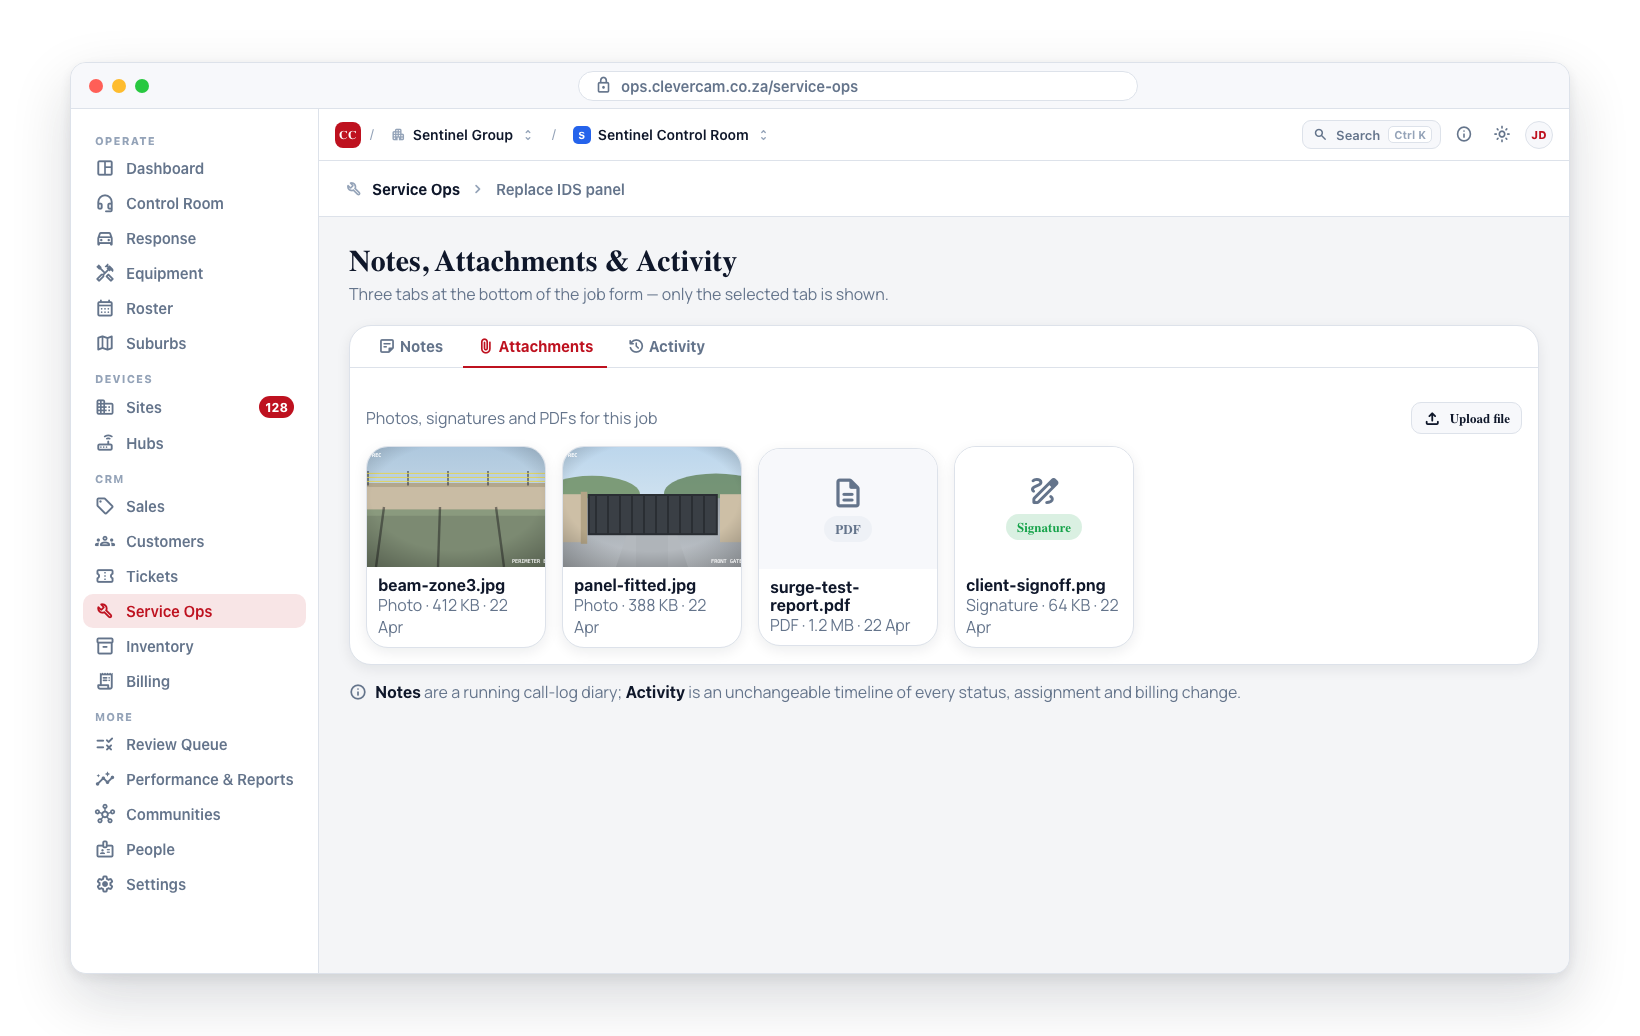
On the job workspace these live on two of the main tabs: Files & tickets carries the job's tickets and attachments, and Activity carries the notes-and-audit surfaces (Customer comms, feedback, Activity & notes, Change history).
Tickets
The tickets attached to this job — call-log-style follow-ups and to-dos tied to the work. Add a ticket here and it also appears in the Needs attention → Ticket reminders queue when it has a due date.
Attachments
Upload photos, PDFs, or any supporting documents. Attachments are stored in private, access-controlled storage scoped to your VCR — they are shown through short-lived signed links generated when you open the job, never as public URLs, and are not exposed on any public share page. Deleting an attachment removes both the file and its record together.
The technician sees the files you attach. Anything that is not a photo — a floorplan PDF, the customer's quote, a spec sheet, a client document — appears in a Documents card on the job's Job tab in the CleverTech app, where the technician can tap it open. Photos you upload land in the job's Notes timeline alongside the technician's own; signatures stay with sign-off. Opening a document needs a connection (the file itself is not cached on the phone), so a technician heading into a dead zone should open it before they go.
The technician's notes come back the same way. A free-text note typed into the CleverTech app's Notes tab ("gate motor seized, quoted a replacement") arrives here as a Note tile carrying the text — there is no file to open. Notes can be written offline and sync when the phone reconnects. They also get their own Technician notes section in the review drawer so an approver reads them without opening the job.
Notes & activity
Two stacked panels:
-
Activity & notes — the job's whole story, newest first. Type a note (a call, a part on order, the next step) and click Add note; each is stamped with your name and the time (⌘/Ctrl + Enter posts quickly). Type @ to mention a colleague — they are emailed a link to the note and asked to acknowledge it. Around your notes, the timeline records everything that happens to the job by itself:
- Booking — created (and from which quote, ticket, template, maintenance plan or earlier job); scheduled, rescheduled — with the time it had before (Rescheduled to Wed 16 Sep 09:00 — was Tue 15 Sep 14:00), taken off the schedule, the visit window or length changing; the lead technician assigned, reassigned or removed; technicians added to or taken off the team; priority; customer, site and access details; edits, naming the fields; the job lines or the people to phone about the job being changed (one line per person every 10 minutes, so a long edit doesn't flood the timeline).
- In the field (CleverTech) — the technician opening the job, on the way, arrived (flagged away from the site address when the phone was not at the site), started, paused, resumed, checklist ticks, photos, notes (with their text), ending a visit unfinished (with the reason), signing off (with any override reason), leaving site, asking the control room for help — each at the moment it happened on the phone, even if the phone synced later. Every visit — who did it, the time on site, who signed, and the work summary — and a visit edited or removed in the office. Parts issued to, installed on or returned from the job. Equipment work on the site's register — installed, removed, replaced, serviced, found faulty, tested, firmware updated, details corrected — with the technician's note as the reason; and every time someone revealed a stored password for the job. A run of checklist ticks, photos, parts or equipment changes by the same person folds into one line (Ticked 7 checklist items on CleverTech) — Show all opens it.
- The customer — confirming the appointment, asking to move it, cancelling through their link, leaving access details; every email about the job (who sent it, to whom, opened, bounced); appointment, cancellation and job-complete notices sent by text or app notification — or a line saying the notice reached nobody; automatic messages from your automations (Automatic message “Technician on the way” sent to Jane, or not sent because of the daily limit or no channel the contact accepts); service-report links; reminders; the technician is on the way message.
- Closing it out — sign-off, deposit and commission overrides with their reasons; approved for invoicing or withdrawn; sent back for rework with the reason (every one, even after the next rejection replaces it on the job); the amount someone typed; invoiced (with the invoice number); closed without invoice and reopened; linked to or unlinked from a duplicate; follow-up jobs, quotes and tickets created from this job; deposits.
Each line says who did it — a colleague or technician by name, the customer, or System for what runs by itself — and a line naming another record (the quote, the invoice, a ticket) links to it. The All · Notes · Updates chips narrow the timeline to what people wrote or to what happened, and the timeline updates by itself while the job is open — a technician arriving shows up without reloading. It's append-only — entries can be added but never edited or deleted — and is the same timeline used on quotes, leads and tickets. Adding notes needs service management access; everyone who can open the job can read it.
-
Change history — a field-level log of every change to the job's status, priority, assignment, approval, invoicing, payment, and completion, with an expandable before/after view. This log is recorded automatically and cannot be altered or deleted.
The full trail started on 14 September 2026. For jobs older than that, the timeline was filled in from what CleverOps had already recorded: CleverTech field actions, visits, notes, photos and files, parts used, automatic messages, team changes and earlier appointment times (from the notices technicians received — who made those changes was never recorded, so those lines show no name), lead-technician and priority changes, approvals and invoicing done by a person, emails, and the latest override, reminder and on the way stamps. Jobs imported from ServCraft don't show the import's sign-off stamps, visits or stock movements. Job-line and contact edits were not recorded before then.
Visits & sign-off
Jobs in the field rarely resolve in one trip. A false-alarm callout might need two or three visits before the root cause is found and fixed. CleverOps treats every technician visit as a separate record — each with its own work summary, time on site, equipment used, and optional client signature.
The Visits & sign-off card sits on the workspace's Work tab:
| Element | What it does |
|---|---|
| Add visit | Opens the sign-off form to log a follow-up visit. Saving it does not change the job's status — the job stays open so the next technician knows the work is not done yet. |
| Click any visit row | Opens the same form in edit mode for that specific visit. |
| Complete & sign off (header button) | Opens the form for a new visit with the "Mark job as completed" option ticked. Saving it records the visit and marks the job as completed. |
Each visit row shows the visit number, when it happened, the technician's name, minutes on site, whether a signature was captured, and a preview of the work summary. The most recent visit is tagged latest.
What the sign-off form captures
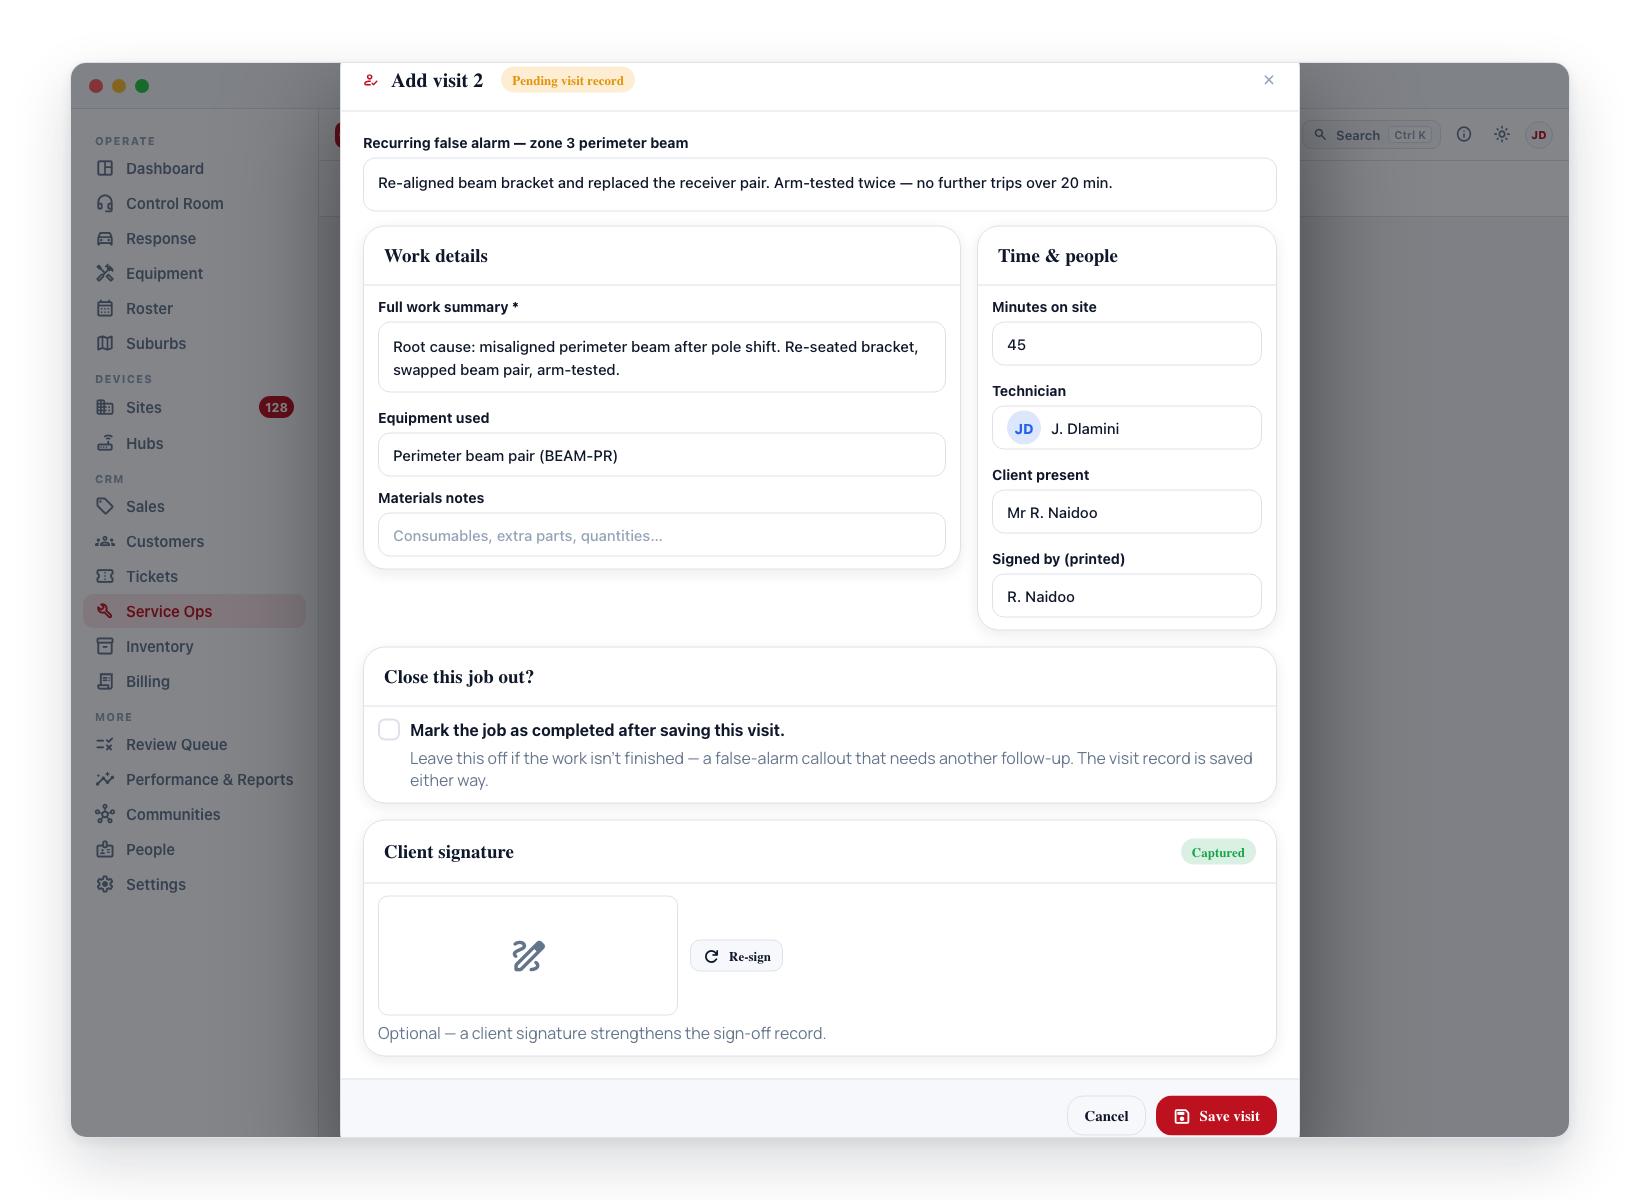
- Work details — full work summary (required), equipment used, materials notes.
- Time & people — minutes on site, technician name, whether the client was present, and who signed off.
- Close this job? — a checkbox "Mark the job as completed after saving this visit". Off by default for Add visit, on by default for Complete & sign off.
- Client signature — a captured signature or a fresh signature pad. Re-signing replaces the existing signature. Capturing it is required to complete the job (see Sign-off required before completing or invoicing below). Captured signatures are held in private, access-controlled storage scoped to your VCR and displayed via short-lived signed links — never as public URLs.
When a visit ends without the work being done
Not every trip finishes the job. A technician who ends a visit early in CleverTech picks what stopped it from a short list, alongside the free-text note:
No access · Customer not there · Wrong part · Waiting on a part · Needs a second tech · Unsafe to work · Customer declined · Needs more time
The note still carries the detail; the code is the part you can count. "How often do we arrive and can't get in?" is usually the biggest recoverable cost in a service business, and free text could never answer it. The reason is cleared automatically when the job is eventually completed, so it always means this visit ended early, and here is why.
Sign-off required before completing or invoicing
To stop unfinished work from being billed, a job cannot be marked Completed — or approved for invoicing — until it is signed off:
- Every required checklist item is done. Items tagged Required on the checklist must be ticked — or, for pass/fail, reading and text steps, answered (optional items do not block).
- Every photo-required checklist item has a photo attached. Photo steps (and any step tagged Requires photo) must have at least one linked photo. Such steps are always Required too, so ticking one without attaching its photo still blocks sign-off; steps with no photo tag never block on photos.
- Every failed check has its demanded evidence. A failed pass/fail or out-of-range reading whose template settings demand a note blocks until the technician's note is captured; one that demands a photo blocks until a photo is linked against it. These are conditional — a step that passes demands nothing extra.
- A client signature is captured on at least one visit.
If any of these is missing, the Complete & sign off button is disabled and the form lists exactly what is outstanding. You then have two choices:
- Finish the sign-off — capture the signature on the pad and tick the remaining required steps, then complete.
- Complete without full sign-off — enter a short reason in the panel that appears (for example, "Client not on site to sign — verified by photos, to sign on next visit"). The reason is recorded against the job and shown in the billing review, so the bypass is auditable rather than silent.
This rule is enforced on the server, so it holds across every path a job can be completed or approved — the status dropdown, the Complete & sign off button, the schedule board drag, the Needs attention review queue, and the CleverTech mobile app. The CleverTech app mirrors the same gate in its sign-off flow: the technician ticks the checklist (including required steps), snaps any required photos directly against their steps, and captures the signature on the phone — and can record the same auditable complete without full sign-off reason when a signature, required step, or required photo can't be captured on site. When a job is sent back for rework, any prior override reason is cleared, so the job must earn a fresh sign-off before it can be completed again.
Why track visits separately
- False-alarm workflow — intermittent faults often need a follow-up visit. Each callout has its own record, photos, and signature.
- Billable time — total time on site is easy to calculate when each visit is its own entry.
- Audit trail — supervisors can see who went out, when, and what they did on each visit, without the records being merged into a single summary.
When a technician completes the job from the CleverTech mobile app, that also creates a visit record — so the visits timeline shows both in-app and mobile sign-offs together.
Job Card (pre-dispatch)
Before a technician leaves for site, generate a Job Card — the brief they take with them. It is the mirror of the Service Job Report: where the report documents what was done after a visit, the Job Card says what to do before it — where to go, how to get in, who to call, what to check, and what to take.
Open a saved job and pick Job card — technician brief from the Documents menu in the workspace header. It opens a printable, branded PDF — the same template as quotes and invoices — in a new tab. Print it, or save and share it with the technician.
For the job's site and customer, the card brings together:
- Header — job number, scheduled date and time, priority, status, and the assigned technician with their phone number.
- Customer & site — the billing party and the site address.
- Scope — the title, description, issue type, schedule type, suburb, estimated duration, and a Complicated — extra care flag.
- Access & directions — technician access notes, key / gate / alarm instructions, site response notes, special-handling (SOP) notes, and the site's GPS coordinates. When nothing is captured, the card says so rather than leaving a silent blank.
- Who to call — the job's preferred contacts first, marked (preferred), then the site and customer contacts, primary first, with each contact's role, phone numbers, and whether they can authorise work. Falls back to the customer's billing contact when no contacts are on file.
- Tasks to complete on site — the job checklist, rendered as empty tick-boxes for a printed copy, with Required and Requires photo flagged on the steps that need them.
- Parts & equipment to bring — the job's line items as a pick list (quantity, item, and notes — no prices).
- Equipment already on site — the site's active and faulty installed equipment (label, location, serial, status), so the technician knows what is already there.
- Recent jobs at this site — the last few jobs at the site, for context.
Job Cards are generated on demand and are not stored permanently.
On the technician's phone
The assigned technician has the same information in the CleverTech mobile app, across the job's Job and Site tabs: the job's core — title, scope, site, and parts to bring — is available offline from the synced job, so it opens with no signal; the richer context (access notes, who to call, site history, quotes, events and on-site equipment) loads when the phone is online, and says so otherwise. The preferred contacts picked on the job show first, above the site's full call list.
Service Job Report PDF
Open any service job and pick Preview service report from the Documents menu in the workspace header to generate a Service Job Report. The report uses the same branded template as invoices and quotes.
In the same menu, Email report to customer (shown when the job is linked to a customer) sends the same PDF to the customer. The dialog is the standard recipient picker — To defaults to the billing email, with one-click CC suggestions from the customer's contacts and site app users; contacts tagged Service jobs arrive pre-ticked. The report is attached as a PDF and the email includes a secure link to the customer's account portal.
Send report by WhatsApp / SMS, alongside it, texts the customer a link to the report instead — a text message cannot carry a file, so they open the report on the customer portal and tap Download PDF for the same document. See Text documents for how numbers are chosen and how opt-outs are honoured; contacts tagged Jobs arrive pre-ticked.
Two differences from Email report are worth knowing:
- It appears on any saved job, including one attached to a site rather than a customer — CleverOps finds the customer through the site. (Email requires the job to name a customer directly.)
- It needs the job to be saved, because a link points at a record. A brand-new job must be saved once before its report can be texted.
The signature image appears in the PDF but not on the portal page — the on-screen report names who signed and when, and the image travels only in the downloaded document.
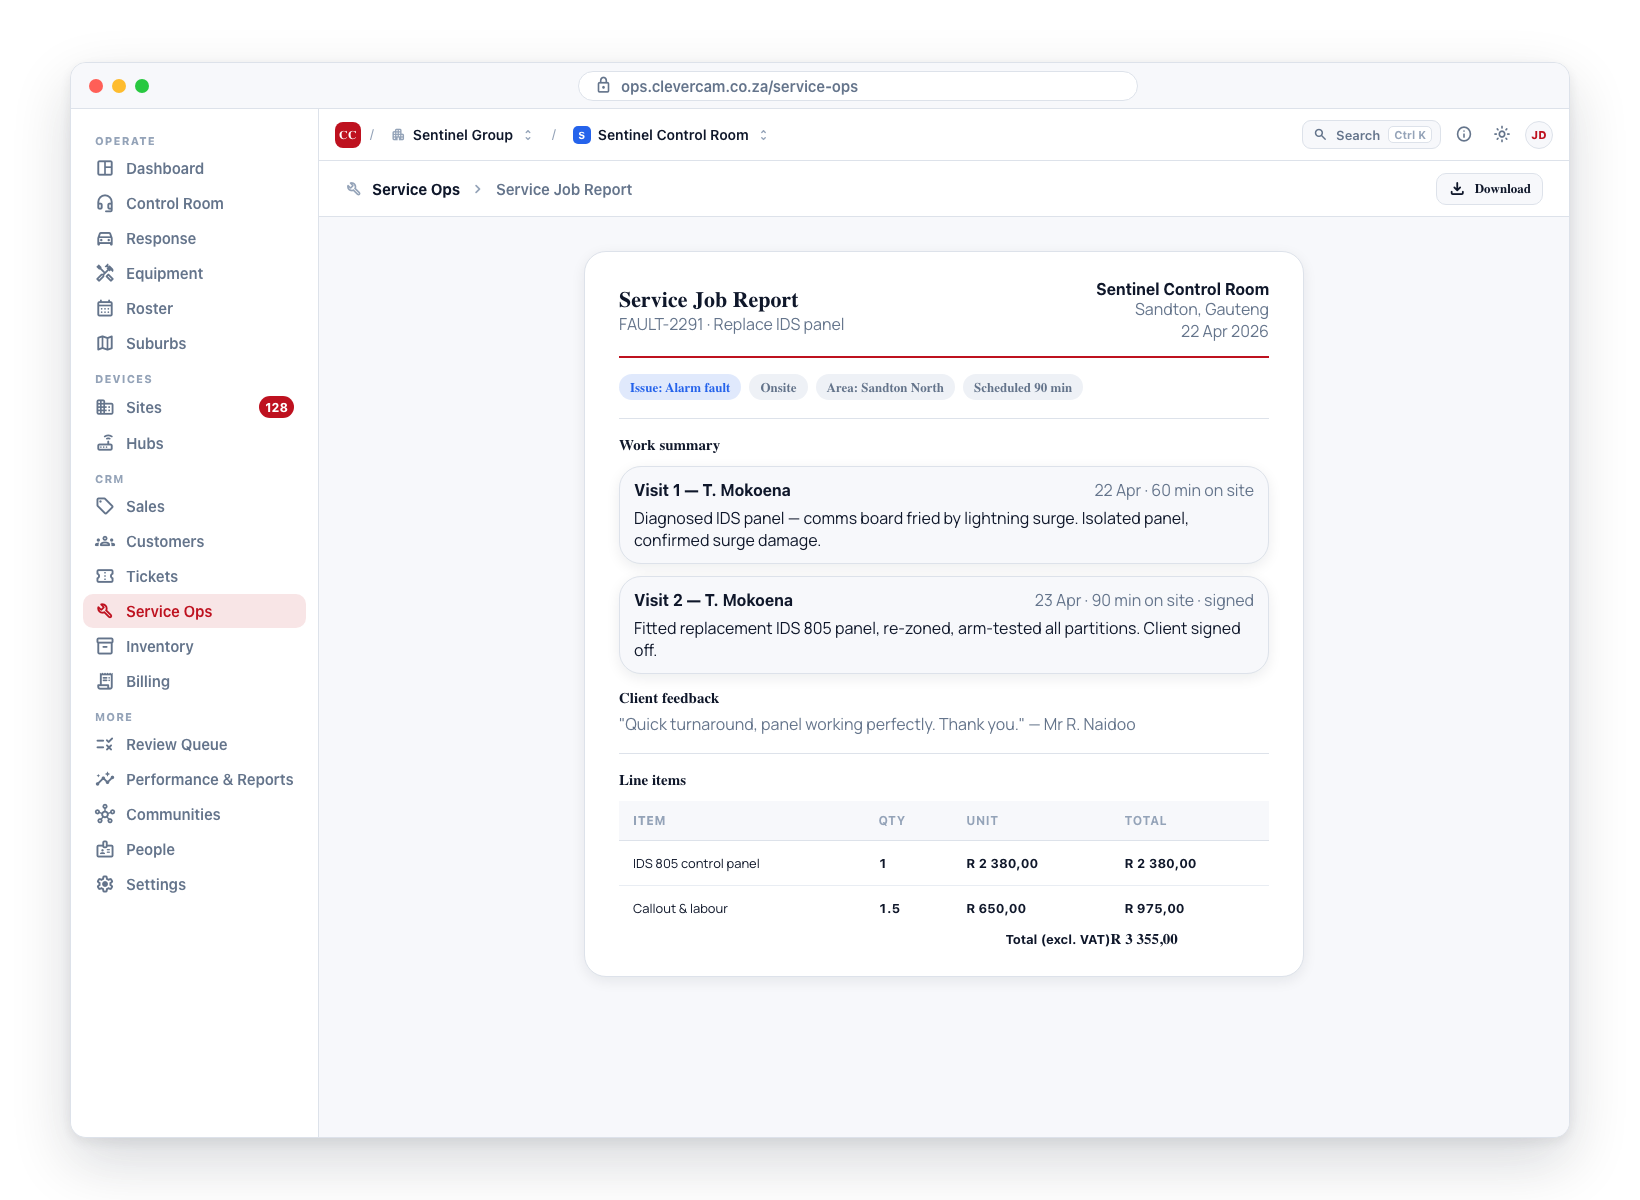
The report is built to answer a customer's three questions at a glance — who came out and when, what was done (and proven), and whether it costs anything. It includes:
- Masthead ribbon — job number, completed (or scheduled) date, the technician team (lead plus a "+N" for additional techs), and a highlighted Job total cell whenever the job carries charges.
- At-a-glance band — visits, total time on site, checklist progress, photo count, and the sign-off state (Signed in green; Not signed or Exception in amber). Nothing important is buried in the body.
- Site visits — a numbered record per visit: date and time, technician, time on site, the full work performed summary, and equipment/materials used, followed by the total time on site across every visit.
- Work checklist — each step with its tick, its Required marker, and — for photo-required steps — a per-step Photo attached / Photo missing status.
- Photo evidence — the job's photos embedded in the document with captions (the checklist step each one satisfies, or the file name) and timestamps. Up to twelve photos are embedded; any beyond that are counted with a "more on file" note.
- Client feedback — the feedback recorded on the job.
- Parts & charges — always present, so pricing never needs a phone call: itemised line items with a Subtotal → VAT → Job total breakdown when the issuing entity is VAT registered (the Job total is VAT-inclusive — the figure the invoice will bill), an explicit note when the job is billed as a single amount, and an explicit "No charges were recorded against this job" line when there is nothing to pay.
- Sign-off — customer and technician side by side: the captured customer signature image with the signatory's name and date (whether it was captured in the office sign-off form or in the CleverTech app), and the closing technician's name and date. A job completed under a recorded override states plainly that a full on-site sign-off was not captured. An unsigned copy prints blank name/date lines, so it can be signed by hand.
Reports are generated on demand and are not stored permanently.
The approval workflow
Completing a job does not send it straight to invoicing. The process is:
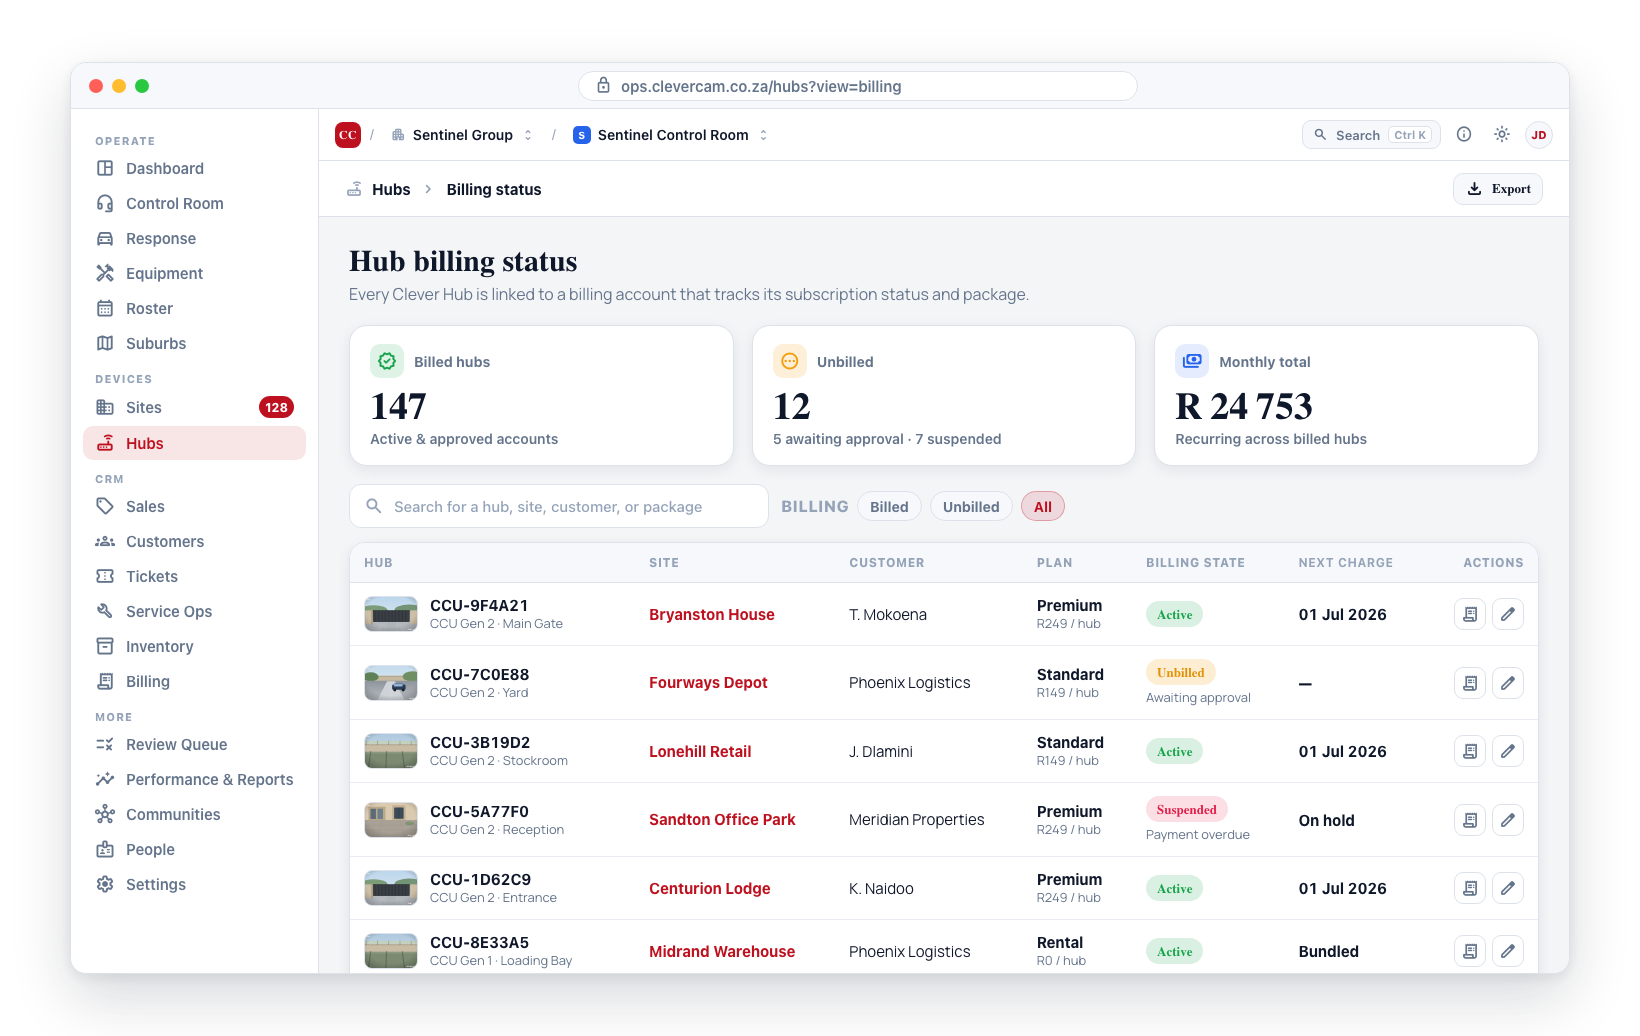
- Technician completes the job — status changes to Completed. This requires sign-off (required checklist done + client signature) or a recorded override.
- Supervisor reviews from the Needs attention → Review & invoice tab.
- Approve — marks the job as ready for invoicing. It is now eligible for the monthly billing run.
- Alternatively, Send to invoice immediately creates a draft invoice for this job.
Both need a customer to bill: the job's own, or its site's when that customer belongs to your control room. A job on a site you share with another control room, where the site is on their customer, can't be approved ("its site's customer belongs to another control room") or sent to invoice ("Cannot invoice: job has no customer in this control room") until you link one of your own customers to it — see Needs attention → Review & invoice.
A job that is not signed off cannot be approved for invoicing. In the review queue its Approve button is disabled (and a Not signed off flag is shown); bulk-approve skips any such jobs rather than failing the whole batch. To clear it, open the job and complete the sign-off (or record an override), or send it back for rework.
If the work is not acceptable, Reject returns the job to In Progress with a rejection reason. The technician gets a push notification, sees the reason in CleverTech, and can redo the work. Rejection clears the completion timestamp and any sign-off override, so the job must be signed off again before it can be re-completed — and if the job had already been invoiced, it also clears the invoiced state, unlocking the line items.
Customer review
The Activity tab of a saved job carries a Customer review panel — the customer's own word on the work, on the same rail the Needs attention → Review & invoice queue uses:
- Request review (or Send again on an unanswered request, Ask again after an answer) opens the request dialog: email recipients, WhatsApp/SMS numbers, an editable message with the review link added automatically, and an optional link to the service report. The customer answers on a branded portal page with one tap — All good, Please call me or Something's not right — plus optional stars and a note. Their answer appears here as it lands, without a refresh.
- Phoned them instead? Switch the same dialog to Log their answer and write down what they said — it counts exactly like a tapped answer, and records that a person took it down.
- Once they answer, the panel shows the answer chip, their star rating out of 5 if they gave one, their words, when and how they answered, and how the request went out (channels, how many times).
- Something's not right and Please call me each file a follow-up ticket on the job (assigned to whoever asked, due now); the panel says so and offers Mark handled, which closes the ticket.
The completion notice's "How did we do?" link and an automation's satisfaction request now open the same portal review page and land on this panel, so every answer a customer gives about this job is in one place. A low rating (1–2) on a stars-only answer still files an Operational follow-up ticket automatically; a "not right" / "call me" answer files its own ticket instead, so one reply never opens two. Every answer appears on the job's timeline and the customer's Activity timeline too, and ratings count towards the company's Reviews reporting.
Commission tracking
If a sales representative is attached to the job and a commission amount is set, that amount rolls up onto the commission summary on the person's Field work tab. Jobs that have not yet been paid contribute to the unpaid total; completed jobs feed the monthly breakdowns.
Deleting a job
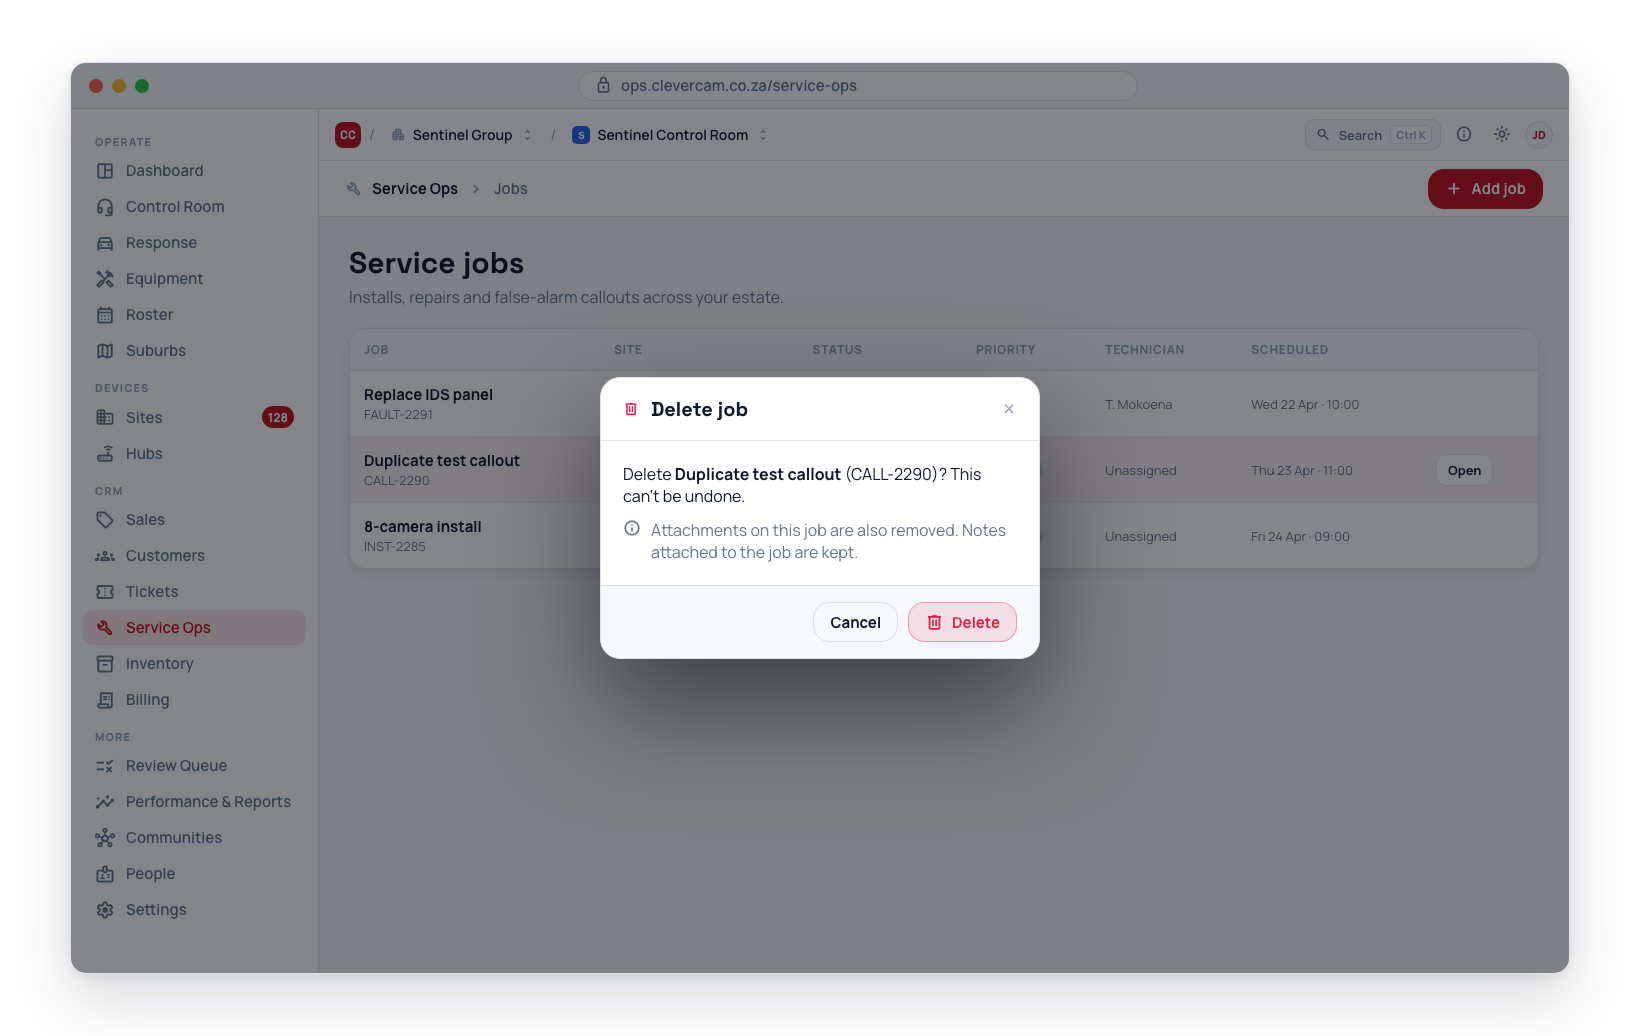
Open the job; Delete job is in the Danger zone at the bottom of its Work tab. It removes the job after a confirmation prompt. Attachments are also removed. Notes attached to the job are kept.
Next steps
- Schedule board — drag jobs onto technician rows with smart overlap warnings.
- Needs attention — the overdue, review, and reminder queues.