Zone Structure & Alarm Panel Users
The Zone structure card only appears when the control room has the Allow 3rd Party Alarm Receivers module on (super admins in Super-admin mode always see it). See Modules & Capabilities.
The site-level Zone structure editor gives you a site-wide picture of all the partitions and zones that your linked alarm panels report. Every panel you have connected to the site — Ajax, IDS Hyyp, Onyyx, INHEP, and others — contributes its partitions and zones into a single combined view, presented as one table for the whole site. The Alarm Panel Users table — found on the People tab — lets you link each keypad user number to a real contact so that arm and disarm events show a person's name instead of a generic "User 3".
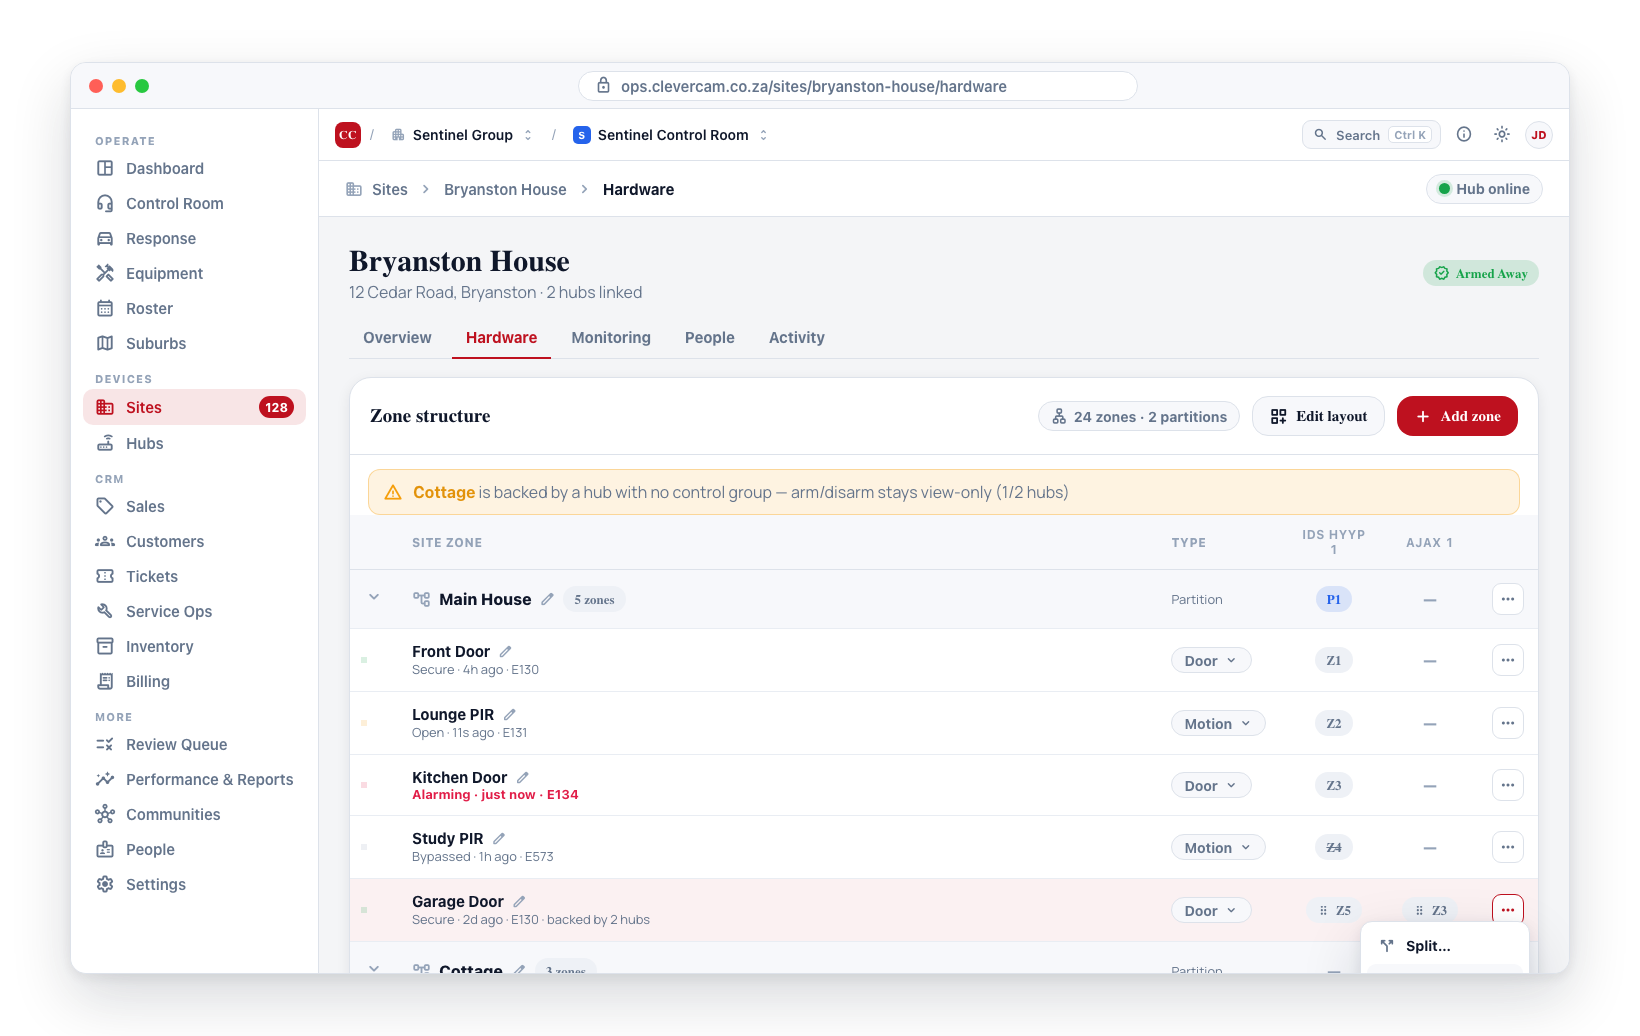
The Zone structure card is primarily for organising and labelling your alarm structure. Olarm partitions also get an inline Arm menu on the partition header — Away, each stay/home mode, and Disarm — see Arm a partition. For other panel types, and for bypassing zones, use the per-hub rows in the Hardware → Hubs & cameras card above it and in CleverAlert. Otherwise, use the zone structure card to shape how the site looks: rename labels, move zones between partitions, separate zones that were incorrectly grouped together, and clean up leftover entries. Use the Alarm Panel Users table on the People tab to link panel user numbers to contacts.
- See zone and partition totals, and add to the structure — counts shown above the table with + Add zone, + Add partition and Pre-create… buttons, so a monitor-only panel's zones and partitions can be set up by number before the panel has reported them.
- Rename a site partition or zone — click the label to edit it inline.
- Arm a partition — Olarm partitions show an Arm menu (Away / stay modes / Disarm) on the partition header, with a rename for each stay mode.
- Treat partitions as separate premises — one panel, several households (cottages, a house and its flat): give each partition its own name, pin, photo, directions and keyholders.
- Move a zone between partitions — drag and drop it onto another partition, or onto Unassigned.
- Move a hub slot to a different zone — drag a slot badge from one zone row onto another to re-link the physical connection.
- Change a zone's type — use the type dropdown on any zone row.
- See which hub backs each zone — one column per linked hub shows which slot on that hub maps to each zone.
- Split a partition or zone — the row menu lets you peel off hub connections into a new separate entry.
- Merge partitions or zones across hubs — the row menu lets you collapse two entries into one.
- Put a zone on hold — the row menu lets you temporarily mute a chattering zone for the control room, with a reason and a since-timestamp.
- Bulk merge in Edit layout mode — select multiple rows at once and merge them in one step.
- Clean up leftover entries — one-click button removes entries that are no longer connected to any hub.
- Link a keypad user number to a contact — the Alarm Panel Users table on the People tab, so arm and disarm events show the person's name instead of a generic user number.
Opening the zone-structure editor
- Navigate to Sites > Connected Sites and click a site name.
- Open the Hardware tab.
- Scroll to the Zone structure card at the bottom of the tab.
- The table loads the current alarm structure for the site. One section appears per partition, plus an Unassigned strip for zones that are not attached to any partition.
The Alarm Panel Users table lives on a different tab — open the People tab to find it beneath the call-list table.
How the structure is built
Each physical alarm panel reports its own partitions and zones. CleverOps groups these into site-level partitions and zones so you can view the site as a whole:
- Site partition — a partition visible at the site level. It can be backed by one or more physical partitions from one or more hubs. Shown as a section header in the table.
- Site zone — a zone visible at the site level, optionally attached to a partition. It can be backed by one or more physical zone connections. Shown as a row in the table.
- Hub slot — the cell in a hub column that tells you which input on that hub backs this zone (for example "Z5" under the "Olarm 1" column means "zone 5 on the Olarm 1 hub").
New zones reported by a panel appear automatically when the panel sends its information for the first time. No manual setup is required. Olarm communicators also report their own health (Wi-Fi, cellular, mains and backup power, firmware updates, tamper) against a pseudo-zone numbered 999 or 998. That is the communicator talking about itself, not a zone on the panel, so no "Zone 999" row is created for it.
Table layout
The table is a grid: zones and partition headers are rows, fixed information is on the left, and every linked hub adds a column on the right.
| Column | What it shows |
|---|---|
| (state dot) | Coloured dot showing the zone's current state (alarming, tamper, fault, open, bypassed, secure, or unknown). |
| Site zone | The site-level name for this zone. Click to rename. The current state and the last event code are shown below the name. |
| Type | The zone type — click to change. On a radio's telemetry input (TELE 1–TELE 8) a Behaviour picker sits underneath it — see Telemetry inputs. |
| Hub name | One column per hub linked to the site. Shows the slot ID (e.g. "Z5") when this zone is connected to that hub, or "—" when it is not. A bypassed slot is shown with a strikethrough. |
| (actions) | The "..." menu — exposes Split, Merge into, and Hold zone / Release hold options. |
Each partition has its own header strip:
- The partition's editable name on the left.
- The zone count for that partition.
- For Olarm partitions, an Arm menu (Away / stay modes / Disarm) — see Arm a partition.
- One cell per hub, showing the panel-side partition slot (e.g. "P1") when that hub backs this partition, or "—" when it does not.
- A "..." menu for Split and Merge into actions.
For panel types other than Olarm, arm and disarm live on the Hubs & cameras card on the Hardware tab and in CleverAlert. Bypassing a zone is always done there — never from this card.
Partitions and the zones inside them are listed by name, counting numbers the way you would: "Zone 2" comes before "Zone 10", not after it. Zones named after a place ("Garage door", "Voorstoep") sort alphabetically alongside the numbered ones. There is no need to pad names to a fixed width — "Zone 1" and "Zone 01" both sort correctly.
Toolbar
A thin strip above the table shows totals and editing controls:
- N zones · M partitions — running totals across the whole site, including unassigned zones.
- Edit layout — turns on multi-select mode with checkboxes on every row, so you can bulk-merge several partitions or zones at once. This button only appears on sites with two or more linked hubs, or where a partition or zone is already backed by mappings from more than one hub. Single-hub sites have nothing to merge across, so the toggle is hidden to keep the toolbar simple.
- + Add zone — opens the Add zone dialog to add a zone by its number on the panel (or a site-only zone) before any panel reports it. Disabled while Edit layout is active.
- + Add partition — opens the Add partition dialog. Shown once the site has an alarm panel.
- Pre-create… — creates zones 1…N and partitions 1…M on a panel in one go — see Pre-create zones and partitions. Shown once the site has an alarm panel.
- + Add TELE input — on a site with a FOX or RDC radio, adds one of its telemetry inputs (FOX TELE 1–5, RDC TELE 1–8) as a site zone, so you can name it and set its behaviour before it first fires. See Telemetry inputs.
Partial control banner
When one or more partitions are backed by hubs that don't have a control group attached (for example a panel that was added but never grouped), an amber banner appears below the toolbar listing each affected partition with its controllable / total hub count — for example "Front Door (1/2 hubs)". Arm and disarm commands only fire at the controllable hubs; the others stay view-only until grouped.
Partitions as separate premises
Sometimes one alarm panel covers several households: cottages on a farm, a house and its garden flat, a small block of units. Each partition is then a different property with its own front gate, its own photo, its own people. The Partitions are separate premises switch at the top of the Zone structure card declares exactly that. It only appears once the site has at least one partition.
Leave it off (the default) and partitions are what they have always been — areas of one household that arm independently. Nothing else on the site changes.
Switch it on and CleverOps asks you to confirm: every active partition becomes a premises; you can demote individual ones afterwards. Once confirmed, the partition chip strip is replaced by one premises card per partition, and two more things open up:
- Panel-wide alerts go to — a small selector beneath the switch. Panel-wide events name no partition (mains power, battery, comms, tamper and test signals), so the site decides who hears about them: Site-wide keyholders only (the default) or Everyone on the site.
- Receives alarms for on each person in the call list — see Site details → People. A keyholder can be scoped to particular premises; people left on Whole site hear about everything.
Scoped keyholders see and arm only their own premises in CleverAlert, and any invites they send from the app bring people into their own premises only.
The premises profile
Each card carries a partition's premises profile. Everything is saved as you go — there is no Save button — and an error rolls the field back and tells you.
| Field | What it does |
|---|---|
| Name | The partition's label, renamed the usual way — click it, type, Enter. This is the premises' name wherever it is shown. |
| Pn tag | The panel partition number, for reference. |
| Separate premises switch | On = its own household or building. Off = Area of the main household — uses the site's name, pin and people: the card greys out and the profile below is ignored. Use it to demote, say, the main house's own second partition while the cottages stay premises. |
| Photo | Upload a photo of this premises for responders, or Remove it. With no photo of its own the card says Inherits site photo. |
| Pin | Inherits site pin until you give it one. Click the chip to open the map picker — it starts on the site's pin; click the map or drag the pin onto this premises' gate and it is saved immediately. 📍 Own pin shows once it has one; Clear pin goes back to inheriting the site's. |
| Address line | A short "where exactly" line, e.g. Cottage 3, second gate on the left. |
| Directions for responders | Free text on how to reach this premises once on the property — what a responder needs on top of the site's own instructions. |
| People | Read-only: the keyholders scoped to this premises by name, plus + N site-wide keyholders (the people on Whole site). Change who is scoped where from the People tab. |
Inheritance is the point, not a gap: a premises without a pin, photo or directions of its own simply uses the site's, and the card says so in words. The usual zone table still sits below the cards — its Partition column lists the premises by name, and renaming, moving, splitting and merging work exactly as before. The premises profile belongs to the partition row, so it survives a rename; when you merge a partition into another, the merged-away partition's profile goes with it and the target keeps its own.
Turning the switch off puts the site back to ordinary partitions. The premises profiles and keyholder scopes are kept, not deleted — switch it on again and everything is where you left it.
When you add a CID-only communicator (FSK, FOX, RDC, FinMon) through the site's Add hub wizard and choose two or more partitions to pre-create, the wizard offers the same thing as a tick box — These partitions are separate premises (cottages, flats, units) — so the site lands in premises mode as soon as the panel is linked.
Add a zone
Click + Add zone in the toolbar. Zones are added on the panel, by number — the same way a live signal identifies them — so a zone the panel has never reported (zone 3 on a panel that has only ever sent zones 1, 2 and 4–6) is ready to name and file now, and the panel's first signal on that number lands on the row you named. The dialog asks for:
- Panel — which alarm panel on the site the zone belongs to (shown when the site has one or more). Pick Site-only zone (no panel zone yet) for a site-level entry with no panel zone behind it, to be linked to a hub cell later.
- Zone number — the zone's number on the panel. It is pre-filled with the next free number on that panel, and a number already on the panel is refused with the name of the row that has it. Zone 0 is refused: in Contact ID it is the panel itself.
- Label — the site-level name. Required.
- Type — the zone type (Door, Motion, Smoke, Fence, Panic, Duress, Fob, User, Tamper, Medical, General). Defaults to General.
- Partition — pick an existing partition or leave it at Unassigned. On a site with a single partition it is pre-selected.
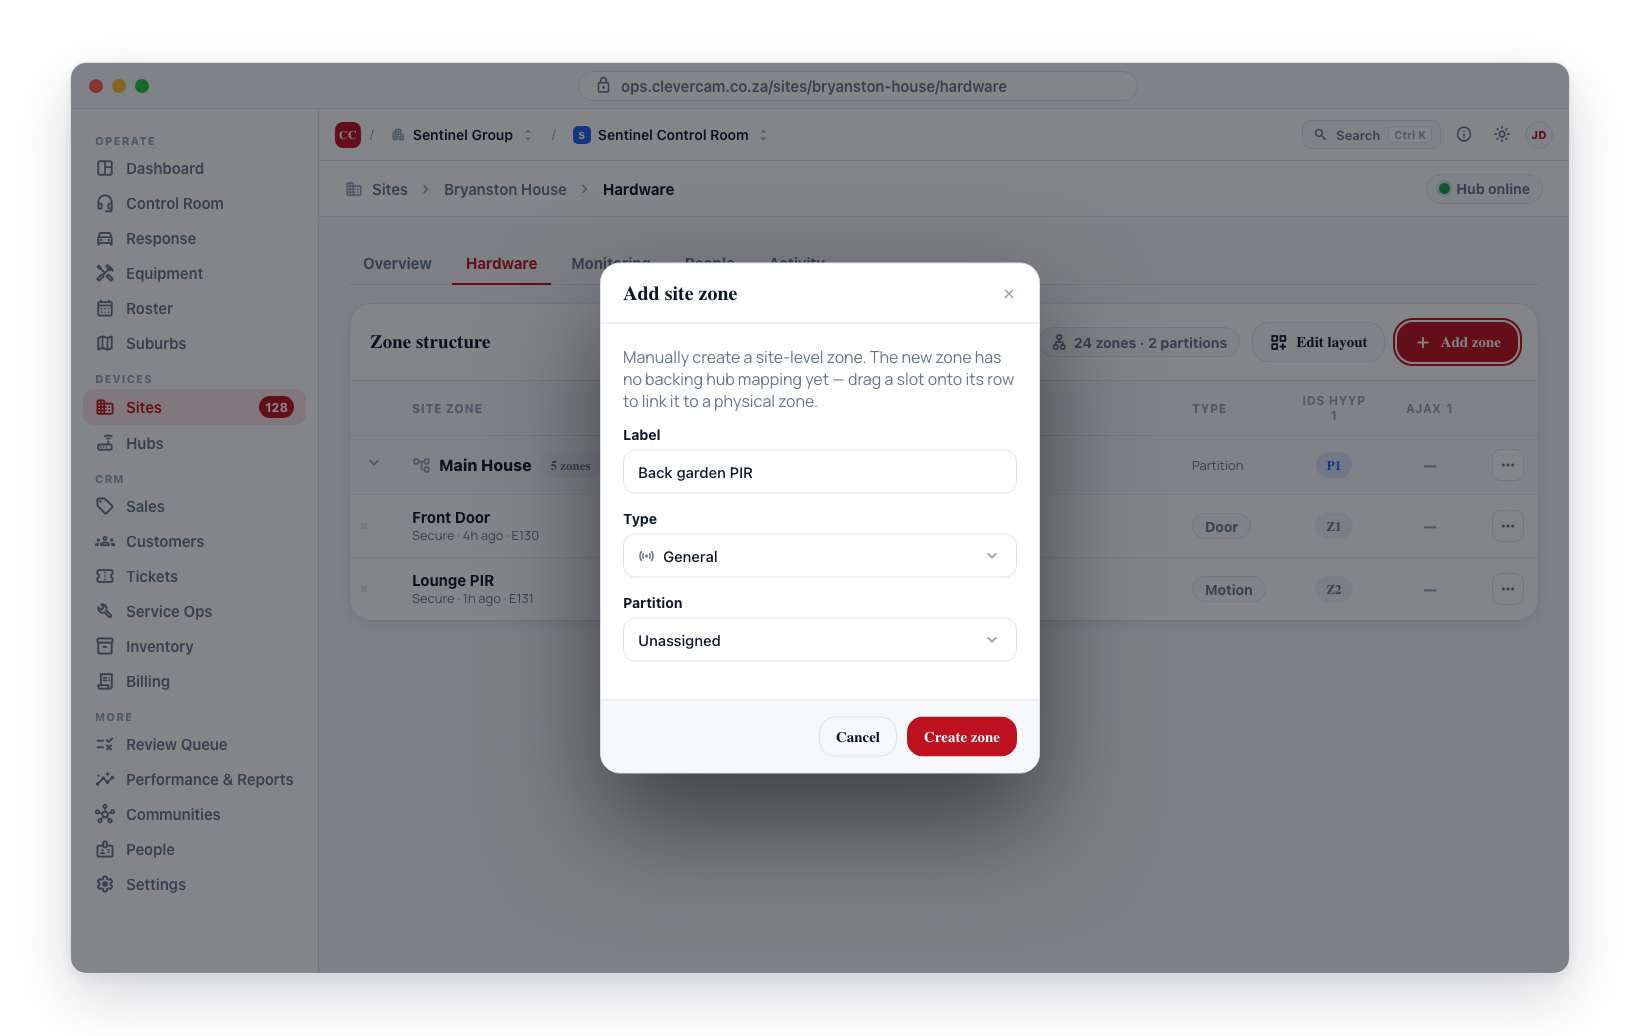
The zone is created immediately with its hub cell filled in ("Z3" under the panel's column), under the partition you chose — or, if you chose none and the panel has a single partition, under that one, exactly as a signal naming no partition would be filed. A site-only zone has no hub connection yet, so every hub column shows "—" and the row appears with an amber tint; link it by clicking the "—" cell under a panel and typing the zone number, or by dragging a slot badge from another row onto it (see Rebind a hub slot).
Add a partition
Click + Add partition in the toolbar (shown once the site has an alarm panel). Partitions used to appear only when a signal named one, so a monitor-only panel whose second area had never armed had nowhere to file its zones. The dialog asks for:
- Panel — which alarm panel the partition is on.
- Partition number — its number on the panel, pre-filled with the next free one. Partition 0 is refused: in Contact ID it is the panel itself, never a partition.
- Name — optional; left blank the partition is Partition N.
The partition appears at once as a section of the table, and the panel's arm and disarm signals for that number land on it. When it is the panel's only partition, the panel's zones are grouped under it automatically. Adding a number that is already on the panel does nothing — the existing partition is kept. A panel that reports its areas under a number you did not expect (an IDS panel behind an Onyyx communicator that transmits everything as partition 2, say) is not renumbered by this: rename that partition to what the customer calls it, or add the missing number and move zones onto it.
Pre-create zones and partitions
Click Pre-create… in the toolbar to create a panel's zones 1…N and partitions 1…M in one go — the same step the Add hub wizard offers for CID-only radios (see Pre-creating zones and partitions), now available on the site page for every alarm panel at any time: HYYP, Onyyx and Olarm panels linked in monitor-only mode, and panels picked from a receiver's Already reporting list. Pick the panel, a zone count (8, 16, 24, 32 or a custom number up to 999) and a partition count (1, 2, 4, 8 or custom up to 64); the dialog says how many of each will actually be created. Numbers the panel has already reported are kept — only the gaps are filled — and with one partition every zone is filed under it. The zones are named Zone 1, Zone 2… ready to rename.
Hub columns
The right side of the table adds one column per hub linked to the site. The header row labels each column with the hub's name.
- A zone backed by "Olarm 1 · Z5" and "Olarm 2 · Z3" shows "Z5" in the Olarm 1 column and "Z3" in the Olarm 2 column on the same row.
- A zone backed by only one hub shows a slot ID in that hub's column and "—" everywhere else.
- A partition backed by "Olarm 1 · P1" shows "P1" in its header row under the Olarm 1 column, and "—" in any other hub column.
- A bypassed connection (bypassed at the panel) is shown with a strikethrough on the slot ID. There is no Bypass button here — toggle bypass from the Hubs & cameras card on the Hardware tab or in CleverAlert.
- A zone with no hub connection at all shows "—" in every hub column and an amber row tint. Use the orphan cleanup banner to remove it.
Renaming
Both site partitions and site zones have an editable name. Click the name, type a new one, and press Enter or click away to save. Press Esc to cancel. The change takes effect immediately.
The name on each connected hub is independent — renaming the site-level zone does not change the panel's own zone description.
Arm a partition
Olarm partitions show an Arm menu on the partition header. It appears only for partitions backed by an Olarm hub that reports the arm modes it supports — other panel types are armed from the Hubs & cameras card or in CleverAlert.
Click Arm ▾ to see every mode the panel supports, top to bottom:
- Away — full arm.
- One row per stay/home mode — each with its own label. Simple panels show a single Stay (and sometimes Sleep); Paradox-style panels expose several custom stay profiles, listed as Stay 1, Stay 2, … until you rename them.
- Disarm.
Picking a mode sends the command to every controllable hub backing the partition — the same fan-out the partial-control banner describes — and shows an "N of M hubs" confirmation. (Bypassing open zones on arm is offered by CleverAlert's arm prompt, not from this menu.)
Rename a stay mode
The panel does not tell us what each custom stay profile is for, so they start as Stay 1 / Stay 2 / …. Click the pencil next to any stay row to give it a meaningful name — for example "Night" or "Perimeter". The name is yours: it survives panel re-syncs and is not overwritten by the panel. Clear the field to reset it to the default.
Rebind a hub slot
Each filled cell in a hub column is a draggable badge (e.g. "Z5", "Z12"). To re-link the physical connection to a different zone:
- Press and hold a slot badge.
- Drag it onto the destination zone row. The destination row highlights while you hover.
- Release. The connection moves — the slot disappears from the original row and appears on the new row under the same hub column.
This is useful when a slot was automatically linked to the wrong zone, or when you have manually added a zone and need to connect it to a real panel slot.
- The drag moves the connection — it does not copy it. The original zone loses the slot and may become an orphan if it has no other connections.
- Dropping onto the same row does nothing.
Drag-drop reparenting
To move a zone into a different partition, drag the zone row and drop it onto the destination partition's header. To detach a zone from every partition, drop it onto the Unassigned strip at the bottom of the table.
- The move only changes the site-level grouping — it does not reprogram the alarm panel.
- Dropping a zone onto its current partition does nothing.
Zone type
Every zone row shows a type in the Type column — for example "Door", "Motion", "Smoke". Click the type to change it to any of the eleven values (Door, Motion, Smoke, Fence, Panic, Duress, Fob, User, Tamper, Medical, General). The change takes effect immediately.
The type is automatically assigned from the zone's description when the panel first reports it. You only need to change it when the automatic classification is wrong — for example when the panel sends "Sensor 14" with no indication of what the zone protects.
Telemetry inputs
A radio's telemetry inputs are hardwired terminals an installer can connect to anything on site: a gate contact, a fence energiser, a separate panic button, or the alarm panel's own arm output. A FOX radio has TELE 1–5; an RDC radio has TELE 1–8. The radio only says which input fired, so what it means is set per site.
They are listed together in the zone table under Telemetry inputs (TELE 1–8), with the Zone # column reading TELE 1, TELE 2 and so on, and the hub column showing T1, T2. An input appears on its own the first time it fires, or you can add it ahead of time:
- Click + Add TELE input in the toolbar. (It only appears once the site has a FOX or RDC radio linked.)
- In the Add telemetry input dialog, pick the Radio if the site has more than one, then the Input. Each input is shown with the code it arrives on (FOX
E004…E060, RDCD20 004…D20 063); inputs already in use are greyed out. - Give it a Label (what it is wired to, e.g. Front gate), a Type, and a Behaviour (below).
- Click Add input. For Reports an open / close, then move the new zone into the partition it reports for.
Under each input's Type there is a Behaviour picker:
| Behaviour | What a signal on this input does |
|---|---|
| Raises an event | The default. The signal becomes a 24hr alarm event for the operators, named after the input, e.g. 24hr alarm — Front gate. |
| Log only | The signal is kept in the site's event history, but no operator event is raised and no customer push is sent. |
| Reports an open | For an input wired to the panel's arm output. Each signal is recorded as the input's partition opening, e.g. Partition 2 disarmed: a normal open, not an alarm. |
| Reports a close | The same, recorded as the partition closing, e.g. Partition 2 armed (away). |
The Partition column decides which partition an open or close is for. Move the input into that partition; an input left Unassigned reports for the whole site (disarmed / armed (away)).
The change applies from the next signal onward. Events that were already raised keep their original wording.
Reports an open / close changes the event the input raises. The partition's armed state in the table and in CleverAlert still comes from the panel's own partition reports. On a site where the panel also reports through another communicator (an Olarm, say), you see both: the panel's open or close and the radio input's.
Zone state display
The dot's colour reflects the zone's current state, in priority order:
| State | Colour | Meaning |
|---|---|---|
| Alarming | red | The zone is in alarm — takes priority over everything else. |
| Tamper | red | Tamper detected. |
| Fault | amber | Hardware or communication fault. |
| Open + Bypassed | amber | Zone is physically open and has been bypassed. |
| Open | amber | Zone is violated but not alarming. |
| Bypassed | grey | Zone is manually bypassed on the panel. |
| Secure | green | Zone is closed and normal. |
| Unknown | grey | No panel data received yet. |
The text below the zone name shows the current state, how long ago it last changed, and the last event code the panel sent for this zone (when available). These are informational — no actions are taken from this tab.
"Alarming" is time-limited. When an alarm event arrives, the zone is treated as alarming for a period based on its type. After that time, the dot returns to the zone's underlying state — even if the panel never sent a specific restore message. A panel restore clears the alarming state immediately.
How long each zone type stays in the alarming state:
| Zone type | Duration | Why |
|---|---|---|
| Fob, User | 1 minute | Button presses and keypad actions — a short flash is enough. |
| Door, Motion, Fence, Panic, Duress, General | 10 minutes | Standard event-style triggers. |
| Smoke, Medical | 30 minutes | Life-safety zones — longer visibility so operators cannot miss them. |
| Tamper | 1 hour | Latching state — panels reliably send a restore, so a longer window is appropriate. |
The zone type is identified automatically from the panel's description (e.g. "Door sensor" → Door, "PIR" → Motion). Unrecognised types default to General with a 10-minute window.
The zone's stored state (what the site's Hardware tab hub list, CleverAlert's Devices tab and CleverCommand show) is stricter, because it has no time window of its own:
- A zone is only put into alarm when the panel has sent a zone restore before — i.e. when CleverCam can expect to see the alarm clear. Many radios and communicators only ever send the alarm, never the restore; on those the stored state stays secure (the alarm event, notifications and the time-limited "Alarming" dot above are unaffected). A brand-new panel's first alarm is treated the same way; after its first restore, every later alarm shows.
- While in alarm, the zone clears when the panel sends its restore, when its area is disarmed (entering the code ends every alarm in that area, restore or no restore), or after 1 hour without either (a restore that was lost or arrived out of order).
- Tamper clears on its restore or after 1 hour.
- Fault and low battery are real, lasting conditions: they clear only when the panel restores them.
- A restore only clears the condition it belongs to — a sensor-supervision restore (R381) does not secure a zone that is in alarm, and vice versa.
- Zones whose signal family is in Automation mode on the site (see Automation signals) are exempt from all of the above timing rules — a telemetry fault stays in alarm until its own restore arrives.
The safety-net check runs every two minutes; a fresh alarm on the zone always shows again.
Split a partition or zone
Occasionally two hubs will each report a partition or zone that looks similar enough that CleverOps groups them into a single entry. When that is wrong — for example two separate buildings on the same site that both happen to use "Partition 1" — splitting peels one or more hub connections off into a new separate entry.
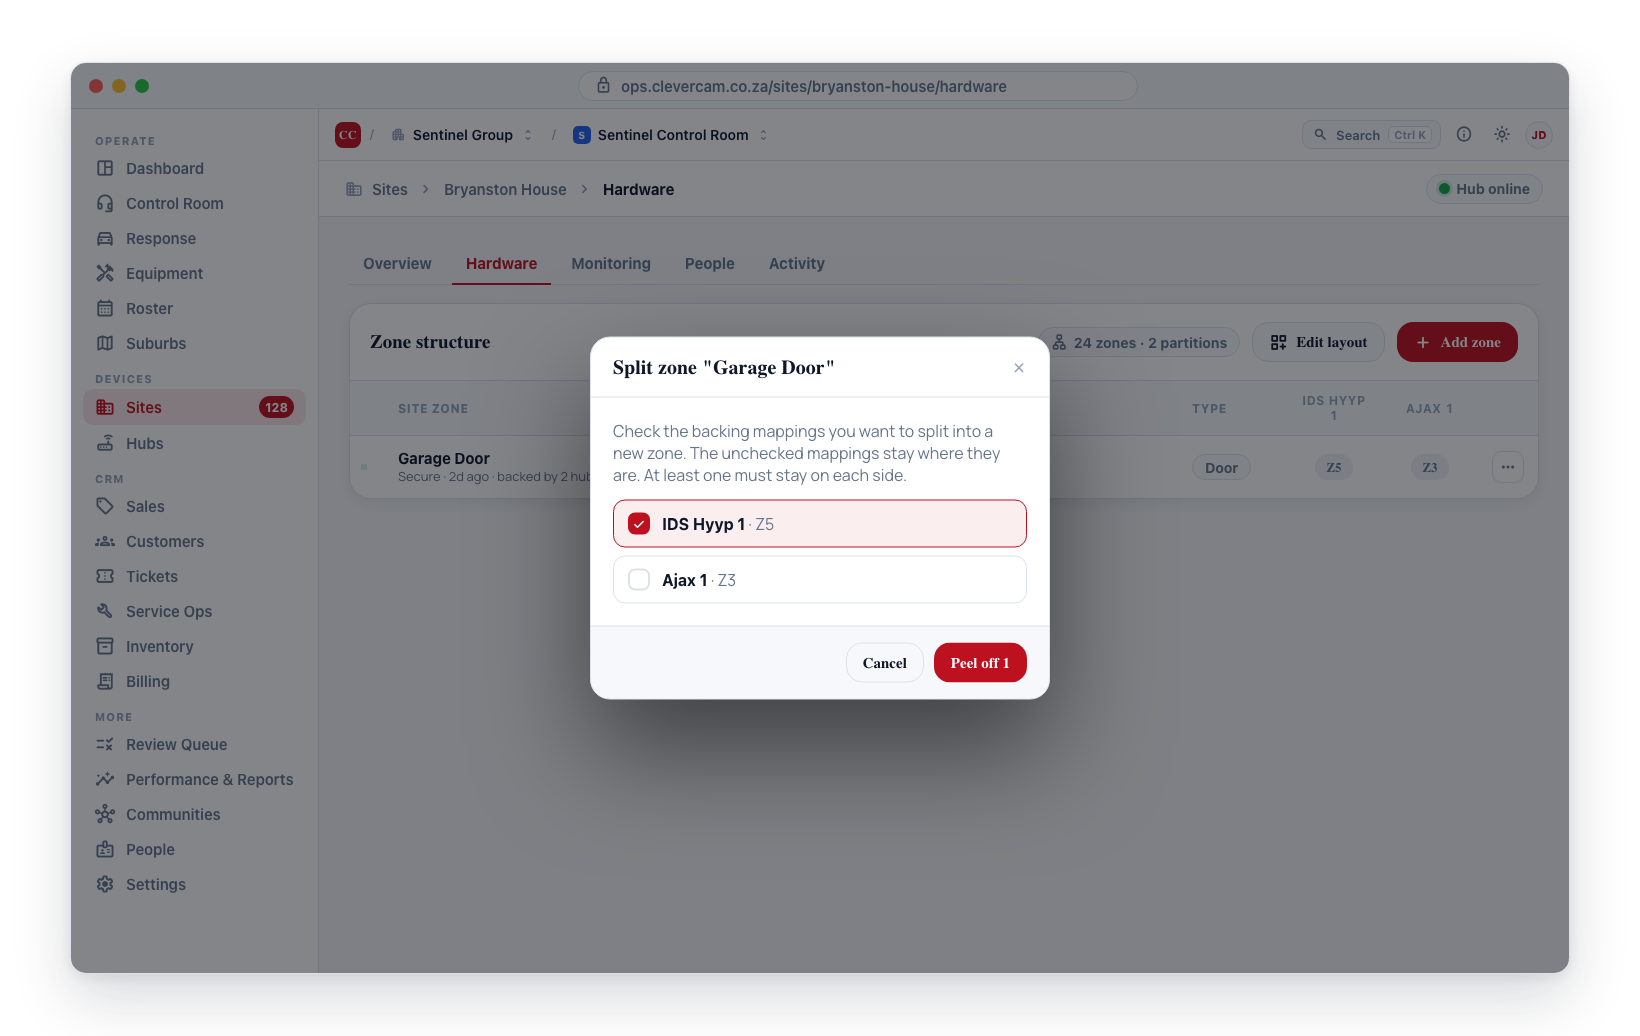
- Click the "..." button on the partition header or zone row. The button is disabled when the entry only has one hub connection.
- Choose Split.
- A dialog lists every hub connection for that entry. Tick the ones you want to move to a new entry; leave the others to stay on the original.
- You must leave at least one connection on each side.
- Click Peel off N. The table refreshes and you will see two entries where there was one.
For partitions, the new entry inherits the original's name. All zones stay on the original partition — if you need a zone to follow the split partition, drag it manually.
For zones, the new entry inherits the original's name, type, and parent partition.
To split into more than two groups, split again on either of the resulting entries.
Once you rename a partition or zone, or merge two of them together, the result is treated as user-curated. If a panel later sends another mapping with the same default name (e.g. "Partition 1"), CleverOps will not silently re-attach it to your curated row — a fresh entry is created instead, which you can then merge in deliberately. This protects the structure you've built.
Merge partitions or zones
When two hubs each report a partition or zone that is really the same physical thing — for example two communicators both covering the same door — merge them into one entry.
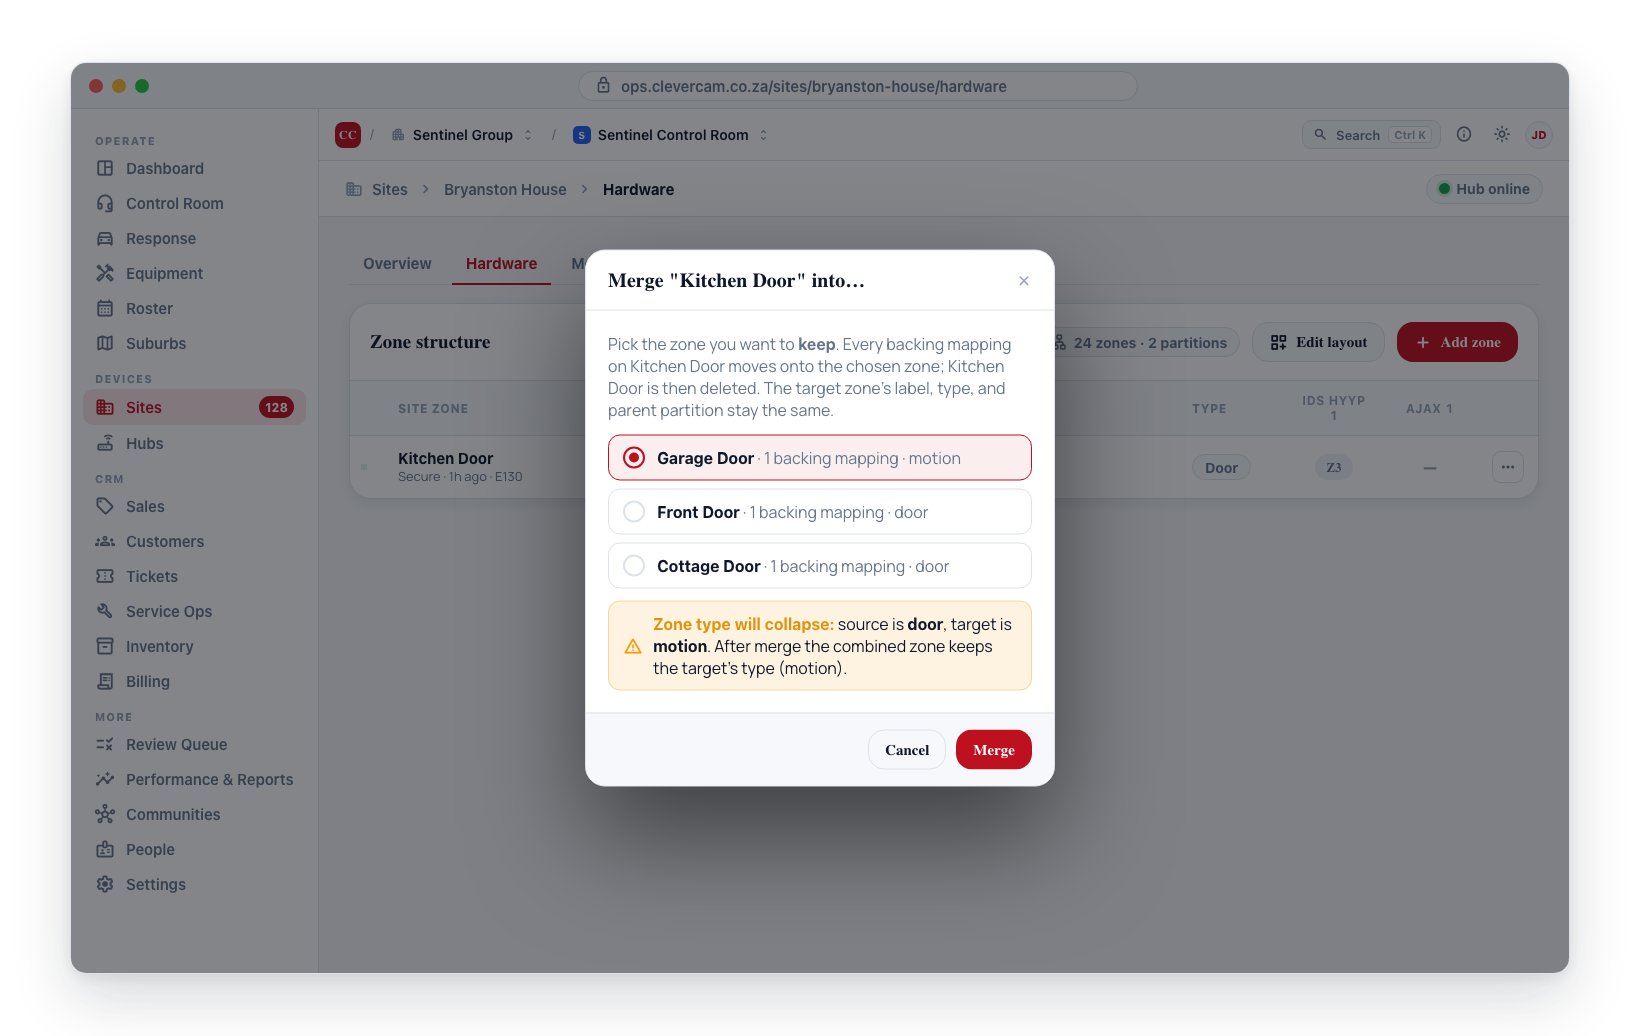
- Click the "..." button on the row you want to dissolve (the one to be removed).
- Choose Merge into.
- The dialog lists every other partition or zone on the site.
- Pick the one you want to keep and click Merge.
What the merge does:
- Partition merge — moves all hub connections and child zones from the source to the target, then removes the source.
- Zone merge — moves all hub connections from the source to the target, then removes the source. The target zone's name, type, and parent partition are unchanged.
The result is a single entry backed by connections from both hubs.
When you merge two zones with different types (e.g. a Door zone into a Motion zone), the merge dialog shows a yellow warning telling you which type will be dropped — the target zone's type always wins. Review the warning before clicking Merge: if you want to keep the source's type instead, change the target's type first, or pick the source as the target by inverting which row you start the merge from.
Merges cannot be undone from the interface — if you change your mind, use Split on the merged entry to separate the connections again.
Hold a zone (zone-on-hold)
When one zone keeps firing — a faulty sensor, a flapping tamper — and you want the control room to stop acting on it without touching the panel, put the zone on hold. A hold is a control-room action: the panel keeps sending the signal and it is still recorded, but the control room does not surface or dispatch it while the hold is active.
- Click the "..." button on the zone row and choose Hold zone….
- Enter a short reason (e.g. "faulty sensor chattering") and, optionally, an auto-release time (30 minutes up to 24 hours). Leave it on No expiry to release it manually.
- Click Place on hold.
The zone row then shows an On hold since … line with the start time, the auto-release time (if set), the reason, and a count of how many signals have been muted. To lift the hold, open the row menu again and choose Release hold — or let the auto-release time expire.
A hold is scoped to the control room (VCR) you have selected: it never silences the zone for another monitoring company that also watches the site, and it affects only that one zone. It is non-destructive — it does not change the panel, the bypass state, or the site's monitoring status — and every hold and release is written to the audit trail.
A bypass is set on the alarm panel and stops the signal at source (toggle it from the Hubs & cameras card or in CleverAlert). A hold is a control-room mute — the panel still sends the signal and it is recorded; the control room simply does not act on it until the hold is released or expires.
Operators place and release the same holds from the control room — see the Zone on Hold page in the CleverCommand docs.
Edit layout mode
To collapse more than two rows at once, turn on Edit layout in the toolbar. Every zone row and partition header gains a checkbox.
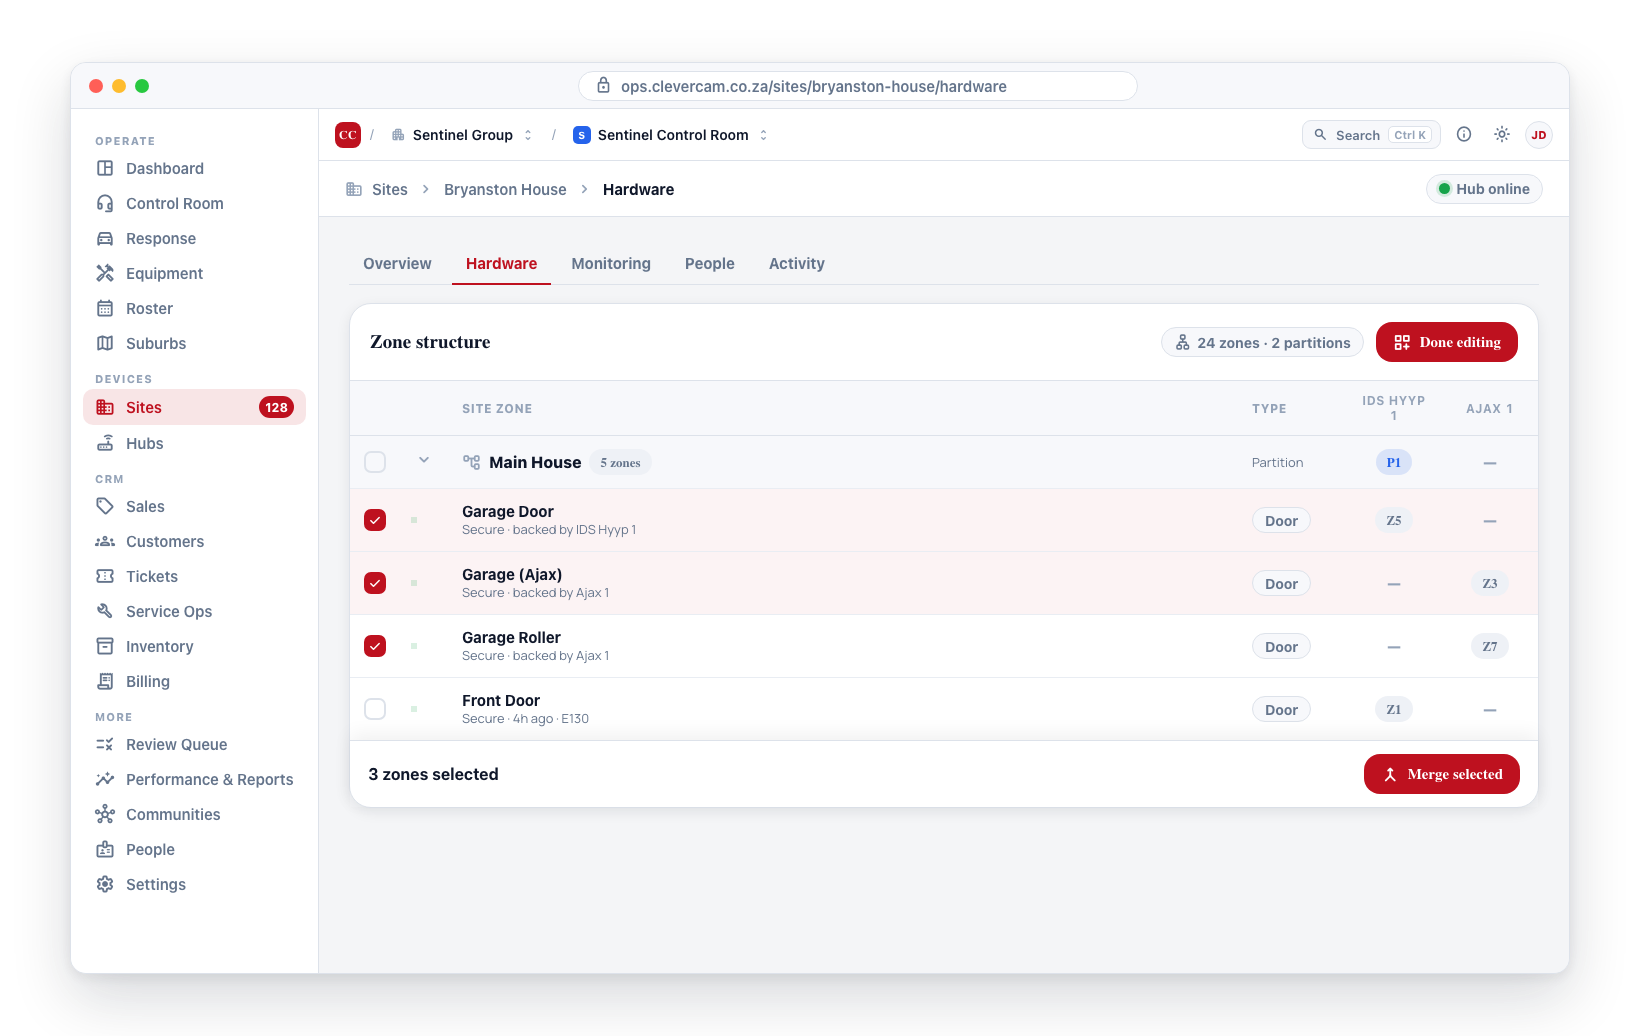
- Tick two or more rows of the same kind (either all zones or all partitions — they cannot be mixed).
- A sticky Merge selected bar appears at the bottom of the tab showing how many items are selected.
- Click Merge selected. The dialog lists every selected row; pick one to keep and click Merge. Every other selected row is collapsed into it.
- Click Done editing to leave Edit layout mode.
Orphan cleanup
Sometimes a site-level partition or zone is left behind with no hub connection — these show with an amber background and "—" in every hub column.
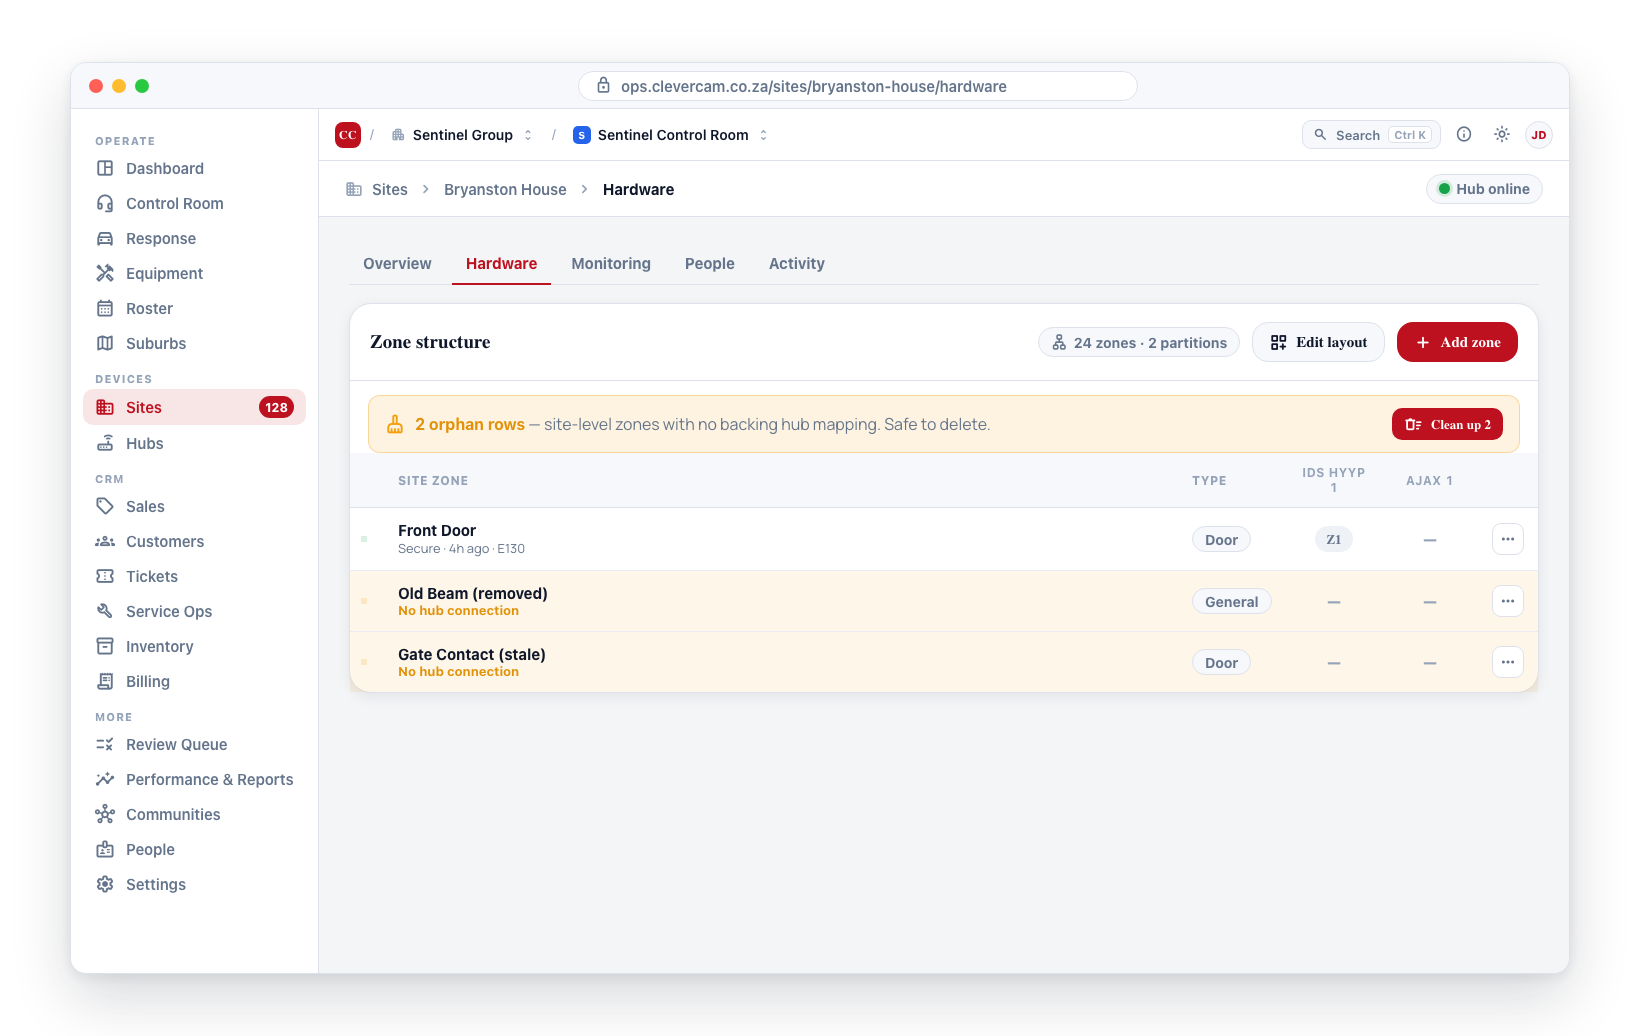
When at least one such entry exists, an amber banner appears above the table with a Clean up N button. Click it to remove all disconnected partitions and zones on the site in one action. The actual panel data on your hubs is not affected.
When you unlink a hub from a site, leftover entries are swept up automatically. The manual button remains for cases where entries are left behind by a panel sync.
Unassigned zones
If a zone exists on the site but has not been linked to a partition yet, it appears in the Unassigned strip at the bottom of the table. You can drag a zone into Unassigned to detach it from every partition, and drag it back out into a partition to attach it.
CleverCam files zones under a partition on its own whenever it can tell where they belong:
- The panel names the partition. The first signal that arrives for a zone with a partition number places the zone under that partition (unless you have already placed it somewhere yourself — your own arrangement is never overwritten).
- The hub has exactly one partition. Every zone on that hub belongs to it, so pre-created zones, zones first seen while the panel was still unlinked, and zones the panel reports without a partition number are all placed under it. This is why a one-area panel never shows its zones apart from the area — in this table or in CleverAlert's Devices tab.
Zones stay in Unassigned only on multi-partition hubs where no signal has named the partition yet. Drag them into place, or wait for the panel to report.
Unlinked hub data warning
In a healthy state this banner never appears. When it does, it means one or more hub connections have not yet been matched to the site-level structure — usually because the hub is not linked to a site yet, or because it will be resolved on the next panel signal. The list shows which hub and slot are affected so you can tell if a specific hub needs attention.
Alarm Panel Users
The Alarm Panel Users table lives on the People tab, beneath the call-list table. It lists every contact connected to the site — both app users and non-app contacts — and lets you link each one to a keypad user number on the alarm panel.
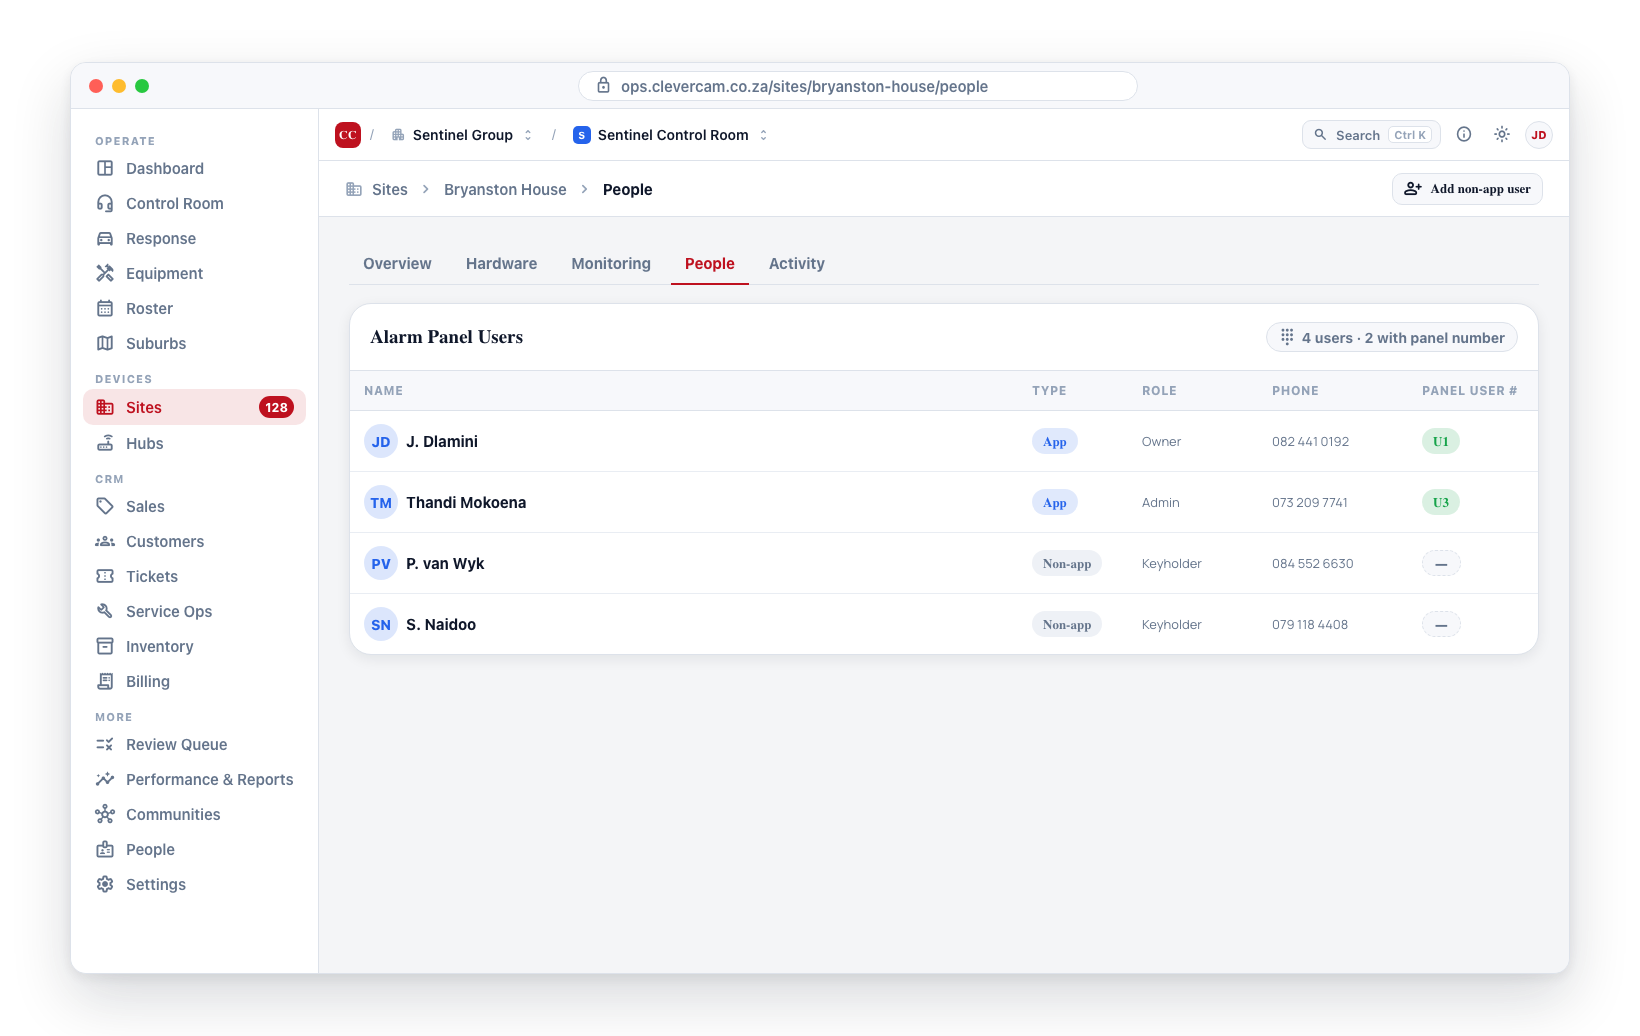
| Column | What it shows |
|---|---|
| Name | The contact's display name. Click to edit the name and phone number. |
| Type | "App" for a registered CleverAlert user, "Non-app" for a keyholder-only contact (no app notifications). |
| Role | The role the contact has on this site (owner, admin, etc.). |
| Phone | The phone number used on the call list. |
| Panel user # | The keypad user slot on the alarm panel. Click to edit. Shown as "U3" when linked, "—" when not. |
Why the Panel user # matters
When the alarm panel sends an arm or disarm event, it reports a user number rather than a name. CleverOps uses that number to look up the matching contact in this table and then:
- Shows the person's name in the alarm feed (e.g. "Disarmed by Jaco" instead of "Disarmed - User 3").
- Makes the event searchable by contact in reports.
- Carries the attribution through into CleverAlert and the control room view.
If the panel sends a user number that is not linked to anyone, the event falls back to a generic "User N" description. No information is lost — you can link the number at any time and it will be used for future events.
Editing the panel user number
- Click the Panel user # cell on the contact's row.
- Type the number that the keypad uses for this person.
- Press Enter or click away to save. Press Esc to cancel. Clear the field and save to unlink.
The count strip at the top of the table (e.g. "2 users · 0 with panel number") tells you at a glance how many contacts still need linking.
When an arm or disarm event arrives with a user number that is not linked to any contact, CleverOps does not create a new contact for you — it simply logs the event as "User 3" and moves on. Linking is always a deliberate step: you decide which real contact corresponds to which keypad slot.
This is intentional. Keypad slots can be reassigned, shared, or reused after staff changes. If you want every keypad user visible in CleverOps, add the contact manually on the People tab and then link the panel number here.
Editing a contact's name and phone
Clicking the Name cell opens a small editor, and what it edits depends on the contact's type.
- A non-app contact is yours: the dialog holds a single Name field and a Phone, both stored on the site's own record of that person. Delete removes the contact from the site.
- An app user owns their own CleverAlert profile, so the dialog edits per-site overrides instead. By default the row follows their profile — when they change their name or number in the app, the change appears here. Typing a different value stores an override that applies on this site only; clearing the field, or typing exactly what their profile says, removes the override and resumes following the profile. Their CleverAlert profile is never changed from CleverOps, which is why the First name, Last name and Email fields in the full person editor are shown read-only — use Name on this site and Phone to set what your control room sees.
Editing contacts, phone numbers and panel user numbers needs the Customers & sites permission, or the Administrator / control-room-manager role. Owners and company admins always have it. Responders on a reaction unit can see the call list but cannot change it — challenge words and medical alerts are deliberately out of their reach.
If the fields look editable but nothing you type sticks, this permission is what is missing; a control-room admin can grant it on Settings → Team.
Non-app contacts
To link a keyholder who will not install CleverAlert, add them via the People tab using Add non-app user. They will then appear in this table as "Non-app", and you can assign their panel user number exactly the same way.
Where to arm, disarm, or bypass
The Zone structure card is for structure and organisation, plus the Arm menu on Olarm partition headers and the control-room Zone on Hold action. To act on zones at the panel:
- Arm / Disarm a partition — Olarm partitions have an Arm menu on the partition header here; for every panel type you can also use the per-hub rows in the Hubs & cameras card (also on the Hardware tab), or CleverAlert.
- Bypass / Unbypass a zone — use the Hubs & cameras card, or CleverAlert. (Not available on this card.)
- Hold / Release a zone for the control room — use the row "..." menu on this card (see Hold a zone).
Relationship to other tabs and cards
- Hardware → Hubs & cameras — the per-hub view of the same information, with the arm, disarm, and bypass controls.
- Monitoring → Setup — the routing rules (monitoring policy, per-CID eligibility, signal-pair restore handling) and the site mode (Classic / Residential / Business / Continuous-movement) that decide how events from these zones are handled. Per-event SOPs (e.g. Tamper, Burglary) live on Monitoring → Alarm handling. The per-site dispatch-limit override lives on Monitoring → Setup.
- People → Alarm Panel Users — link keypad user numbers to real contacts so arm and disarm events report a name instead of "User 3".
Troubleshooting
A zone shows "—" in every hub column. The zone entry exists on the site but no hub is connected to it. That is a leftover entry — click Clean up N in the amber banner above the table to remove it. The original hub data, if any, is not affected.
A zone shows up as "General" even though it is clearly a door or motion sensor. The zone type is identified from the description the panel reported when the zone was first seen. If the panel sent something unrecognisable (or nothing), the zone defaults to "General". Fix it by clicking the type in the Type column and picking the correct value.
A zone keeps showing as "Alarming" every time the panel fires. That is expected — the alarming state refreshes each time an alarm event arrives from the panel. The state clears automatically after the zone type's time window (1 minute for fob, 10 minutes for motion and door, 30 minutes for smoke, 1 hour for tamper), or sooner if the panel sends a restore.
A radio's TELE input keeps raising "24hr alarm" when the site opens or closes. The installer has wired the panel's arm output to that input. Set the input's Behaviour to Reports an open or Reports a close (whichever it signals), and move it into the partition it reports for. See Telemetry inputs.
A partition shows zero zones. The partition exists (the hub reported it) but none of its zones have appeared or been linked yet. Zones will show up as the panel publishes them.
The cleanup banner appears after a hub is removed. If the hub was unlinked using the proper Remove hub action, leftover entries should be cleaned up automatically. If the banner still appears, click Clean up N to remove them.
Arm and disarm events show "User 3" instead of a person's name. The alarm panel reports the user by keypad slot number, and slot 3 has not been linked to a contact yet. Open the Alarm Panel Users table, click the Panel user # cell on the right contact, and enter "3". Subsequent events by that user will show their name. Past events are not changed.
A zone row shows two numbers separated by a slash (e.g. "1/3"). The zone is backed by two panel connections with different slot numbers. That is fine if the two connections really are the same sensor wired to two hubs — but if they are different sensors that were accidentally grouped together, open the row's "..." menu, choose Split, and move one of them to its own entry.