Operator Checklists
An operator checklist is the list of steps that attach to a live event and have to be dealt with before it can be resolved. Rows assigned to the control room appear on the operator's CleverCommand kanban card; rows assigned to the responder appear on CleverResponder while a unit is dispatched.
Checklists are authored inside an alarm type's Action Plan, so a burglary can carry a different list from a fire without any extra scoping rules.
Where they are authored
| Scope | Where |
|---|---|
| Control room default | Settings → Alarm Handling → Action plans — pick the alarm type, open its Checklists section. |
| One site only | Site details → Monitoring → Alarm handling — the Per-site alarm handling card, same Checklists section on the alarm type you want to change. |
Per-site edits are stored sparsely: only the fields you actually change are saved, so every untouched step keeps tracking the control-room default.
Both surfaces live behind the Advanced Alarm Handling module. Without it, neither Settings → Alarm Handling nor the site's Alarm handling sub-tab appears. See Modules & Capabilities.
Until mid-2026 checklists were authored on their own Operator Checklists tab (per VCR and per site) and, for CID-level scoping, in a per-pattern editor on the site's Pattern Detection panel. Both editors were removed when Action Plans took over — an Action Plan is already per alarm type, which is the scoping the per-pattern editor existed to provide.
Template rows saved before the change still attach at runtime for any alarm type whose plan leaves its checklist empty, which is why the fall-through is described below. There is no longer a screen to create or edit them.
Building a checklist
Open the Checklists section on an alarm type's plan. It holds two independent lists — Operator checklist and Responder checklist — and each step has a type:
| Step type | What the assignee does |
|---|---|
| Instruction | Read-only guidance; nothing to submit. |
| Acknowledge (tick) | One-click confirmation. |
| Single select | Pick one option from a list you define. |
| Multi select | Pick any number of options from a list you define. |
| Take photo | Capture a photo in CleverResponder. |
| Verify password | Check the caller's password before continuing. |
| Scan QR code | Scan a QR code in CleverResponder. |
Use a step's ↑ / ↓ buttons to reorder it and its Remove button to remove it. Steps are numbered in the order they will be shown.
Checklists only appear on alarm types whose Handling is set to Control room — the only handling that runs the full operator flow. A type set to Review queue or Log only never reaches an operator, so it has no checklist section.
Legacy template fields
The retired template editor exposed a wider row model than an Action Plan step, and rows saved with it still attach. The fields below describe those stored rows, and the vocabulary a CleverCommand operator still sees on the kanban card.
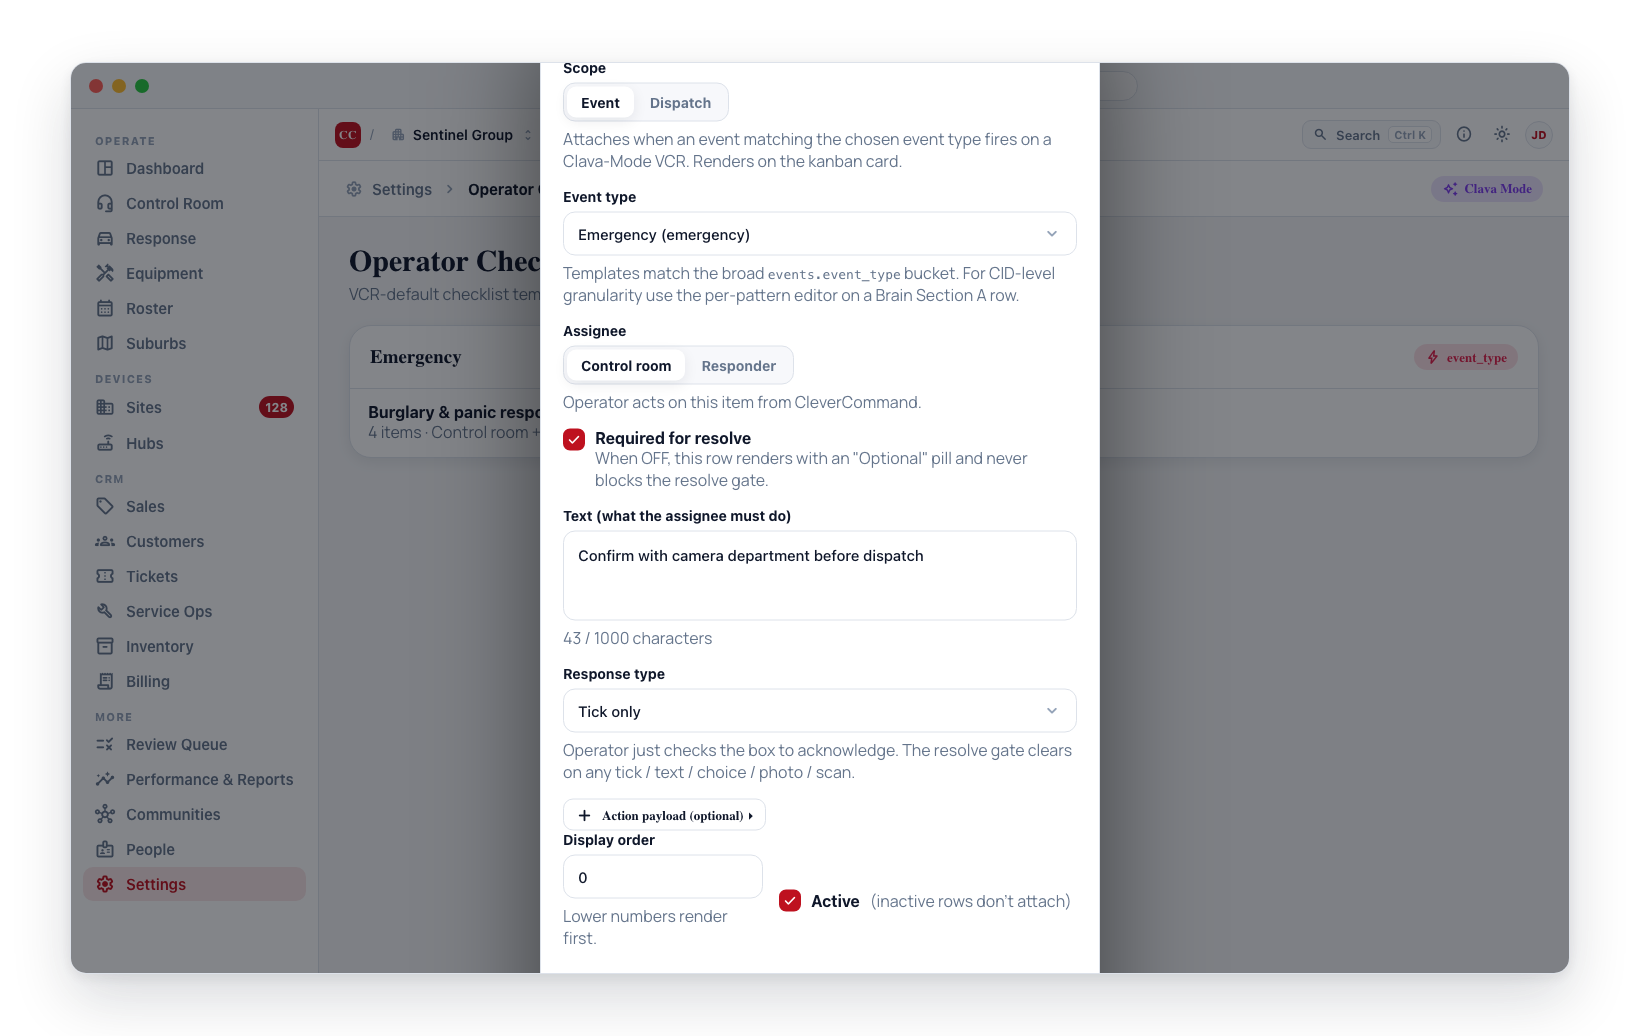
- Scope — segmented control:
- Event (default) — the row attaches when an event matching the chosen
event_typearrives. Renders on the event's kanban card. - Dispatch — the row attaches when a unit is dispatched to an event. Renders with a
Dispatchpill on the kanban card and on the responder app's checklist. Use for "confirm responder arrived", "photograph the breach point", "scan QR at front desk", and similar dispatch-only tasks. When Dispatch is selected, the Event type / pattern / CID fields disappear (dispatch templates aren't keyed by event_type).
- Event (default) — the row attaches when an event matching the chosen
- Event type (only when Scope = Event) — the broad
events.event_typebucket the row attaches to:- Emergency — burglary, panic, duress, fire, medical, tamper
- Malfunction — AC mains failure, hub offline, line trouble, low battery
- Routine — opening / closing, scheduled events, low-priority telemetry
- Restore — recovery signals (AC restore, comms restore, zone restore)
- Assignee — segmented control:
- Control room (default) — the row appears on CleverCommand kanban for the operator
- Responder — the row appears on CleverResponder for the field responder while dispatched (and stays reviewable read-only when the responder reopens the completed call-out from History)
- Required for resolve — toggle (default ON). When OFF, the row renders with an "Optional" pill and never blocks the gate. For event-scoped items the gate is the event resolve gate; for dispatch-scoped items it's the dispatch completion gate.
A required Responder row only starts blocking once a unit on that event is marked on scene. Until then it shows an "On arrival" pill on the kanban card and doesn't hold the event up — an alarm nobody was sent to, or a unit recalled because the customer answered the phone, leaves nobody who could have done it. See When no responder reaches the scene.
Marking a row Required also decides who can let it go. A required row can only be waived (or ticked on someone's behalf) by a Supervisor, or by a Controller holding the Clear mandatory event tasks capability — see Waiving a task. Optional rows are ungated. Make a row required when you want that supervision, not merely because it matters. 5. Text — what the assignee must do (e.g. "Confirm with camera department", "Photograph swimming pool gate"). Up to 1000 characters. 6. Response type — how the assignee acknowledges:
- Tick only — one-click acknowledgement
- Acknowledge (gates dispatch) — one-click confirmation that also blocks dispatch: while a required Acknowledge row is unticked, no unit can be nominated or dispatched for the event. Use for must-read instructions. See Acknowledge-before-dispatch below.
- Free text — type a response
- Single choice — pick one from an
optionslist - Multiple choice — pick multiple from an
optionslist - Photo — responder captures a photo on the CleverResponder app (auto-forces Assignee = Responder)
- QR scan — responder scans a QR code on the CleverResponder app (auto-forces Assignee = Responder)
- Action payload (advanced, optional) — a small JSON hint that surfaces as a contextual button on the kanban card. Pick a
kind:- Call back —
phone+contact_name. The kanban row gets a 📞 button that opens the manual / AI call picker pre-filled with the contact. - QR expected value —
expected_value. The responder app reads this and recordsmatched: true | falseon the response so the kanban row can renderQR ✓/QR ✗. - Photo subject hint —
what. The responder app surfaces the hint near the camera-launch button.
- Call back —
- Display order — lower numbers render first. Ad-hoc operator rows added on the live event default to 1000.
- Active — inactive rows don't attach to new events.
How a legacy template row is chosen
For stored template rows the override rule is fully-replace, not additive, and applies per scope:
- Event-scoped: if any active site rows exist for
(site, vcr, scope='event', event_type)(and matching CID, if CID-scoped), the site rows attach and the VCR defaults are suppressed for that(event_type, cid)at that site. Otherwise, the VCR defaults attach. - Dispatch-scoped: if any active site rows exist for
(site, vcr, scope='dispatch'), the site dispatch rows attach to every dispatch at that site and the VCR dispatch defaults are suppressed. Otherwise, the VCR dispatch defaults attach. There's no event_type / CID axis for dispatch templates.
Action Plan checklists do not work this way — a per-site plan patches individual steps rather than replacing the whole list, so a site can change one step and keep the rest.
Telling burglary apart from fire
The legacy templates scoped to a coarse event_type bucket, so a single
"emergency" list covered burglary, panic, fire, medical and tamper together. A
separate per-pattern editor existed to narrow that down by CID.
An Action Plan is already per alarm type, so the problem no longer arises: give Burglary one checklist and Fire another, and each attaches only to its own alarm type. The per-pattern editor was retired for that reason.
Photo and QR responses
When a responder submits a photo response, the image uploads to the public responder-evidence storage bucket (5 MB cap, image/jpeg + image/png). The response stores only the public URL, not the binary, so it stays under the 8 KB jsonb cap. Operators in CleverCommand see a 56×56 thumbnail in the kanban row that links to the full image.
QR scan responses store the scanned value plus an optional matched flag when the template's action_payload.expected_value was set. Mismatches still record (audit trail) — they never hard-block resolve. The expected value is never displayed on the responder's scanner screen, so the checkpoint code can't be read off the phone and counterfeited.
Acknowledge-before-dispatch
A row with response type Acknowledge is a hard gate on dispatch, not just on resolve. While any required Acknowledge row on an event is still unticked:
- the operator cannot nominate or dispatch a unit for that event — the dispatch is blocked server-side with a clear "Acknowledge the required checklist instructions before dispatching a unit" message on every dispatch surface, and
- the event cannot be resolved either (every required row blocks the resolve gate).
This is the equivalent of a traditional control room's "agent must acknowledge the action plan before acting" rule. Author it on the control-room plan for a blanket policy, or on the per-site plan for an account-specific instruction. Once the operator clicks Acknowledge on the event's kanban checklist card, dispatch proceeds normally.
Acknowledge rows should be Event-scoped (they must already be attached before a dispatch is attempted) and assigned to the Control room. The gate is enforced in the database — across smart dispatch, the dispatch kanban, the nomination picker, and event details — so it holds no matter which surface the operator uses. Responder-assigned Acknowledge rows are skipped by the dispatch gate: they would deadlock it, since no unit may roll until the row is ticked and no responder can tick it until a unit rolls.
Field naming on the DB
Templates live on vcr_site_checklist_templates. Items (the per-event copies that the attach trigger creates) live on vcr_event_checklist_items. Responses (one row per tick / text / choice / photo / scan / waive) live on vcr_event_checklist_responses. The multi-response model means an item can be ticked twice and both responses persist; the resolve gate is satisfied as soon as the first response lands.
A waive is just another response (kind: 'waived' with the operator's reason), which is why it clears the gate without the gate needing to know about waiving. A release — the customer standing the event down from any channel — is different: it stamps released_at on the item itself, so the row is skipped by the gate while remaining un-responded and still visible. See When the customer stands the event down.
The on-arrival rule stores nothing on the item at all — the gate asks live whether any dispatch on the event carries an arrived_at stamp, so a late arrival re-arms the rows by itself and nothing needs back-filling.
Related
- Operator Checklist (CleverCommand) — the kanban consumer side
- Clever/Advance Mode — the kanban view this is gated on
- Action Plans — the per-alarm-type plan a checklist lives inside
- Site details → Monitoring — the per-site alarm-handling card