Hub Management
The Hub Management page gives you a complete inventory of every Clever Hub linked to your monitoring centre. Clever Hubs are the hardware devices installed at customer sites that connect cameras and sensors to the CleverCam cloud. From this page you can monitor hub status, filter by various criteria, and access detailed information about each device.
The Overview dashboard
The Hubs page opens on an Overview dashboard, with a Hubs tab (the full inventory) beside it — plus Receivers, Identity & Signals and Test signals when the Alarm Receivers module is on. The Overview reads your hub fleet's health at a glance, and every tile opens the inventory filtered to those hubs.
- Fleet KPIs — Total hubs, Online, Offline, Deployed (linked to a site), Spare (not on a site — kept claimed as rental spares), Faulty, and No billing (hubs with no billing account — see below).
- By hub type — how the fleet splits across CCU models.
- By receiver — only for control rooms with alarm receivers: how the communicator fleet splits across your receivers, one bar per receiver with its communicator type beside the count. Where the by-type bars lump two RDC bases (or two Olarm feeds) into one RDC row, this panel shows each base on its own. A receiver nothing reports through still gets a bar, at zero. Click a bar to open the inventory filtered to that receiver.
- Ownership — rental vs owned hardware, plus any hubs with No billing or Billed elsewhere.
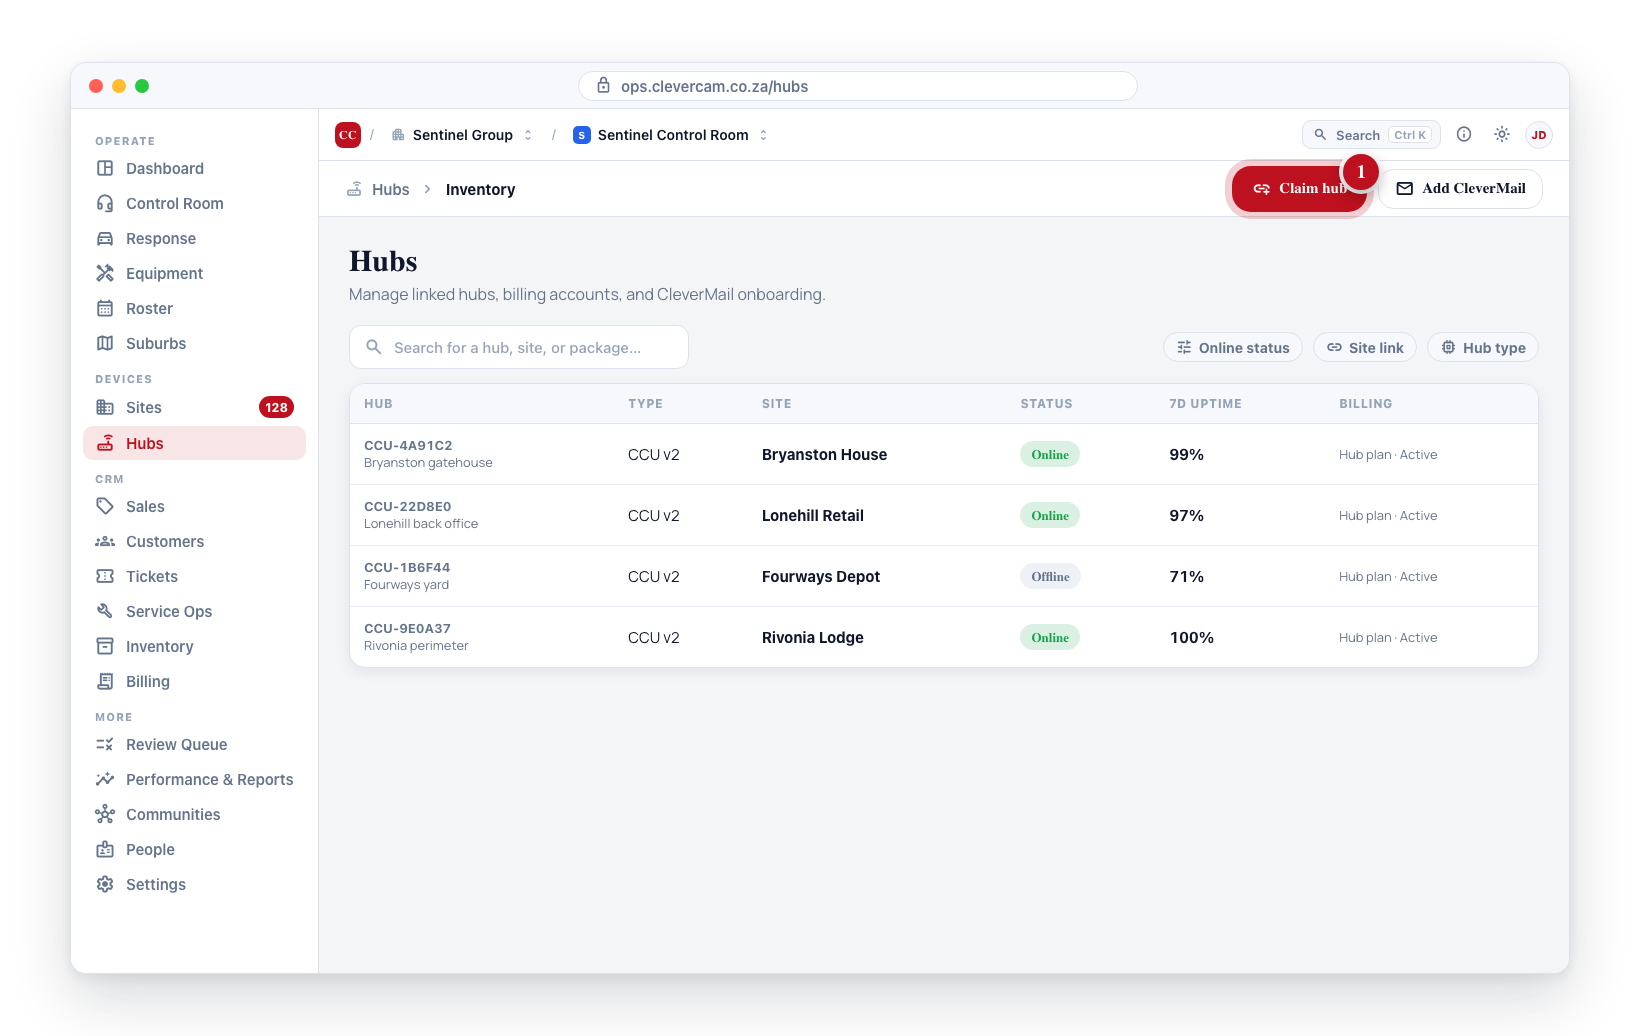
Viewing Your Hubs
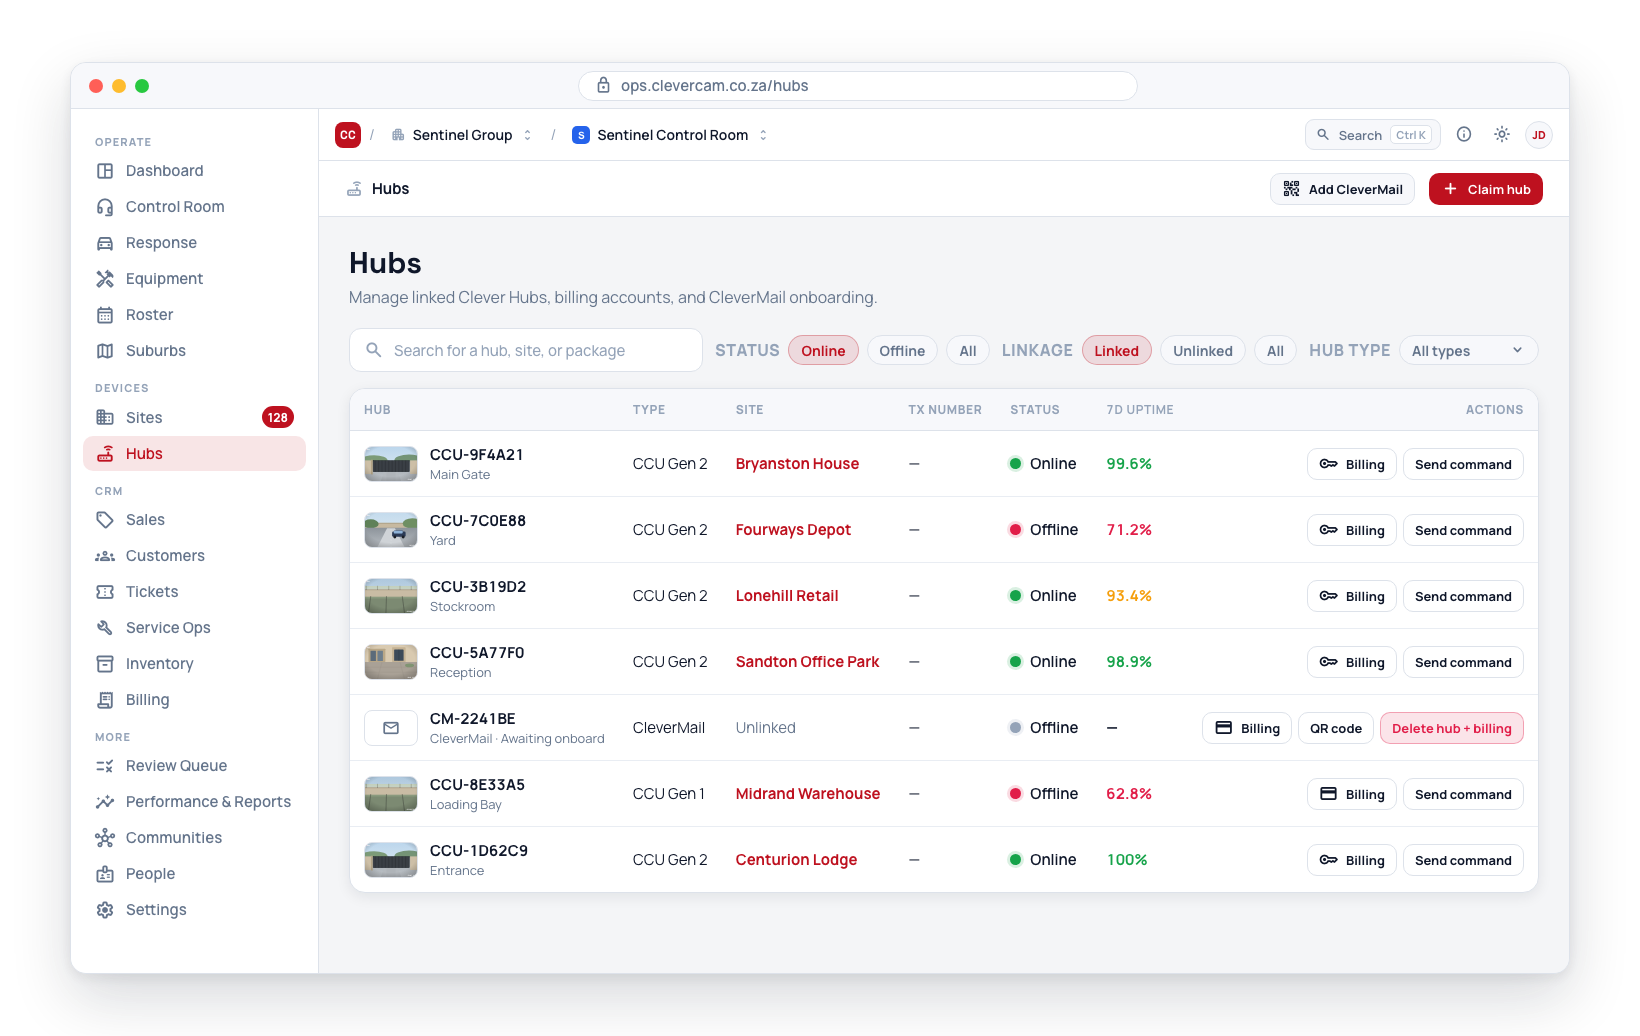
- Navigate to Hubs in the sidebar.
- The hub list loads as a table showing all Clever Hubs associated with your monitoring centre.
- The table opens with seven columns — Hub, Type, Site, TX number, Status, 7d Uptime and Actions — and ten more can be switched on from Columns ▾ above the table. Every column is described under Choosing your columns.
Billing, Ownership and Client are off by default — that detail matters to one or two people per company and pushed the table into horizontal scrolling for everyone else. Switch the Billing and Client columns on if you want them, or use the row's Billing button in the Actions column: hover the button for the one-line summary, click it for the full detail (see Billing, ownership & client details below). The Hardware and Client-relationship filters work exactly as before.
Choosing your columns
The list does not show every column at once. Columns ▾, above the table, is where you decide which ones it shows — tick a column to bring it in, untick it to hide it. The button says how many are currently hidden, so a column somebody switched off is never a mystery. Hub and Actions are listed too, ticked and greyed with always beside them: they cannot go, and the list says so rather than leaving them out.
Put them in the order you read them. The ↑ and ↓ beside each column in Columns ▾ move it one place; a column heading's own menu (the small ▾ that appears when you hover a heading) has Move left and Move right for the same thing. The locked columns stay where the list put them, but other columns may move past them.
Your choice is yours alone and it follows you. Columns, their order and the sort are saved against your login, not the browser, so the list looks the same on the control-room machine and on your laptop, and changing it does not touch what your colleagues see. Reset to default view puts everything back.
The seven you start with:
- Hub (always shown) — the hub's serial number and name. A hub is named after its communicator type by default (HYYP, Olarm, FSK; a CCU is My CCU) and can be renamed from its site's Edit hub dialog — names need not be unique. For an alarm radio that is transmitting but not bound to a site, a warning line also appears here — "1,240 signals unrouted · 3m ago" — meaning the receiver is hearing it but its signals raise no events. Bind it from Identity & Signals. An Olarm, HYYP or Onyyx panel registered by TX number that has not yet sent anything shows Waiting for first signal here instead — the device attaches itself on the panel's first signal, no re-keying needed (the same note its site's Hardware tab shows). Hubs with neither (including every CCU) show nothing extra.
- Type — the hub model or generation. For an alarm communicator the receiver it reports through is shown beside the type — RDC · RDC Receiver - M — so a control room with two bases of the same type can tell at a glance which base a radio is on. CCUs, which report directly, show the type alone.
- Site — the site this hub is linked to (click to open it), or Unlinked. A Billing only flag appears beside the site name when your control room holds the hub's billing but the site is monitored by a different control room.
- TX number — the TX number (account code) the communicator transmits as its identity — how most legacy alarm radios are known ("the HYYP on TX 2458"). A hub bound to more than one code shows the first plus a +N count; hover for every identifier. CCUs, which have no TX number, show a dash.
- Status — Online or Offline.
- 7d Uptime — the hub's online share of the past 7 days, worked out for the rows on screen after they load.
- Actions (always shown) — the Billing button plus the buttons for commands, QR code, billing and release (see Hub Actions).
The ten that start switched off:
- Last seen — how long ago the hub last reported (its newest heartbeat, check-in or online stamp); hover for the exact time.
- Firmware — a CCU's OTA version, or the firmware a communicator reports.
- Package — the billing package on the hub's account (CCU 8 Standard, FSK, …), or No billing.
- Receiver — the base or feed the communicator reports through, on its own rather than tucked under the type.
- Identifiers — the serial-style bindings other than the TX number: panel IMEI, Olarm serial or uuid, VBS uid. First plus a +N count; hover for all of them.
- Billing — the CleverCam ↔ company hardware relationship as one word: Owned, Rental, No billing or Billed elsewhere (a dash for communicator types, where it does not apply).
- Client — the company ↔ client relationship: Company site, Client's own, Managed by <company> or Unlinked. See Site ownership.
- Claimed — the date the hub record was created.
- Hub ID — the hub's numeric id, for support conversations.
- Notes — the hub's internal notes, clamped to one line; hover for the whole note.
The list only fetches the extra look-ups behind the columns that are showing, so a page with the default set is as quick as it ever was however many columns exist.
Sorting the list
Click a column heading to sort by it; click it again to reverse. An arrow marks the column the list is sorted on. The heading's ▾ menu offers the two directions by name — A → Z / Z → A for text, Newest first / Oldest first for dates, Online first / Offline first for status — so you never have to click twice to get the one you meant.
These headings sort: Hub (the default — by name, then serial), Type, Site, TX number (hubs with one first / without one first), Status, Last seen, Firmware (as version numbers, so 1.14.10 comes after 1.9.0), Package, Receiver and Claimed.
The sort is done by the server across your whole fleet, not just the page on screen — so sorting by site and paging forward really does walk the alphabet, rather than re-shuffling the fifty rows you happen to be looking at. Like your columns, the sort is saved against your login.
The remaining headings — 7d Uptime, Identifiers, Billing, Client, Hub ID, Notes and Actions — are not sortable; their menu says so. Uptime in particular is worked out per page from the hub's online/offline history, which cannot be ordered across thousands of hubs without computing all of it.
Searching and Filtering
Use the controls above the table to narrow your view:
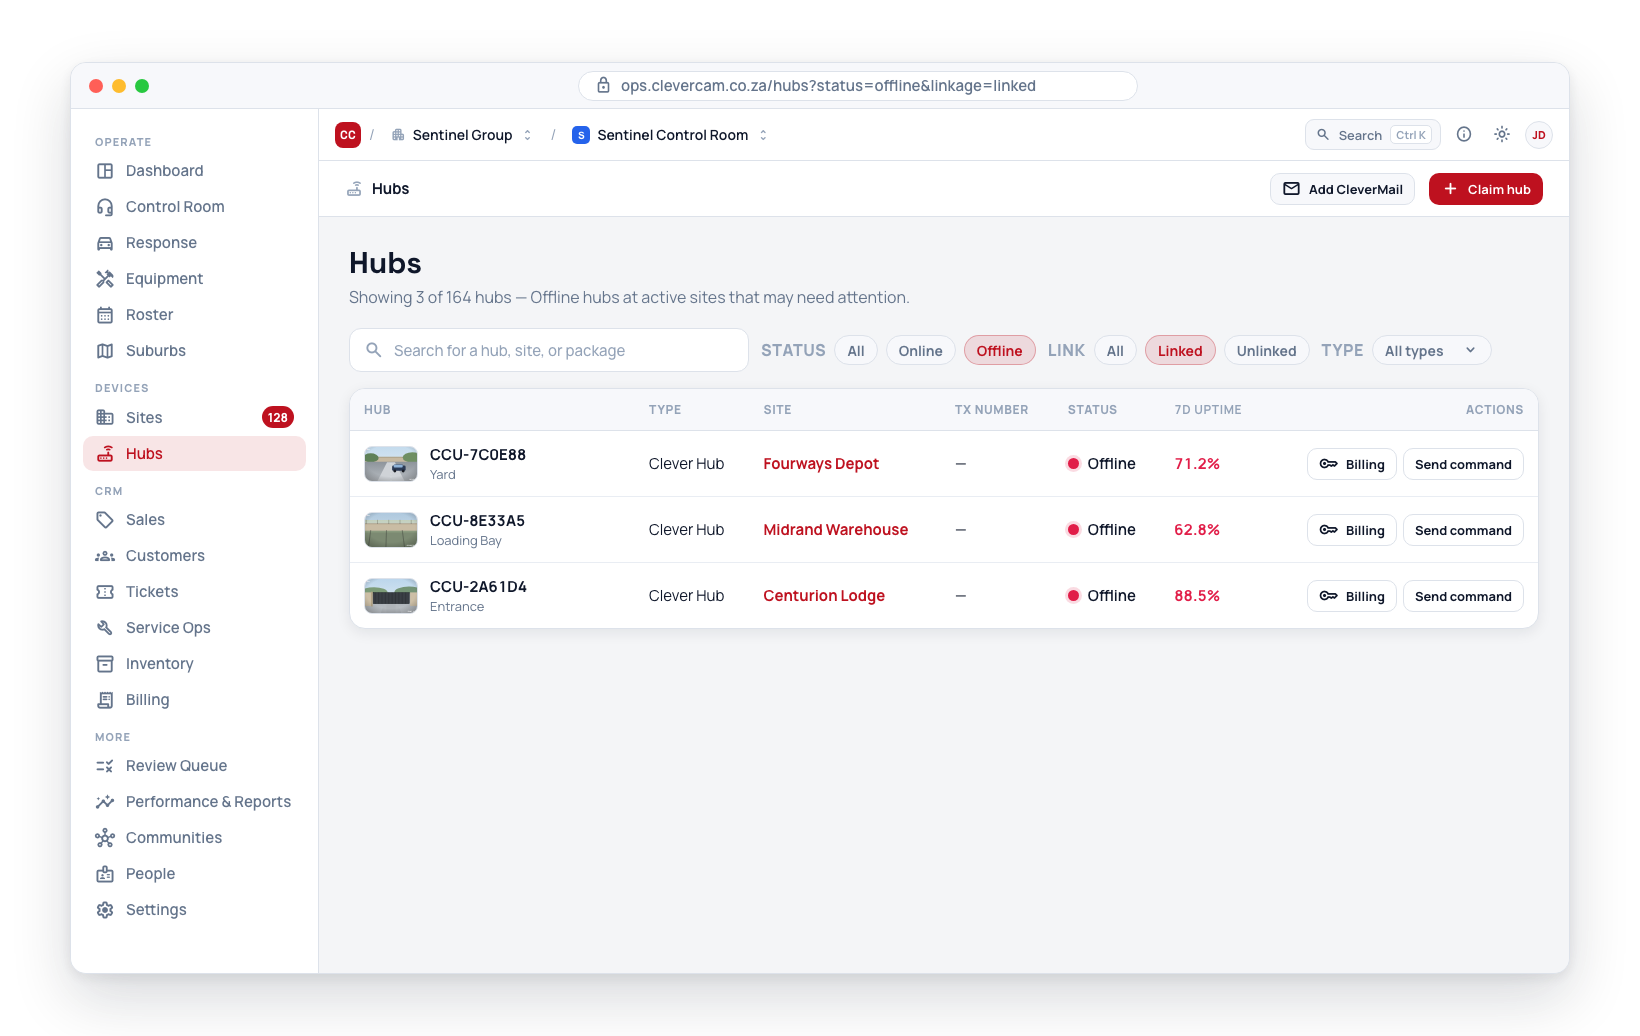
- Search bar — Search by hub serial, label, linked site name, receiver name, or TX number (account code) — "2458" finds the HYYP transmitting on TX 2458. Panel IMEIs and Olarm serials match too, even though the TX number column only shows account codes.
- Status filter — Show only Online hubs, only Offline hubs, or All.
- Linkage filter — Show only Linked hubs (assigned to a site), only Unlinked hubs, or All.
- Hub type filter — Filter by a specific hub model or type. A type your control room has more than one receiver for is marked as such in the list — RDC · 2 receivers — a hint that the Receiver filter beside it can split it further.
- Receiver filter — Shown only when your control room has alarm receivers (CCU-only fleets never see it). Narrows the list to the hubs reporting through one receiver — the radios on RDC Receiver - M as opposed to RDC Receiver - N. It follows the Hub type filter: with a type selected it lists that type's receivers (or reads No receivers for this type for a CCU type); with All types it lists every receiver, each prefixed by its type (Olarm · Olarm Receiver). Inactive and paused receivers are marked in the list. Changing the hub type to one the selected receiver does not belong to clears the receiver scope; All types keeps it.
- Hardware (CleverCam) filter — Show only Owned, only Rental, or only No billing hubs. Matches the Ownership badge exactly: Owned and Rental only apply to camera CCUs, while No billing finds unbilled hubs of any type.
- Client relationship filter — Show only Company site, Client's own, or Managed elsewhere hubs (the client relationship shown in the row's billing-details popover). See Site ownership for what these mean.
The most useful filter combination for troubleshooting is Offline + Linked. These are Clever Hubs at active customer sites that have lost connectivity and may need attention.
When the table is empty, the message distinguishes the two cases: "No hubs match your filters" when hubs exist but the search or filters exclude them all, versus a true no-hubs state, which shows a Claim your first hub button to start the claim flow.
Every one of these — the search box included — is applied by the server across your whole fleet, so a search reaches a hub on page 40 as easily as one on page 1, and the counts on the Overview describe the entire fleet rather than the page in front of you. The line at the right of the bar above the table — 312 of 3 083 — says how many hubs the current search and filters match, out of the fleet.
Filtering from a column
A column's ▾ menu is also where its filter lives, so the answer to "how do I narrow the list by this" is the same for every column. Pick a value and the whole fleet is filtered; the heading's ▾ turns solid while a filter is set.
The six filters in the bar are reachable from their columns too: Status (online / offline), Site (linked / unlinked), Type (the hub type), Receiver (only when your control room has receivers), Billing (Owned / Rental / No billing — the Hardware filter) and Client (the Client relationship filter). Setting one from the heading is the same as setting it in the bar — the dropdown follows, and so does the page's URL.
Three filters exist only on their column. While set, each shows as a chip in the bar above the table — even if you later hide the column — with × to clear it:
- TX number — Has a TX number or No TX number
- Identifiers — Has an identifier (any active binding at all) or No identifiers
- First signal (on the Hub column) — Waiting for first signal finds every Olarm, HYYP or Onyyx panel registered by TX number whose device has not sent anything yet, across the whole fleet — the rows carrying the Waiting for first signal note; Not waiting is everything else, CCUs included.
Like the bar filters, these three are part of the page's URL, so a filtered view — every panel still waiting for its first signal, say — can be bookmarked or sent to a colleague.
Exporting the list
Export CSV, in the bar above the table, downloads every hub the current search and filters match — the whole filtered fleet, not the fifty rows on screen — with the columns you have showing, in your order (Hub is always first, as Serial and Name). Dates are written as ISO so they sort and Excel reads them; the TX number and identifier columns list every value separated by semicolons. 7d Uptime is not in the file: it is worked out per page after the rows load, so a fleet-wide export would have it for almost nobody. The file is named hubs-YYYY-MM-DD.csv. A very large fleet is paged out 200 hubs at a time, so the button reads Exporting… for a few seconds on a big control room.
Paging through the hub list
The table shows 50 hubs at a time, with Prev / Next and a "Showing 1–50 of 3 032" line beneath it. Small fleets show no pagination at all.
Turning a page returns you to the top of the list, so you start the new page at its first row rather than halfway down it. Changing the search or any filter takes you back to page one, since a page number from the previous result set no longer means anything. The rows already on screen stay put while the next page loads, so the table does not blink between pages.
The Overview tiles, the ownership split, the hub type filter's list and the unbilled / orphan-billing warnings above the table are all whole-fleet figures — they do not change as you page.
Receivers tab
For control rooms with the Alarm Receivers module, the Receivers tab puts your alarm receivers on the Hubs page, next to the hubs that report through them. It is the same list as Settings → Alarm Receivers — the same receivers, the same columns (Label, Communicator, Panels, Radios, Webhooks, Last Webhook, Supervision, Status, Setup, Actions), the same Add receiver button and the same edit dialog — not a copy. A receiver you add, edit, pause, activate or delete here is the one Settings shows, and vice versa; there is one set of receivers. Rows are grouped by communicator type, then label, so two receivers of the same type sit together.
Two things connect it to the inventory:
- Panels — the count of hubs linked to a site through that receiver is a link: click it to open the Hubs tab filtered to that receiver (linked hubs only, so the list shows exactly what the number counts).
- Any change made here refreshes the hub list, so the Receiver filter and the receiver names on the rows follow immediately.
Everything the receivers table shows and does — the three receiver states, supervision (fail to test), Olarm's two feeds, unrouted radios — is described on the Alarm Receivers page. The Settings page additionally carries the Hardware and Base health sub-tabs, which are not repeated here.
Offline supervision
The Online/Offline status in this table is maintained by offline supervision: CleverCam watches each hub's check-ins, flags the hub Offline (raising a Hub Offline event on its site) when it goes quiet past its timeout, and flags it Online again when it reports back. How aggressively that happens — or whether it happens at all — is configurable at three levels, each of which can also just inherit from the level below it:
- The hub itself — open the hub's site, go to Hardware → Hubs & cameras, edit the hub, and set Offline supervision.
- Its alarm receiver — Settings → Alarm Receivers → edit the receiver → Hub offline supervision. The default for every hub reporting through that receiver; only applies to hubs on a receiver.
- Its hub type — the platform-level default per hub model, managed by CleverCam.
The hub's own setting wins, then the receiver's, then the hub type's. If nothing is set anywhere, the platform default is supervised, offline after 4 minutes.
The Offline supervision dropdown on the hub editor has three kinds of option:
- Inherit — follow the chain above. The option's label spells out what that currently resolves to and where it comes from — e.g. Inherit — 4 minutes (hub type default) or Inherit — Unsupervised (receiver "RDC Receiver - M") — and the helper text below the field always shows the effective setting, so "inherit" and "unsupervised" can never look alike.
- Offline after N — supervised, flagged offline after that quiet period (2 minutes up to 24 hours).
- Unsupervised — never flag offline — this hub is never marked Offline and raises no offline events.
Unsupervised only stops the offline claims: the hub is never flagged Offline and never raises a Hub Offline event. If an unsupervised hub reports in while it happens to be flagged Offline, it is still brought back Online and any stale Hub Offline events are closed — coming online is direct evidence, not supervision.
Use it when someone else supervises the hardware — for example a radio network (RDC) that monitors its own radios and reports failures through its own channels. Before this setting existed, the only workaround was a huge timeout, which read as "supervised at 2739 years" — pick Unsupervised instead.
The supervision engine never acts faster than 4 minutes of silence, whatever the timeout says (and hubs whose only sign of life is a periodic heartbeat get at least 21 minutes before the heartbeat path flags them). Picking 2 minutes therefore behaves as 4.
Hub Actions
Each hub row has an Actions column with contextual options depending on the hub type and status:
Claim hub, Add CleverMail, Add Dahua Direct, Add Hikvision Direct, Add Panic App, Add billing and Release hub need the Claim, add & release hubs capability — the Radio swaps and Technical coordinator roles grant it. Delete hub + billing and Remove billing need Remove hubs & panels permanently, granted by the Radio removals role. Company owners and admins have both without any role. Buttons you lack are disabled with a tooltip naming the capability; see Roles and Permissions.
-
Billing — every row's first action (see Billing, ownership & client details below).
-
QR code — Only an unlinked CCU or CleverMail hub shows this: those are the hub types set up by scanning a QR code in CleverAlert. View the hub's setup QR code (see QR Codes). Alarm communicators have no QR onboarding, so their rows never offer it.
-
Add billing — For hubs showing No billing, create the billing account without re-entering the serial and verification code. This is mainly for unlinked spares: a hub linked to a site is claimed and billed automatically, so a deployed hub should not normally be sitting on No billing. The exception is a hub flagged faulty, which is claimed but deliberately left unbilled until it is cleared. The hub goes onto its hub type's standard package (super admins in Super Admin mode can tick Rental instead), and if the hub isn't claimed by your control room yet, adding billing claims it at the same time. The confirmation names the package and price before you commit.
-
Release hub — For hubs showing No billing, drop the hub out of your fleet. This is for hardware that was removed, replaced, or never installed. It clears the claim only: the hub record itself is not deleted, so you can claim it again later with its serial and verification code. A hub that is still linked to a site cannot be released — the button is disabled, and hovering it explains why (the hub must be removed from the site first: open the site from the Site column, then remove the hub there). Hubs that have a billing account are never offered this action; use Remove billing first.
Releasing asks for a reason — Replaced with another unit, Faulty / not working, Removed from site, Customer cancelled, Never installed, or Other (which requires a note) — plus optional notes for detail like the replacement unit's serial or the fault symptoms. Every release is recorded permanently with who did it and when, and CleverCam reviews the record; see Released hardware triage. Super admins in Super Admin mode also get a Mark hardware faulty tick in the same dialog, which quarantines the unit so it can't be put back into service.
-
Remove billing — lives inside the billing-details popover (click the row's Billing button), next to the billing detail it acts on. Removing billing stops monitoring until billing is re-added. The control room that owns the billing account can always remove it — including hubs flagged Billing only · not monitored here, where your centre pays for a hub whose site is monitored elsewhere. Rental hubs: only a super admin in Super Admin mode can remove billing for a rental hub.
-
Delete hub + billing — For supported hub types (such as CleverMail virtual CCUs and Panic hubs), remove the hub and its billing in one step. Any camera streams linked to that hub — for example the per-channel CleverMail streams — are deleted along with it, so a cancelled CleverMail site can be cleared in a single action. This is only available for these billing-only/virtual hub types; it can never delete the cameras of a real monitored CCU.
-
Moving a CCU or CleverMail hub to another site is done from the site it is on: open the site from the Site column, edit the hub under Hubs & cameras and choose Move to another site…. The wizard copies the cameras and groups across, keeps or deletes the originals, moves eligible schedules and, when it was the site's last hub, can archive or delete the emptied site; events stay where they happened and the move can be undone from the old site. See Moving a hub to another site.
-
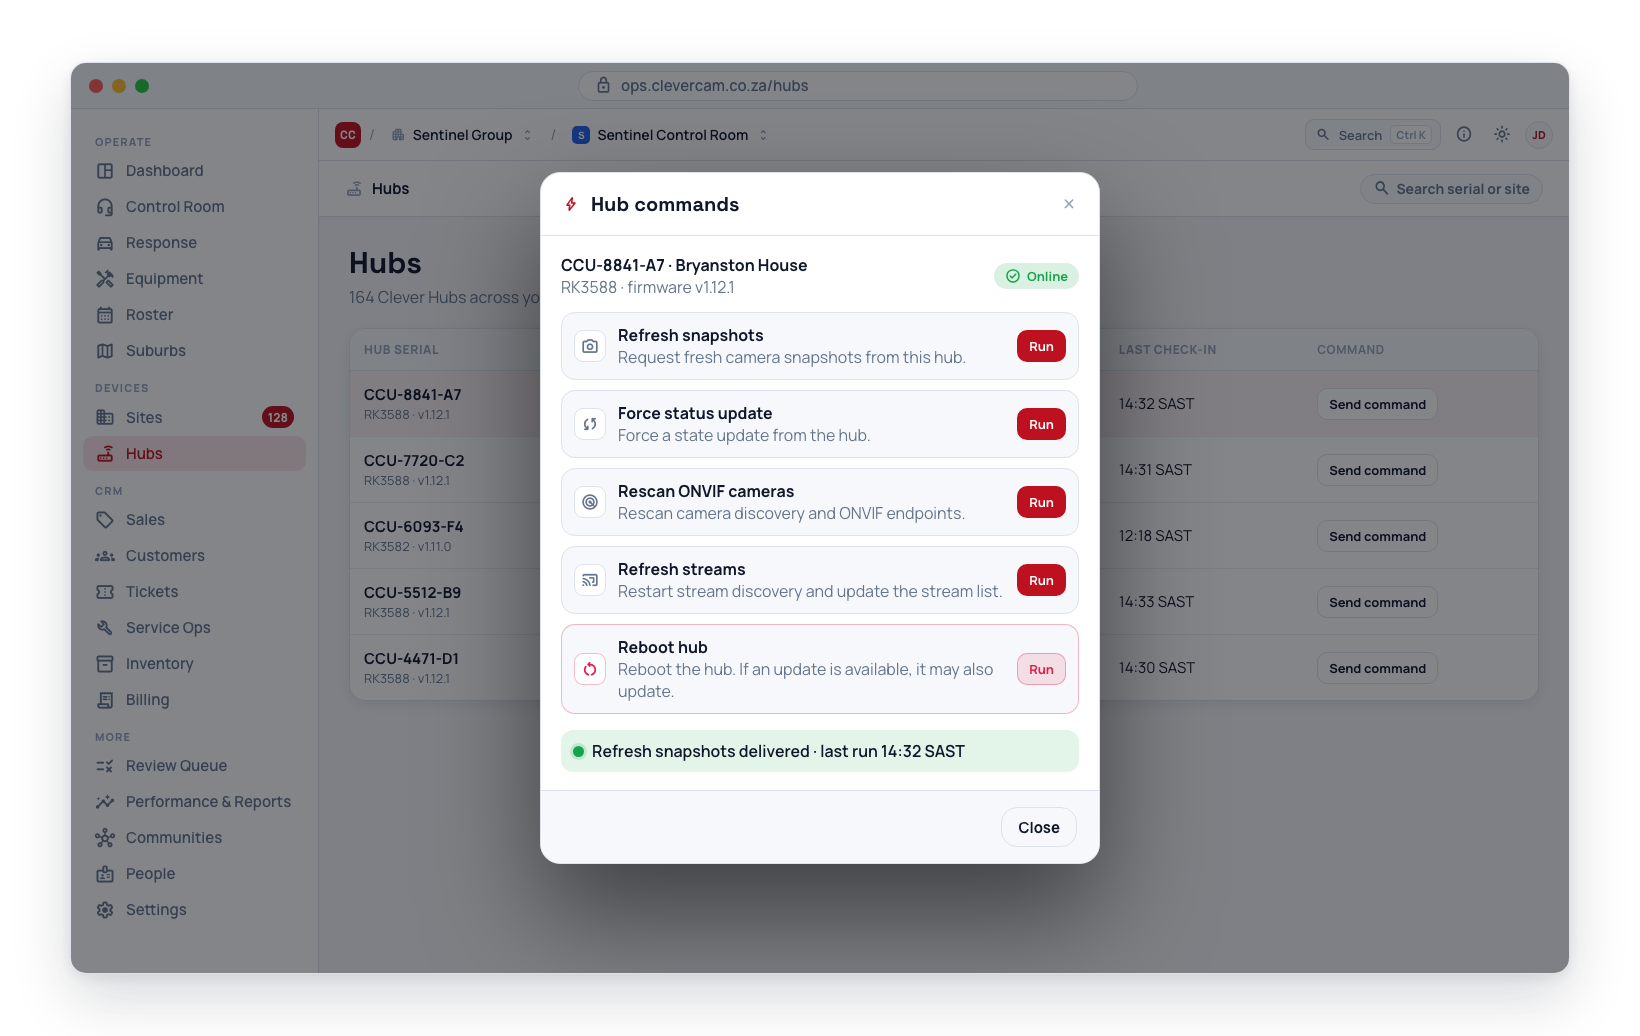
Send command — For Clever Hubs linked to a site, open the command panel to send remote commands such as refresh snapshots, force status update, rescan cameras, refresh streams, or reboot (see Hub Commands).
Billing, ownership & client details
Every row carries a Billing button in the Actions column. Its icon says how the hub is billed — a key for owned hardware, a globe when another control room bills the hub, a billing glyph otherwise — and the whole button turns red when the hub has no billing account at all. Hover it for a three-line summary; click it to open the detail:
- Billing — the package, whether the account is active, and the price (e.g. CCU 8 Standard · Active · R70/hub), or billed by another control room, or no billing account — not charged, not monitored.
- Ownership — the CleverCam ↔ company hardware relationship for camera CCUs: Owned (your company bought the hub) or Rental (rented from CleverCam). Super admins in Super Admin mode get the Owned/Rental toggle right here, which keeps the billing package in sync. Non-CCU hub types read not applicable.
- Client — the company ↔ client relationship, derived from the linked site's ownership: Company site (your control room holds the site's primary link), Client's own (a self-managed site), or Managed by <company>. Only CleverCam's own CCU hardware can read Client's own — see Only CleverCam hardware can stay self-managed.
- Remove billing — when your control room owns the billing account, the remove action sits at the bottom of the same popover.
The Site column shows the linked site name as a clickable link that opens a site detail view.
Claiming Hubs, CleverMail and Panic App
At the top of the page there are four buttons:
- Claim Hub — Opens a dialog where you can enter a hub serial number and verification code to register it to your monitoring centre.
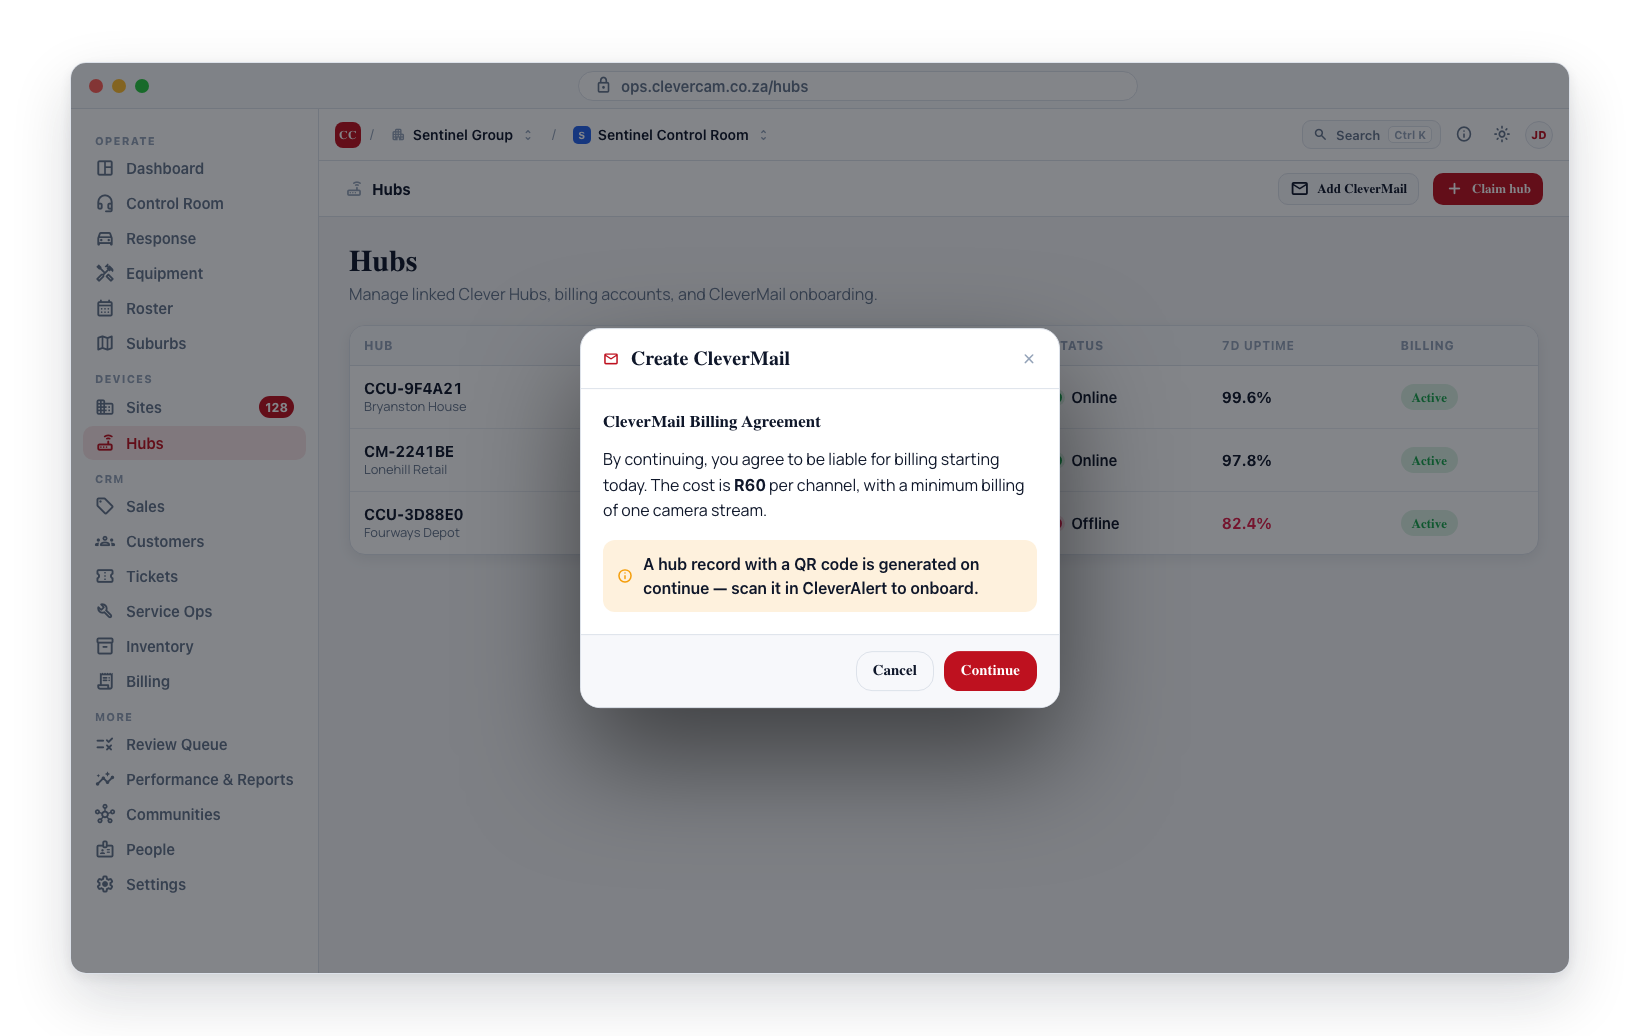
- Add CleverMail — Opens a dialog to create a CleverMail entry, which generates a hub with a QR code for onboarding.
- Add Dahua Direct — Creates a Dahua Direct hub, for Dahua cameras that connect straight to CleverCam with no hub or other hardware on site. Choose whether each camera connects itself or the cameras come through a recorder (XVR / NVR). On Continue it opens the hub's camera picker: save the device login there, enter the connection details it shows into each camera (or once into the recorder), and tick the cameras to monitor as soon as they report in. See Dahua Direct setup.
- Add Hikvision Direct — Creates a Hikvision Direct hub, for Hikvision cameras and recorders (DVR / NVR) that send their events and pictures straight to CleverCam with no hub or other hardware on site. On Continue it shows the hub's connection details — HTTP Listening, the heartbeat (FTP, or email + time sync on an older recorder without FTP), Platform Access (ISUP 5.0) and the clock, each with copy buttons and the secrets hidden until you ask — and the devices as they report in. Once the hub is on a site, tick the channels to monitor, or add a recorder's channels by number before they have sent anything. Live view is not available yet. See Hikvision Direct setup.
- Add Panic App — Creates a Panic App hub — a panic-button-only product with no cameras or detection. The hub is registered to your control room with its billing account created immediately, ready to link to a site. The per-app-user charge only starts once the hub is linked to a site with app users on it.
CleverMail SMTP settings and the setup test
A CleverMail hub is a "dumb device": a camera or DVR that emails its own alarm snapshots to CleverCam instead of running through a physical CCU. Each CleverMail hub has its own SMTP mailbox that the camera authenticates against.
To view the mailbox details, open the site, find the CleverMail hub, and choose View SMTP settings. The dialog lists the server, port, username, password, and the sender/receiver addresses — each with a copy button — so you can enter them into the camera's email-on-alarm configuration. The mailbox password is issued when the hub is first linked to a site — which is also the first moment any screen shows it — so always read it from the site after linking, never from anywhere earlier. Moving the hub to another site, or unlinking and re-linking it, keeps the same password, so a camera that is already set up keeps working.
At the top of that dialog is a Recent test indicator:
- Green "Recent test received <time ago>" — the camera's Test button worked and its test mail reached CleverCam. The device name the camera used is shown next to the time, confirming the SMTP setup is correct end to end.
- Blue "No test mail received yet" — no setup test has arrived. Press Test in the camera's email settings to confirm delivery, then reopen the dialog.
When a setup test mail arrives it also logs a low-key Camera email test entry in the site's event feed in the CleverAlert app, so the installer can confirm it from either side. Setup tests are never treated as alarms — they raise no siren, no push notification, and never reach the control-room operator board.
CleverCam builds a camera out of the snapshot, so an alarm mail with no attached image creates nothing at all — and it fails quietly. The mail is accepted, the hub counts as online, and the channel simply never appears: no camera, no thumbnail, no events, for as long as the device keeps mailing.
So if a channel never turns up, check the device's email settings before anything else. Hikvision calls it Attached Image (Network → Advanced → Email); Dahua needs the snapshot linkage on the event and a capture schedule that covers it. A device that has been mailing pictureless alarms for a day now raises an alert on our side too, but the fix is always on the device.
Setting it up by chat, from the app
Entering the SMTP details and the event and snapshot settings into a Hikvision or Dahua by hand is fiddly, and the pictureless-mail trap above is easy to miss. When your technician is on site, on the same Wi-Fi as the camera, they can instead let CleverAlert do it: the CleverMail hub's page in the app offers Set up a camera by chat. They tell the assistant the camera's IP (or let it scan the network) and its admin password, and it reads the device, writes the correct mailbox, event and snapshot settings for that brand, and then confirms with our mail server that the pictures are actually arriving — not just that the device said "OK". It is for your security company's staff (it uses the same access rule as the hub chat), and it is switched on per control room.
How CleverMail cameras arm
The first alarm mail from a CleverMail hub creates a camera group on the site called CleverMail, and every channel that mails in afterwards joins that same group. Cameras rarely all report on the same day — a DVR channel only appears in CleverCam once it has sent its first snapshot — so the group is the thing that carries the settings, not the individual cameras.
Because of that, arm state is set on the group, not per camera. Changing a single CleverMail camera's arm or chime setting has no lasting effect; the group's setting is applied to every camera in it.
Set it from View SMTP settings — the same dialog you copy the mailbox details from. At the bottom is Detection state, with three choices:
- Armed — detections raise alarms. This is what a new site starts on.
- Chime only — detections are analysed and logged, but raise no alarm.
- Off — the cameras are not analysed at all.
You can set this before any camera has reported. There is no group until the first snapshot email arrives, so the dialog says as much and creates the group for you when you save — the cameras are then created in that state as they come in, and cameras that report later inherit whatever the group is set to at that moment. The setting covers every CleverMail camera on the site, so two CleverMail hubs on one site share it. Customers can also change it from the CleverMail group in the CleverAlert app.
A CleverMail camera is only analysed while its group is armed or on chime. If the group is disarmed and chime is off, snapshots still arrive and the camera thumbnail still updates — but nothing is detected and no events are raised. The site will look healthy while seeing nothing, so leave chime on if you want a disarmed site to keep watching.
How CleverMail cameras are named
A CleverMail camera is named after the camera itself. The alarm mail that creates it — the first one from that channel with a picture attached — carries the name the device gives itself, and CleverCam uses that as the camera's label, so the control room reads "Person detected by camera Pole 6 - Camera 6A" rather than "…by camera CleverMail".
Where the name comes from, in this order:
- The channel name. Hikvision cameras send it as CHANNEL NAME. A Hikvision DVR or NVR lists its channels under CAMERA NAME(NUM), and each channel's camera gets its own name from that list. Dahua recorders send Alarm Input Channel Name.
- The device name, when a single camera's channel name is still a factory default such as Camera 01: Hikvision IPC NAME (IPT NAME on thermals, IPDOME NAME on PTZs), Dahua Alarm Device Name. A recorder's device name is never used, because it is the same for every channel. A recorder channel keeps even a factory name like Camera 01, since that still tells its channels apart.
- "CleverMail", when the mail names nothing usable. Factory names such as IP CAMERA or THERMAL CAMERA, serial numbers and MAC or IP addresses are ignored. Many Dahua cameras use their serial number as their device name until someone renames them. Tiandy recorders and the cloud cameras put no name in the mail at all.
The name is read once, when the camera is created. After that it is yours: renaming the channel on the device later does not rename the camera in CleverCam, and a name you set in CleverOps (open the site, go to Hardware → Hubs & cameras, choose Show N streams on the CleverMail hub, then Edit on the camera, and change its Label) is never changed back by CleverMail.
The easiest time to name a CleverMail camera is on the device, before it sends its first snapshot. Set each channel's name in the camera's or recorder's own settings, and every camera arrives in CleverCam already labelled.
What each CleverMail camera reports
Every alarm mail says what the camera thinks it saw. A Hikvision camera sends Motion Detection, Intrusion Detection or Line Crossing Detection. A Dahua camera with its own smart detection sends SMD(Human) or SMD(Vehicle). CleverCam reads that from every mail and counts it per camera, so you can see which kinds of alarm a camera sends and how often the AI agreed with it.
To see it:
- Open the site and go to Hardware → Hubs & cameras.
- On the CleverMail hub, choose Show N streams, then Edit on the camera.
- The Camera alarm types panel sits under the camera's snapshot, with one row per type the camera has sent:
- Camera says: our name for the type (Motion, Intrusion, Line crossing, Person, Vehicle…) followed by the camera's own words for it.
- Alarms 24 h and Alarms 14 days: alarm mails of that type that carried a picture.
- AI agreed 24 h and AI agreed 14 days: of the alarms the AI checked, how many it found a person or vehicle in, for example 2 of 6,651 · 0%. The AI only checks while the camera is armed or on chime, so a camera that was disarmed the whole time shows – here.
- Last seen: when the camera last sent that type.
The list fills in by itself. A type shows up the first time the camera sends it, including types CleverCam has no name for yet, which are listed under the camera's own words. Health mails are listed too, marked Health mail, never an alarm, so you can confirm the camera is checking in. The numbers trail the live mail by up to five minutes. Refresh reloads them, and the footer says when counting started for that camera. Counting began on 19 September 2026.
The panel is read-only. It changes nothing about which alarms the AI checks or which ones raise an event.
Most motion and intrusion alarms from an ordinary camera are wind, shadows, insects or headlights, and filtering those out is what the AI is for. It can also miss real people on a thermal camera, whose picture looks nothing like the daylight images it was trained on. Read the numbers per camera.
The Camera onboard analytics setting in the same editor is for cameras on a CCU, which can listen to a camera's own analytics directly. CleverMail cameras don't show it, because their alarms arrive by mail.
Panic App sites
A Panic App site is a panic-button-only service: the end user gets the CleverAlert app stripped down to just an emergency/panic button — no cameras, detection, or events. It is billed per app user on the site (not per site), so the charge scales with how many people you onboard.
To set one up:
- Open the site you want (from the Site column here, or the Sites page), go to Hardware → Add hub, and pick the Panic App tile — it sits alongside the CCU, CleverMail and receiver tiles.
- Confirm the per-app-user billing note. A Panic App hub is created and linked to that site.
You can also create the hub first from Add Panic App on this page and link it to the site afterwards; and inside the Add hub dialog the Add method dropdown still carries Create new Panic App as an equivalent route. 3. Open the site's People tab and add the users who should have the panic app — each gets an invite code / QR to sign in with.
Personal cover — the one-button version. For a single person with no premises at all (anywhere-panic), don't build this by hand: on the Sites page click Add personal cover. From a name and a mobile number it creates the base site at their home address, links it to your control room, adds the Panic App hub, puts the person on it with App panic set to Site + location panic, and sends the app invitation — see Personal cover.
Once a user's only site is a Panic App site, their CleverAlert app automatically shows the panic-only home — the emergency button and nothing else. Each active app user on the site appears as a Panic user line on your billing breakdown.