Customer Contacts
Customer contacts are the admin, billing, and work-authorization register for a customer account -- the accounts person, the facilities manager, or the owner who has to sign off on a callout. They are not the alarm call list; that is managed separately.
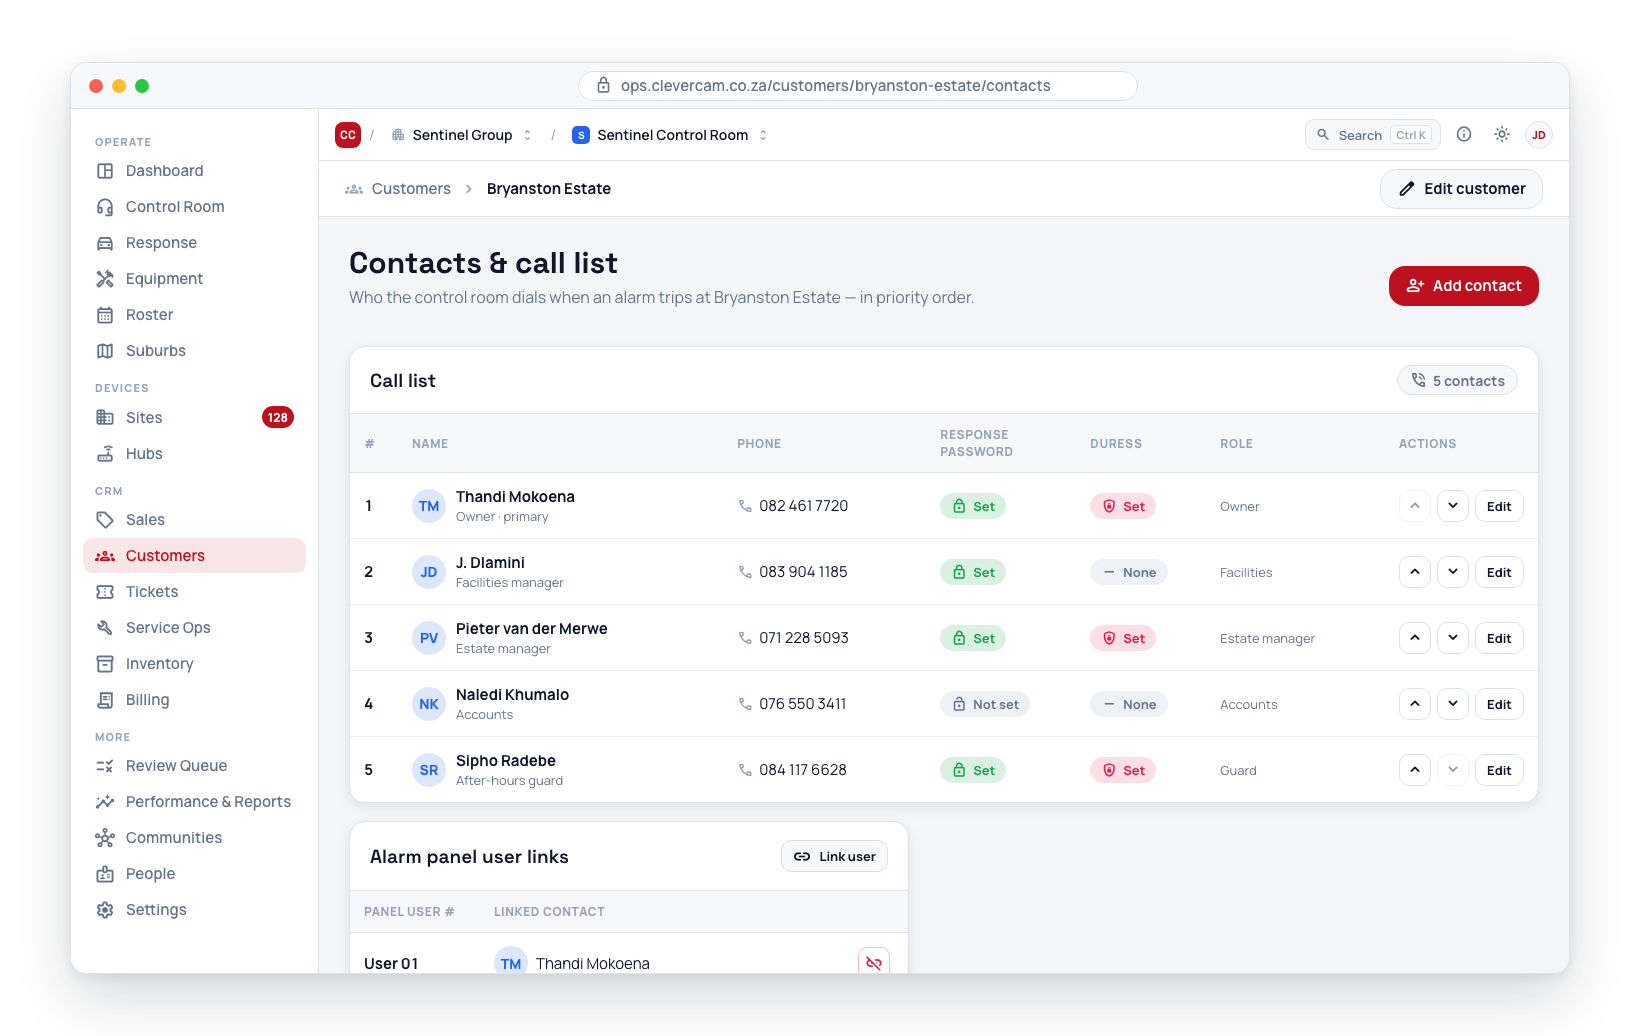
If you are looking for the call list the control room dials when an alarm trips at a site, go to Site Details → Users, not here. Customer contacts are for billing, admin, and work-authorization purposes only.
Where Contacts Live
Contacts belong to a customer and are managed in one place:
- Customers → [customer] → Sites & contacts tab → Contacts & notification preferences -- the list of admin, billing, and authorizing people for this account, below the customer's linked sites.
A contact is always on one of your own control room's customers (why).
The Contacts List
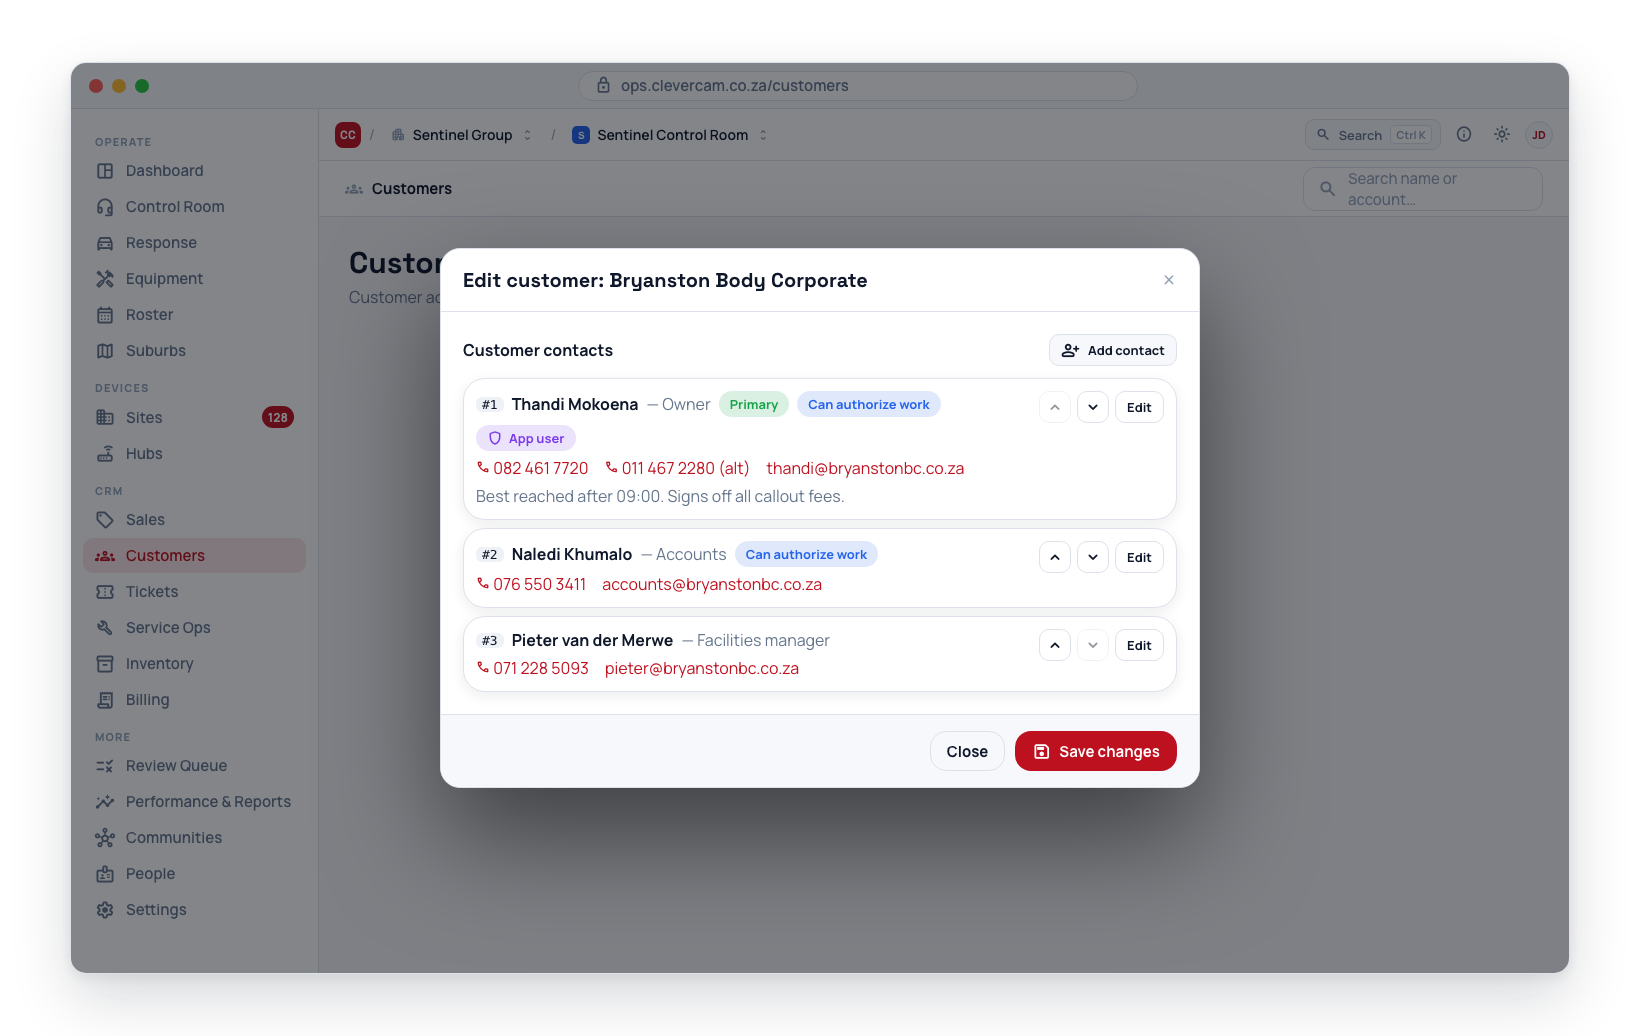
Each contact card shows:
- Position number and Name, optionally a Role
- Primary badge -- at most one contact per customer can be marked as primary
- Can authorize work badge -- shown when this contact can approve callout fees on behalf of the customer
- App user badge (with a shield icon) -- appears when the contact is linked to a CleverAlert app user
- Only: … badge (with a sites icon) -- appears when the contact is scoped to specific sites instead of the whole account; hover it to see the full site list. See Site scope.
- Phone and Alternate phone -- click to dial
- Email -- click to open in your mail app
- Availability (calendar icon) -- a one-line summary of when the contact is reachable, e.g. Reachable any time, Mon–Fri 08:00–17:00, or Custom hours (3 days). Hidden when not set.
- Language (globe icon) -- the contact's preferred language, when set
Below each contact are supervisor-only Move up / Move down / Edit buttons. Delete contact is in the Danger zone at the bottom of the edit dialog.
Link a site user (recommended)
If someone already uses the CleverAlert app on one of this customer's sites, link them instead of retyping them. Linking ties the contact to their app account (user_id), so the two can't drift into out-of-sync duplicates.
When there are app users on the customer's sites who aren't contacts yet, a prompt appears above the list — "N app users on this customer's sites aren't a contact yet" — with a Link a site user button. The same button also sits next to Add contact in the header.
- Click Link a site user.
- In the picker, search by name, email, or phone and click Link on the right person. The picker only lists app users connected to this customer's sites who aren't already linked to a contact.
- The contact form opens pre-linked and pre-filled from their app account — name, email, and phone are pulled in, not retyped. Adjust the role, primary/authorize toggles, notification preferences, etc., then save.
For someone who does not use the app (an accounts person, an external bookkeeper), use Add contact below and enter their details manually.
Suggested links
CleverOps also spots contacts that are probably already app users but aren't linked yet. When an existing contact's email (or, failing that, phone) uniquely matches an app user on the customer's sites, a "Looks like app user …" line appears on that contact's row with a Link app user button — one click links them. The same suggestion shows inside the contact form while you're editing. Matches are only offered when there's exactly one candidate, so an ambiguous name never gets linked to the wrong account, and the link only happens when you click — nothing is linked automatically.
Add a Contact
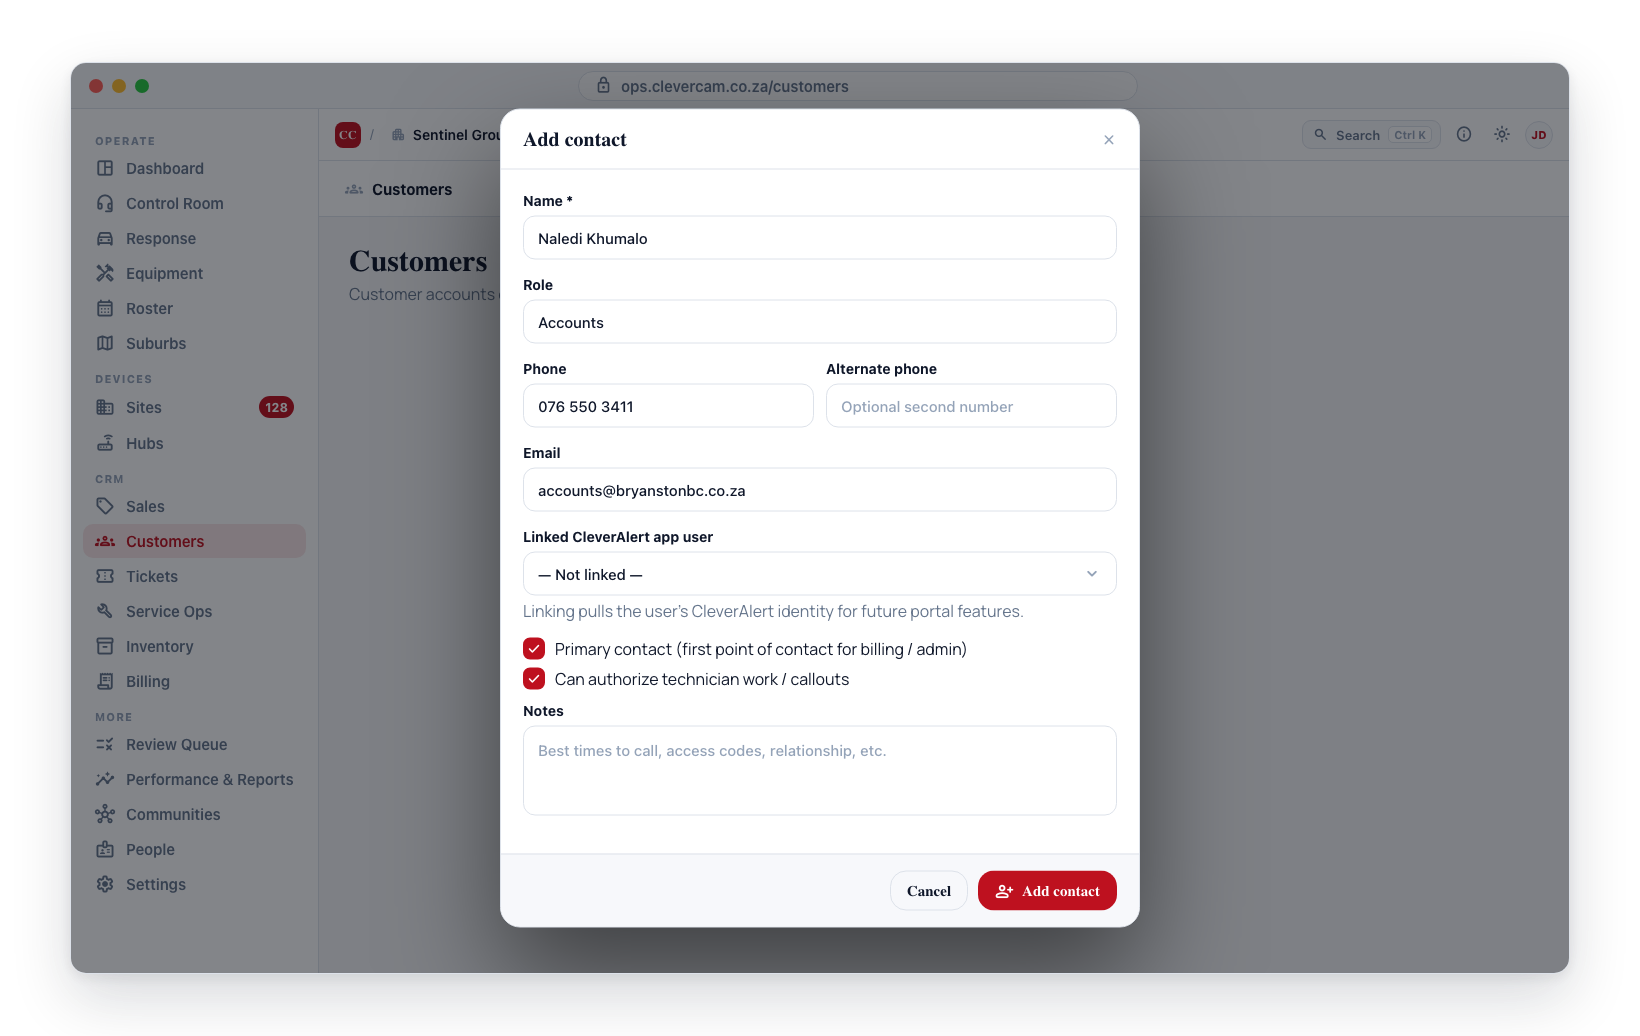
- Open Customers → [customer] → Sites & contacts.
- Click Add contact at the top of the Contacts & notification preferences card.
- Fill in:
- Name (required)
- Role -- free text, for example "Accounts", "Facilities manager", or "Owner"
- Phone and Alternate phone -- entered in local (082 123 4567) or international (+27 82 123 4567) format; numbers are stored internationally so calls and WhatsApp/SMS document sends reach the contact reliably
- Preferred language -- the contact's home language; operator context and call ranking. See Availability & language.
- Linked CleverAlert app user -- optional; see below
- Sites this contact covers -- All sites (the default, including sites added later) or Only selected sites with a checklist of the customer's sites. See Site scope.
- Email documents (auto-CC) -- tick which document emails this contact should always be CCed on (Invoices / Quotes / Statements & account links). See Email documents (auto-CC).
- Is primary -- tick to mark as the primary admin contact for this customer
- Can authorize work -- tick if this contact can approve service-job charges
- Billing & service permissions -- what this contact may do from a portal link:
- May reschedule / cancel an appointment -- on by default (it's how appointment reminders have always worked); untick to restrict a specific contact from rescheduling/cancelling their own portal link. Only enforced on the SMS reminder link, which is minted per-contact; the shared email link is unrestricted.
- May book a service call -- off by default. Tick to show that contact's customer a "Book a service call" card on their account portal (any contact of the customer having this ticked is enough to show it, since the account link isn't tied to one specific contact).
- May be asked for payment -- controls the automatic overdue-invoice reminder texts: only contacts with this ticked (and a text opt-in) get the WhatsApp/SMS payment chase. Emails are unaffected.
- Availability -- when this contact can be reached; tick Reachable any time or set per-day windows. See Availability & language.
- Notes -- internal only
- Click Add contact.
New contacts are added at the bottom of the list. Rearrange them afterwards with the up/down buttons.
Only one contact per customer can be marked as primary. If you mark a new contact as primary while another one already holds that status, you will be asked to remove the primary flag from the existing one first.
Email documents (auto-CC)
Tag a contact with the document types they should always receive, and CleverOps CCs them automatically whenever that document is emailed for their customer:
| Tag | Auto-CCed on |
|---|---|
| Invoices & receipts | Invoice emails (single and bulk Email selected), emailed payment receipts, and the automatic overdue-invoice reminders |
| Quotes | Quote emails and the automatic quote follow-up reminders |
| Statements & account links | Emailed statements (PDF attached) and the Account link email (the customer's no-login account view) |
| Service jobs | Emailed service-job reports and the automatic job appointment reminders (day-before / morning-of) |
Tags also serve as the fallback address: when a customer has no billing email, the document goes To a contact tagged for that document type (then the primary contact, then the first contact with an email) instead of being skipped. This applies to automated reminders and to sends you trigger yourself — a customer you can reach is a customer you can reach, whichever button started the send.
There are two places to set the tags:
- The contact form -- the Email documents (auto-CC) checkboxes described above.
- Any send dialog -- when emailing an invoice, quote, or account link, every suggested contact row has an Always button. Click it to save the tag for that document type on the spot (and add the contact to the current email's CC). Click again to remove it. This needs the same supervisor access as editing contacts.
A tagged contact shows an Auto-CC badge on their card in the contacts list. Tags only take effect when the contact has a valid email address.
Automations use the same tags to decide who receives a customer notification: a contact tagged Service jobs is chosen for job notices (Quotes for quote notices, Invoices & receipts for overdue-invoice notices) ahead of the primary contact.
When a send dialog opens, tagged contacts arrive pre-ticked as CC — you can untick anyone for that particular send without affecting their tag.
Sending to one person only
The pre-filled recipients are a starting point, never a rule. When someone phones and wants their own copy, the dialog gives you three ways to cut the list down — none of them touch anyone's saved tags:
- Only — on any suggested row. One click makes that person the To and clears every CC, so the send goes to them and nobody else. It appears once there is somebody else on the list.
- Clear — next to the To label, empties the To address so you can pick or type a different one.
- Clear all — next to the CC label, drops every CC at once. Individual CCs also come off by clicking their chip.
The same applies to the WhatsApp / SMS checklist: each row has an Only button and the Send to heading has Clear all.
Site scope (franchise customers)
By default a contact covers the whole account — every site the customer has now or adds later. For multi-site customers (a franchise with many stores, a group with several branches) that is often wrong: the Cape Town store manager should not be copied on Durban's job emails.
Sites this contact covers in the contact form fixes that:
- All sites (default) -- the contact behaves exactly as before, across every site including ones added later.
- Only selected sites -- tick the specific sites this contact is responsible for. The contact then only receives site-specific messages for those sites.
What respects the scope:
- Service-job emails and texts -- appointment schedule/reschedule notices, the day-before / morning-of reminders, and the job-complete notice only reach contacts covering the job's site (both the auto-CC email leg and the per-contact WhatsApp/SMS leg).
- Quote follow-up texts for a site-linked quote.
- Autopilot "Log & notify" customer notices for an event at a site.
- Automations customer notifications about a job or quote at a site — a contact scoped to other sites is never the one chosen.
What deliberately ignores it — account-level documents go to everyone: invoice emails and overdue reminders, statements, the account link, and payment-request texts are for the account as a whole, so every contact (subject to their own tags and opt-ins) still receives them.
A scoped contact shows an Only: Store A, Store B badge on their card. If a scoped site is later moved off the customer, the form flags it as no longer on this customer so you can untick it deliberately.
Which alarm/event types someone gets texted about (burglary, open/close, power…) is a site People setting — Site Details → People, on each non-app user. Customer contacts only carry billing & service messaging preferences.
Text documents (WhatsApp / SMS)
Six documents can be sent by WhatsApp or SMS: quotes, invoices, statements, payment receipts, service reports, and the account link. The message carries a link to the document on the customer portal — where the customer can read it and download the same branded PDF — because a text message cannot carry a file.
Which contacts arrive pre-ticked depends on the document. Quotes use the Quotes tag; invoices and payment receipts use Invoices (whoever is set up to receive the invoice is the person who wants the receipt for paying it); statements and the account link use Statements; service reports use Jobs.
The Send by WhatsApp / SMS dialog has its own recipient picker, drawing mobile numbers from the same three places the email picker draws addresses: the customer's billing number, their contacts (main and alternate numbers), and CleverAlert app users connected to their sites. There is no To/CC — a text has one kind of recipient, so it is simply a checklist. (Quotes are the exception in name only: the same number checklist sits inside the quote's combined Send to customer dialog, alongside the email fields.)
Every contact row has its own Always button, saved separately from the email tags. A contact may well want invoices emailed and never texted, so the two lists are kept apart.
A contact and the billing number can be the same number. The picker shows it once, as the contact's row — the named row, with their opt-out state and their Always button — so whoever is pre-ticked is always a row you can untick.
WhatsApp is tried first; anyone who is not reachable on WhatsApp gets an SMS instead.
If someone replies STOP to one of your messages, CleverOps records that they have withdrawn consent. They still appear in the picker — greyed out and labelled Opted out, so you can see why a message never reached them — but they cannot be selected, and the send is refused even if their number is typed in by hand.
This cannot be overridden from the app. To message them again, the customer has to opt back in.
Someone who has simply never been asked is a different case. Because a quote, invoice, statement, receipt or service report is a document the customer requested rather than marketing, CleverOps will text it to a number on file even when no opt-in has ever been ticked for that contact. Only an explicit STOP blocks a send.
An email can attach a receipt or a service report for work you are still capturing, because the email carries the document itself. A text carries only a link, and a link needs something to point at. So Record payment before texting a receipt, and save the job before texting its report. The buttons stay disabled until then and say why.
Availability & language
Two optional fields capture when and in what language to reach a contact.
Availability
In the contact form, Availability has a master toggle and a per-day editor:
- Reachable any time -- tick when the contact can be called at any hour. No day windows are needed.
- Per-day windows -- when Reachable any time is off, each weekday (Mon–Sun) has its own available tick box plus a time window on the same row -- the from, the to, and how long it runs. A day left unticked means the contact is not available that day, and its window is greyed out until you tick it. Times are local.
A window whose end is earlier than its start is flagged Crosses midnight and is correct -- that is a contact you can reach on night shift. Setting the two the same reads as Same start and end — the whole day.
Leave everything unticked if availability is unknown — nothing is stored and the contact list shows no availability line.
The contact card shows a compact summary: a single shared window collapses to a day range (Mon–Fri 08:00–17:00); mixed windows show as Custom hours (N days); the any-time toggle shows Reachable any time.
Language
Preferred language is a dropdown of South Africa's official languages plus a few common others (stored as an ISO code such as en, af, zu). Pick — Not set — to leave it blank. An existing contact whose stored code is not in the list keeps that code as an extra option so it is never lost on save.
How they are used
Availability and language are consumed by CleverCommand's contact-availability ranking engine — the Haiku-powered ranker that helps an operator decide who to call first on an event. When a contact is passed to that engine, one who is reachable right now (evaluated against their schedule in the saved time zone) is ranked higher, and a known-unreachable contact is pushed down (never below a contact with no phone). Language is surfaced to the operator as context. A contact with no schedule on file is treated neutrally — a missing schedule is never a penalty.
These fields live on the customer-contact record. The control room's live Call customer helper currently ranks the site's alarm call list; availability and language captured here are stored on the contact and consumed by the same ranking engine wherever a contact is forwarded to it.
Linking to a CleverAlert App User
A customer contact can optionally be linked to a CleverAlert app user. This allows CleverOps to recognize that the contact and the CleverAlert user are the same person, which will be used by future features such as the customer portal.
The Picker
In the contact form, Linked CleverAlert app user is a dropdown that lists every CleverAlert app user already connected to at least one of this customer's sites. Each option is shown as:
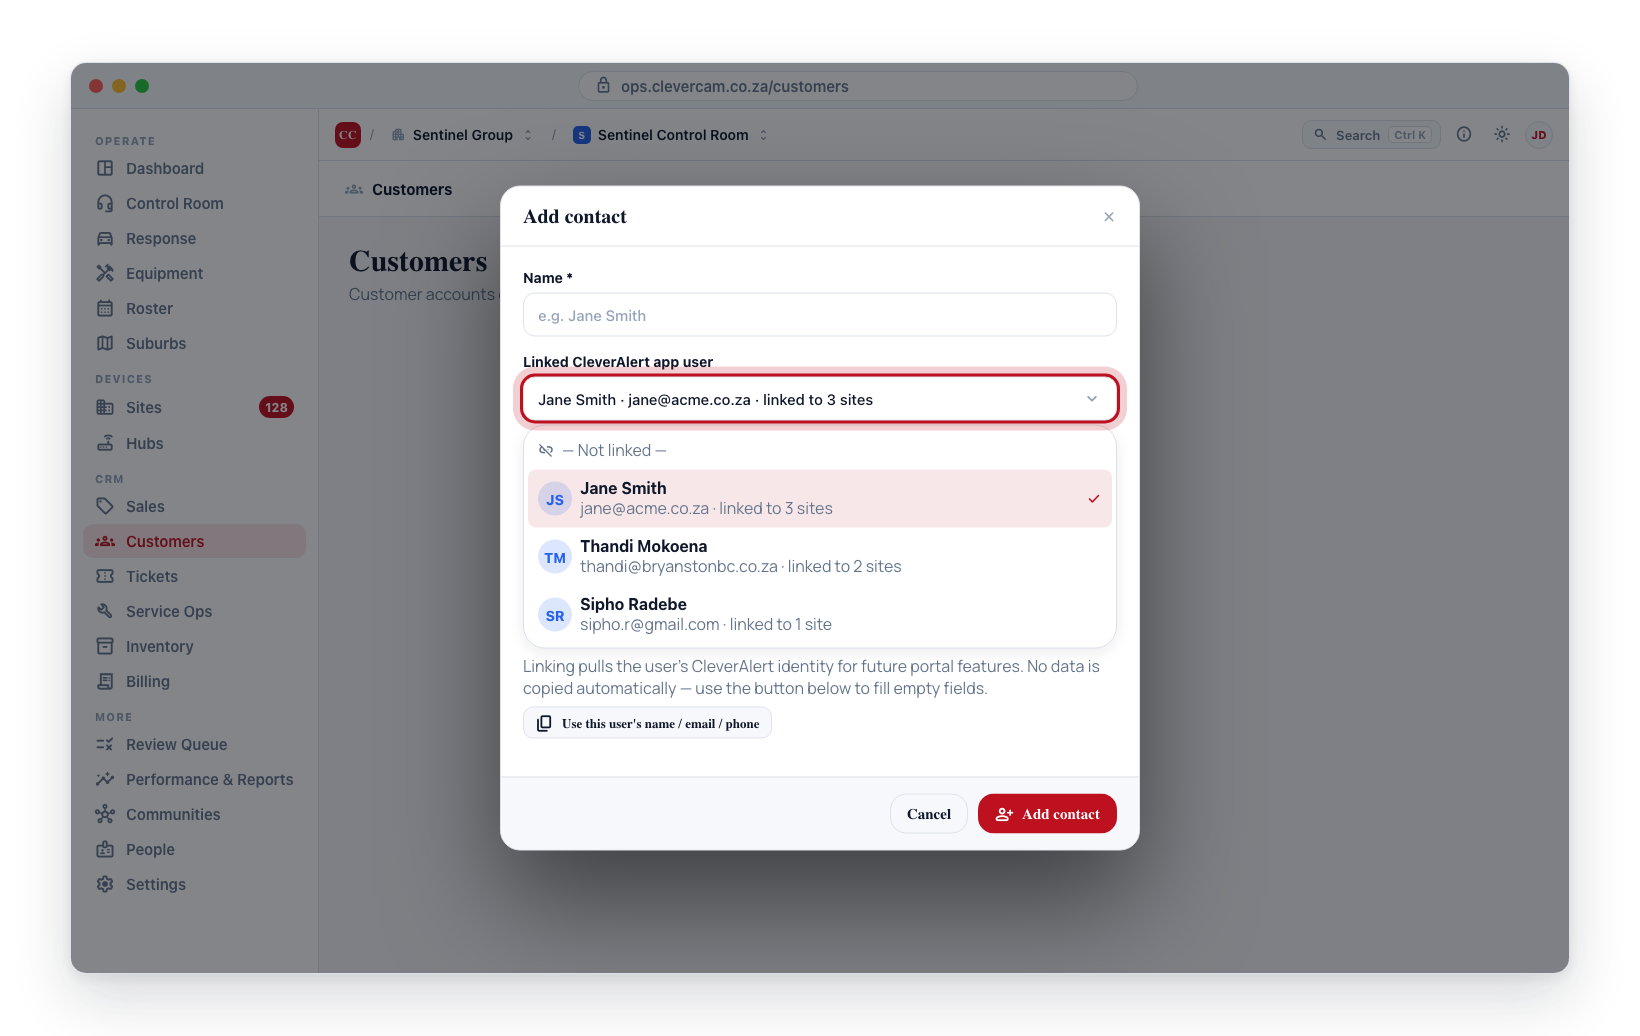
Jane Smith · jane@acme.co.za · linked to 3 sites
The dropdown only shows users who are already connected to this customer's sites -- random users from other customers are not shown.
If none of the customer's sites have an app user connected, the field reads:
No CleverAlert users are connected to this customer's sites yet. Invite them to the app first, then come back to link the contact.
Autofill from the Linked User
When a user is selected and Name / Email / Phone are still blank, a Use this user's name / email / phone button appears below the dropdown. Click it to copy the CleverAlert user's details into the form. Fields that already have a value are left unchanged.
This is a one-time copy. Later changes to the app user's CleverAlert profile are not automatically reflected in the contact record.
What the Link Unlocks
Today, linking a CleverAlert app user to a contact:
- Shows the App user badge on the contact card so you can see at a glance that this person has a CleverAlert account.
- Gives a clearer picture of a customer's admin roster.
In future, this link will also power the customer portal embedded in CleverAlert, allowing a signed-in customer to view their invoices, statements, and service-job history.
Unlinking
Set the picker back to -- Not linked -- and save. The contact is preserved; only the link to the app user is removed.
Re-ordering Contacts
Use the Move up and Move down buttons next to each contact to change their order. The first contact in the list is the first one listed on invoices, statements, and service-job approval prompts.
Permissions
Creating, editing, moving, and deleting contacts requires supervisor-level access. Users without that access can view the list but will not see the Add, Edit, Move, or Delete buttons.
Related
- Site Details → People -- the alarm call list (not this).