Actions & Verification
CleverCommand provides a set of actions that operators use to process events through their lifecycle. From adding initial observations to making a final verification decision and closing the event, these actions form the core of the operator's workflow.
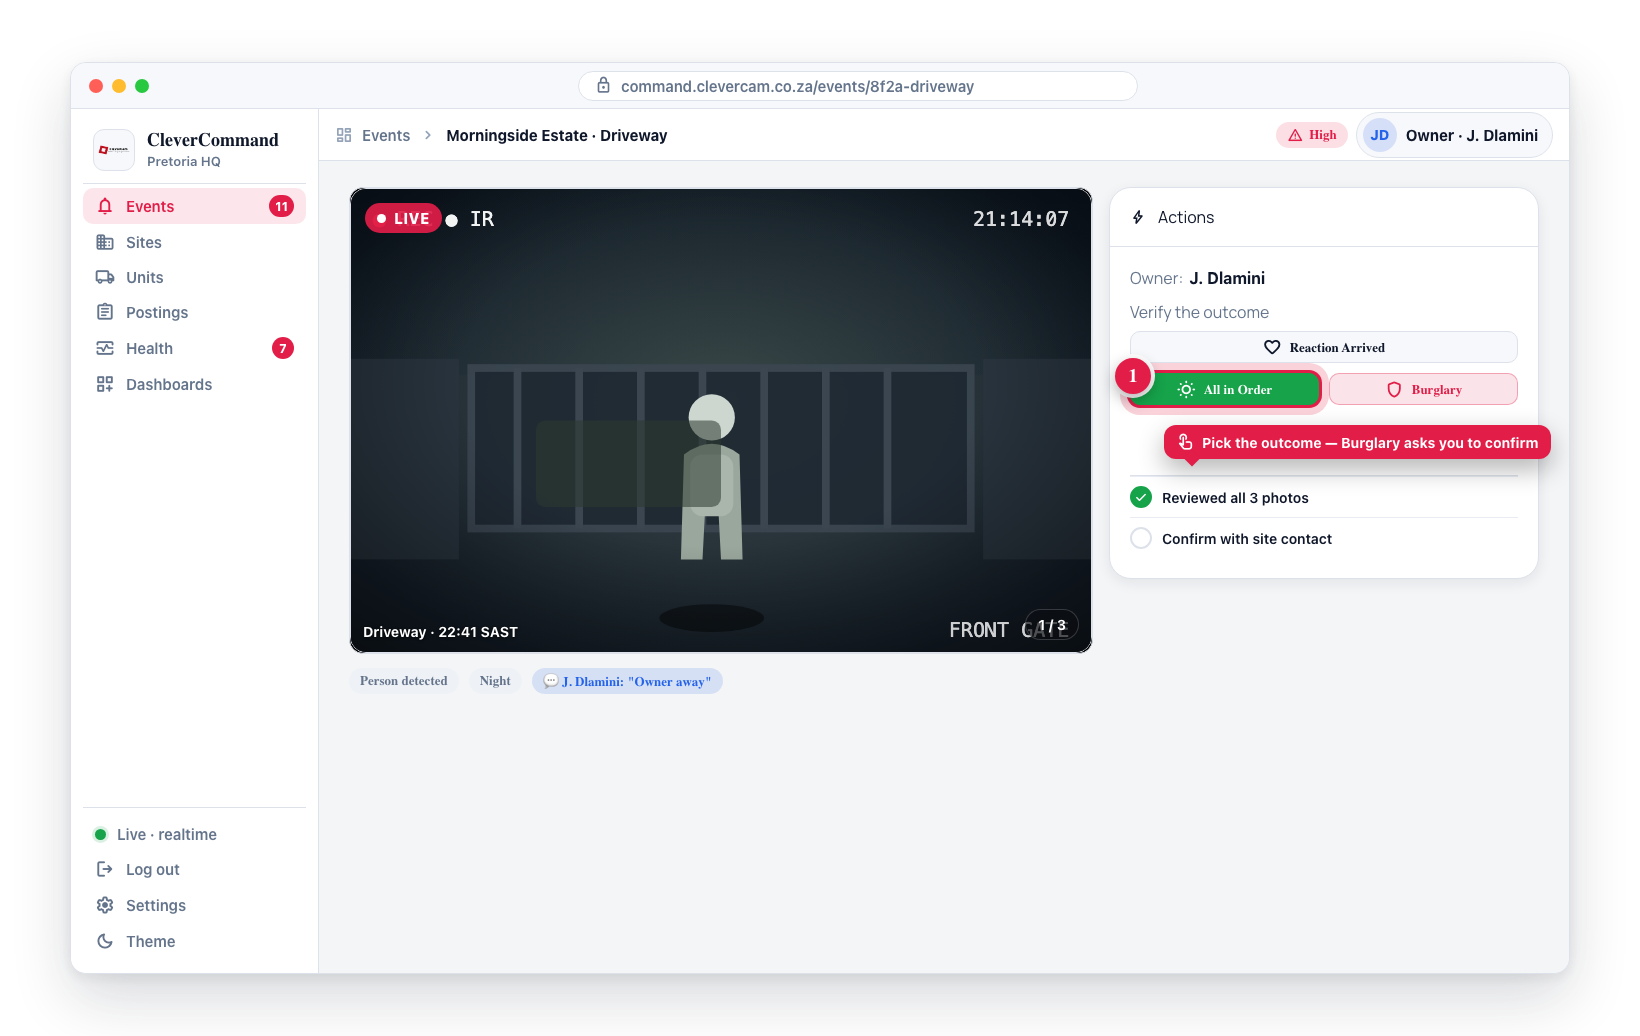
Decide the outcome: All in Order, or Burglary (which asks you to confirm).
If the site has an active notice for the control room, an amber banner appears in the notes section (alongside the Action Plan instructions and site notes) with the notice text and its active date range — e.g. "🏖️ On holiday — phone Jaco at 072 219 5375 · 14 Jul – 21 Jul". A 🏖️ badge marks a holiday / away note; 📌 marks any other heads-up. Clicking the banner opens the Holiday notes & notices popup, which adds the site's past notices — kept after they expire so you can see when the site was last away.
It's the same heads-up shown on the site's event card, and it clears automatically when the notice's date window ends. These are authored in CleverOps under a site's Temporary notices.
Adding Actions
Actions are notes and decisions that operators attach to events to document what they observe and decide. Each action becomes part of the event's permanent timeline.
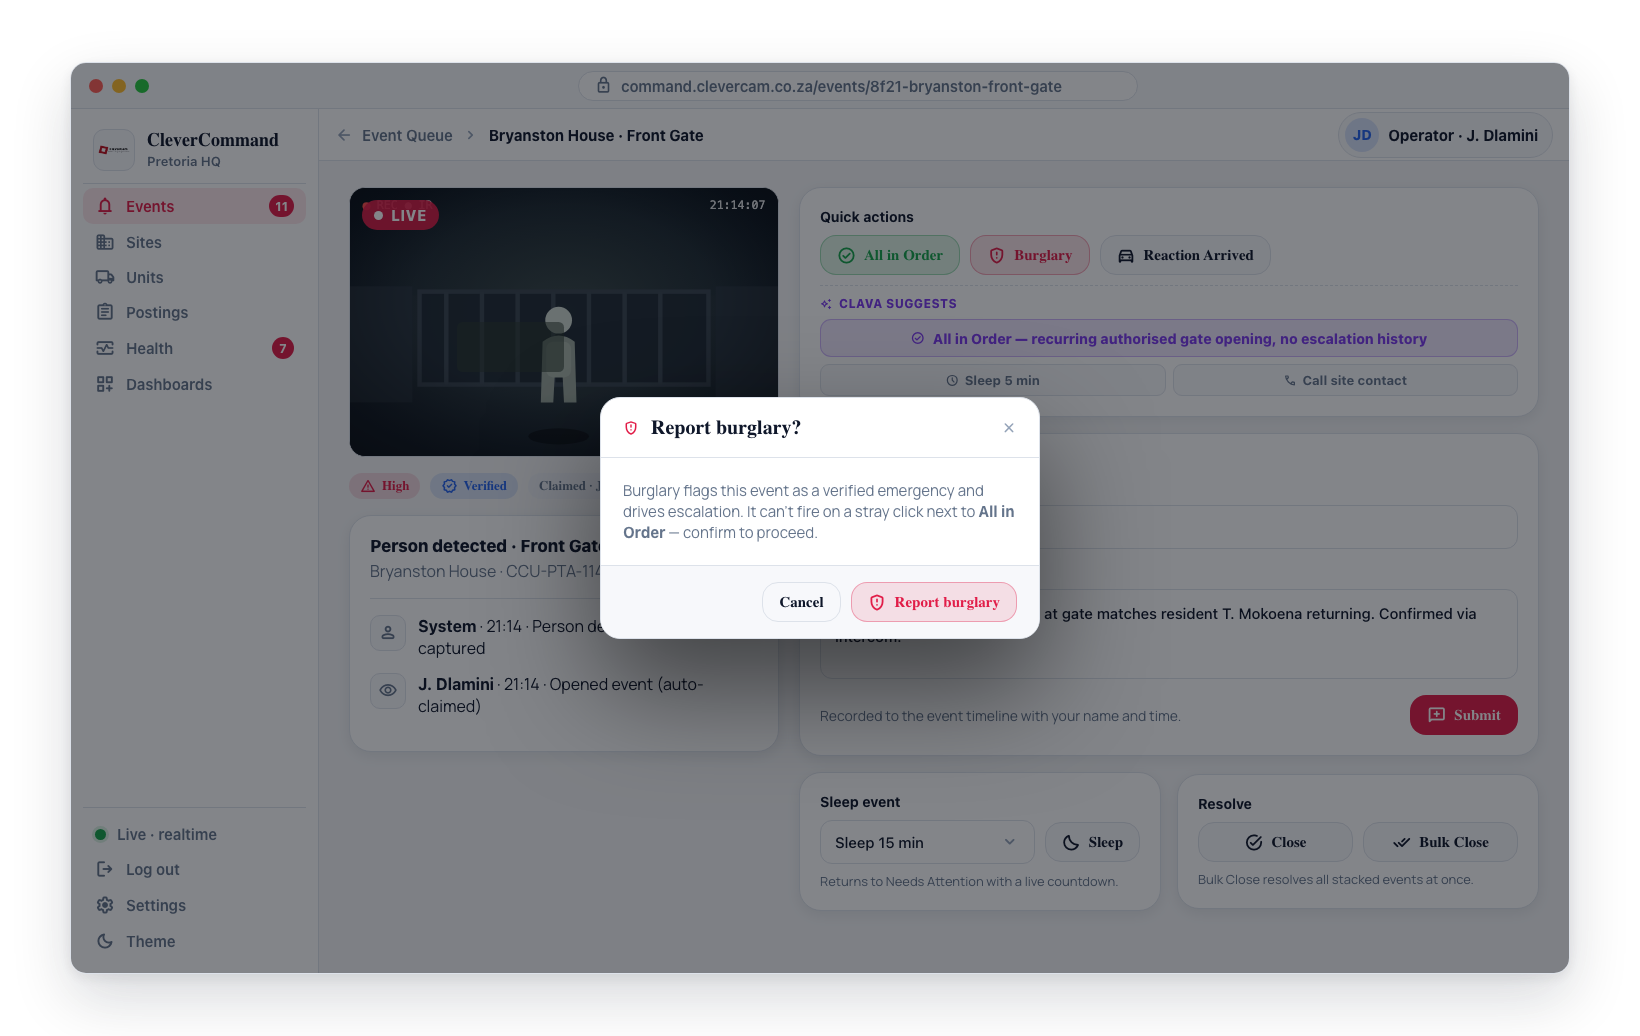
Creating an Action
- Open an event from the queue
- Navigate to the Actions section in the event details
- Enter a heading for the action (e.g., "Initial Assessment", "Site Contact Response")
- Enter a description with details about your observation or decision
- Submit the action
The action appears in the event timeline with your operator name and timestamp.
Quick feedback chips
Above the feedback box is a row of one-tap chips — Workers on site, Keyholder on site, Passer-by, Animals or birds, Test, Technician on site, No movement on cameras, Response on site, Already handled, Per site instruction, Account suspended, Other. Tapping one writes a Feedback entry with that text to the timeline straight away, so the common outcomes need no typing. Hover a chip for the Afrikaans phrase it stands for. The chip you picked also becomes the event's close reason (see Closing Events); tap it again to clear it.
Verifying Events
Verification is the process of confirming the outcome of a detected event. This is one of the most important decisions an operator makes. CleverCommand provides quick action buttons for the two primary verification outcomes.
All in Order
When you determine that there is no genuine threat at the site (e.g., animal movement, wind-blown objects, authorized person):
- Review the event photos and any available evidence
- Click the All in Order button in the quick actions bar
- The event is flagged as all-in-order and moved to the Resolved section
- A timeline entry records the decision
Burglary (Problem at Site)
When you determine that the event represents a genuine security incident:
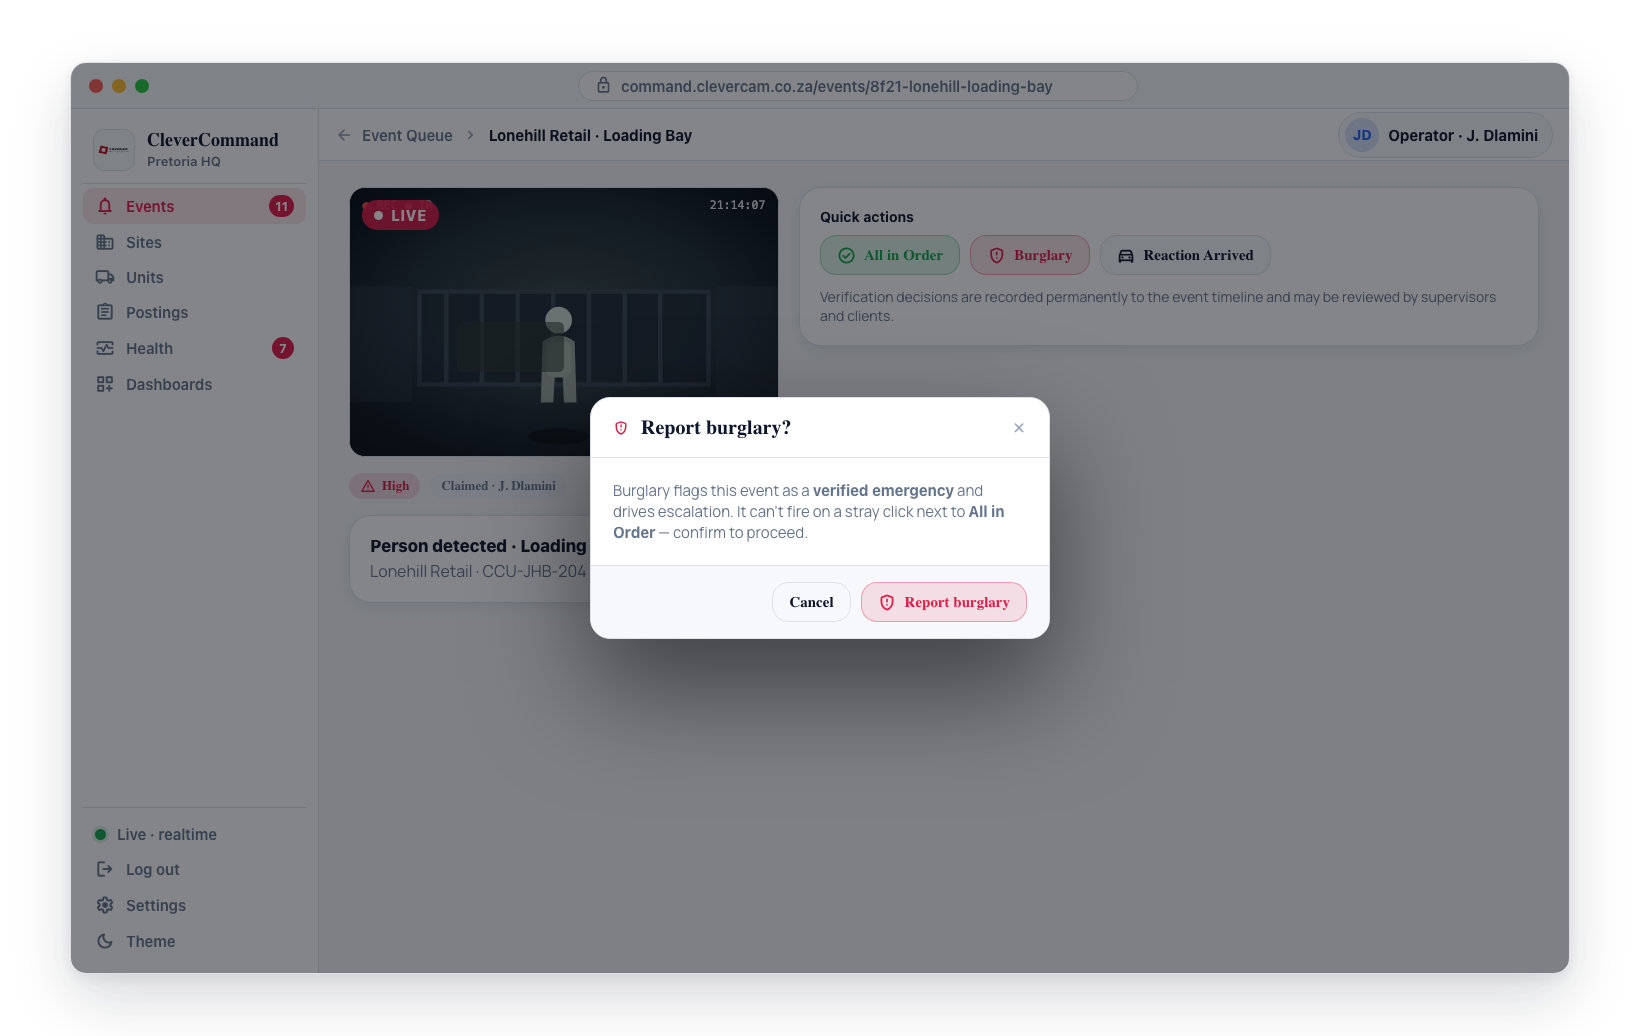
- Review the event photos and confirm unauthorized activity
- Click the Burglary button in the quick actions bar
- A confirm dialog appears ("Report burglary?") — Burglary flags the event as a verified emergency and drives escalation, so it can't fire on a stray click next to All in Order
- Click Report burglary to confirm; the event is flagged as a confirmed problem at the site
- A "Burglary logged" toast confirms success, and a timeline entry records the decision
If the write fails (e.g. a network blip), a red "Burglary NOT logged" toast appears — the flag was not set; click Burglary again.
Reaction Arrived
A third quick action, Reaction Arrived, logs that a reaction officer has arrived on scene. This is used alongside dispatches to track responder presence at the site.
When a unit never rolled
All in Order and Reaction Arrived also move the event's dispatches along: All in Order completes a unit that is en route or on scene (recording your name and the All in order outcome), and Reaction Arrived marks an en-route unit on scene.
A unit that is only nominated never rolled, so neither button can count it as having attended. When you press either one while a unit is still nominated on the event, CleverCommand asks first — "Romeo 3 never rolled":
- It attended — record it -- for a unit you ran by radio. It is recorded as rolled (at the time you nominated it) and on scene now, and then the button does its usual work: All in Order completes the run.
- It didn't go — withdraw it -- the nomination is cancelled, then the button does its usual work.
- Back -- nothing changes.
If that unit is still on another run, It attended stops and names the run -- complete it first, then try again.
If an event is marked all in order some other way while a unit is only nominated on it, that nomination is withdrawn -- it is never counted as an attendance.
Verification decisions are recorded permanently and may be reviewed by supervisors and clients. Take time to review the evidence carefully before making a determination.
Watching a Videofied clip arrive
Videofied panels record a short clip when a detector trips, and send it over the panel's mobile connection. That link is slow — a typical clip is around 215 KB and takes about a minute to come through. Nothing about that is a fault; it is the radio.
You do not have to wait for it.
A picture appears within about a second and keeps improving as the clip streams in. It is real footage from the recording, not a placeholder, so you can usually tell straight away whether somebody is there.
What you see is the part of the clip that has arrived so far, playing on a loop at normal speed. Each time more comes in the loop gets a little longer — it waits for the current play-through to finish before extending, so it never jumps back to the start under you. You do not need to scrub or press anything.
The same first frame is used as the event's picture on the Kanban board, so an alarm stops looking like an empty tile while its footage is still on the way. It is replaced by the proper snapshot once the clip lands.
Underneath the picture a label shows how far along the transfer is, and which camera it came from:
- Downloading 38% · DCV N2 — arriving normally.
- Stalled at 38% — nothing has advanced for a while. The panel has probably lost signal. Treat the picture you have as all you are going to get for now.
When the clip finishes, the picture is replaced once by the playable video, and a filmstrip of stills appears beneath it. Click any frame to enlarge it.
Scrubbing nine seconds of small, greyscale video to find the moment someone appears is slower than glancing along a row of stills. The filmstrip is also what you want when writing up the event — the frames enlarge cleanly and there is no player to fight.
Where more than one camera saw the event, the panel sends them one at a time — it cannot upload two at once. CleverCommand grabs a first frame from every camera before downloading any of them in full, so you see all the scenes within a few seconds rather than waiting a minute for the second camera to begin. The full clips then follow one after another. If a new alarm arrives while a clip is downloading, that camera jumps the queue for its first frame too. CleverCommand keeps the panel connected while they come in; without that the panel would hang up after three minutes and any clip still waiting would be lost for good.
Switching between the cameras that saw it
When more than one camera recorded the alarm, a row of camera chips appears at the top-left of the video, each labelled with the panel's own name for that camera — DCV N2, DCV N1, and so on. Click one to watch that camera's clip.
The first clip stays selected by default. That is deliberate: a second camera often finishes uploading a minute after the first, and what you are already watching must not change under you when it lands. For the same reason, picking a chip or pressing on the player holds the viewer on that clip while new signals join the stack — see The viewer follows the newest signal.
The chips only appear when there is genuinely more than one clip, so a single-camera alarm looks exactly as it always has.
Before this existed, the second camera's clip replaced the first in the record and there was no way to know another angle had ever been recorded. If you are verifying a Videofied alarm, check whether there is a second chip — the camera that saw the person is not always the one you opened.
Site outputs — deterrence and access
Where a site's alarm panel has outputs wired to it, two buttons appear on the second row of the Actions panel: Deterrent and Provide Access.
Both fire the same kind of thing — a relay on the customer's alarm panel — but they are kept apart on purpose. Opening a gate and setting off a pepper spray are not the same decision.
What the buttons do
Deterrent covers outputs that act physically on whoever is at the site: sirens, strobes, fog (smoke cloak) generators and spray units. If the site has exactly one, the button is labelled with that output's name and fires it directly. If it has several, the button opens a list.
Provide Access covers gates, doors, booms and lights — anything that lets someone in or lights the way.
Both require the Provide Access permission. Without it the buttons are visible but disabled, so you can see the site has outputs even if you may not use them.
Every deterrent asks first
Activating a deterrent always shows a confirmation naming the output and the site. This is not a misclick guard alone — the action is recorded against your name, appears in the site's event timeline, and is auditable afterwards. Access outputs fire without a prompt.
Switching an output off
Some panels accept an explicit on and off; others only accept "fire". Where an off is genuinely possible, an Off control appears next to the output in the list. Where it isn't, there is no off button rather than one that quietly re-fires the output.
Videofied panels: the two-way window
Videofied (Frontel) panels are the exception, and it is worth understanding why the buttons sometimes grey out.
A Videofied panel dials in — to report an alarm, to send video, or on its own schedule. CleverCam cannot call it. So outputs on a Videofied site are only available while the panel is connected, which is roughly three minutes from its last activity.
When the window is open, the Deterrent button shows a live countdown of the seconds remaining. Acting on the panel extends it, so working through a response does not run you out of time; the panel is released once you stop.
When the window is shut, the button is disabled and the tooltip says which of these applies:
| Tooltip | What it means |
|---|---|
| Two-way window closed | The panel has hung up. It will be reachable again the next time it dials in. |
| Panel offline (…) | The panel disconnected, with the reason the Frontel server gave. |
| This panel has never connected | The panel has not yet reported to CleverCam at all — usually a setup issue. |
| No deterrent outputs configured for this site | The site has no siren, strobe, fog or spray output set up for the control room. |
The timer comes from the receiver that is actually holding the panel's connection, and it stops being refreshed the moment that connection ends. If the countdown is running, the panel is genuinely reachable — the buttons are not guessing.
If the panel disconnects between you pressing the button and the command reaching it, the command fails and says so. It is never held back to fire later. This is deliberate: a spray or siren going off at a technician an hour after the incident ended is worse than the command not running at all.
Knowing whether it actually fired
Videofied panels report back when a relay switches, so a deterrent on those sites moves from sent to confirmed once the panel acknowledges it. If a panel refuses the command, that is reported too.
This depends on one setting on the customer's Frontel server (GIProtocolSendAction). If it was missed during installation, commands still reach the panel but never report back — see the Videofied setup page in CleverOps.
Claiming Events
Claiming an event signals to other operators that you are actively working on it. This prevents duplicate effort in multi-operator control rooms.
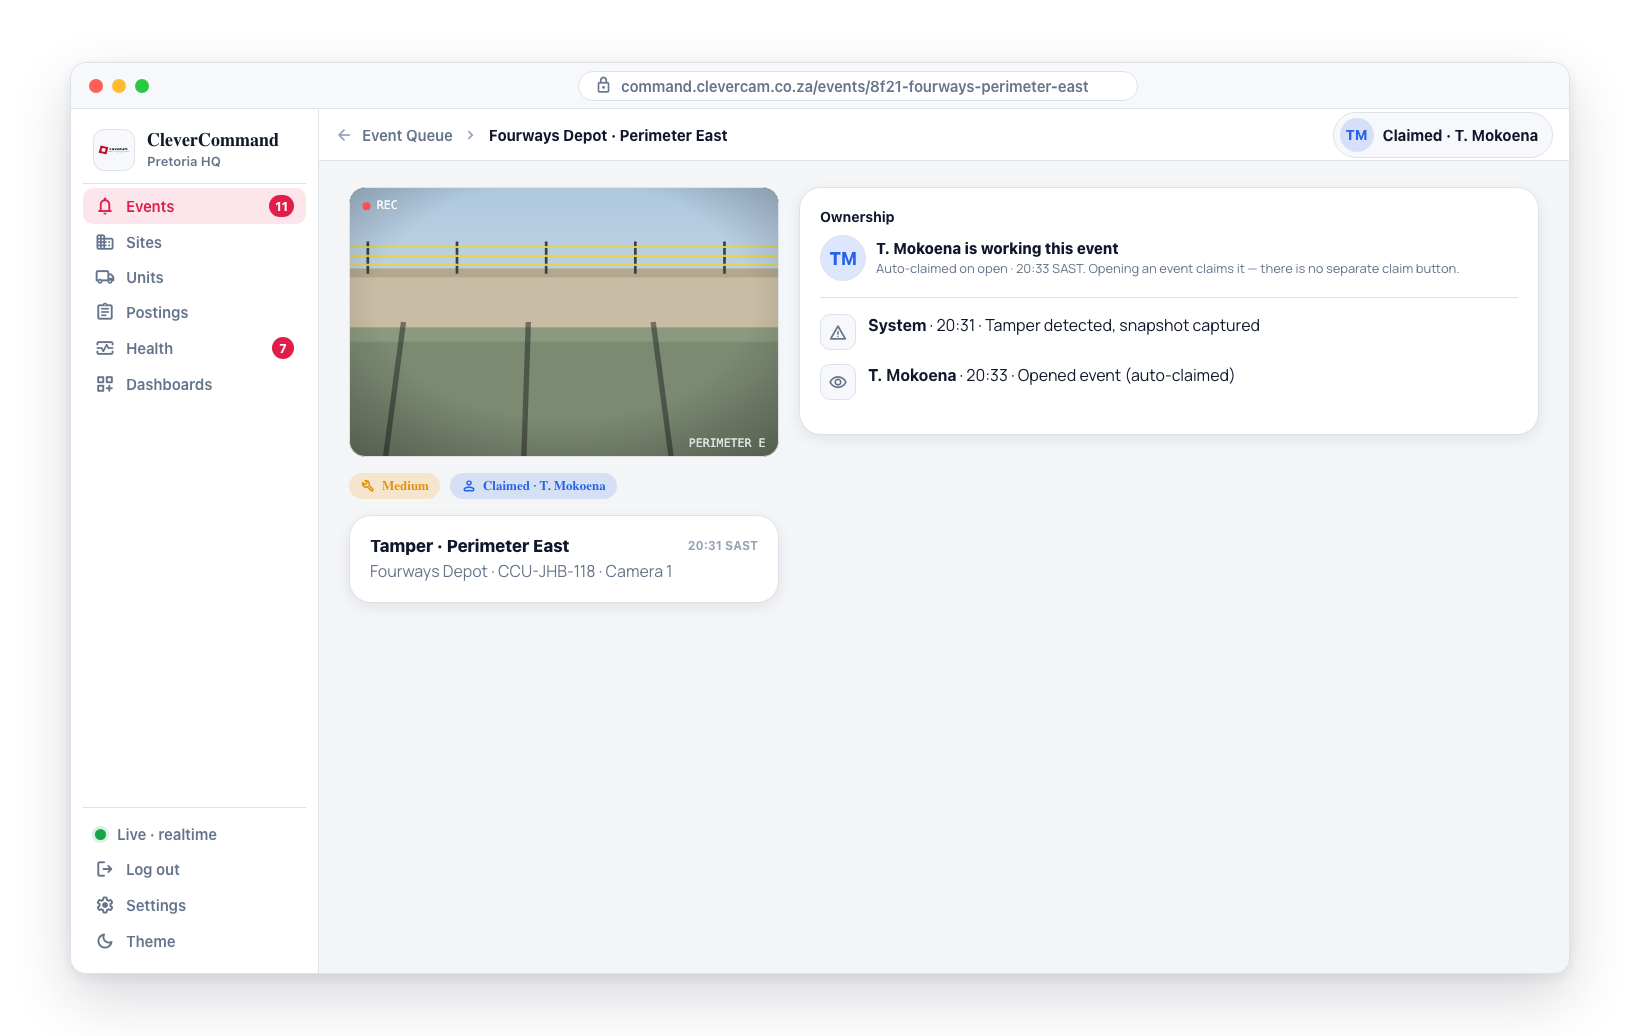
Events are automatically claimed when you open them. There is no separate claim button -- opening an event from the queue triggers an ownership claim. If the event is already owned by another operator, their name is displayed in the event header. If you are the first to open it, your operator name is associated with the event.
Other operators can see who has claimed each event.
Sleeping Events
The sleep function allows you to temporarily move an event to the Sleeping section and revisit it later. This is useful when you are waiting for more information (such as a callback from a site contact) or when a lower-priority event needs to be reviewed after a set period.
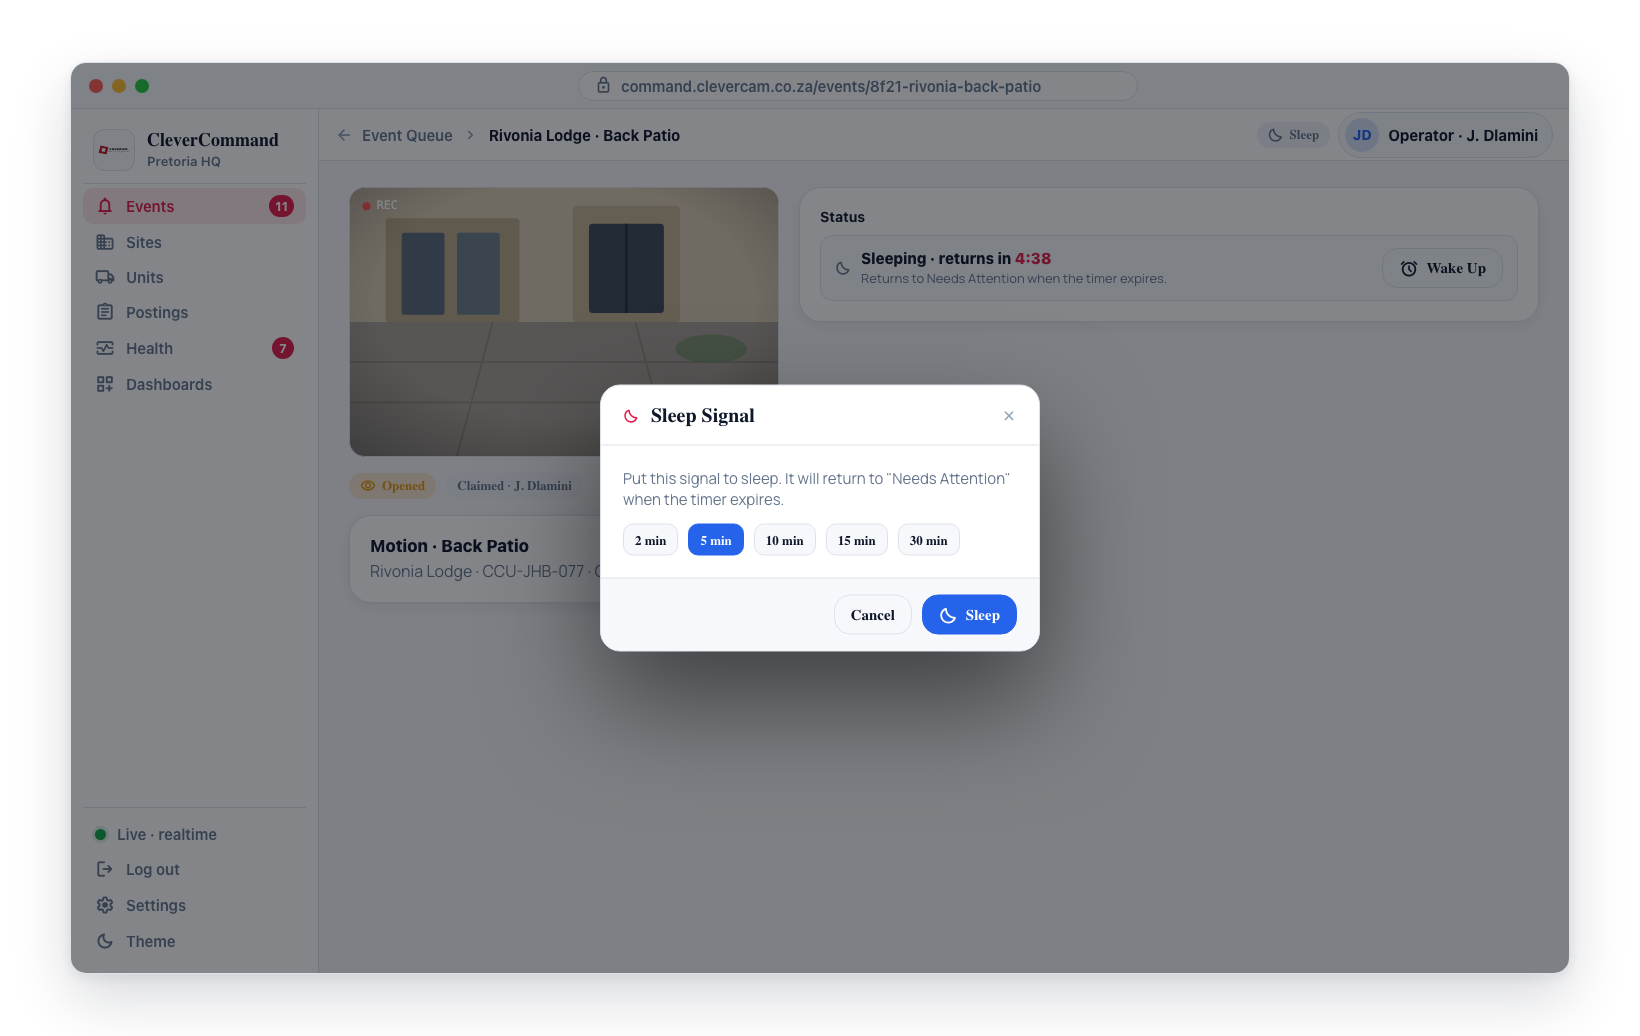
- Open the event you want to sleep
- Set the sleep duration (in seconds) using the sleep controls
- Click the Sleep button
- The event moves to the Sleeping section with a visible countdown timer
- When the sleep period expires, the event returns to the Needs Attention section
A sleeping event shows a status bar with a live countdown. You can cancel the sleep early by clicking the Wake button, which immediately returns the event to the active queue.
Use the sleep function for events where you have dispatched a unit and are waiting for arrival confirmation, or when you have called a site contact and are waiting for a callback.
Scheduling & logging calls
Two more first-class actions sit on the event's secondary action row (next to View site history, View snapshot wall and View zones & partitions). Each one is recorded on the event timeline, and Schedule a check is also available from a kanban card's More actions menu (the target ⌖ icon) in Clever/Advance mode.
Events carry a verification level: Response requested — someone asked for a response (an app panic, a phone-in, or a customer "verify") — or, once an operator has reviewed the evidence and confirmed a genuine threat, Confirmed threat (shown as a red ⚠ Confirmed threat chip). Confirmed threat is set by the Escalate flows in image review — the two levels are deliberately separate: a request coming in is not the same as an operator actually verifying a threat.
Schedule a check
Sometimes you're finished with an event but something still needs doing later — the keyholder is in a meeting, a technician is coming in the morning, a gate motor needs re-testing. Schedule a check books that job as its own card so you can close the event now:
- Click Schedule a check.
- Pick a time — use a quick preset (+30 min, +1 hour, +2 hours, +4 hours, Tomorrow 08:00) or set an exact date and time.
- Type what needs doing (e.g. "Call Mr Naidoo back to confirm the gate motor was repaired").
- Optionally tick A responder must attend — this adds a photo-on-arrival task for the responding unit.
- Leave Close this event now ticked (the normal case) and click Schedule & close.
At the chosen time a card headed Follow-up check opens on the board carrying your instruction, and the instruction also becomes a required control-room checklist item, so the job has to be actioned rather than glanced at. The check is quiet — it appears on the board like any other event, but raises no siren, no customer notification and no operator Telegram. A "Check scheduled" entry records the time and instruction on the original event.
If a unit is still rolling, or the event otherwise isn't finished, untick Close this event now — the check is still booked and the event stays in the queue.
A scheduled check is different from Sleep: sleep parks this event for a short "check back in N minutes" and it returns to the queue as-is. A check closes this event and raises a new, self-contained card at the chosen time with instructions attached — which is what you want when the work will be picked up by a different shift.
Client phoned in
When a client calls the control room about an event you're already viewing, log the call on it:
- Click Client phoned in.
- Tap who called — the site's keyholders appear as buttons, and picking one fills in their name and number from the record. Use Someone else… for a caller who isn't on the call list (a neighbour, a passer-by), and type their name plus an optional number.
- Pick a reason chip (Suspicious activity on site, Querying an alarm, Requesting a patrol, All ok — stand down) or type the reason yourself. Chips just fill the box — you can add detail after.
- Click Log call.
A "Client phoned in" entry is added to the timeline with the caller and reason. When the caller was picked from the call list, the entry is tied to that keyholder's record rather than to a typed-in name.
To open a new event from an inbound call — when there's no event yet — use Log phone-in on the Manual Event Creation page, next to Create manual event. It opens a phone-in event for the chosen site and takes you straight to it.
Add ticket
Not every follow-up needs a scheduled check or a phone-in note on the event itself — something might come up while you're on an event that's really about the site more broadly (a billing query, a request to update a contact) and belongs on the CRM side rather than in this event's own timeline.
- Click Add ticket on the event's secondary action row.
- Pick a category (defaults to Call-in) and write what it's about.
- Click Create ticket.
The ticket is filed against the event's site and appears on CleverOps' Tickets board for triage — it's independent of this event and isn't closed when the event closes.
Add ticket only appears when the control room has the CRM module enabled — see Modules & capabilities in CleverOps, or Adding a ticket for the equivalent on the Sites page.
How an event was resolved
When an event closes, CleverCommand now records how it ended and shows that on the event instead of a generic "closed" label. The status item reads the disposition — for example Closed by customer — all clear (password), Resolved by operator, False alarm, Resolved after dispatch, or DURESS — silent dispatch.
The most important one is the customer all-clear:
If the customer cancelled the alarm with their own password, a green banner appears on the event (and on its kanban card): "✅ Customer cancelled — all clear (password verified). No call or dispatch needed." This is a verified stand-down — there's no need to phone the keyholder or roll a vehicle.
The banner only shows for the normal password. If the customer used their duress password, the event is treated as a silent emergency (DURESS — silent dispatch), never an all-clear.
Closing Events
Closing an event removes it from the active queue and marks it as resolved.
- Complete your verification and any required actions on the event
- Click the Close action
- The event is removed from the active queue for all operators
- The event remains in the site history for future reference
If a quick feedback chip was picked, the status panel shows Closing as: … above the Complete buttons (with a Clear link) and the completion entry reads "Event completed by … — Workers on site." The reason is stored on the completion action for reporting.
Panic, duress, fire and medical ask for a reason
On these events, pressing Complete Event or Complete & Next with no close reason picked and no keyholder call or dispatch logged does not close the event on the first press. The close-reason chips appear above the buttons with "Nothing is on record for this alarm. Pick what happened, or press Complete again to close it as is." Pick a chip, or press Complete again — the second press always completes. Events that already have a call outcome or a dispatch on the timeline are never asked.
Bulk Closing Related Events
When one incident has raised several events at the same site (see Event Stacking), you can close the others as you complete the one you are working on:
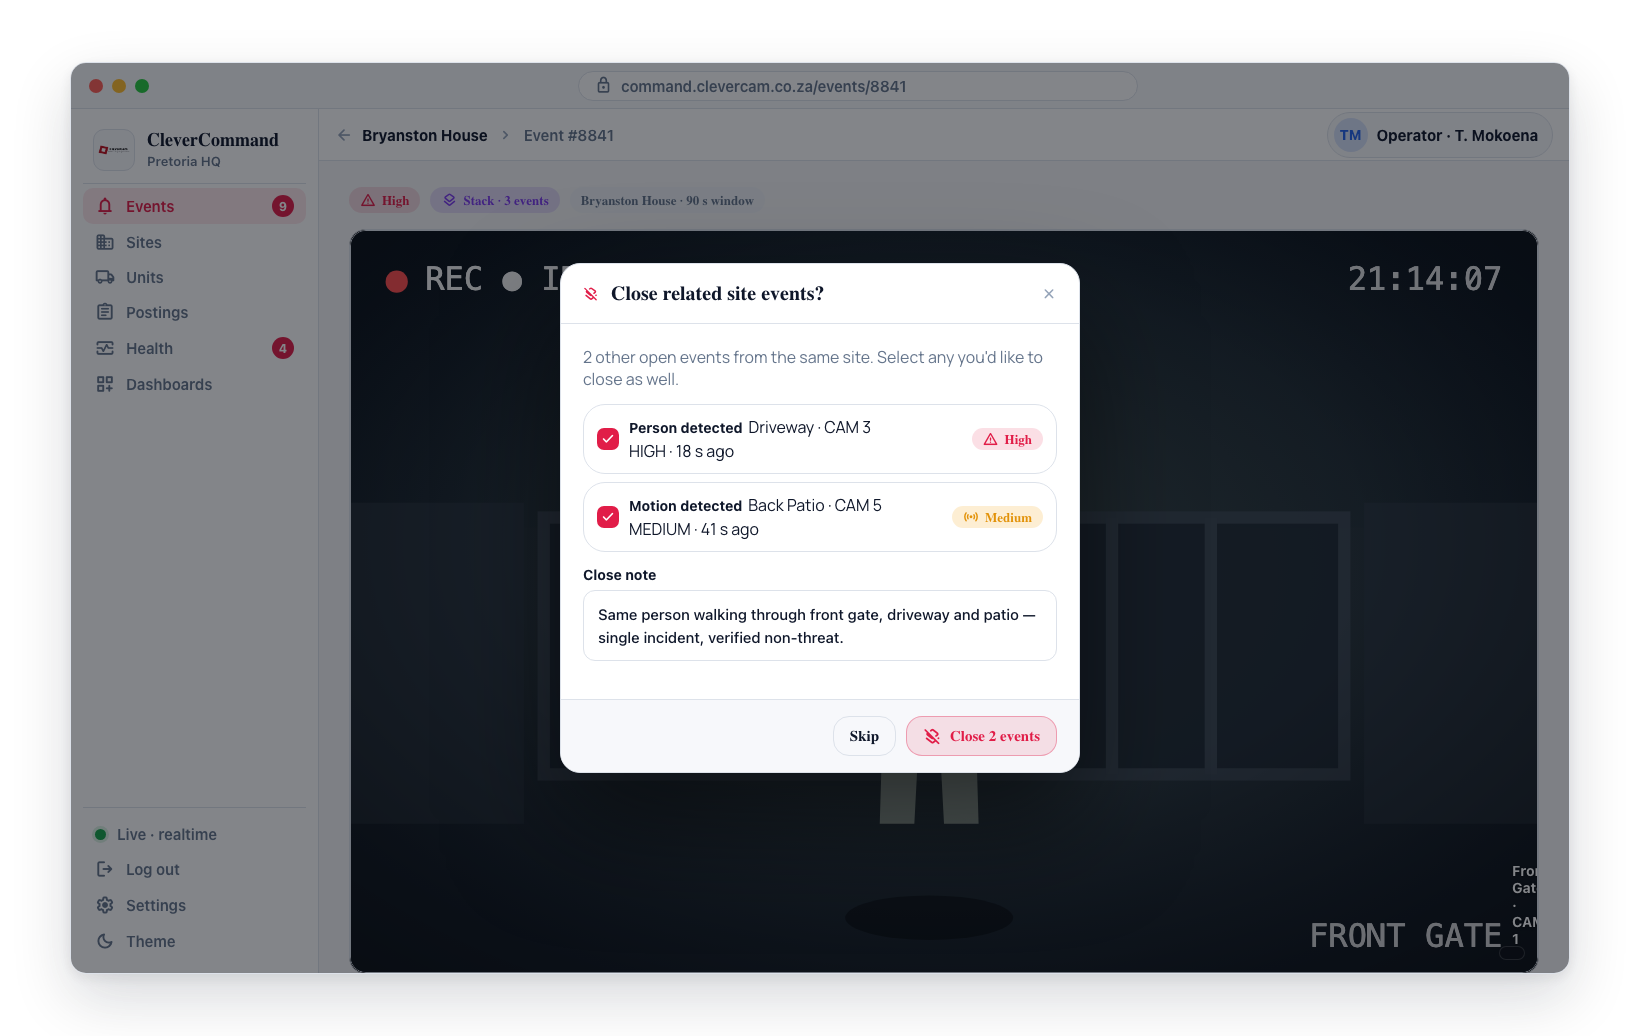
- Complete the event with Complete Event or Complete & Next
- If other events from the same site are still open in your queue, the Close related site events? prompt lists them
- Tick the ones to close, and edit the Close note if needed
- Press Close 3 events (the button counts your ticks), or Skip to close none of them
- Each closed event receives a Bulk Close entry on its timeline with the note
When a close reason was picked, the bulk-close note is pre-filled with it (Closed with related event — Workers on site) instead of the generic wording.
Some ticked events are left open instead, and the prompt lists them with the reason before you move on:
- A response unit is still on the way or on site. Open that event and complete it on its own, so its dispatch prompt can ask you to confirm. A dispatch that is only nominated (no unit has rolled yet) does not hold an event open: bulk close cancels it and closes the event.
- A call is still live on the event.
- Required checklist items are still unanswered.
The prompt only appears if your operator role includes Bulk close events.
Closed events are not deleted. They remain accessible through site history and event search for post-incident review and reporting.
Closed by Another Operator
Each event is shared across every operator in a control room, so when one operator closes it, it is removed from every operator's queue at the same time. If you are viewing an event's details at the moment a colleague closes it, a banner appears at the top of the page -- "Event was closed by another operator -- this view is now read-only" -- with a Back to queue shortcut. All actions, dispatches, and the Close button are disabled because the event has already been resolved.
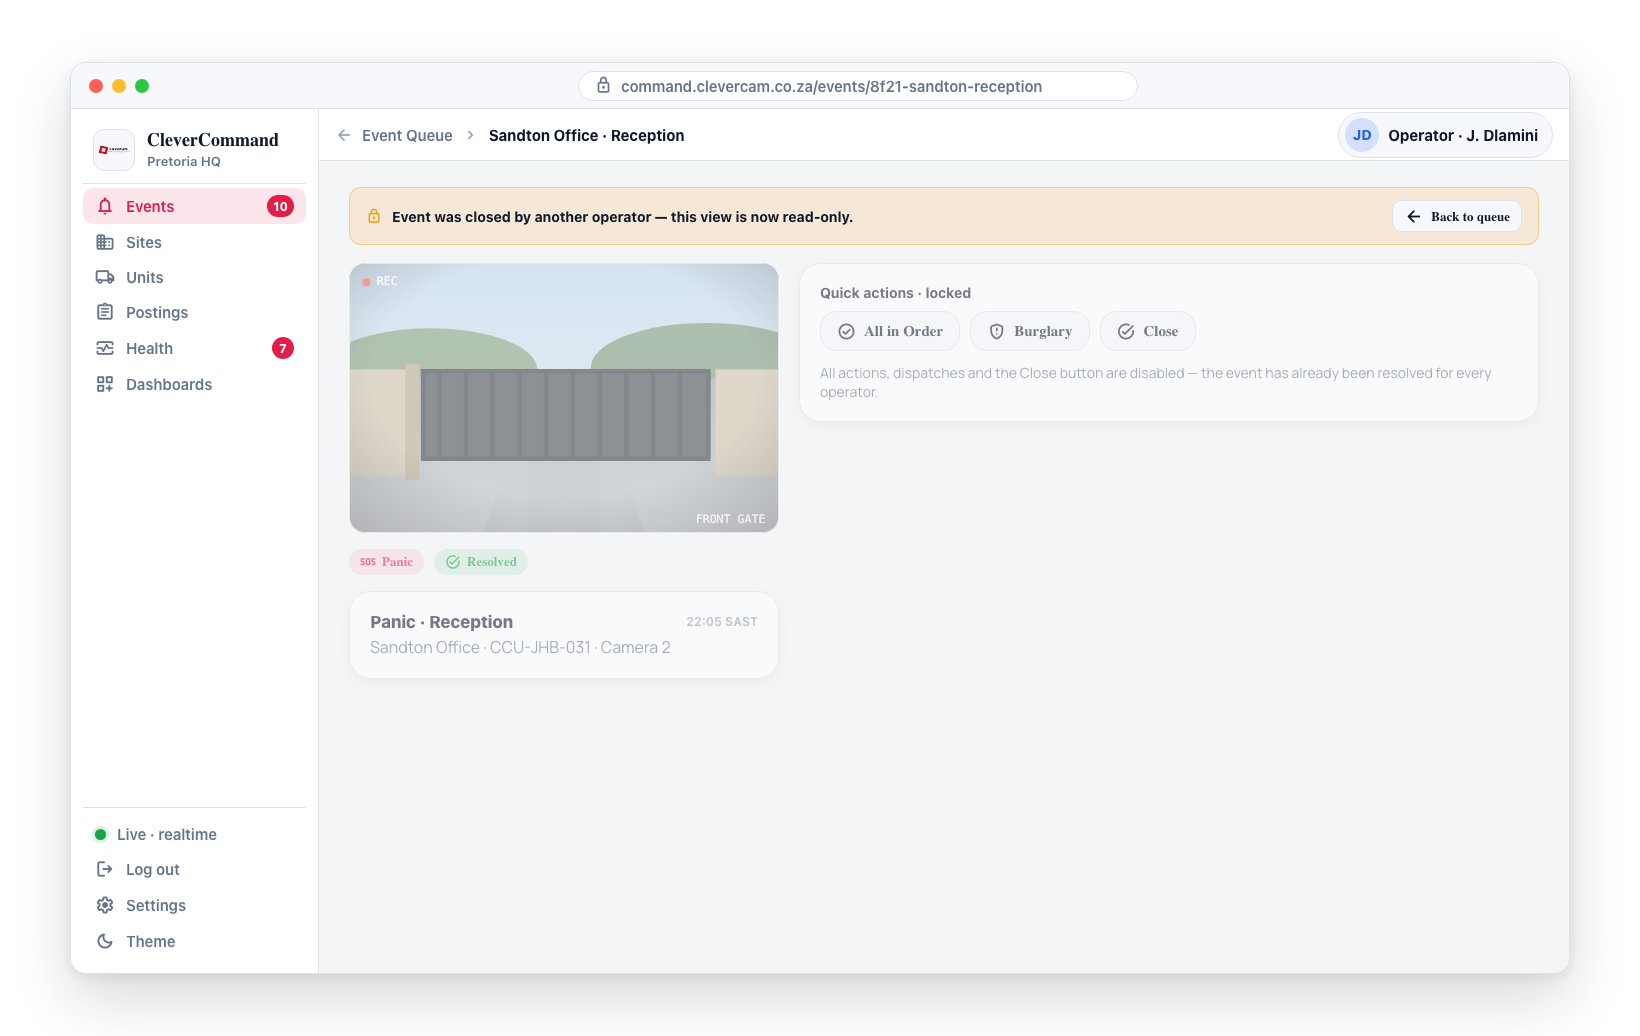
This is normal in multi-operator control rooms. If you see this banner, click Back to queue to pick up the next active event.
Action Workflow Summary
A typical event processing workflow follows this pattern:
- Open -- Click an event to view details (auto-claims ownership)
- Review -- Examine photos and event details
- Investigate -- Add notes, contact site, check history
- Verify -- Mark as All in Order or Burglary
- Dispatch (if needed) -- Nominate a response unit, then Roll it to the site
- Close -- Resolve and close the event once the incident is handled