Media & Evidence
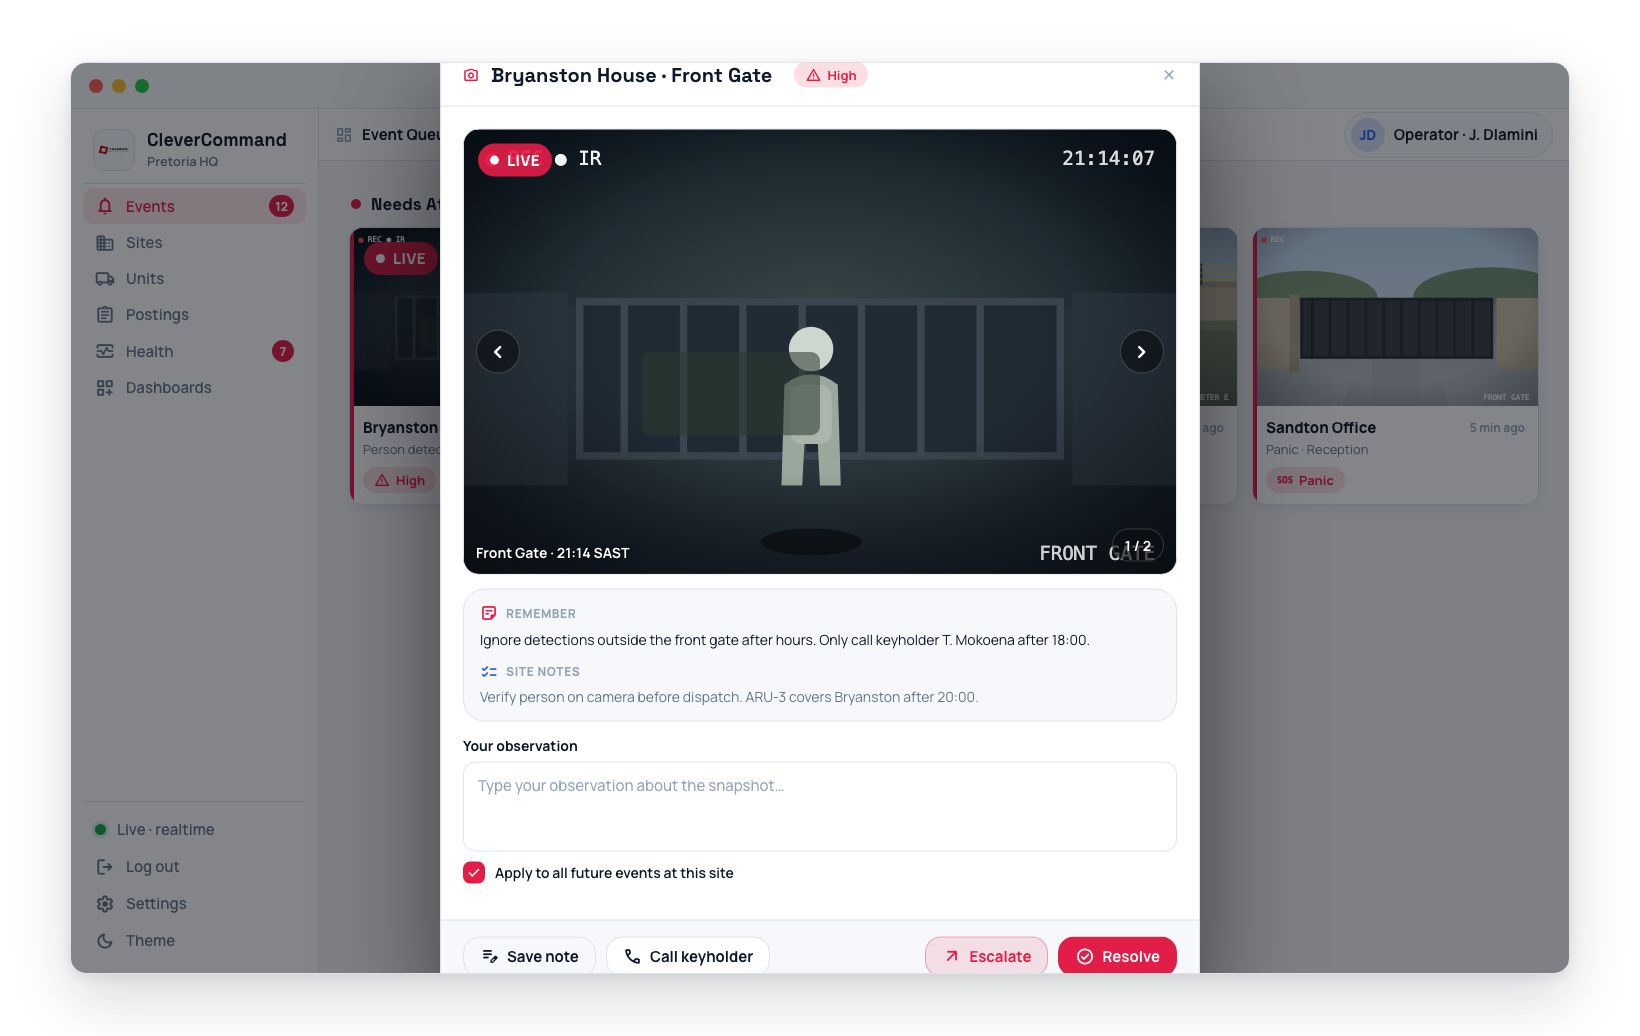
When you open an event in CleverCommand, the first thing you see is the visual evidence captured by the camera at the moment of detection. Event details display snapshot photos, support multi-camera views, and allow operators to upload additional images as evidence. This visual context is critical for making accurate verification decisions.
Event Snapshots
Each event includes one or more snapshot images taken by the camera at detection time. These are the primary visual evidence operators use to assess whether an event is a real alarm or a false positive.
- Primary snapshot -- The main image from the camera that triggered the event
- Multiple snapshots -- If the event was detected by more than one camera, additional snapshots are displayed in sequence
- Image placeholders -- While images load, a blurred color preview is shown so the layout does not shift
- Real picture shape -- Many cameras and recorders send a squeezed picture (a widescreen view packed into a narrower frame such as 704×576, or 960×1080 on a recorder), which used to look squarish or even taller than wide. CleverCommand stretches these back to the widescreen picture they carry, in snapshots, event photos, clips and live view, the way the camera makers' own apps do. Cameras that really are square or upright (a fisheye, a thermal camera) keep their own shape.
Image Gallery
When an event has multiple images, they are displayed in a gallery format:
- Open an event from the queue to view its details
- The primary snapshot is displayed prominently at the top
- Additional snapshots appear below or beside the primary image
- Click any thumbnail to see it at full size
Full-Screen Lightbox
For detailed inspection of any image:
- Click on a snapshot image in the event details
- The image opens in a full-screen overlay
- Navigate between multiple images using arrow controls
- Press Escape or click outside the image to close
Use the full-screen view to zoom in on details when verifying an event. Look for identifying features like clothing, vehicle characteristics, or movement patterns that help determine whether the detection is a real intrusion.
Live View from the Image Viewer
A Live view button appears in the full-screen image viewer and on each camera card in the snapshot wall modal. Clicking it streams the camera live, directly over the snapshot, so you can compare what the camera saw at detection time with what is happening right now.
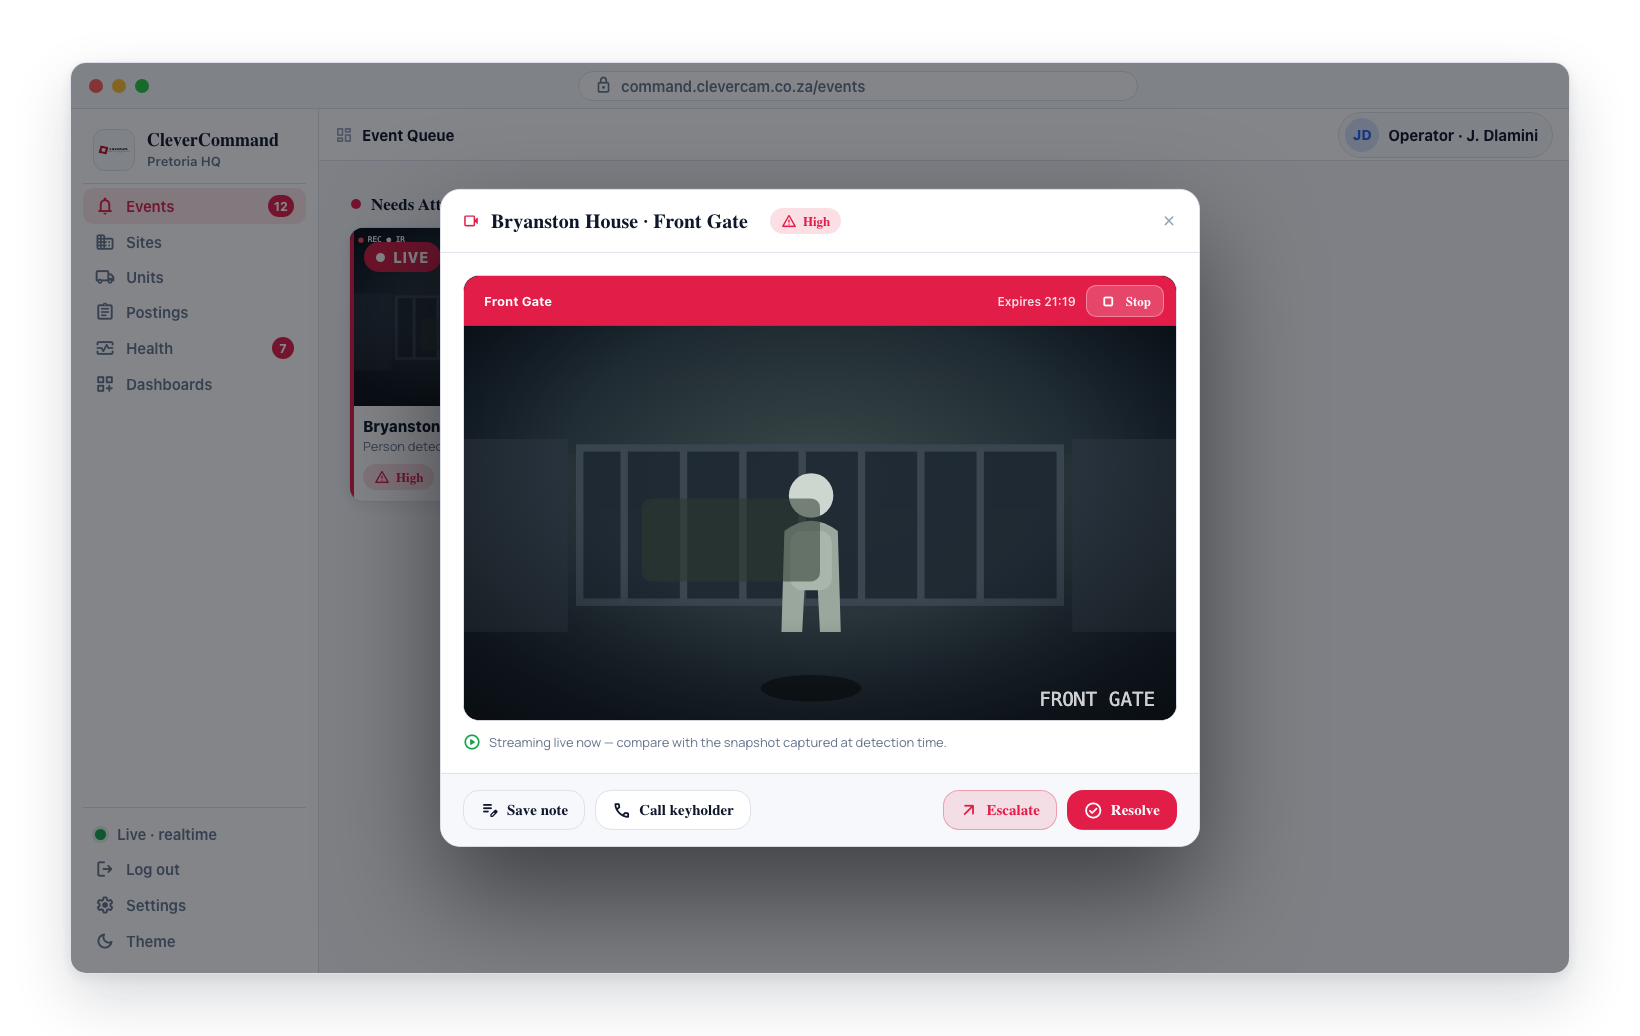
The button only appears when all of the following are true:
- Your operator role has the Live view permission
- The camera has Allow external live view enabled (set by the customer in CleverAlert)
- The camera is not disabled
A red bar at the top of the player shows the camera name; click Stop to return to the snapshot. If the stream cannot start, the viewer falls back to the snapshot and shows a short error — the event itself is unaffected.
Site Notes Banner
The snapshot viewer surfaces site-level guidance at the top of the modal so operators see the relevant rules while reviewing the image. The banner reads from two note sources, in this order:
- Remember -- the Monitoring notes typed on the Sites page (
vcr_site_connection.notes_monitoring). This is the control room's own memory of the site. Use it for verification rules that apply to every event from the site, e.g. "Ignore detections outside the gate" or "Only call after 18:00". - Site notes -- the read-only note the customer and CleverOps both call Site notes (
vcr_site_connection.response_instructions).
Parsed Handling rules and a Billing line follow when the site has them.
The banner's height is capped so long notes never push the snapshot out of view. When the guidance is longer than the banner, scroll inside the banner to read the rest. The banner is hidden when none of these fields contain text. While the modal is open it refreshes live, so if another operator updates the Monitoring notes on the Sites page, the change appears in the banner immediately.
Promote an Observation to Site Memory
Below the observation textarea in the snapshot viewer is a checkbox labelled Apply to all future events at this site. When ticked, any of the four action buttons -- Save note, Call keyholder, Resolve, or Escalate -- also appends your typed observation to the site's Monitoring notes with a timestamp and your operator label. It goes to Monitoring notes, not Responder notes: the observation is the control room's own memory, and Responder notes are sent to the reaction unit's phone on arrival.
The next time anyone opens an event for that site, the appended line appears on the Remember banner.
How it behaves:
- Type an observation into the textarea
- Tick Apply to all future events at this site
- Click any of the action buttons -- the per-event note is written and the site Monitoring notes are appended with
[YYYY-MM-DD HH:MM Operator] <your text> - Untick the box if you only want the note on this event, not on the site
The checkbox is only enabled when there is text in the observation field and a site context is resolved. It is hidden for events without a linked site (community chimes, orphaned events). Resolves with the default "all in order" sentence are never promoted -- that sentence is generic, not site-specific.
Anything appended here is visible to every operator on every future event for the site. Use it for stable rules and recurring patterns, not for one-off observations.
Uploading Additional Images
Operators can attach additional images to an event as supplementary evidence. This is useful when you have screenshots from other systems, photos sent by site contacts or a responder, or other visual documentation.
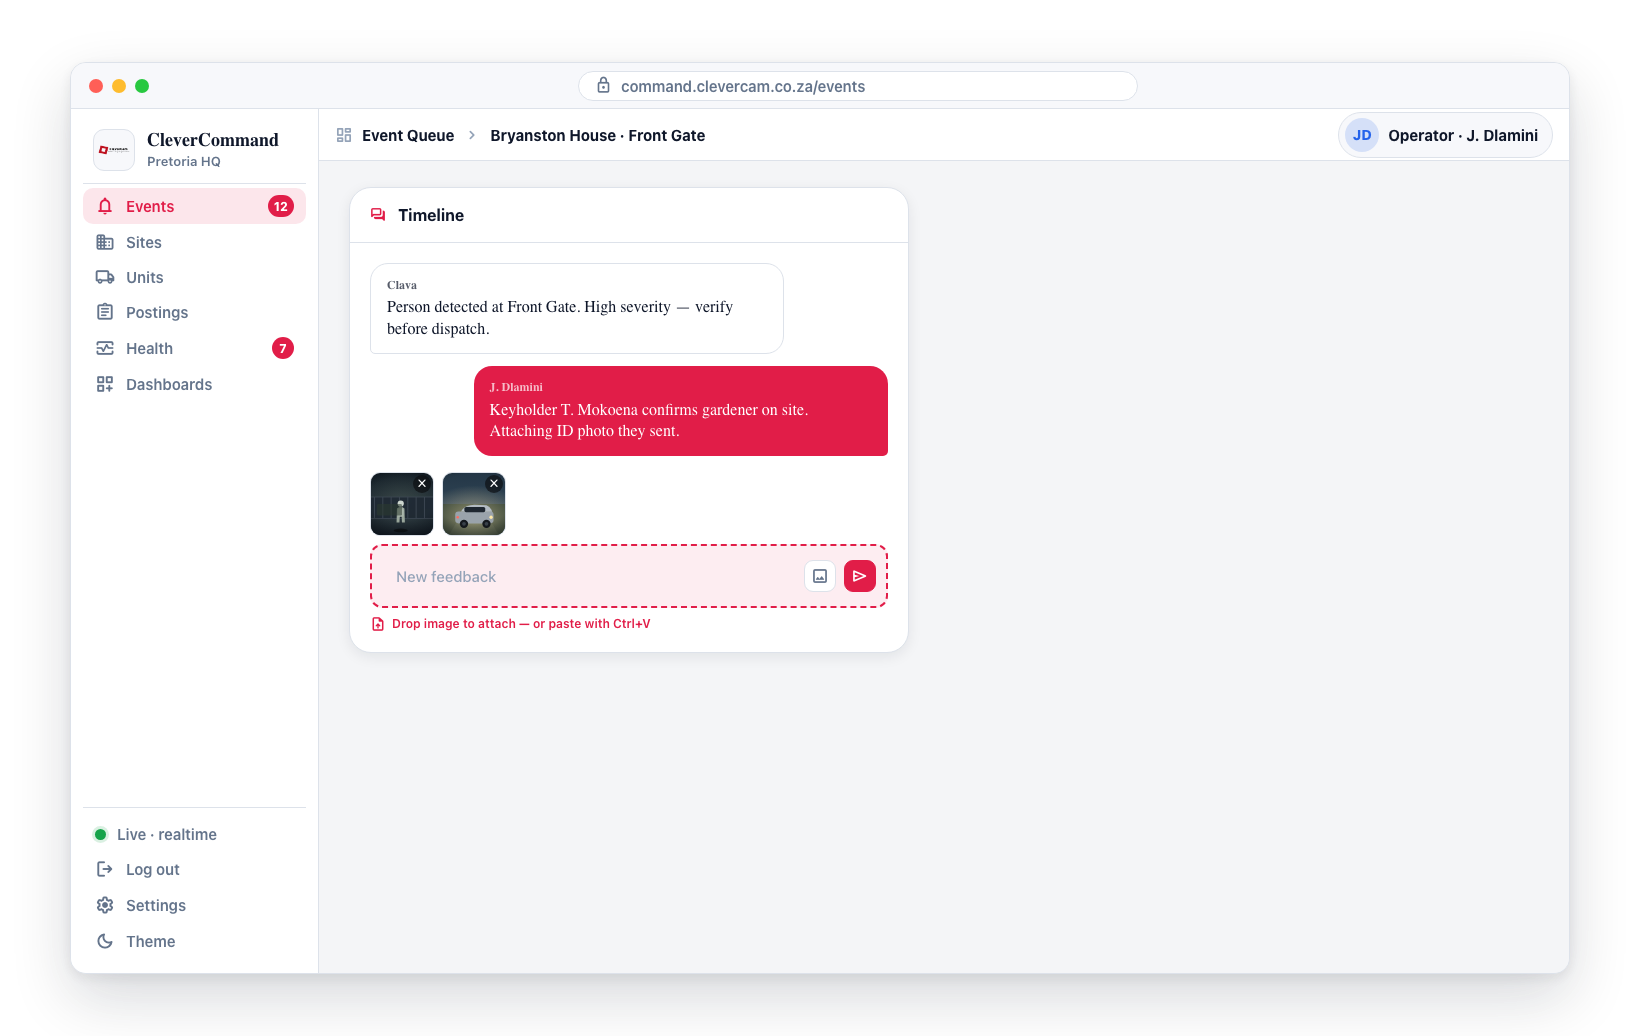
Images go through the feedback composer at the bottom of the Timeline panel. However they get there, they wait as previews above the composer (click the × on one to drop it) until you send — then every image in the composer goes in that one send, each as its own Photo entry on the timeline, with anything you typed on the first. PNG, JPEG, GIF and WebP up to 5 MB each.
Attach Button
- Click the image button beside the send button
- Pick one or several images — select them all at once in the file dialog
- Press Enter or click send
Drag and Drop
- Open the event details panel
- Drag one or more image files from your desktop or file explorer
- Drop them onto the composer
- Press Enter or click send
Clipboard Paste
- Copy an image to your clipboard (screenshot, image from another application)
- Click into the composer and use Ctrl+V (or Cmd+V on Mac) to paste
- Press Enter or click send
Images can be added while the event is open; a closed event is read-only.
Uploaded images become part of the permanent event record. They are visible to all operators and are included in event history and reports.
A responder's own photos should not need to come in through here: CleverResponder keeps call-out photos and the report on the phone when there is no signal and sends them itself when signal returns, with the time and place each photo was taken — see CleverResponder → No signal on site.
Image Loading
Images may take a moment to load depending on network conditions and image size. During loading:
- A blurred color placeholder shows an approximate preview of the image
- A loading spinner may appear on top of the placeholder
- Once loaded, the full image replaces the placeholder
If an image fails to load, a broken image indicator is shown. This can happen if the camera was offline when the snapshot was requested or if there was a network issue during capture.