Invoices & Payments
Invoices are sent to your customers and list everything they are being charged for — typically a mix of monthly subscription fees, completed service jobs, and any manual adjustments. Payments are the money you receive against those invoices.
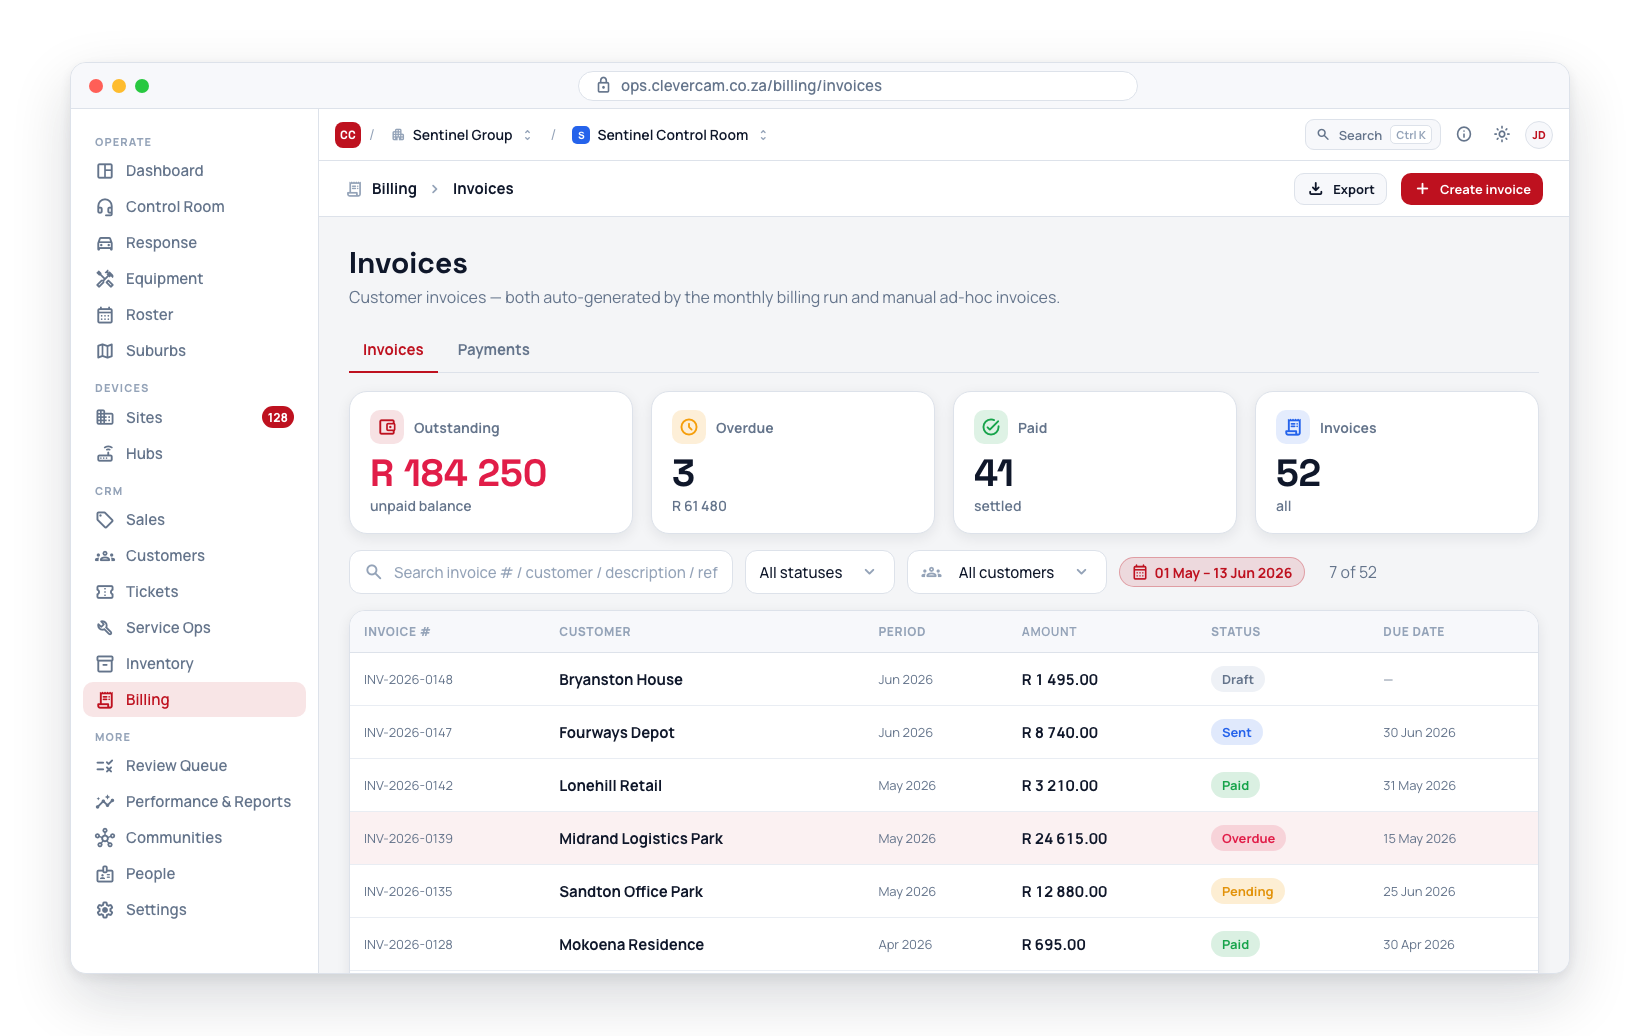
Two tabs cover this area: Invoices and Payments.
Invoice line items have a Disc % column (a per-line percentage discount; VAT is charged on the discounted amount), configured under Billing → Config. How the invoice PDF looks is a document template, picked in the invoice form's Template field; an invoice raised from a quote starts with the quote's pick.
What the invoice PDF says about paying
The document's payment wording follows how the customer actually pays:
- EFT customers get the PAYMENT / BANKING block — printed only when a real bank account is configured under Billing → Config → Banking. With no account set up, the block is suppressed entirely rather than printing a bare account name with nothing to pay into.
- Debit-order customers (an active debit mandate, or a subscription whose payment method is Debit order) get no banking block and no "please settle" — the note reads "No action needed — this amount will be collected by debit order", naming the collection day when the subscription carries one.
The closing sentence is a single slot that CleverOps words per invoice — "No action needed — this amount will be collected by debit order…" or "Please settle by <date>. Quote the invoice number as your reference." A document template that switches the Payment terms block off for invoices prints neither, so a template that does so should carry a text block of its own that still reads correctly for a debit-order customer.
Line figures print on the control room's VAT display axis — unit and line total together, so the lines always sum to the totals block. On an ex-VAT room the subtotal says (excl. VAT) under VAT-exclusive lines; on an inclusive room the lines are VAT-inclusive and the VAT is stated under the TOTAL. And when every line's period matches the invoice heading ("September 2026"), the repeated suffix is dropped from the lines.
The Invoices tab
When no invoices exist yet, the empty state points you at both starting paths: click Create invoice for an ad-hoc invoice, or draft the monthly batch from the Runs tab (see Monthly Billing Run).
Opening the list with ?run=<batch id> (the link from a batch) scopes it to that batch; a Batch #N chip in the filter bar clears it.
Out of the box each invoice in the list shows the invoice number, customer, issue date, due date, status, total, outstanding balance and description. Invoices that the accounting sync has pushed to Xero carry a small Xero badge next to their number; one that was created in Xero and mirrored here reads From Xero. Which columns the list shows, and in what order, is yours to choose — see Choosing your columns below.
Choosing your columns
Columns ▾, above the table, is where you decide which columns the list shows — tick a column to bring it in, untick it to hide it. The button says how many are currently hidden, so a column somebody switched off is never a mystery. Invoice # is listed too, ticked and greyed with always beside it: it cannot go.
Put them in the order you read them. The ↑ and ↓ beside each column in Columns ▾ move it one place; a column heading's own menu (the small ▾ that appears when you hover a heading) has Move left and Move right for the same thing. Invoice # stays where the list put it, but other columns may move past it.
Your choice is yours alone and it follows you. Columns, their order and the sort are saved against your login, not the browser, so the list looks the same on the control-room machine and on your laptop, and changing it does not touch what your colleagues see. Reset to default view puts everything back.
The columns, grouped — the first eight are on by default, the rest start switched off:
- Invoice # — the number, or Draft #id until the invoice is issued, with the Xero badge when it applies
- Customer — the account billed; click it to open the customer's billing tab
- Issue date / Due date — the dates printed on the invoice
- Status — the status pill, with the viewed dot once the customer has opened it on the portal
- Total / Balance — the invoice total and what is still owed
- Description — the invoice's description, clipped to one line (hover for all of it)
- Overdue — how many days past due the invoice is: unpaid and past its due date (its issue date when it has none), the same rule the reminders and the age analysis use. Blank when it is not overdue
- Paid — when the invoice was settled in full
- Emailed — when it was last emailed to the customer, or Never
- Subtotal / VAT — the amount before VAT, and the VAT
- Site — the site(s) the invoice is for, from its lines or the job it was raised from
- Reference — the customer's reference or order number
- Kind — Tax invoice, Pro-forma or Deposit (see Document kind)
- Source — CleverOps, CleverOps (synced to Xero) or From Xero
- Batch — the monthly billing batch it was raised in, with the period billed
- Raised by — the person who raised it; Automated for the billing run and the accounting sync
- Raised — when the invoice was created, which is the order the list opens in
The list only fetches the data behind the columns that are showing, so a page with the default set is as quick as it ever was however many columns exist.
Sorting the list
Click a column heading to sort by it; click it again to reverse. An arrow marks the column the list is sorted on. The heading's ▾ menu offers the two directions by name — A → Z / Z → A for text, Largest first / Smallest first for money, Newest first / Oldest first for dates, Most overdue first / Least overdue first for the Overdue column — so you never have to click twice to get the one you meant.
These headings sort: Invoice #, Customer, Issue date, Due date, Status, Total, Balance, Overdue, Paid, Emailed and Raised. The list opens on Raised, newest first — so anything you or a colleague just created is at the top — even while the Raised column is hidden. Issue date is the reading order for reconciling against a statement; the two differ whenever an invoice is back- or forward-dated, and on a migrated book they can differ a lot, because invoices imported from an accounting package keep their original dates.
The sort is done by the server across your whole book of invoices, not just the page on screen — so sorting by balance and paging forward really does walk down from the largest, rather than re-shuffling the fifty rows you happen to be looking at. Like your columns, the sort is saved against your login.
The remaining headings — Description, Subtotal, VAT, Site, Reference, Kind, Source, Batch and Raised by — are not sortable; their menu says so.
Filtering from a column
A column's ▾ menu is also where its filter lives. Pick a value and the whole book is filtered; the heading's ▾ turns solid while a filter is set, and a chip naming the filter appears in the filter bar — even if you later hide the column — with × to clear it. Clear filters clears these along with everything else.
- Overdue — Overdue or Not overdue, by the rule above
- Balance — Still owing or Settled
- Source — Raised in CleverOps or From Xero
- Emailed — Emailed or Never emailed
The Status column reaches the same filter as the status dropdown in the filter bar, and the Customer heading offers the customers on the page you are looking at (use the customer picker in the bar for anyone else). Column filters are session-scoped — they clear when you leave the page.
Export CSV
Export CSV in the filter bar downloads every invoice the current filters and search match — the whole filtered book, not the page on screen — in the columns you have showing, in your order, with Invoice # always first. Money is written as plain numbers so the spreadsheet can sum it; dates are ISO. Build the view you want (an overdue chase with Overdue, Emailed and Raised by showing, say) and the file is that view.
A view toggle above the list switches between Invoices, Ad-hoc charges, Statements, and Supplier bills. Ad-hoc charges is the pending ledger of per-dispatch, distance-band and hourly work, invoiced one-invoice-per-customer from a ticked selection. Supplier bills is a read-only list of your Xero purchase invoices (supplier name, issue and due dates, total, amount owing, status) pulled in by the accounting sync for cost visibility — click a bill to expand its line summary; capture and pay bills in Xero itself. Nothing is matched or captured here: the buy side's own view of bills — capturing a supplier's invoice, matching it to the order and the receipt, and approving it — lives on Inventory → Purchasing → Bills.
Statuses
| Status | Meaning |
|---|---|
| Draft | Not yet issued — still editable. A draft has no invoice number and no issue date; it shows as Draft #id until it is issued, is not on statements, balances or ageing, and is not pushed to Xero or reminded |
| Pending | Issued (numbered and dated) but not yet emailed |
| Sent | Emailed to the customer |
| Paid | Fully settled |
| Overdue | Shown in place of Pending or Sent once the due date (the issue date when there is none) has passed and a balance is still outstanding — worked out, never stored (see below) |
| Void | Cancelled — kept for your records but excluded from statements |
| Credited | Cancelled by credit note — fully credited, so nothing is owed and it is no longer chased |
When you create an invoice by hand you can only set its status to Draft or Sent. The other statuses are reached through their own actions — Paid by recording a payment, Void from the invoice's lifecycle actions, and Credited by crediting the invoice in full — so a "paid" invoice is always backed by a real payment record.
Overdue is worked out, not set. Nothing moves an invoice into an Overdue status: an issued invoice stays Pending or Sent underneath. Wherever an invoice's status is shown — the invoice lists (Billing, the customer, the site, the project), the invoice itself, its PDF and the customer's portal — an unpaid invoice past its due date (its issue date when it has none) reads Overdue, from the day after that date. Every overdue figure uses the same rule — the Overdue tiles on Billing and its Overview, the customer's Overdue chip, the Customers list — and it is also the rule automated reminders, statements and debit-order runs pick invoices by. Because Pending and Sent are still the stage underneath, filtering the list on Sent can show invoices whose pill reads Overdue; pick Overdue in the Status filter to see only those.
Numbers are allocated at issue. The invoice number is drawn from the entity's sequence the moment a draft stops being a draft — Issue invoice, Mark as sent, or emailing it — never before. Deleting a draft therefore never leaves a gap in the sequence, and an issued invoice can no longer be deleted (void it instead). Invoices created directly as Sent, pro-formas and deposit invoices are numbered immediately.
Emailing a draft issues it before the email is written, so the subject, the message and the attached PDF all carry the new number. If the draft cannot be issued — a counter sale short of stock, for example — nothing is sent, the invoice stays a draft, and the send dialog shows the reason. Texting a draft is not possible: WhatsApp / SMS waits until the invoice is issued.
Document kind
Separately from its status, every invoice is one of two kinds of document. You choose which under Customer & dates → Document kind when you create it:
| Kind | What it is |
|---|---|
| Tax invoice | The ordinary invoice. Numbered INV-…, carries a due date, and is chased by reminders and ageing. (It heads itself Tax Invoice only when the issuing entity is VAT-registered; an unregistered entity issues a plain Invoice.) |
| Pro-forma | A request for payment before the work is done — a deposit request or an advance. Numbered from its own PF-… sequence, heads itself Pro-forma Invoice, and carries no due date, which is what keeps it out of payment reminders and ageing. |
A pro-forma is not a tax invoice: no supply has happened yet, so no VAT is claimable off it. That is why it may never carry the Tax Invoice heading, and why you follow it with a real tax invoice once the work is delivered.
Pick the kind before you save. The invoice number is drawn from the matching sequence at that moment, so the kind is fixed from then on — the selector is read-only when you reopen the invoice. If you picked wrong, void it and raise a new one.
Deposit requests raised by the deposits flow set this for you.
Which legal entity issues it
On a control room with multiple billing entities, the Customer & dates panel also carries an Issued by (legal entity) picker — which of your entities the invoice goes out under (letterhead, VAT identity, and number series). It defaults to your default entity. When the panel is collapsed into chips, an Issued by chip shows the current entity, and the open invoice's hero shows the same chip. Like the document kind, the issuer is fixed once the invoice is issued — correcting it means crediting and reissuing. Single-entity control rooms never see any of this.
Actions on an invoice
Click any row to open the invoice. Draft invoices open in edit mode — you can change line items, descriptions, and prices, and there is a footer with Cancel, Preview PDF, and Save buttons. Invoices that have already been sent open in read-only view with a panel for actions such as emailing, voiding, or marking as paid, plus a Preview PDF button.
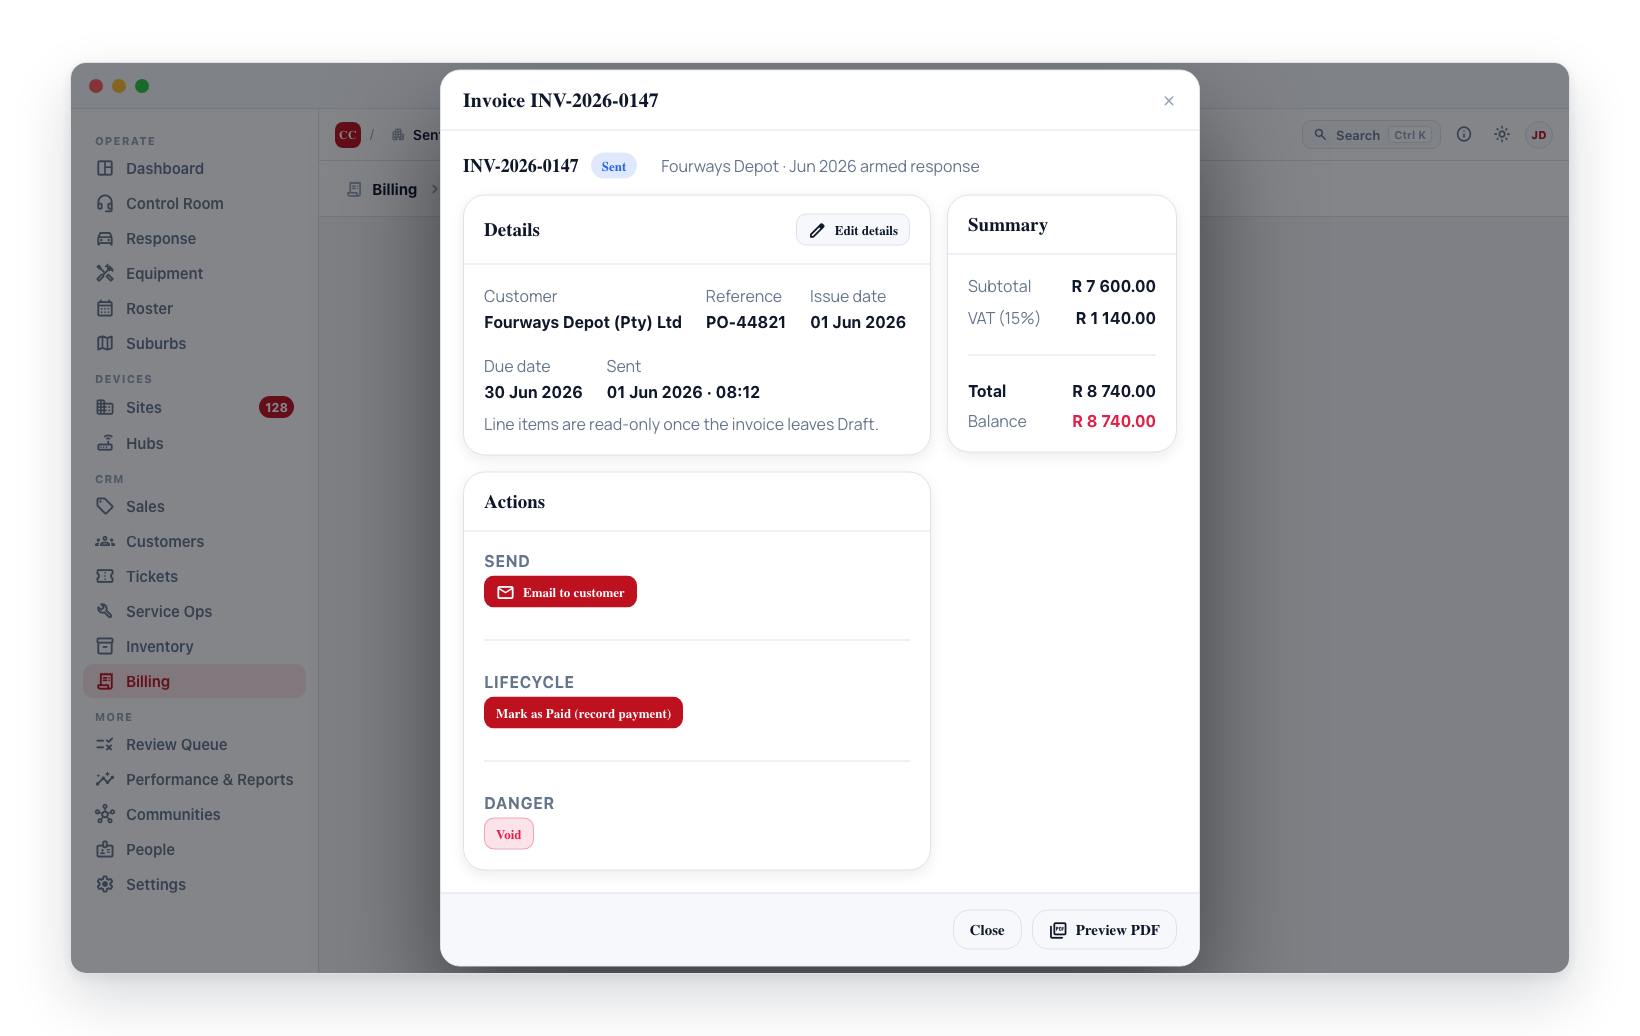
From either view:
- Edit line items (drafts only) — add or remove lines, and change descriptions and prices. Each line can also be tagged to a department (cost centre) with the picker under its description, so ad-hoc revenue is attributed the same way plan-driven lines are. The picker only appears once departments are configured under Billing → Config → Departments; a fixed-amount discount line inherits the cost centre of the line it discounts.
- Preview PDF / Download PDF — Preview opens a branded PDF version of the invoice in a new tab; Download saves it straight to your device. Available on both draft and sent invoices.
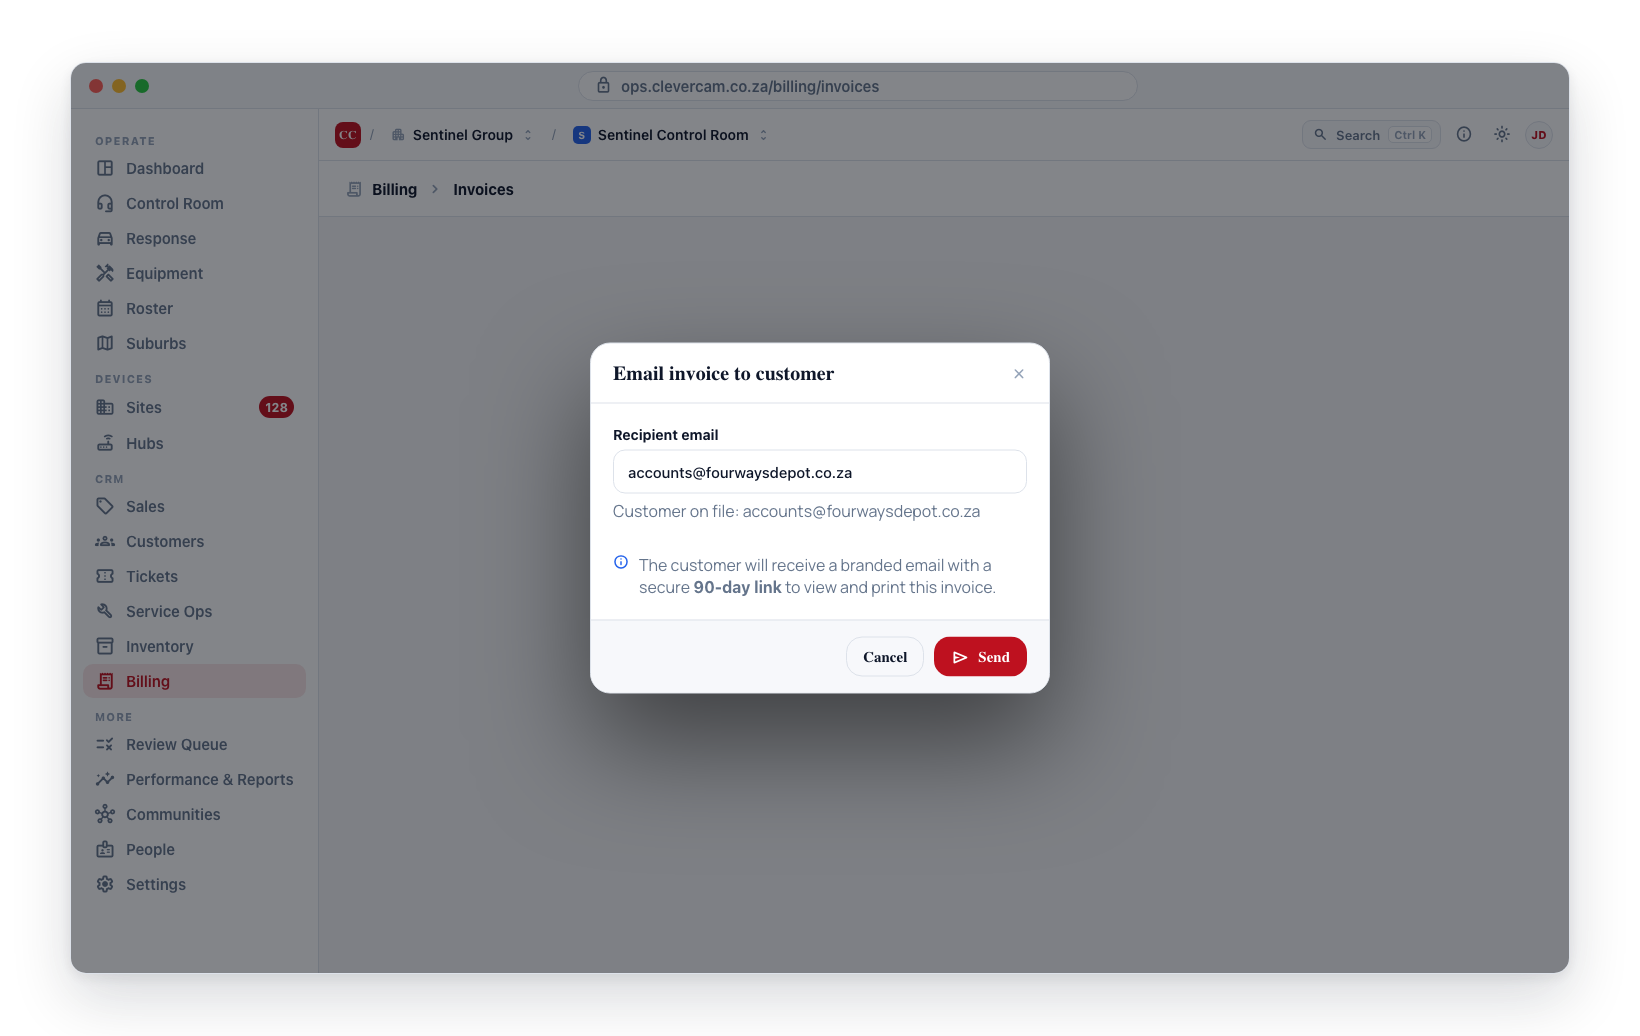
- Email to customer — opens the send dialog and marks the invoice as sent on success. On a draft, the dialog notes that sending issues it first. Everyone included receives the invoice PDF as an attachment, any supporting documents, plus a secure link that is valid for 90 days. The dialog is a full recipient picker:
- To defaults to the customer's billing email. You can always type a different address, and clicking To ✓ on the selected row clears it so you can pick another. If the customer has no billing email the box opens empty — send anyway and the invoice goes to a contact tagged for invoice emails, then the primary contact, then the first contact with an email. Only a customer with no address anywhere is refused.
- CC — add any number of extra recipients: type an address and press Enter, or one-click any suggestion. Suggestions list everything on file for the customer: the billing email, the customer's contacts (with Primary/role shown), and CleverAlert app users connected to the customer's sites.
- Contacts tagged for invoice emails are pre-ticked as CC when the dialog opens. The Always button on a contact row saves that tag right from the dialog, so future invoice emails (and overdue reminders) include them automatically.
- Nothing pre-filled is compulsory. Only on a row sends to that one person — it becomes the To and every CC is dropped; Clear empties the To address; Clear all removes every CC. None of it changes anyone's saved tags. See Sending to one person only.
- You can email an invoice at any status except Void — including a Paid one, where the button reads Email a copy so you can send the customer their record without changing the invoice's status (emailing only ever flips Draft/Pending to Sent).
- A second copy within 24 hours asks first. If the invoice was already emailed in the last 24 hours, pressing Send does not send. The dialog says when it went, who sent it and to whom — and whether that email bounced — and the button becomes Send again; the copy goes out only when you press it. This is what you use after correcting a mistyped address. While an invoice is being emailed, a second send of the same invoice is refused until the first one finishes.
- WhatsApp / SMS — texts the customer the same secure link, which opens the invoice on the portal where they can download the PDF and see how to pay. Available once the invoice is issued: a draft has no number yet, so the button stays disabled until you Issue invoice. A text cannot carry a file, so the link is the whole mechanism. The dialog offers every mobile number on file (billing number, contacts, connected CleverAlert app users) and pre-selects anyone tagged for invoice texts; anyone who replied STOP is shown greyed out and cannot be messaged. Only on a row narrows the send to that number alone, and Clear all empties the checklist. The message quotes the amount still due, so a part-paid invoice reads correctly. WhatsApp is tried first, with SMS as the fallback.
- Record payment — opens the payment form pre-matched to this invoice.
- Unmark paid / Delete last payment (paid invoices only; needs the Credit notes, voids & adjustments capability, as do Void, Apply credit and Issue credit note — the Credits and voids role grants it, owners and admins have it) — reverses the most recent payment recorded.
- Void — use this for invoices that should not have been issued. The invoice is kept for your records. If the invoice has already gone out to the customer, the confirmation points you at a credit note instead — voiding leaves them holding an invoice that no longer exists on your side. If the invoice includes subscription charges, the confirmation reminds you that voiding does not roll back the subscription's next billing date — adjust the subscription on Billing → Subscriptions if that period must be billed again.
- Issue credit note — reduces or cancels an invoice the customer already has. See Credit notes.
The invoice window stays open after each of these actions: the list behind it refreshes, but the window only closes when you close it. After an email send, that means the send dialog's confirmation stays readable, including the invoice's Public link with a Copy button for sharing by hand if the email does not arrive.
Bulk actions
Tick the checkbox on one or more invoice rows to reveal a bulk action bar above the list (billing management access required). The header checkbox selects or clears every invoice on the current page. The bar shows how many are selected and offers:
- Email selected — queues each selected invoice for background emailing, with the same branded email and 90-day secure link as a single Email to customer. Sending runs on the server, spaced out with a little jitter, and carries on after you leave the page. Each one resolves its recipient the same way a single send does: billing email, else a tagged contact. The confirmation summarises what was queued and what was skipped — customers with no address anywhere, invoices already emailed or already in the queue (so re-queueing never double-sends), and drafts. Background sending never overrides the 24-hour check: an invoice that went out in the last 24 hours is not sent again from the queue. Contacts tagged for invoice emails are CCed automatically on each send, and each invoice carries its own supporting documents.
- Mark as sent — moves the selected Draft and Pending invoices to Sent in one step. Invoices already past those statuses are left untouched and reported as skipped.
- Export CSV — downloads a spreadsheet of the selected invoices, in the columns you have showing (Invoice # always first). To export everything the filters match rather than a ticked selection, use Export CSV in the filter bar instead.
- Clear selection.
The selection is cleared whenever you change a filter or move to another page, so a bulk action only ever applies to invoices you can currently see.
Supporting documents
Some customers want more than the invoice itself: the job card for the work being billed, or their own worksheet handed back with the bill. Each invoice's detail view has a Supporting documents card that shows exactly what the customer will receive, assembled from three places:
| Document | Where it is switched on | Applies to |
|---|---|---|
| Job report | Customer → Billing → Attach the job report | Every invoice raised from a service job |
| Standing documents | Customer → Documents → With invoices | Every invoice for that customer |
| One-off files | The invoice's Attach file button | That invoice only |
The job report is the post-visit service report for the job the invoice was raised from — site visits, the work checklist, photo evidence and the customer's sign-off. It is generated fresh at send time, so it always reflects the job as it stands. Invoices not raised from a job are unaffected, whether the switch is on or not.
Standing documents come from the customer's Documents tab. Ticking With invoices on a row sends that file with every invoice for that account — the usual case is a purchase-order worksheet or an SLA annexure the customer supplied and wants returned each month. It is a per-document tick, never a category rule, because most of that tab (ID documents, debit-order mandates) is internal and must not leave the building.
One-off files are uploaded on the invoice itself and go out with that invoice alone.
One file or several
A second switch on the customer's Billing tab, Combine into one PDF, decides how they arrive:
- Off (the default) — each supporting document is a separate attachment. Nothing is converted, so a spreadsheet arrives as a spreadsheet.
- On — supporting PDFs and photos are added to the end of the invoice PDF and the customer receives a single file. This is what an accounts-payable department that files one document per invoice usually needs. Formats that cannot become PDF pages — spreadsheets, Word documents — are still sent as separate attachments, because dropping them silently would be worse.
Each document keeps its own page numbering when combined, the way an annexure pack does: the invoice page still reads "Page 1 of 1" and the job report paginates itself.
A supporting document that cannot be read is skipped, and the invoice still goes out — the bill is the thing that matters. You are told which files were left out: on a single send the confirmation carries a warning listing them, and after a bulk send you get a second message naming how many invoices went out incomplete. Nothing is ever silently dropped.
On the customer's links too
Supporting documents no longer ride on the email alone. The same documents are listed under a Supporting documents heading, each with its own Download button, in both places a customer can reach an invoice:
- the invoice's secure share page — so a customer sent the link by WhatsApp or SMS, rather than emailed, reaches everything the invoice carries;
- the account view's Invoices tab, when they open an invoice.
Two differences from the email are worth knowing:
- Always separate files. Combine into one PDF describes what a mail client should show and has no meaning on a web page, where the customer picks what to open. Both pages always list one row per document.
- Live, not a snapshot. The page lists what the invoice carries now, the same way Download PDF reflects the current balance. Untick With invoices on a standing document and it stops appearing on links that were already sent; the job report is generated fresh each time it is asked for.
Only the documents that belong to the invoice are ever listed. The rest of a customer's Documents tab — ID copies, debit-order mandates — stays internal; a share link reaches only its own invoice's files, and an account link reaches only that account's, invoice by invoice.
Public invoice share link
When you email an invoice, the customer also receives a secure link to view it online. That link expires after 90 days — and so does its access to the invoice's supporting documents. From that page Download PDF hands them the same branded invoice you see in CleverOps, reflecting the current balance at the moment they ask for it.
Pay online (card)
When an invoice still has a balance owing and your VCR has connected its own Yoco account, the public share page shows a Pay … now button. The customer clicks it and is taken to a secure, Yoco-hosted card-payment page for the outstanding amount. Once Yoco confirms the payment, CleverOps automatically records a Card payment against the invoice and the balance updates — closing the invoice when it reaches zero. No action is needed on your side; the payment simply appears on the Payments tab.
Card payments settle directly into your VCR's own Yoco account — the money never passes through CleverCam. Connect your account under Billing → Config → Card payments; until you do, no Pay now button appears, so an invoice never charges into anyone else's account. If you bill from more than one company, each connects its own Yoco account and an invoice only ever offers Pay now on the account of the company that issued it — an invoice from a company with no Yoco account of its own shows no button, even when your other company is connected.
Automated overdue reminders
Once enabled for your control room, CleverOps automatically emails the customer a reminder for any invoice that is past its due date with a balance still owing — on a cadence you control, until it is paid or a reminder cap is reached. The reminder reuses the same branded email and 90-day secure link as a manual Email to customer, and stops the moment the invoice is marked Paid, Void, or Credited. A reminder carries the link only — no invoice PDF and no attached files. Where the invoice has supporting documents, the reminder lists them by name just above the button, and the link it sends is where the customer downloads them. That is deliberate: "we can't pay until we have the signed job card" is a common reason an invoice sits unpaid, and a chase that never mentions the job card can't fix it. See Automated reminders to switch this on and tune the schedule. Each invoice's Details panel also has an Auto-reminders control to force or suppress reminders for that one invoice.
Line items
Each invoice contains an ordered list of charges, with each line showing:
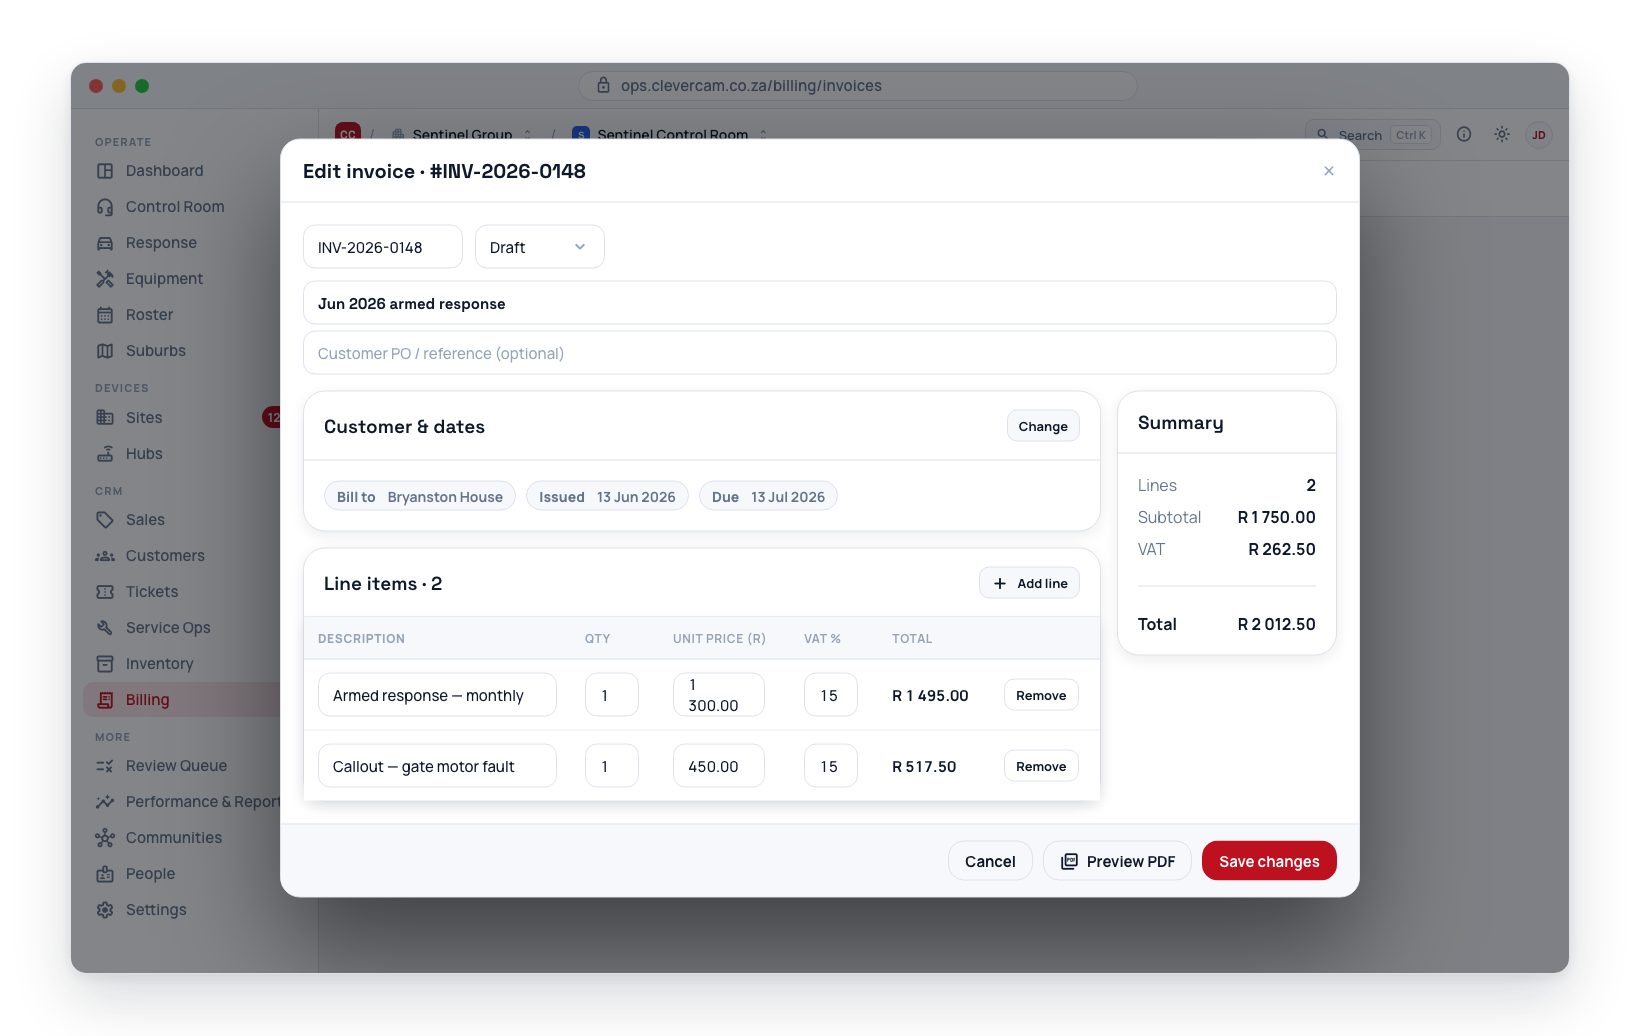
- Source — where the charge came from, shown as a small caption under the line's description: Subscription, Service job, Manual line, Quote, Ad-hoc guarding, Ad-hoc charge, or Counter sale (a catalog item sold straight off this invoice — see below). Service job and Quote are links — click through to the record that raised the line; the rest are labels only, because a subscription has no standalone document to open.
- Site — the site the charge relates to (if applicable)
- Description, Quantity, Unit price
- VAT rate, VAT amount, and line total
The invoice's overall totals are calculated from the sum of all line items.
The Site on a line is also what puts the invoice on that site's record. An invoice is addressed to a customer and has no site of its own, so Site Details → Service & Billing → Invoices lists every invoice with at least one line billed at that premises. Invoices raised from a site's jobs (Send to invoice) and quotes (Bill directly) carry the site automatically; an ad-hoc invoice created here names a customer but no premises, so it appears on the customer record only.
Ad-hoc guarding and Ad-hoc charge read alike and are not the same thing. Ad-hoc guarding is a roster extra, swept onto the invoice by the monthly run along with the subscriptions; an ad-hoc charge is a per-dispatch row from the Ad-hoc charges ledger, which only ever reaches an invoice because a billing manager ticked it. A batch review captions the second kind ad-hoc charge under the line description in the same way.
Counter sales — selling stock on an invoice
When someone buys parts over the counter — a battery, a remote, a camera, no job involved — raise a normal invoice and use Add from catalog in the line-items editor. Search the price book, pick the item, and the line arrives priced from the catalog (the VAT-inclusive selling price, split into ex-VAT unit price and VAT at your rate) with a caption: Counter sale — deducts stock when issued. Quantity and price stay editable while the invoice is a draft.
The quick way in: nominate a walk-in account under Settings → Sales & CRM → Counter sales and a Counter sale button appears beside Create invoice on the Invoices tab. It opens a new invoice already billed to that account with the catalog picker open — so a counter sale is one click from the Billing page rather than a customer search every time. Open till beside it is the same sale with the editor taken away: a full-screen register for the front desk — see Till.
What makes a counter-sale line different from a typed one is exactly that caption:
- Only counter-sale lines move stock. A line you type by hand never touches the ledger — even when it names a SKU and CleverOps links it to the catalog item for reporting. A line that came from a service job doesn't either: its stock already moved when the part was added to the job card. There is no way to deduct the same item twice — each path is counted exactly once, and the invoice path only counts lines born from the catalog picker.
- Stock moves when the invoice is issued — the same moment the invoice number is allocated (leaving Draft, whatever the target status). Drafts hold nothing and can be edited or deleted freely. Each line posts one Counter sale movement out of the control room's counter location (Settings → Sales & CRM; the main warehouse unless you point it elsewhere).
- If the location holds too little, what happens follows the Let stock go negative dial. Off (the default): issuing is refused with a message naming the item and what the location holds — the invoice stays a saved draft until stock is received or the dial is changed. Emailing the draft is refused the same way, before anything is sent. On: the sale posts, the location goes below zero, and the shortfall is recorded on Stock → Exceptions.
- Once issued, the line is frozen where stock cares: its quantity and item cannot change and it cannot be deleted. Voiding the invoice posts the reversing movements — the items go back on hand at the counter location — so void only when the goods actually stayed or came back. The void confirmation reminds you of this when counter-sale lines are present.
- Items that aren't stock-tracked (labour, call-outs, catalog items never booked in) can still be picked; the line simply notes that nothing will move.
- Serialised items can be sold this way, but the invoice doesn't ask which serial — record the unit's serial movement on the Stock page after issuing.
For a walk-in customer with no account, most control rooms keep a generic Cash sales customer and raise counter-sale invoices against it — that is the account to nominate as the walk-in account above.
Taking the money at the same time
At a counter the money is in the drawer before the customer leaves, so the invoice editor has a Payment card on counter sales (it appears when the invoice has counter-sale lines, or is billed to the walk-in account). Tick Payment taken now and fill in three things:
- Taken on — which machine or drawer the money came through: Yoco, SnapScan, Speedpoint 2, Cash. The list is yours to define under Settings → Sales & CRM → Counter payment types; until you define one it offers Cash, Card and EFT. Each entry notes what it books as — the accounting method (Cash / Card / EFT) that statements, the exports and bank reconciliation read.
- Reference — the Yoco reference, receipt number, whatever ties this sale to the machine's own record. This is what makes a month of Yoco takings reconcilable against the Yoco statement.
- Amount received — defaults to the invoice total. Type a smaller figure for a part payment and the rest stays outstanding; the field tells you what would remain.
Saving then does the whole sale in one action: the invoice is issued and numbered, the stock is deducted, the payment is recorded against the invoice, and the invoice settles to Paid. The toast confirms it — "Sale complete — R 459,99 on Yoco."
Two things worth knowing:
- A payment needs an issued invoice, so the card only acts when the status is Sent. Leave it on Draft and the save stops with a note rather than half-recording anything.
- More than the invoice total is refused here on purpose. Take the exact amount, then record the surplus on Billing → Payments, which can hold it as account credit.
Payments taken this way show their tender wherever payments are listed — the Method column reads Yoco rather than Card, with the accounting method on hover — and the payments CSV export carries both a Taken on column (the machine) and a Taken by column (the person). Those two together are what the cash-up is built from.
Invoice balance
The outstanding balance starts equal to the invoice total and goes down as payments are recorded against it — and as credit notes are issued against it. When the balance reaches zero the invoice settles automatically: Paid when money was received, or Credited when credit notes alone covered it.
Which account the customer pays into
If your control room banks into more than one account, each invoice tells the customer which account to pay by EFT — printed in the PAYMENT / BANKING block on the PDF and on the portal's Pay tab. The invoice editor's Customer & dates panel has a Pay into (deposit account) field: leave it on Auto to follow your routing (subscription → customer → plan → VCR default), or pick a specific account to override this one invoice. Set up the accounts and routing under Billing → Config → Banking.
The Payments tab
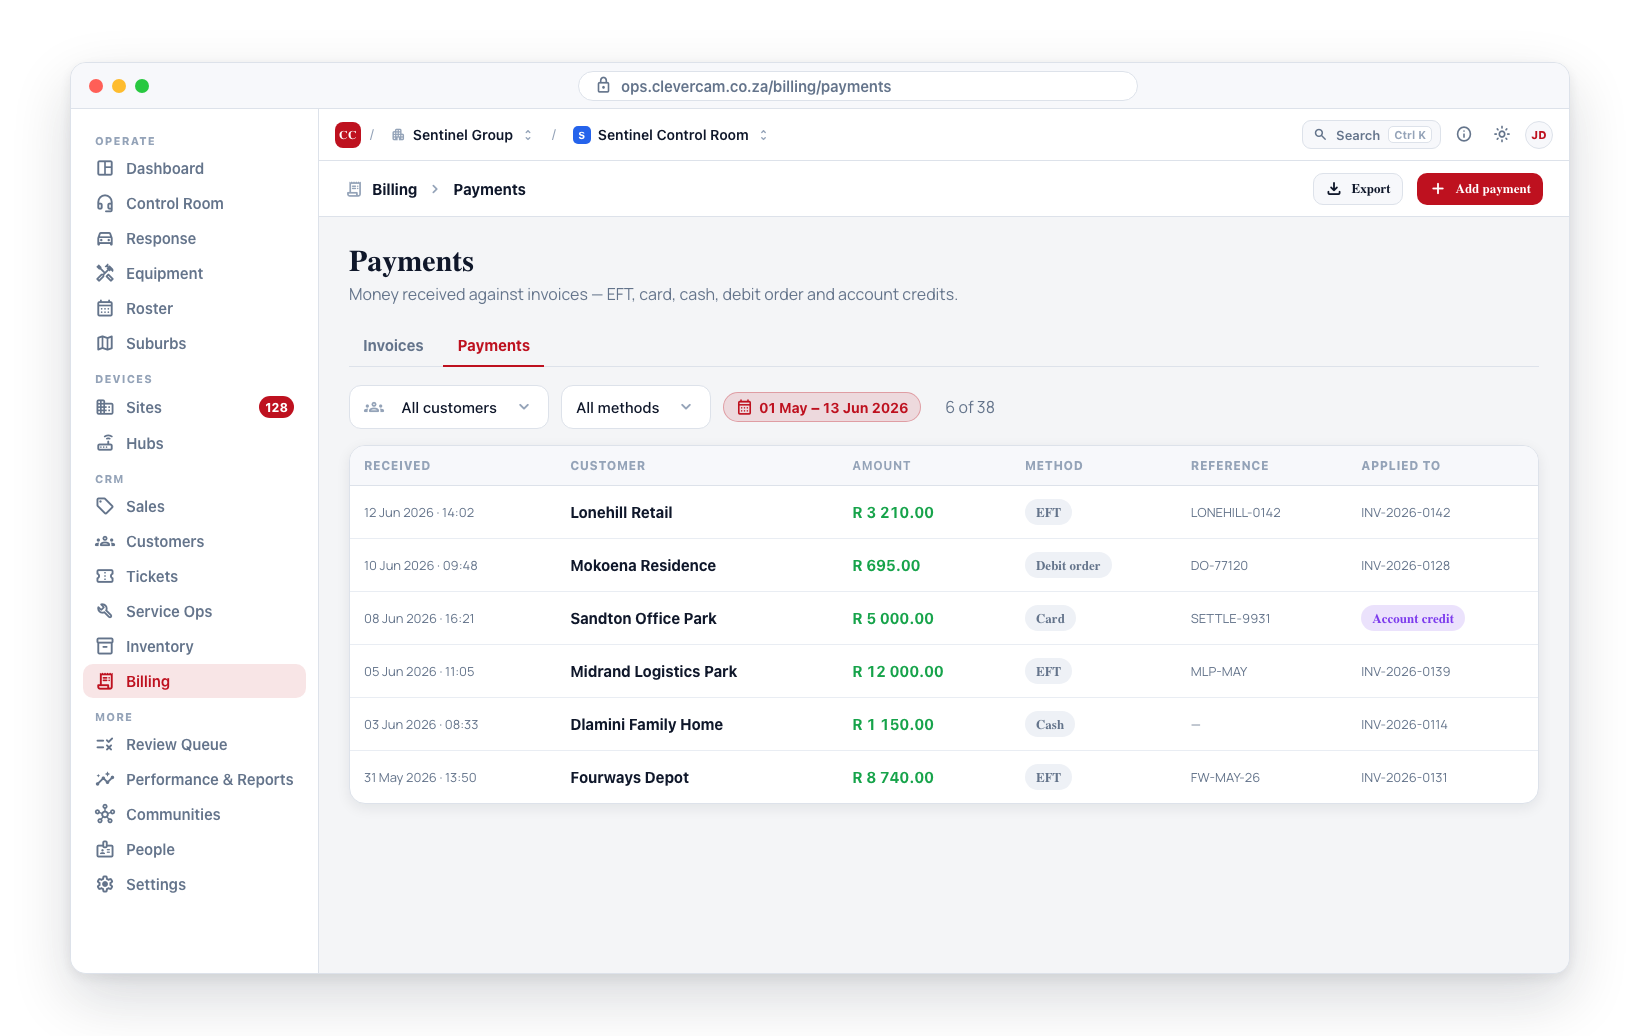
Payments are money received — EFT deposits, card settlements, cash, and account credits. Out of the box the list shows the received date, customer, method, who took it, status, amount, the invoice it was applied to, reference and notes — and, like the Sites and Customers lists, you choose which columns it shows, their order and its sort (see Choosing your columns below). Money that no person captured — a debit-order run, a payment gateway clearing itself — reads automated in the Taken by column rather than sitting blank, so it is never mistaken for a name somebody forgot to fill in. Use Export CSV at the top of the tab to download every payment matching the current filters, with the columns on screen, for reconciliation or import into your accounting system.
The search box finds payments by reference, note, external reference, invoice number or customer name; a plain number (1500 or 1500.00) also matches payments of exactly that amount. The From / To dates are whole local days, To inclusive.
Record payment asks how the money arrived in one control. Once you have defined Counter payment types it lists them under Taken on — Yoco · Card, Speedpoint 2 · Card — with the bare methods (EFT, Debit order, Account credit…) under Not on a machine. Picking a tender fixes the accounting method it books as; the summary on the right reads Yoco · Card. Until you define any, the control is the plain method list it always was. On a saved payment the amount and method stay locked, but the tender can still be corrected among the machines that book as that method.
The tab has three views: Payments (this list), Bank recon — where an imported bank statement is matched to customers — and Payment proofs.
The front desk. Someone holding Take payments & cash up but not Billing & invoices (the Cashier role — see Roles and Permissions) sees Billing as this one tab, titled Payments you took: only the payments they recorded, plus Record payment, Export CSV and Cash-up in its My cash-up form. They can open their own payments to fix a reference, note or tender. Nothing else on the tab is offered — no rejecting, applying, transferring or bank imports, and no money tiles.
Choosing your columns
Columns ▾, in the filter bar, is where you decide which columns the list shows — tick a column to bring it in, untick it to hide it. The button says how many are currently hidden, so a column somebody switched off is never a mystery. Date and Amount are listed too, ticked and greyed with always beside them: a payment is its date and amount, so they cannot go.
Put them in the order you read them. The ↑ and ↓ beside each column in Columns ▾ move it one place; a column heading's own menu (the small ▾ that appears when you hover a heading) has Move left and Move right for the same thing.
Your choice is yours alone and it follows you. Columns, their order and the sort are saved against your login, not the browser, so the list looks the same on the control-room machine and on your laptop, and changing it does not touch what your colleagues see. Reset to default view puts everything back.
The columns, in the order the list starts with — the first nine are on by default, the rest start switched off:
- Date (always) — when the money was received
- Customer — the account, linking to its billing tab
- Method — how the payment books (EFT, Card, Cash, Debit order, Account credit); a payment taken on a machine shows the machine's name here (Yoco, Speedpoint 2) with the accounting method on hover
- Taken by — the person who captured it, or automated
- Status — Cleared, Pending or Rejected; a rejected payment's reason is on hover
- Amount (always) — struck through when rejected
- Invoice — the invoice number it was applied to, or unallocated
- Reference — the payment reference as captured
- Notes — clipped to one line; the full note is on hover
- Captured — when the row was recorded, which differs from Date on a back-dated receipt
- Tender — the machine or drawer the money came through, on its own
- External ref — the gateway's or accounting package's own id for the payment (a Yoco charge, a Netcash batch, a Xero payment)
- Bank line — the bank-statement line the payment was matched from in Bank recon; blank for payments keyed in by hand
The list only fetches the data behind the columns that are showing, so a page with the default set costs what it always did.
Sorting the list
Click a column heading to sort by it; click it again to reverse. An arrow marks the column the list is sorted on. The heading's ▾ menu offers the two directions by name — Newest first / Oldest first for Date and Captured, Largest first / Smallest first for Amount, A → Z / Z → A for the rest — so you never have to click twice to get the one you meant.
These headings sort: Date (the default, newest first), Customer, Method, Taken by, Status, Amount, Invoice, Reference and Captured. Notes, Tender, External ref and Bank line do not; their menu says so.
The sort is done by the server across every payment your filters match, not just the page on screen — so sorting by amount and paging forward really does walk down from the largest receipt. Like your columns, the sort is saved against your login. Within a tie the newest payment comes first, whichever way the list is sorted.
Filtering from a column
A column's ▾ menu is also where its filter lives. Pick a value and the whole list is filtered; the heading's ▾ turns solid while a filter is set, and a chip naming the filter appears in the filter bar — even if you later hide the column — with × to clear it. Clear filters clears these along with the search, the dropdowns and the dates.
- Invoice — Applied to an invoice, or Unallocated (the same filter the Unallocated tile sets)
- Tender — Not on a machine, or one of your control room's counter payment types
- Method — the same choice as the All methods dropdown in the filter bar
- Status — Cleared, Pending or Rejected (the Pending tile sets this to Pending)
Column filters are session-scoped — they clear when you leave the page.
Exporting
Export CSV downloads every payment matching the current filters — not only the fifty rows on screen — with the columns you have showing, in your order, Date first. Amounts are plain numbers so the spreadsheet can sum them, dates are written as 2026-09-11 14:05, and the Method column exports as two columns, Method (how it books) and Taken on (the machine), with Taken by beside them when that column is showing — the pair a cash-up reconciliation reads. The export stops at 20 000 rows and says so; narrow the filters to fetch the rest.
Cash-up — what each person took, on which machine
Cash-up at the top of the Payments tab answers the end-of-shift question the list cannot: not what came in, but who took it, and on what. Pick a day (‹ and › step a day at a time; Today jumps back) and it groups that day's payments by the person who captured them.
Each person gets their takings broken down by tender, not by accounting method — Yoco, Speedpoint 2 and Cash drawer are three separate lines even though two of them book as Card, because that is how the machines are reconciled. Each line carries a count and a total, and what it books as is shown beside it for the bookkeeper. Show transactions opens the underlying receipts for that person: time, customer, tender, status, amount, invoice and reference.
Three rules make the totals countable against a physical drawer:
- Automated money is nobody's. Debit-order runs and payment-gateway webhooks are grouped on their own as Automated — no person and sorted last. They are real money and they are shown, but folding them into whoever happened to be on shift would create a surplus that person could never account for.
- A rejected payment was never in the drawer. Bounced debits are excluded from every total, while still being listed — struck through, with the amount the group is short noted against it — because a supervisor needs to know it happened and needs it not to be in the figure they are counting.
- The day is the local day. A payment taken at 01:30 belongs to that morning's cash-up, not the previous one.
The KPI band splits the day into Taken by people (the figure counted against drawers), Automated, the transaction count with any rejections noted, and Drawers closed — how many of the people who took money have closed their day. Export CSV downloads the day's transactions in the order shown, person by person, with a Taken by column — so the file reconciles line for line against the screen someone has just signed. Export closures, shown once a drawer on that day is closed, downloads the closures instead: system, counted and difference per tender, with who closed each and when.
A cashier (the Take payments & cash up capability) opens the same screen as My cash-up: their own drawer only, with the same close.
Closing a drawer
A person's section reads Open until their drawer is closed for the day. Close day — Close my day on your own — opens the count: one row per tender the system has for that person, the system figure beside a Counted box. Type what was physically counted on each; blank means nothing on that one. The difference updates as you type: R 10,00 short, R 50,00 over or Balanced, per line and for the drawer. Money on a machine the system has nothing for is a difference too, so Add a tender… lists the control room's other payment types for exactly that case. A Note carries the explanation (float was R200, not R250). Close drawer stores the count.
What closing actually does:
- The system figure is recomputed on the server at the moment of closing, in the control room's own timezone, and stored beside the count. A payment rejected a week later does not change a closed drawer's figures — that is a later event, not a different count. The closed drawer shows the stored lines: tender, what it books as, count, System, Counted, Difference, the drawer total, who closed it and when, and the note.
- The day is locked for that person. Money can no longer be recorded into it, deleted from it, or have its amount, tender, method, date or person changed — the attempt is refused with a message naming the day. Reference, notes, external ID, the invoice a payment is applied to and its status can still change, because none of those alter what was in the drawer. Automated money is never locked.
- Who may close. Anyone can close their own drawer; closing somebody else's needs Billing & invoices. A day that has not happened yet cannot be closed, and a drawer already closed has to be reopened first.
Reopening a drawer
Only someone with Billing & invoices can Reopen a closed drawer, and the screen asks why. The reason is written to the audit trail together with the closure as it stood, the closure is deleted, and the day is unlocked for that person — correct the payment, then close the drawer again. Applying a closed day's unallocated credit to an invoice needs no reopen unless the allocation splits the amount.
Payment fields
| Field | Purpose |
|---|---|
| Customer (required) | Who paid — always one of your own control room's customers (why) |
| Invoice | The invoice being settled — leave blank to record an unmatched payment (account credit) |
| Amount | How much was received (required) |
| Method / Taken on | EFT / Card / Cash / Debit order / Account credit — or one of your counter payment types, which names the machine and fixes the method it books as |
| Received at | When the money arrived |
| Reference | The customer's payment reference (e.g. the EFT reference or card settlement ID) |
| External ID | Bank transaction ID for reconciliation purposes |
| Notes | Internal notes |
Record a payment
- Navigate to Billing → Payments.
- Click Add payment in the top-right (or open an invoice and click Record payment).
- Fill in the fields — the amount is prominently displayed at the top, and the summary panel on the right shows the invoice balance before and after the payment.
- Click Save.
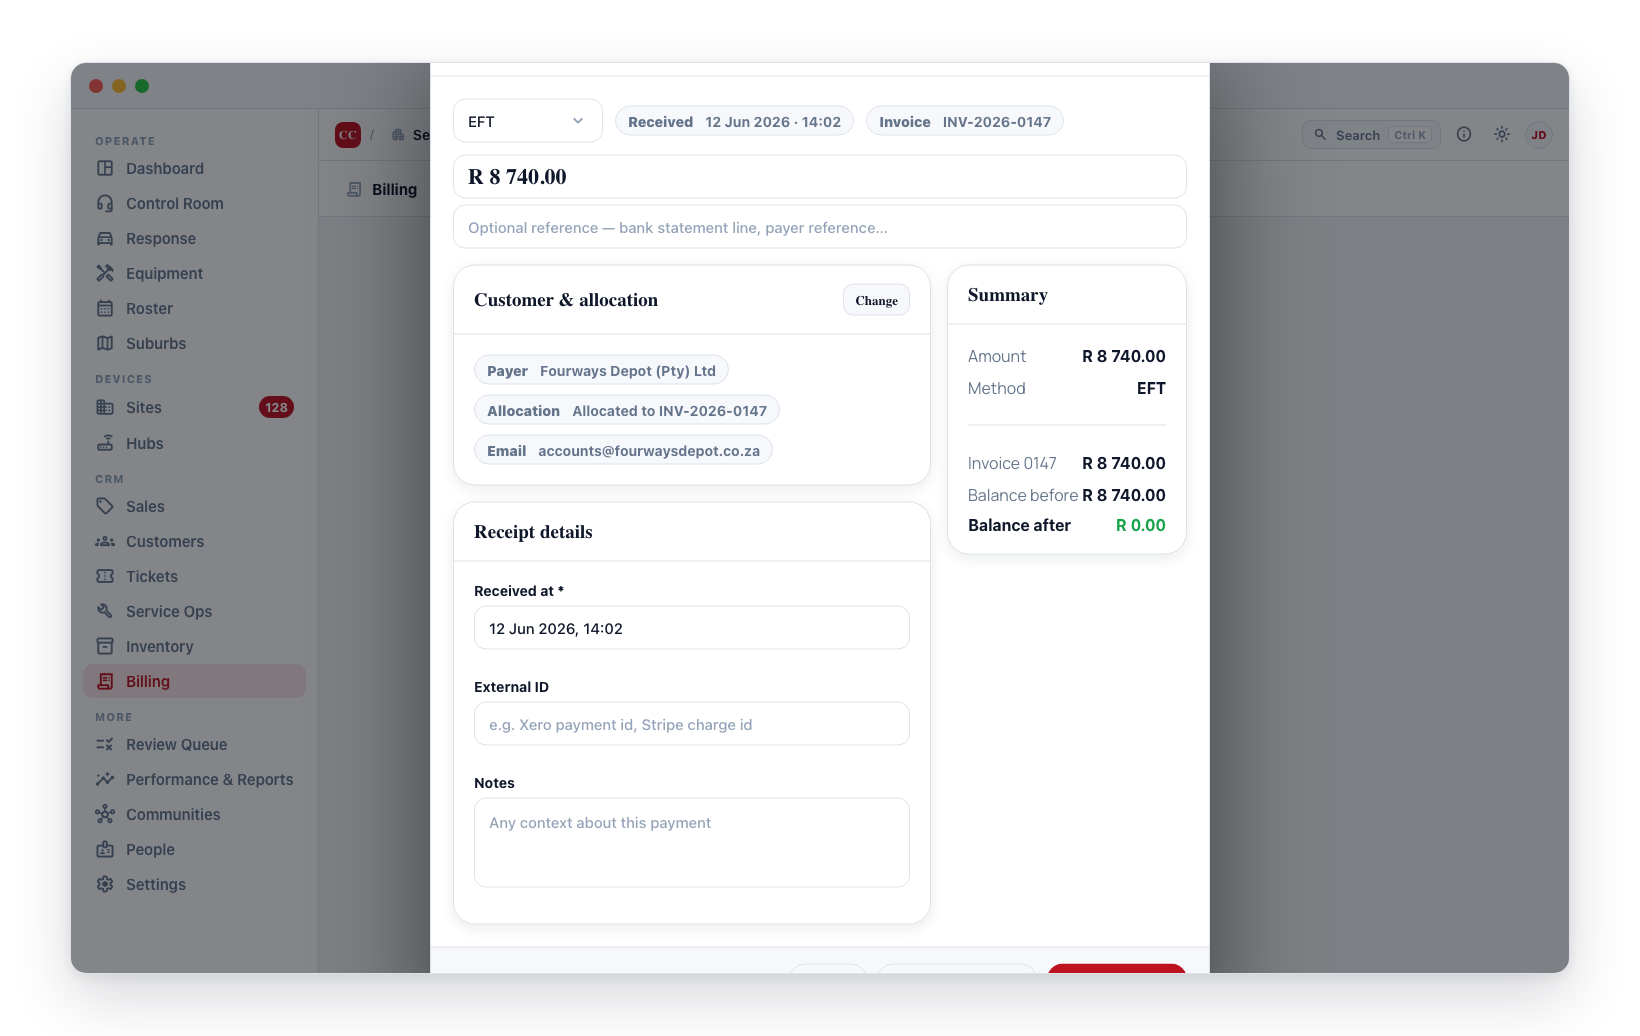
If an invoice is selected, the outstanding balance on that invoice is reduced by the payment amount — and if you enter more than the invoice owes, the surplus is split off automatically and held as account credit rather than over-paying the invoice. If no invoice is selected, the whole payment is held as account credit and can be applied to an invoice later.
Receipt PDF
Open any payment and click Preview receipt to generate a receipt in a new tab, or Download receipt to save it to your device. Receipts use the same branded template as invoices, showing the amount received, the payment method, the invoice being settled (if any), the reference, and the remaining invoice balance.
Receipts are generated on demand — the underlying payment record is the official record, not the PDF.
Rejected / bounced payments
When a debit order is returned or an EFT is reversed, mark the payment rejected rather than deleting it — the record stays for audit, but the money no longer counts.
- On the Payments tab, click Reject on the payment's row.
- Optionally enter a reason (e.g. "Debit order returned — insufficient funds").
- Confirm. The payment's Status badge turns to Rejected (and its amount is struck through), it drops out of the Collected and Total figures and the customer statement, and any invoice it was applied to re-opens — the balance increases by the rejected amount and a paid invoice reverts to unpaid for re-collection.
To reverse a mistaken rejection, click Restore on the row; the payment returns to Cleared and the invoice balance updates again. Every payment carries a Status column — Cleared, Pending, or Rejected.
Unallocated payments (account credit)
A payment recorded without an invoice — a customer paying in advance, an EFT that arrived before the invoice went out, or the surplus from an overpayment — is held as account credit. It already counts as a credit on the customer's statement from the moment it is recorded, so their account balance is correct straight away; it simply isn't answering for any particular invoice yet.
The Unallocated tile in the Payments KPI band counts these. Click it to filter the list down to exactly those payments — it sets the Invoice column's Unallocated filter — and click it again (or the Invoice: Unallocated ✕ chip in the filter bar) to clear it.
Account credit held in Xero
With Xero sync connected, a customer's overpayment or prepayment that Xero has not allocated to an invoice yet also shows here as account credit: method Account credit, the reference captured in Xero (or Xero overpayment / Xero prepayment), and an external ref starting xero-overpayment: or xero-prepayment:. It counts on the customer's statement straight away, and its amount follows Xero — when part of it is allocated in Xero, that part settles the invoice here and the credit shrinks by the same amount; once it is fully allocated, refunded or voided in Xero, the credit row is removed.
This credit is allocated in Xero, not here, because the sync re-sets its amount from Xero and would overwrite a split made in CleverOps. So its row on the Payments tab reads Allocate in Xero instead of offering Apply, it is not offered by Apply credit on an invoice, and opening it shows Held as credit in Xero instead of the Apply to invoice button.
Applying account credit to an invoice
Credit is applied by moving the existing payment onto the invoice. There are three ways in, and all three do the same thing:
| Where | How |
|---|---|
| Billing → Payments | Click Apply on any unallocated row. |
| An open invoice | Open it and click Apply credit (R …) in the Actions panel — shown only when the customer actually holds unallocated payments and the invoice still owes something. |
| An unallocated payment | Open it; a banner reads Sitting as account credit with an Apply to invoice button. |
Whichever you use, pick the credit and the invoice, and the panel shows exactly what will happen before you commit: how much is applied, what the invoice balance becomes, and what stays on account.
Do not settle an invoice by capturing another payment with the method Account credit. Every non-rejected payment counts as a credit on the statement, so a second payment credits the customer twice — their account drifts further into credit while the original credit is still sitting there. Use Apply instead: it re-points the money you already have, so the customer's account balance does not move at all and only the invoice changes.
The rules it follows
- Capped at what the invoice owes. An invoice can never absorb more than its outstanding balance.
- The surplus stays as credit. If the payment is larger than the balance, it is split: the invoice takes what it needs and the remainder becomes its own unallocated payment row, ready to apply to another invoice.
- Applying only part. Leave Amount to apply blank to use as much as the invoice can take, or enter a smaller figure to spread one credit across several invoices — apply a slice, then apply the remainder to the next invoice.
- Both sides are recalculated. Moving a payment that was already on another invoice re-opens that one — its balance is restored and a Paid status reverts to Sent — while the new invoice settles.
- Same customer, same billing entity. Credit cannot be moved to another customer's invoice (use Transfer credit for that) or across billing entities.
- Draft, void and settled invoices are refused. A draft has not been issued, a void one is cancelled, and a settled one owes nothing.
Only a payment row can be moved this way. The Account credit / owing figure shown for context in the panel is the customer's whole-statement position — it also folds in credit notes and transfers and nets off what they still owe — so it will often differ from the amount that is actually applicable. A credit note is not applied to an invoice; it reduces one directly (see Credit notes).
Transferring credit between accounts
To move credit to a different customer, use Transfer credit at the top of the Payments tab. That debits the source account and credits the destination, and appears on both customers' statements. The source must genuinely hold the credit — the transfer is refused if it would push them into debt.
Credit notes
Issuing a credit note, applying account credit, voiding, unmarking paid and deleting a payment all need the Credit notes, voids & adjustments capability. The Credits and voids role grants it; company owners and admins have it without a role. Billing managers without it see the invoice and every other action, but not these. See Roles and Permissions.
A credit note is how you reduce or cancel an invoice the customer has already received. Voiding is for a document that should never have gone out; once it is in the customer's hands, the correction has to be something they can also hold — which is what a credit note is.
Issuing one against an invoice
Open the invoice and click Issue credit note in the Lifecycle actions (it sits beside Mark as Paid — the two are the ways an issued invoice gets settled: by collecting it, or by writing it off). The dialog shows what the invoice was, how much has already been credited, and how much can still be credited.
- The amount defaults to the full remaining value, because the usual case is "this should not have been billed at all". Type a smaller figure for a partial credit.
- A reason is required — it prints on the credit note the customer receives.
- You cannot credit more than the invoice is worth. Once the whole invoice is credited the button disappears.
Draft invoices cannot be credited (edit or delete them instead), and neither can void invoices or balance adjustments.
Issuing one to the account
On the customer's Billing tab, Credit note next to Adjust balance raises a credit that is not tied to any single invoice — a goodwill credit, for example. It lowers what the customer owes on their next statement.
Unlike Adjust balance, this stays available for customers linked to an external accounting ledger, because a credit note is a real document that gets pushed to that ledger rather than a CleverOps-only correction.
What happens to the invoice
- The credited amount comes off the invoice's outstanding balance, so reminders chase only what is genuinely still owed.
- Credit it in full and the invoice becomes Credited: it drops out of what the customer owes, out of "billable", and out of the overdue-reminder queue entirely.
- An invoice that was already paid stays Paid when you credit it — the money really was received, and the credit sits on the account as a balance owed back to the customer.
The document
Each credit note gets its own number from a separate sequence (CN-…), independent of invoice numbers. Click the PDF button on the credit note row in the invoice to open a branded Credit Note — it names the original invoice, shows the VAT split, and states how much of that invoice now stands credited. Credit notes also appear on the customer's statement as credits and are pushed to your accounting package by the accounting sync.
Filtering
The Invoices tab supports:
- Status filter (All / Draft / Pending / Sent / Paid / Overdue / Void / Credited). Overdue here is not a status an invoice is put into — it means unpaid and past the due date (the issue date when there is none), the same rule the Overdue tile in the KPI band counts, so clicking the tile and picking Overdue show the same invoices. Click the tile again to clear it.
- Customer filter
- Date range (by issue date)
- Search by invoice number, reference, or description
- The per-column filters and the sort live on the column headings — see Filtering from a column and Sorting the list.
The Payments tab has a search box, a customer filter, a date range (by received date, whole local days) and a payment-method dropdown, plus the per-column filters described under Filtering from a column. Its KPI band also has a Pending tile counting payments still marked Pending (these never clear themselves — someone has to confirm them); click the tile to show only pending payments, and click it again (or the Status: Pending ✕ chip) to clear the filter.
All filters and the search apply across your whole control room, not just the rows on screen. Long lists are paginated at 50 rows per page, with a Showing X–Y of Z count and Prev / Next buttons at the bottom.
Permissions
- View invoices and payments — any team member with access to your Virtual Control Room.
- Generate PDFs, send emails, record payments, void invoices, and issue credit notes — requires billing management access.
- Edit draft invoices — requires billing management access.