Alarm Panels
Some hubs connected to your site are alarm communicator hubs (such as HYYP, Olarm, Ajax, or FSK). These hubs receive events from your alarm panel and display area arm states, zone statuses, and output triggers directly inside CleverAlert.
Viewing an Alarm Hub
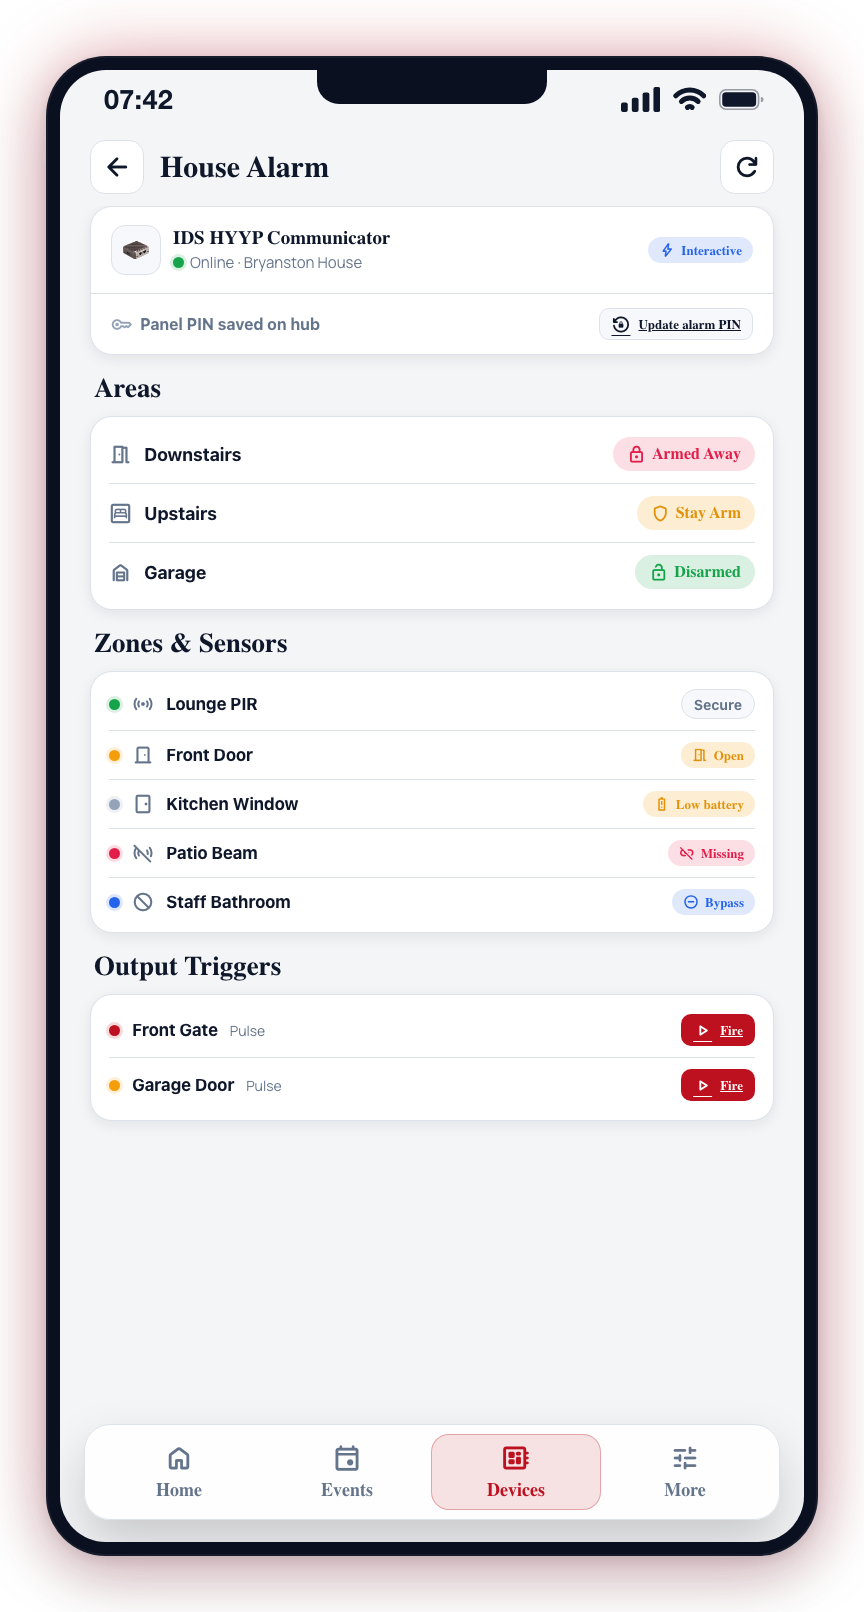
Tap any hub in the Devices tab to open the hub detail page. For alarm communicator hubs, the page shows:
- Hub Info -- Name, online/offline status, and communicator type logo.
- Areas -- Arm states for each area on the panel (for example, Armed Away, Disarmed, Stay Arm).
- Zones -- Sensor zones with their current state (Secure, Open, Alarm, Tamper, Fault).
- Output Triggers -- Programmable outputs configured on the panel.
Which sections appear depends on what the communicator supports. Some communicators are view-only (they show states but cannot send commands), while others support full interactive control.
Areas
An area is a part of your alarm you can arm and disarm on its own — "Upstairs", "Garage", "Perimeter". Most homes have one. A property with a cottage, a separate office or a workshop usually has several, so the family can go to bed with the house armed and the workshop still open.
"Partition" is the alarm industry's word for the same thing, and your panel's own manual will use it. CleverAlert says areas throughout.
On a site where the areas are set up as separate premises (each area its own household — cottages, flats, units), you only see and control your own premises. Other households' areas and zones are not shown, and arm commands to them are refused. Panel-wide device alerts that name no area (mains power, battery, comms, tamper) go to the site-wide keyholders.
Each area row shows:
- Label -- The area name (set on the panel or renamed in CleverAlert by long-pressing).
- Arm State -- A color-coded badge showing the current state:
- Red -- Armed Away
- Yellow -- Armed Stay / Part Arm
- Green -- Disarmed
- Orange -- Entry/Exit Delay
Arm and Disarm (Interactive Communicators)
For communicators that support control (for example, HYYP, Onyyx, and Olarm), each area row in the hub card has an inline Away | Stay | Off segmented control:
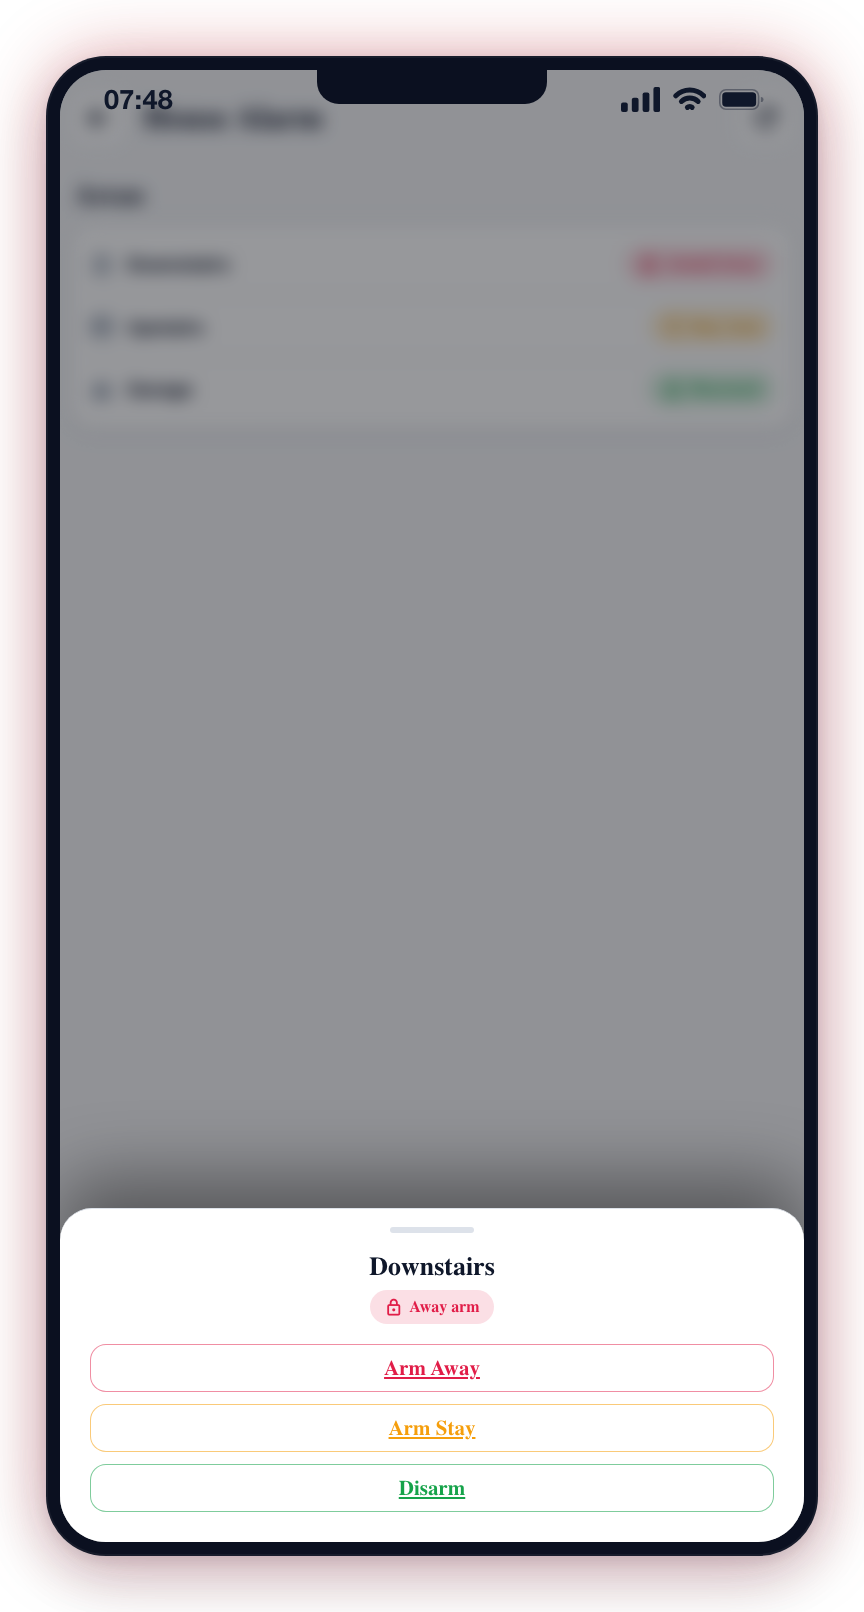
- Tap Away, Stay, or Off on the area row — the command is sent right away. If the panel has several arm profiles, tapping Stay opens a profile sheet so you can pick one. The controls only offer the arm modes your panel reports it can do.
- While the panel works through the command, the row shows a pulsing "Arming…" or "Disarming…" chip and a note like "Command sent 14:02:31 · waiting for the panel to confirm".
- Tapping the row itself (rather than a segment) still opens the full arm sheet with every available mode.
- Hyyp only: if no panel PIN has been saved yet, you will be prompted to enter one — it is stored securely on the hub and reused for later commands. Onyyx hubs authenticate via your linked Onyyx account, so there is no separate panel PIN to enter.
- The arm state updates in real time once the panel confirms the command.
If the hub is offline, its card dims, the arm controls disable, and a muted "Hub offline" chip is shown — commands are refused with an explanation rather than pretending to send.
On Olarm panels the sheet lists every arm mode the panel actually supports instead of a single "Arm Stay" — Arm Away, one button per stay / home mode, then Disarm. Simple panels show a single Stay (and sometimes Sleep); Paradox-style panels expose several custom stay profiles, shown as Stay 1, Stay 2, … until you name them. That works both ways: on the rare panel that reports no full away-arm, Arm Away is left out rather than shown and rejected by the panel.
To rename a stay mode, tap the pencil on its row (or long-press it) and type a name — for example "Night" or "Perimeter". The name is kept when the panel re-syncs, and clearing it resets to the default. These names are shared with CleverOps.
Open the hub detail screen and tap Update alarm PIN in the Communicator section to change the saved PIN at any time. This option only appears on Hyyp hubs — Onyyx does not require a panel PIN.
Arm, Stay Arm, and Disarm commands automatically retry once if the first attempt fails. You do not need to tap again — if it still fails after the retry, an error message appears.
If the panel refuses to arm because a zone is open or in fault, CleverAlert names the open zone(s) and offers Bypass & Arm — one tap bypasses the open zones and arms anyway. The bypass clears automatically on the next disarm. This recovery appears when arming a single area from any screen (the Devices tab, Home favorites, or a hub's Areas card). Site-wide arm from the Home screen never bypasses zones on its own — areas that refuse to arm are listed in the result message so you can arm them individually and decide about the bypass per area.
For communicators without control support (for example, Ajax, FSK), the areas show "Keypad-controlled — the app shows status only" instead of arm controls. An "Open in App" link takes you to the manufacturer's native app for arm/disarm control.
Renaming an area
Long-press any area to rename it. This label is stored in CleverAlert and does not affect the panel's own naming.
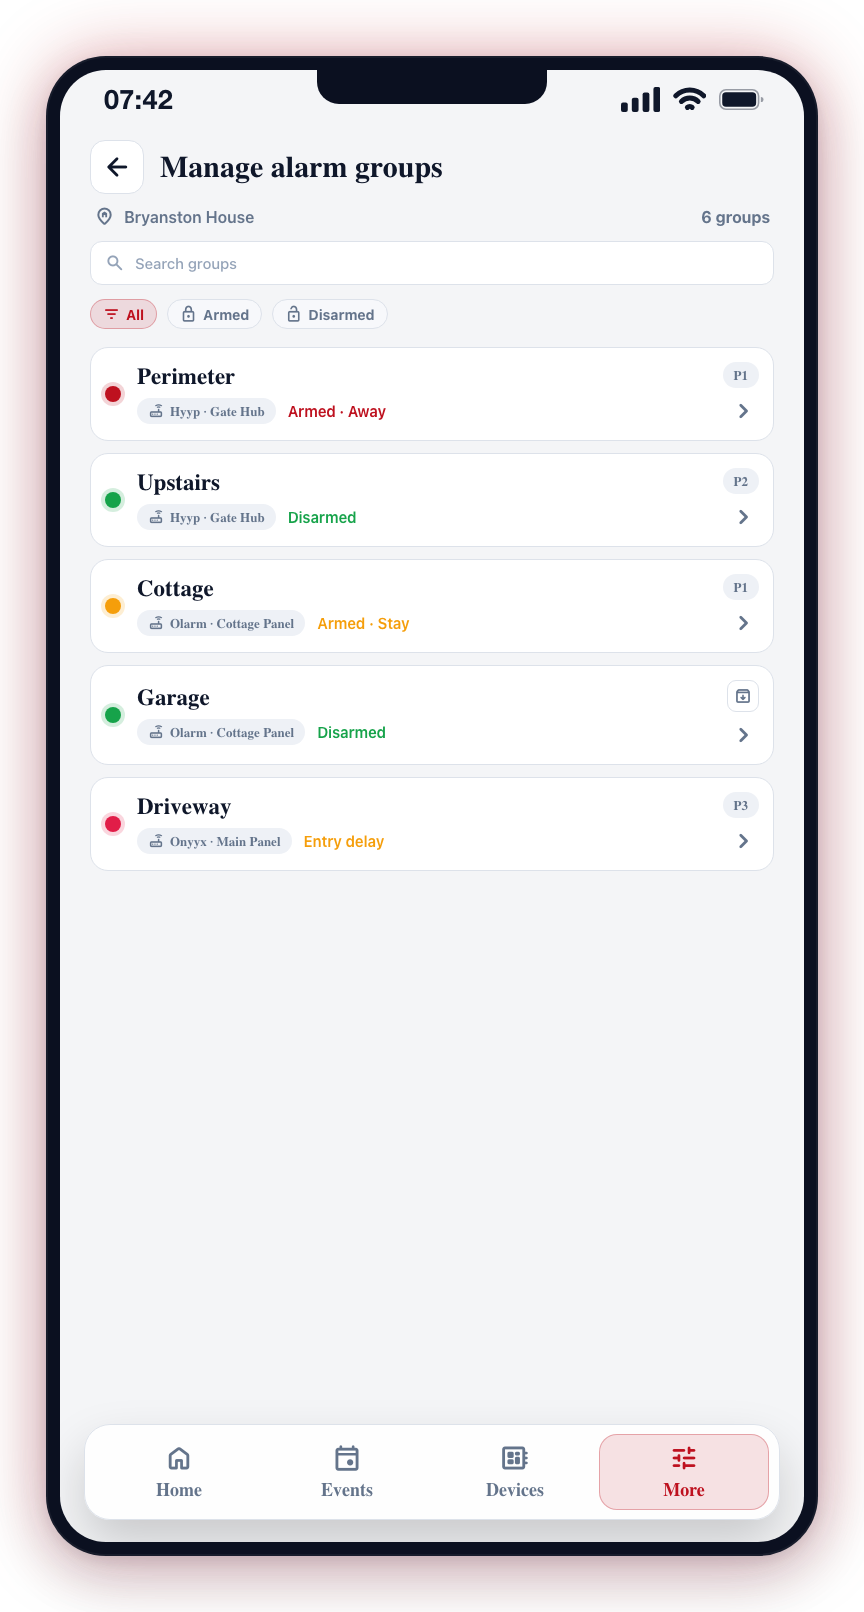
For a single searchable list of every area across every panel at the site (with arm-state filters and an archive option) use Alarm groups under More → Advanced setup.
Zones and Sensors
Zones represent individual devices wired or paired to your alarm panel — motion detectors, door contacts, key fobs, outputs, smart locks, and more.
In the Devices tab, zones list under their area with exceptions first: open, tamper, and bypassed zones are always visible, followed by a few secure zones and a "+ N more zones" row that expands the rest.
A zone is filed under an area as soon as CleverCam knows where it belongs: the panel names the area in a signal, or the panel has only one area (then every zone is its). Zones on a multi-area panel that have not reported yet sit in a separate Not yet in an area list under the areas until their first signal names the area — a control-room operator can also place them by hand in CleverOps. (A panel with no areas at all simply lists its zones under Sensors.)
Each zone row shows:
- State Dot -- A small colored dot for the zone's current state (secure, open, alarm, tamper, bypassed).
- Sensor Icon -- A device-type icon (motion detector, door sensor, key fob, siren, smoke, leak, lock, etc.) so rows stay readable and consistent across hubs.
- Label -- The zone name from the panel.
- Status Chips -- Colored chips appear for MISSING, OFFLINE, LOW BATTERY, BYPASS, and the current zone state.
A zone is only shown in Alarm when CleverCam can also expect to see it clear — that is, when the panel has sent a zone restore before. Many radios and communicators only ever send the alarm and never the restore; on those the zone stays Secure on this screen (the alarm event, the notification and the event list are unaffected). The first alarm on a brand-new panel is treated the same way; once its first restore arrives, every later alarm shows.
While a zone is in Alarm it clears when:
- the panel sends the zone's restore;
- the area is disarmed — entering the code ends every alarm in that area, whether or not the panel sends restores;
- or after 1 hour without either (a restore that was lost or arrived out of order).
Tamper clears on its restore or after 1 hour; fault and low battery stay until the panel restores them. A new alarm on the zone always shows again immediately.
Grouped by Category (Onyyx Hubs)
For Onyyx hubs, the list is grouped by device category so key fobs and outputs no longer mix with detection zones:
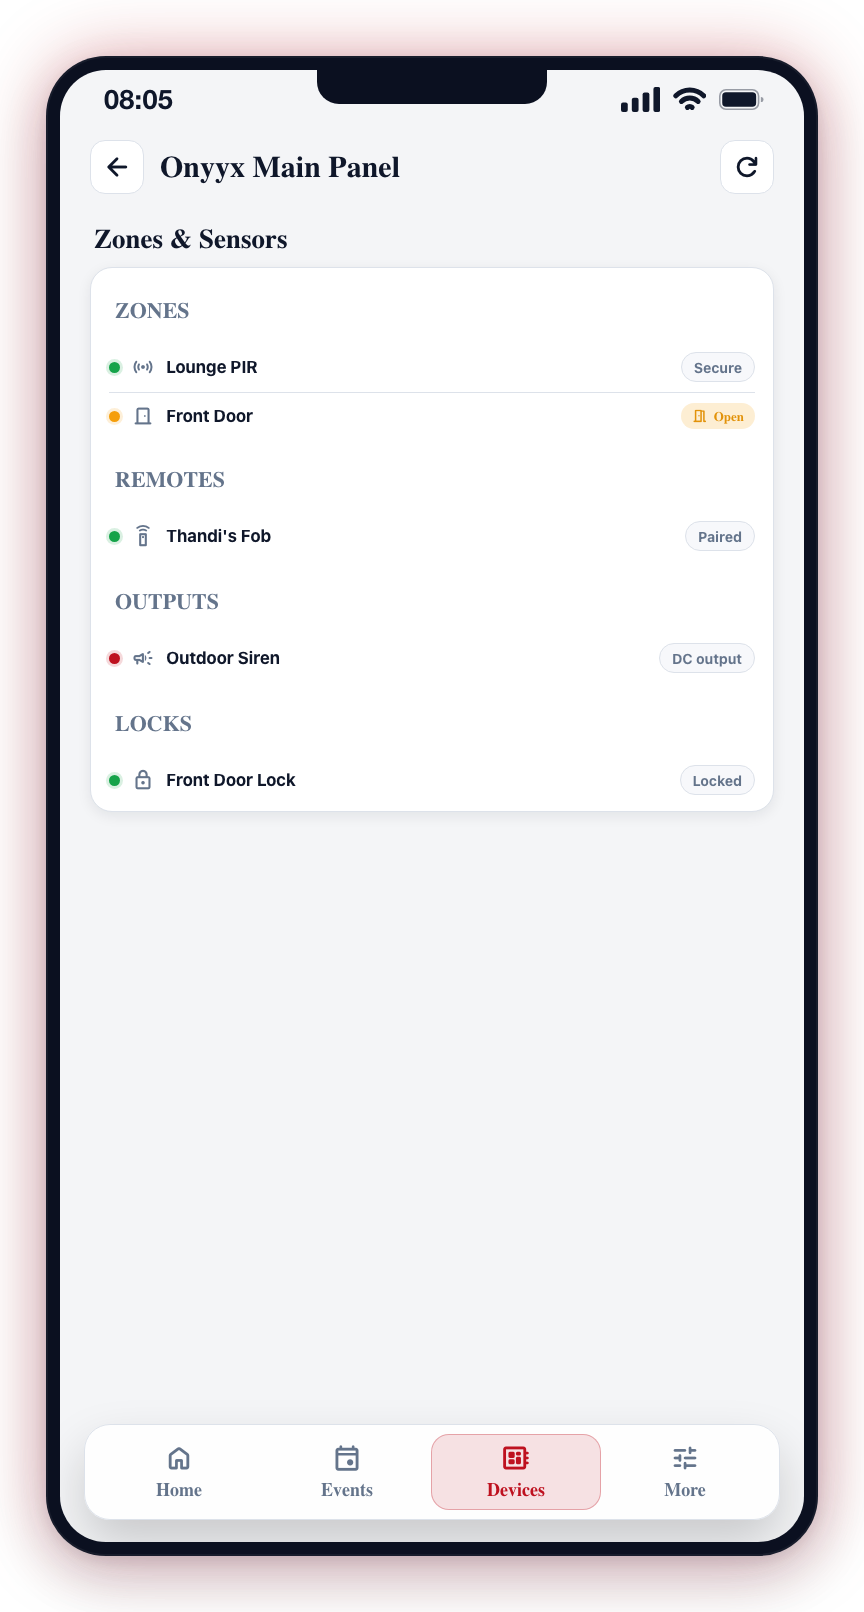
- Zones -- Detectors (motion, door/window, smoke, leak, vibration).
- Remotes -- Key fobs and wireless buttons.
- Outputs -- AC/DC output modules and outdoor sirens.
- Locks -- Smart locks (for example, Yale SDL).
- Other -- Anything that does not fit another category.
Other communicators (Hyyp, Olarm, Ajax, FSK) show a single flat zone list.
Tapping a Zone
What happens when you tap a zone row depends on which screen you are on.
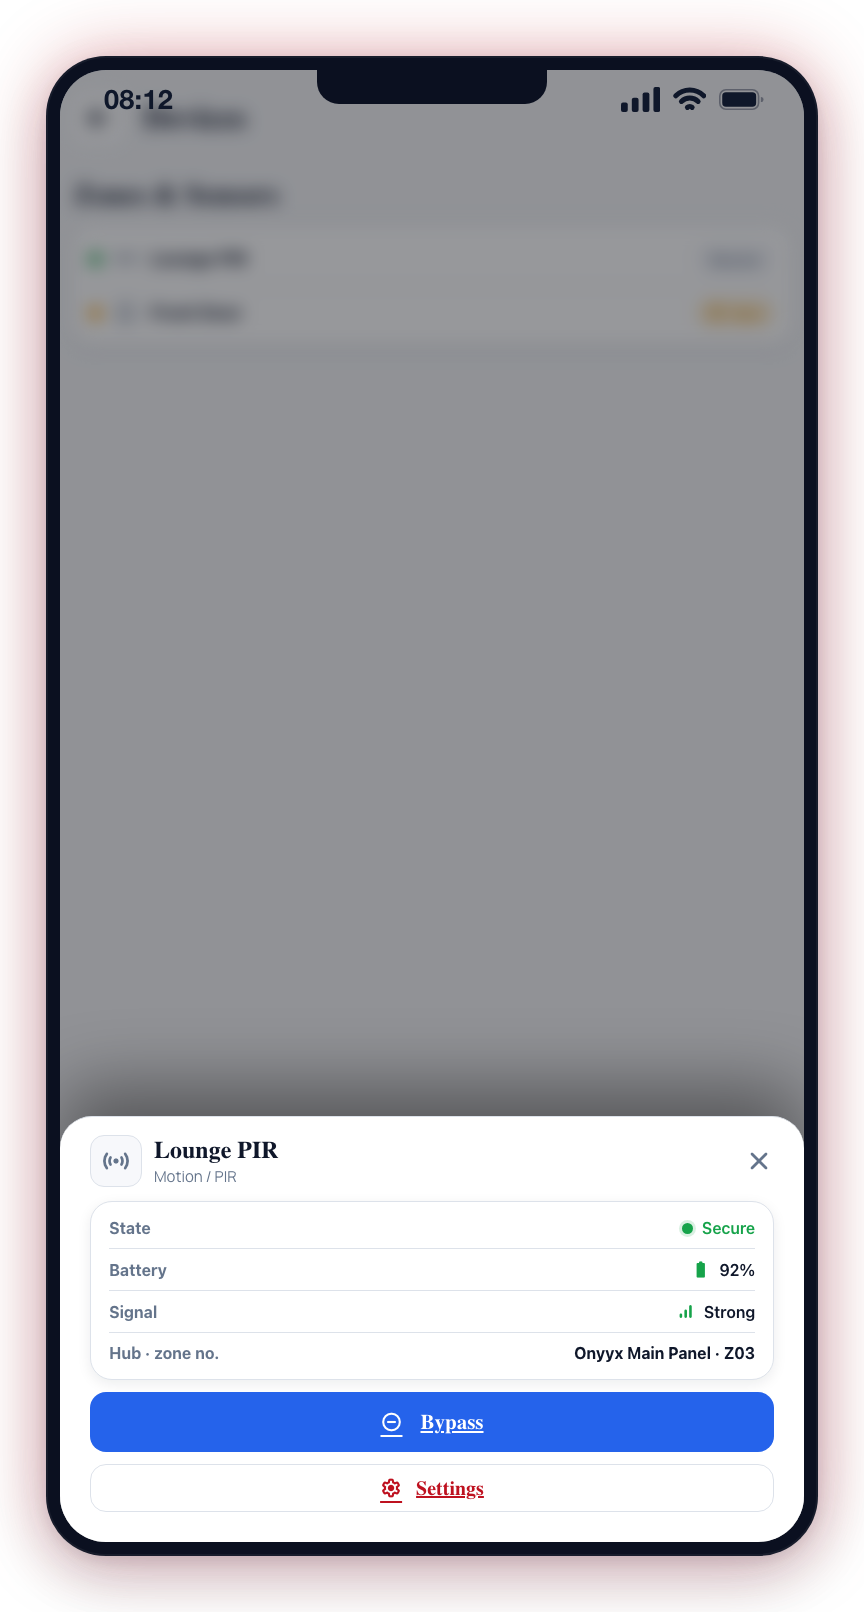
From the Devices tab (expand a hub, then tap a zone) — the zone's info sheet slides up. It shows the zone's current state, battery and signal health, hub label, and the panel's own zone number. From this sheet you can:
- Bypass / Unbypass the zone (when the hub supports bypass control).
- Edit settings — opens the zone editor (see below).
From the View Hub page (open a hub from the Devices tab, then tap a zone in the Zones / Sensors card) — the zone editor opens directly. The exact editor depends on the hub:
- Onyyx hubs — the full sensor configuration sheet opens. From here you can rename the sensor, change its type, edit chime / squawk / siren / vibration / lock settings, change which areas it belongs to, and (in add mode) pair a new sensor by serial number or barcode.
- Hyyp, Olarm, Ajax, FSK and other monitor-only communicators — the Edit Zone bottom sheet opens. It is the same editor described in Alarm zones: rename, change sensor type, mute push notifications for this zone, merge with another zone, or archive.
Bypassing a Zone
Bypassing a zone tells the panel to ignore that zone when arming. This is useful for zones with known issues or when you need to leave a door open while the system is armed.
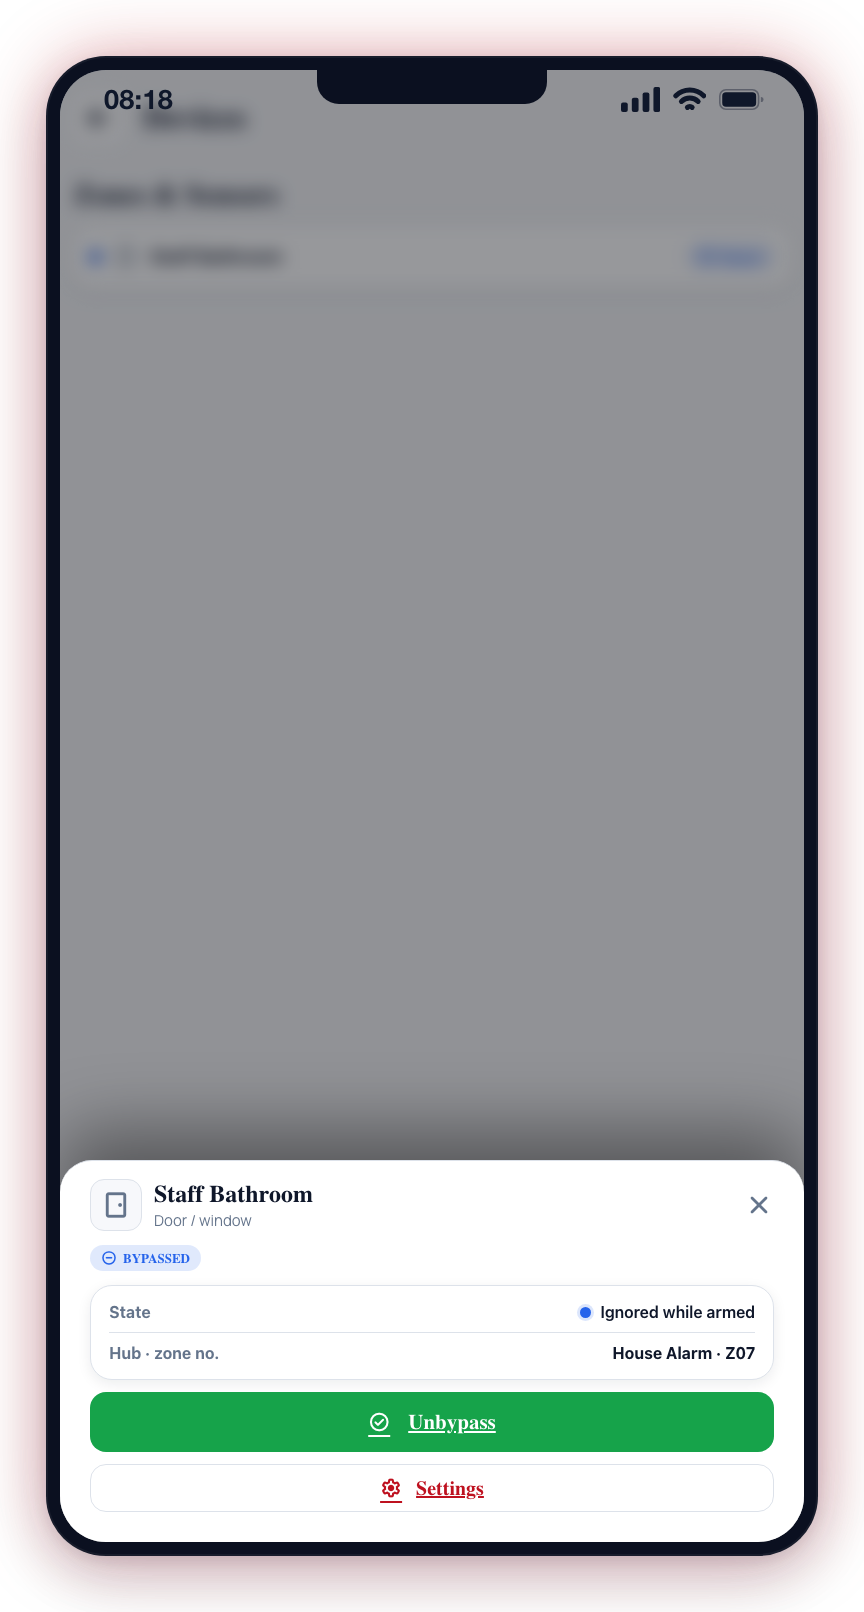
- Open the Devices tab.
- Expand the hub that owns the zone.
- Tap the zone row to open its info sheet.
- Tap Bypass (or Unbypass if it is already bypassed).
- On Hyyp hubs, if no panel PIN has been saved yet you will be prompted once; subsequent actions reuse the saved PIN. Onyyx hubs do not require a panel PIN.
- The zone's bypass state updates in real time.
Bypass lives on the zone info sheet only. The Zones / Sensors card on the View Hub page treats a tap as "open settings" instead, since that page is the place to configure sensors rather than to operate them.
To rename a zone, change its sensor type, mute push notifications for one specific zone, merge two zones that represent the same sensor, or archive a zone — either tap the zone in the View Hub page (above) or use Alarm zones under More → Advanced setup. Both paths open the same Edit Zone sheet.
Output Triggers
Output triggers control physical outputs on your alarm panel, such as electric gates, garage doors, lights, or sirens.
Each trigger row shows:
- Label -- The trigger name.
- Type -- Pulse (momentary activation) or Toggle (on/off).
- Color Dot -- Visual indicator matching the panel's color assignment.
- Fire Button -- A play icon for interactive communicators.
The Triggers section is only shown for hubs that support output control. View-only third-party panels (such as those connected via Ajax or FSK) will not show a Triggers section.
Firing a Trigger
Tap a trigger row to fire it:
- Tap the trigger row.
- If the trigger requires a PIN and none is saved on the hub yet, you will be prompted to enter one (Hyyp only — Onyyx does not use a panel PIN).
- The trigger activates on the panel (for example, a gate opens or a light turns on).
Managing Triggers
For communicators that support trigger management:
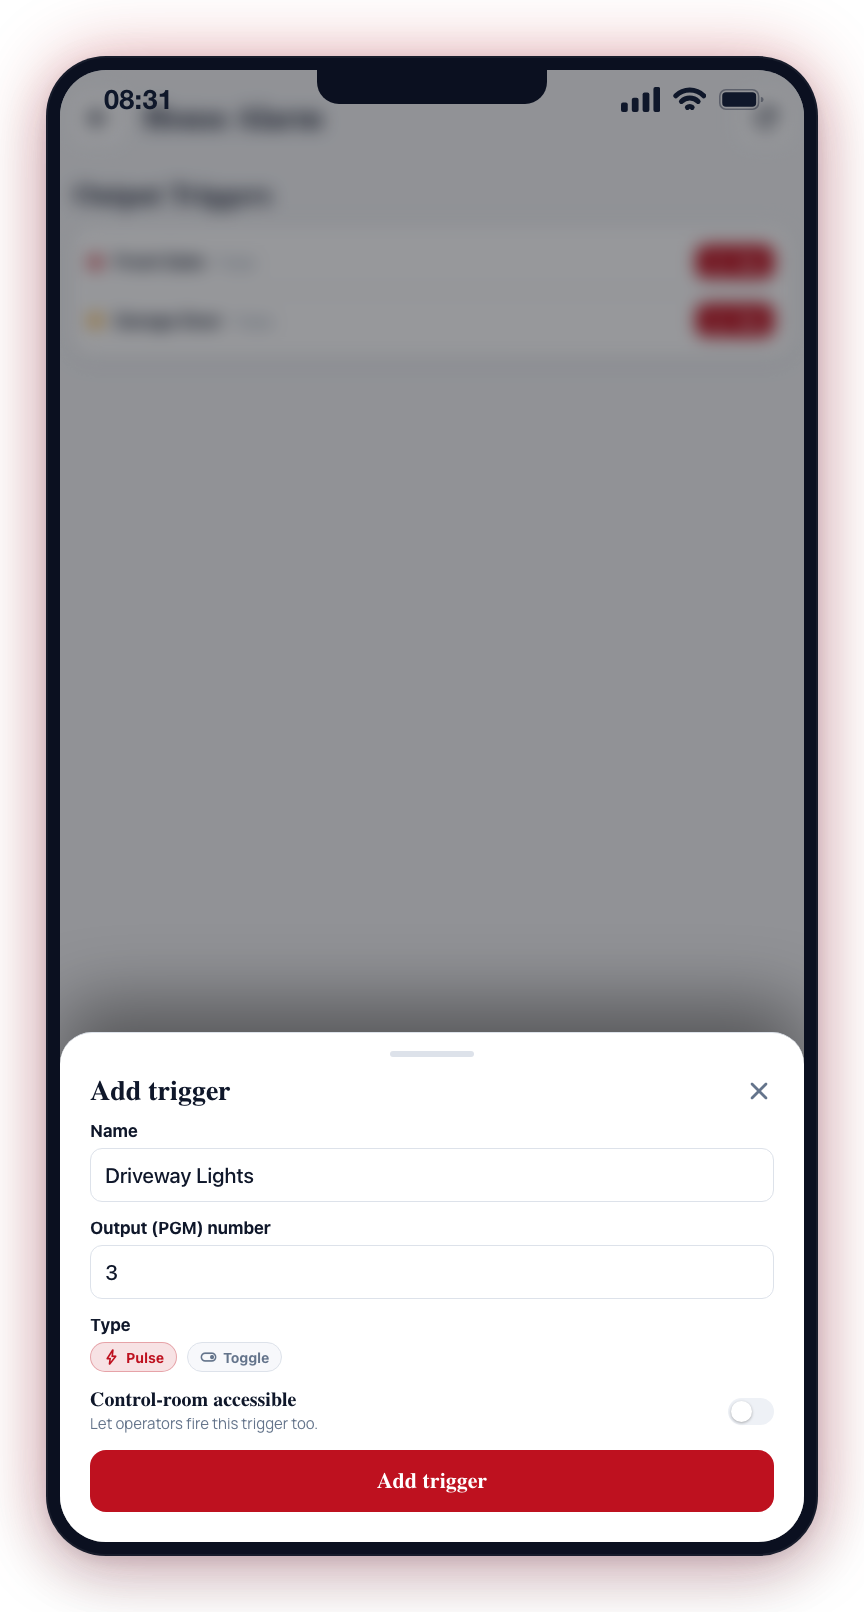
- Long-press a trigger to delete it (with confirmation).
- Tap "Add Trigger" at the bottom to create a new trigger on the panel.
Electric Fence Energisers
Some sites have an electric fence connected through an Olarm PRO communicator. An electric fence energiser appears in CleverAlert as its own alarm hub, alongside the main alarm panel.
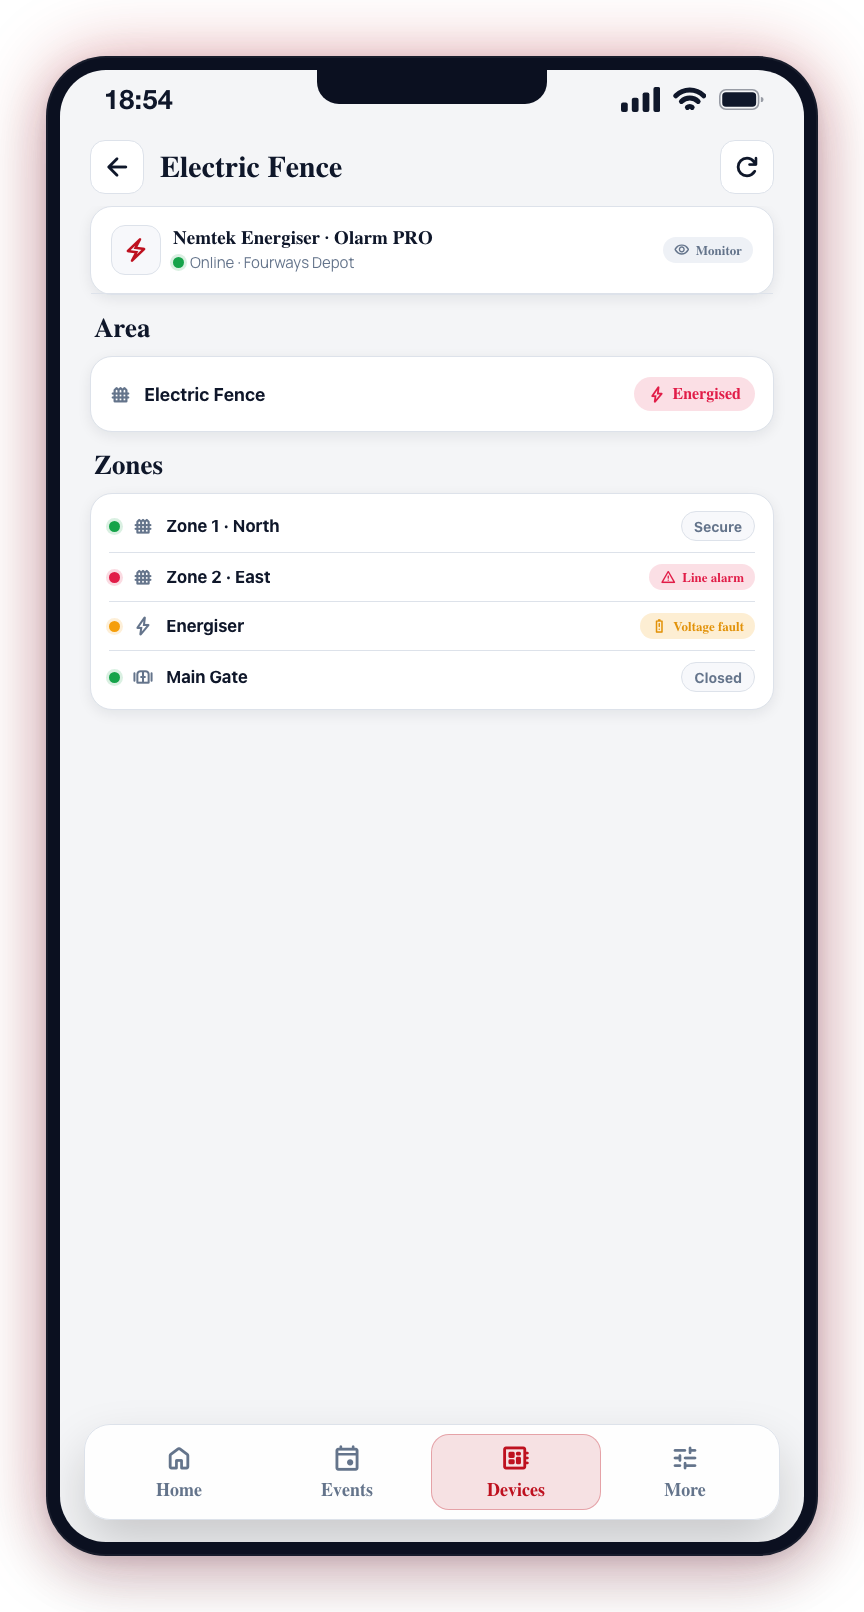
A fence hub shows:
- Area -- a single Electric Fence area reflecting whether the fence is energised (armed) or switched off (disarmed).
- Zones -- one row per fence zone (for example, Zone 1, Zone 2), each with a fence icon. Gates appear here too when the energiser has them configured.
Fence Events
- Fence line alarm -- when the fence line is breached (cut, climbed, or shorted), CleverAlert raises an intrusion alarm, the same as a burglary zone on a normal panel.
- Voltage fault -- when the energiser is not holding charge, CleverAlert raises a trouble event. Operators are notified, but it is not treated as a break-in and does not trigger a siren.
- Fence armed / disarmed -- switching the fence on or off is logged as a routine arm/disarm event.
Arm and Disarm
Most electric-fence installs connect the Olarm for monitoring only -- CleverAlert shows the fence's live state, zones, and alarms, but the fence is armed and disarmed from the energiser's own keypad, and the Electric Fence area is view-only.
Some energisers support remote control -- where they do, the Electric Fence area offers Arm and Disarm like any other alarm area (Stay and Sleep are not offered -- a fence is simply on or off).
Real-Time Updates
Area arm states and zone statuses update in real time. When the panel changes state (someone arms from the keypad, a zone opens, etc.), the change appears in CleverAlert within seconds.
You can also tap the refresh button in the top-right corner to manually pull the latest state from the panel.
If a hub's settings are changed in CleverOps while CleverAlert is already open on your phone, the app may not reflect the new configuration automatically. Pull down to refresh on the Home screen after making changes in CleverOps to pick up the updated hub state.
Home Screen
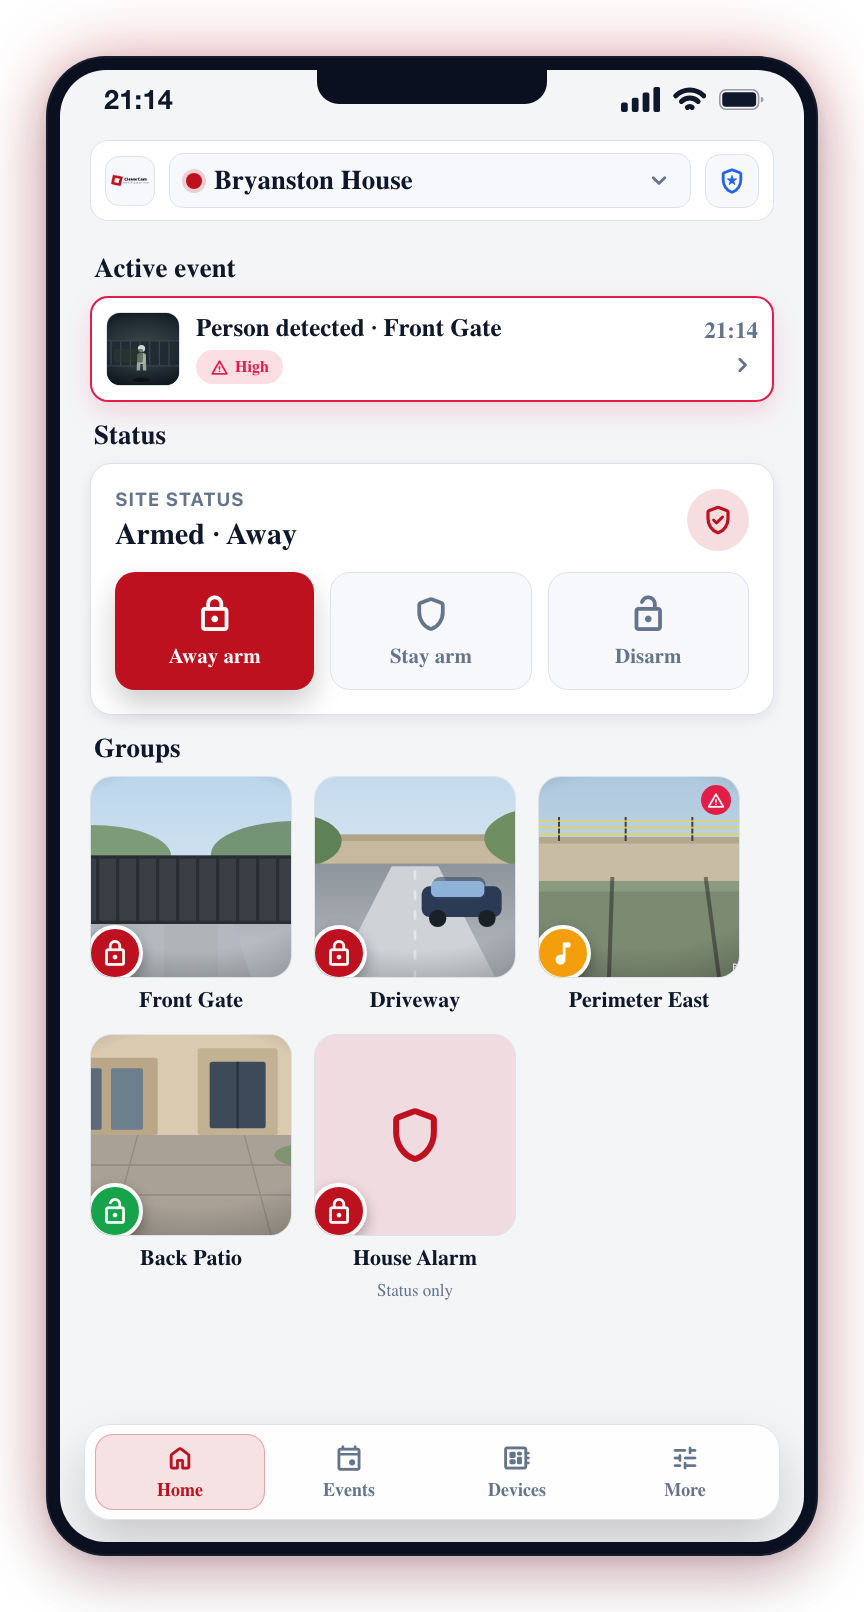
Alarm areas also appear as group cards in the Groups section of the Home screen for quick visibility. For interactive communicators, you can tap them there to arm or disarm, and the Home site arm tiles arm or disarm the whole site at once.