Roles & Invitations
Communities are powered by their members. The role assigned to each member determines what they can do on the BOLO Board and whether they can manage other members. CleverOps communities support four member roles, plus the monitoring centre's own staff who oversee communities in CleverOps.
Community Roles
Each role inherits everything from the role below it.
Viewer
The base role for community members. Viewers can:
- Read approved BOLO Board posts in the community
- Raise a geo-panic alert to the control room (if enabled on their membership or invite)
- Submit a geo-located incident report to the control room (if enabled on their membership or invite)
- View community information
Viewers cannot submit BOLOs, moderate posts, or manage members.
Publisher
Publishers have everything a Viewer can do, plus:
- Submit BOLOs to the community
Submitted posts start as pending and are only visible to the author (shown as "Pending approval") and to moderators, community admins, and monitoring centre staff until they are approved. Publishers cannot approve their own posts.
Moderator
Moderators have everything a Publisher can do, plus:
- Review the BOLO Board moderation queue
- Approve or Reject pending BOLOs in this community
- Optionally attach a rejection reason
Moderators cannot change member roles, remove members, or create invites.
Community admin
Community admins have everything a Moderator can do, plus:
- Approve pending members
- Block a member
- Remove a member (see Manage Community)
- Change a member's role
- Create and disable community invites (links and QR codes)
A community admin's authority applies to their own community only. They cannot see or manage any other community.
Monitoring centre staff (CleverOps)
Your monitoring centre's staff in CleverOps have all community admin powers across every community your centre owns. They can also:
- Create new communities and disable existing ones
- Link areas to a community (automatically including every site in that area)
- Configure monitoring-centre-wide community settings
Role Comparison
| Capability | Viewer | Publisher | Moderator | Community admin | Monitoring centre staff |
|---|---|---|---|---|---|
| Read approved BOLOs | Yes | Yes | Yes | Yes | Yes |
| See own pending BOLOs | — | Yes | Yes | Yes | Yes |
| Submit BOLOs | No | Yes | Yes | Yes | Yes |
| Approve / reject BOLOs | No | No | Yes | Yes | Yes |
| Approve pending members | No | No | No | Yes | Yes |
| Block member | No | No | No | Yes | Yes |
| Remove member | No | No | No | Yes | Yes |
| Change member role | No | No | No | Yes | Yes |
| Create / disable invites | No | No | No | Yes | Yes |
| Create / disable community | No | No | No | No | Yes |
| Link areas | No | No | No | No | Yes |
Most new members should be Viewer. Promote active, trusted members to Publisher so they can submit BOLOs. Reserve Moderator for a small number of people willing to review the queue. Only promote to Community admin someone you trust with membership control.
Invitations
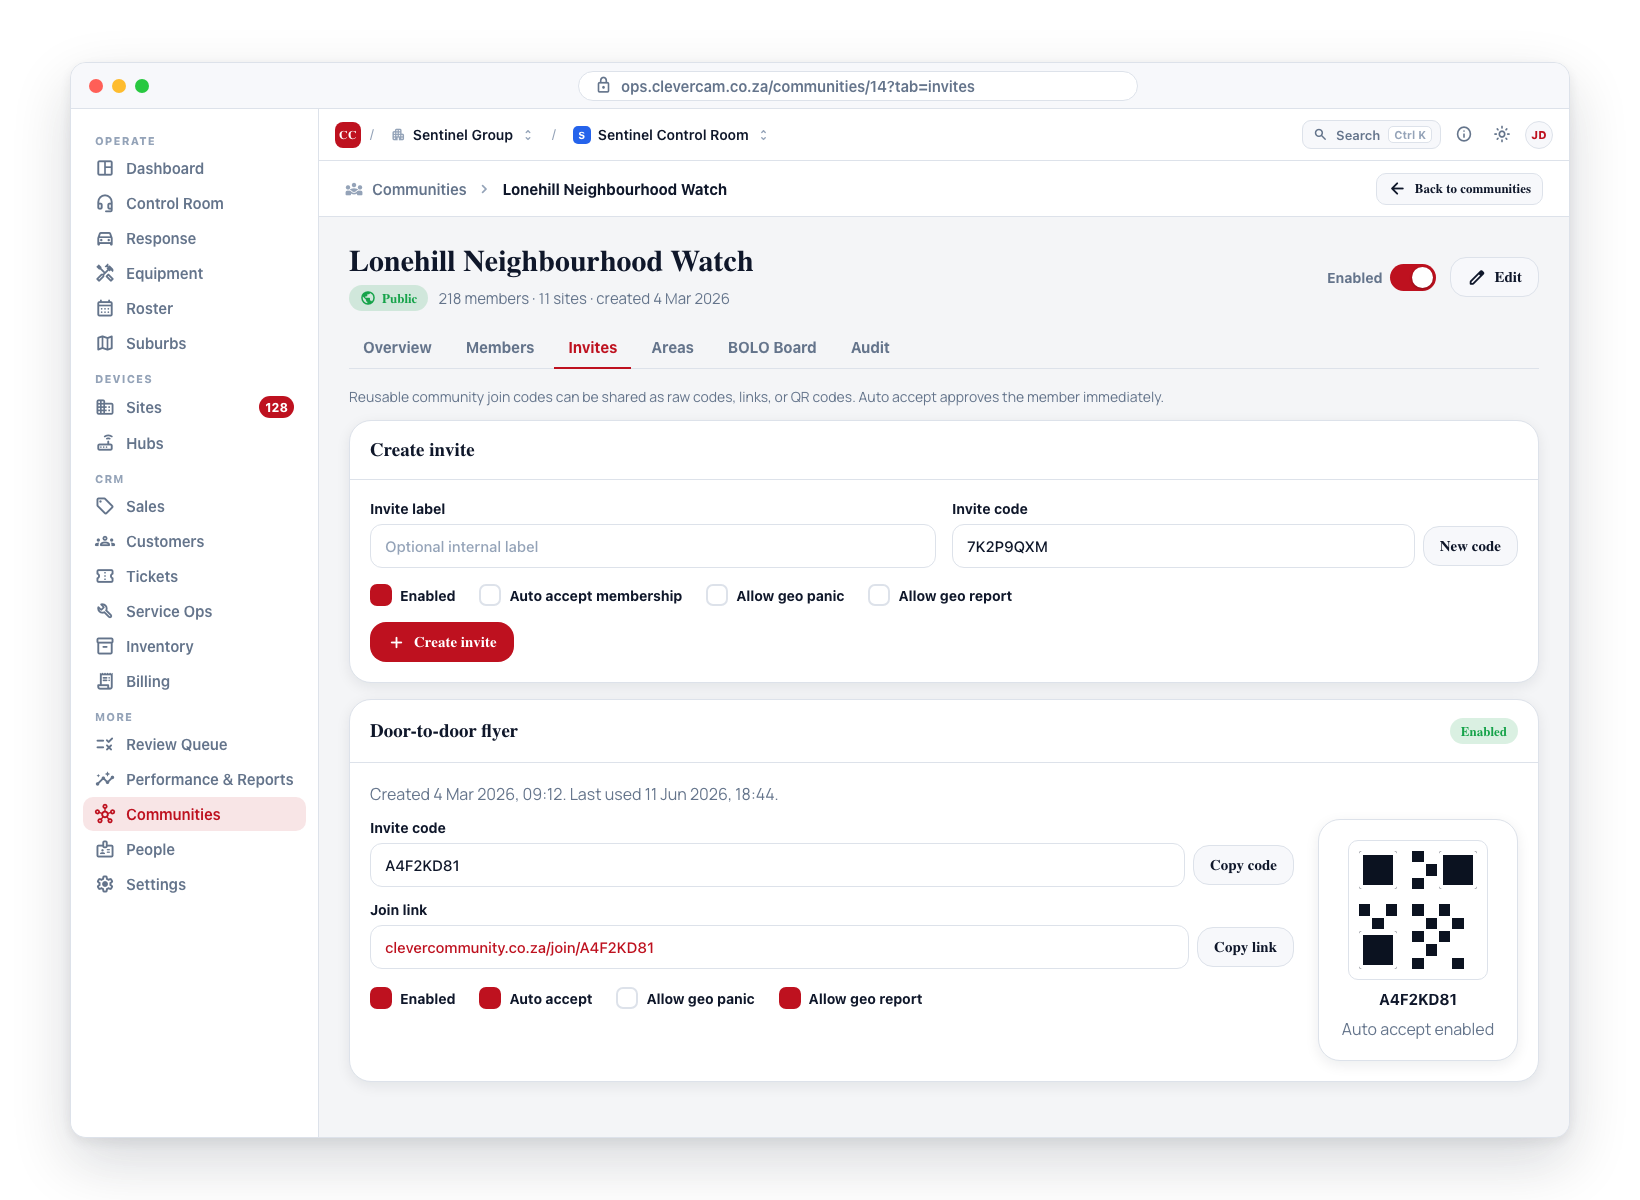
Invitations are how people join a community. Every invite includes:
- Invite link — The unique link that is scanned or clicked to join.
- QR code — A printable version of the invite link (see Community QR Codes).
- Auto-accept — If on, a new member who uses this invite is approved immediately. If off, they land in the pending queue.
- Default role — The role assigned on joining (typically Viewer).
- Geo-panic — Whether members who join via this invite have geo-panic access.
- Geo-report — Whether members who join via this invite have geo-report access.
Invite via Link
- Open the community and go to the Invites tab.
- In the Create invite section, configure auto-accept, the default role, and geo-panic and geo-report access, then click Create invite.
- A unique invite code (and its link) is generated and appears in the invite list. Click Copy link on the invite.
- Share this link via messaging apps, email, or social media.
- Anyone who clicks the link and has the CleverCommunity app can request to join (or is auto-approved if auto-accept is on).
Invite via QR Code
- Open the community and go to the Invites tab.
- Each invite in the list displays its own QR code that encodes the invite link.
- Members scan the QR code with their phone camera or the CleverCommunity app.
- They are taken to the community join page.
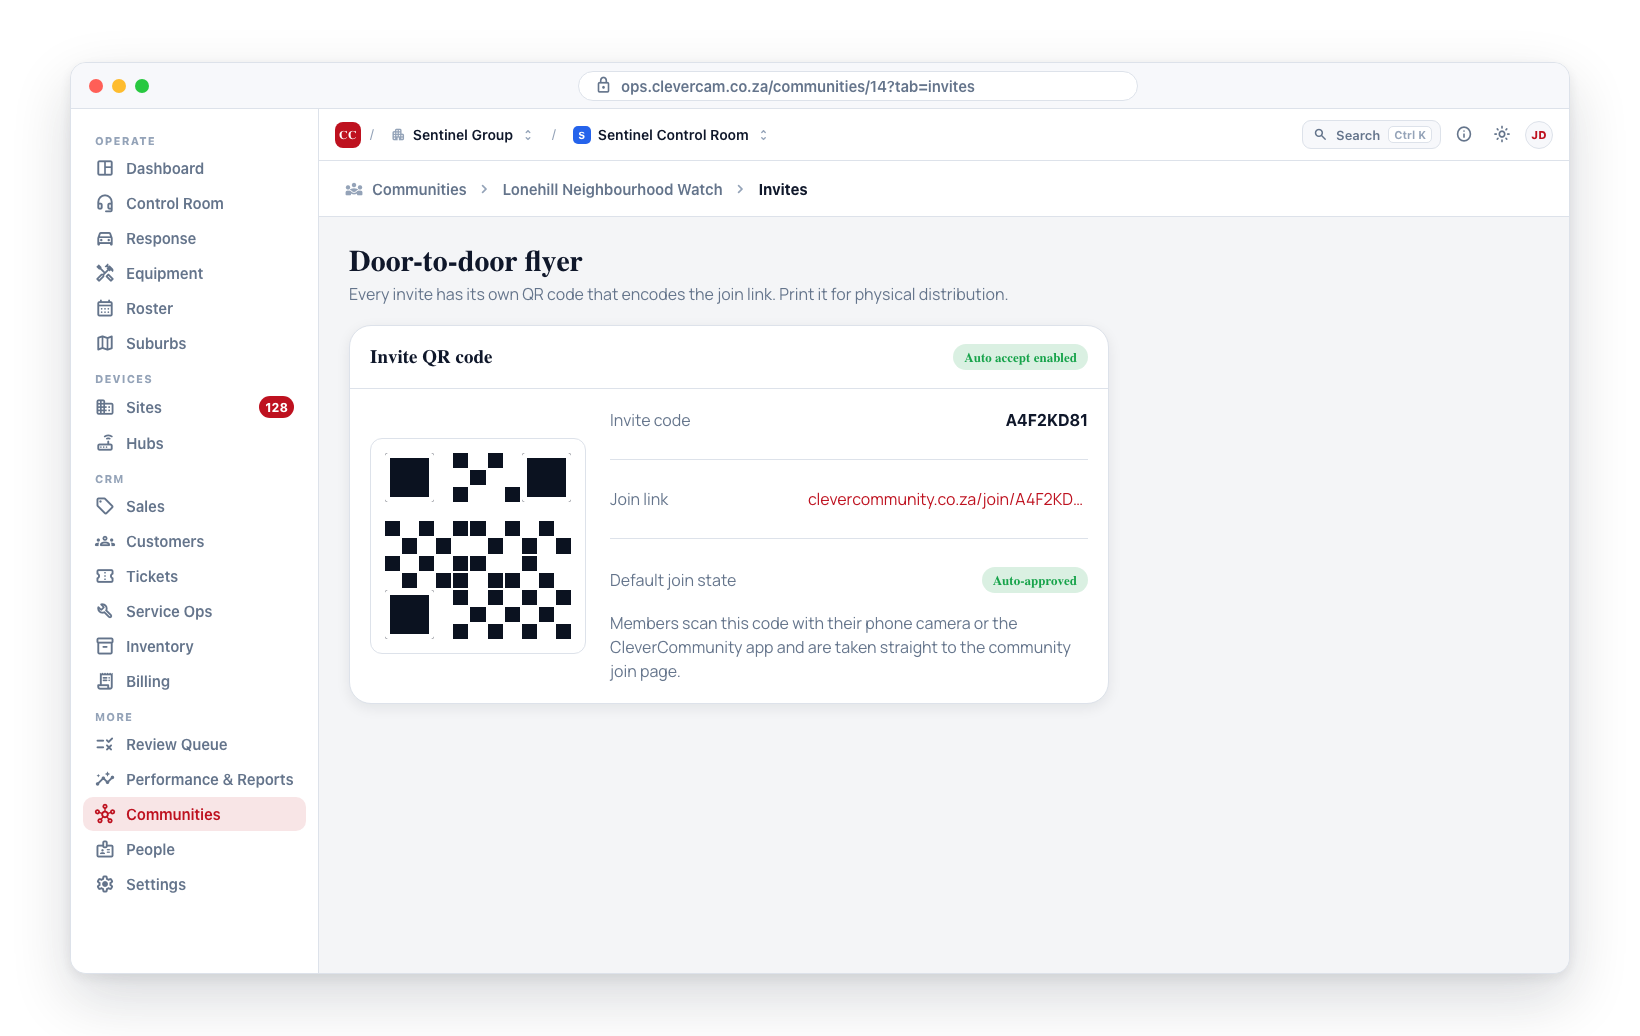
Print QR codes on flyers, posters, or business cards and distribute them in the neighbourhood. This is especially effective for residential communities where door-to-door distribution reaches potential members directly.
See Community QR Codes for more on QR code management and distribution.
Invite Attribution
Every membership records who approved it. The rules that govern this:
- When a community admin or monitoring centre staff member manually approves a pending member, that person is recorded as the approver.
- When an invite's auto-accept is on and someone redeems it, the person who created the invite is recorded as the approver.
- If the invite has no creator on record, the approver is left blank — it is never back-filled to the person who redeemed the invite. An invite cannot approve its own user.
- When a previously removed member re-enters the community, they always go through the pending queue, regardless of the invite's auto-accept setting. A community admin must approve them again.
Without this rule, users could appear in the audit log as having approved their own membership, which would make the approval history misleading. Leaving the approver blank in edge cases is more accurate than attributing the approval to the wrong person.
Changing a Member's Role
Community admins and monitoring centre staff can promote or demote members:
- Open the community and find the member in the member list.
- Use the Role dropdown on their row (Viewer, Publisher, Moderator, or Community admin).
- Save the change.
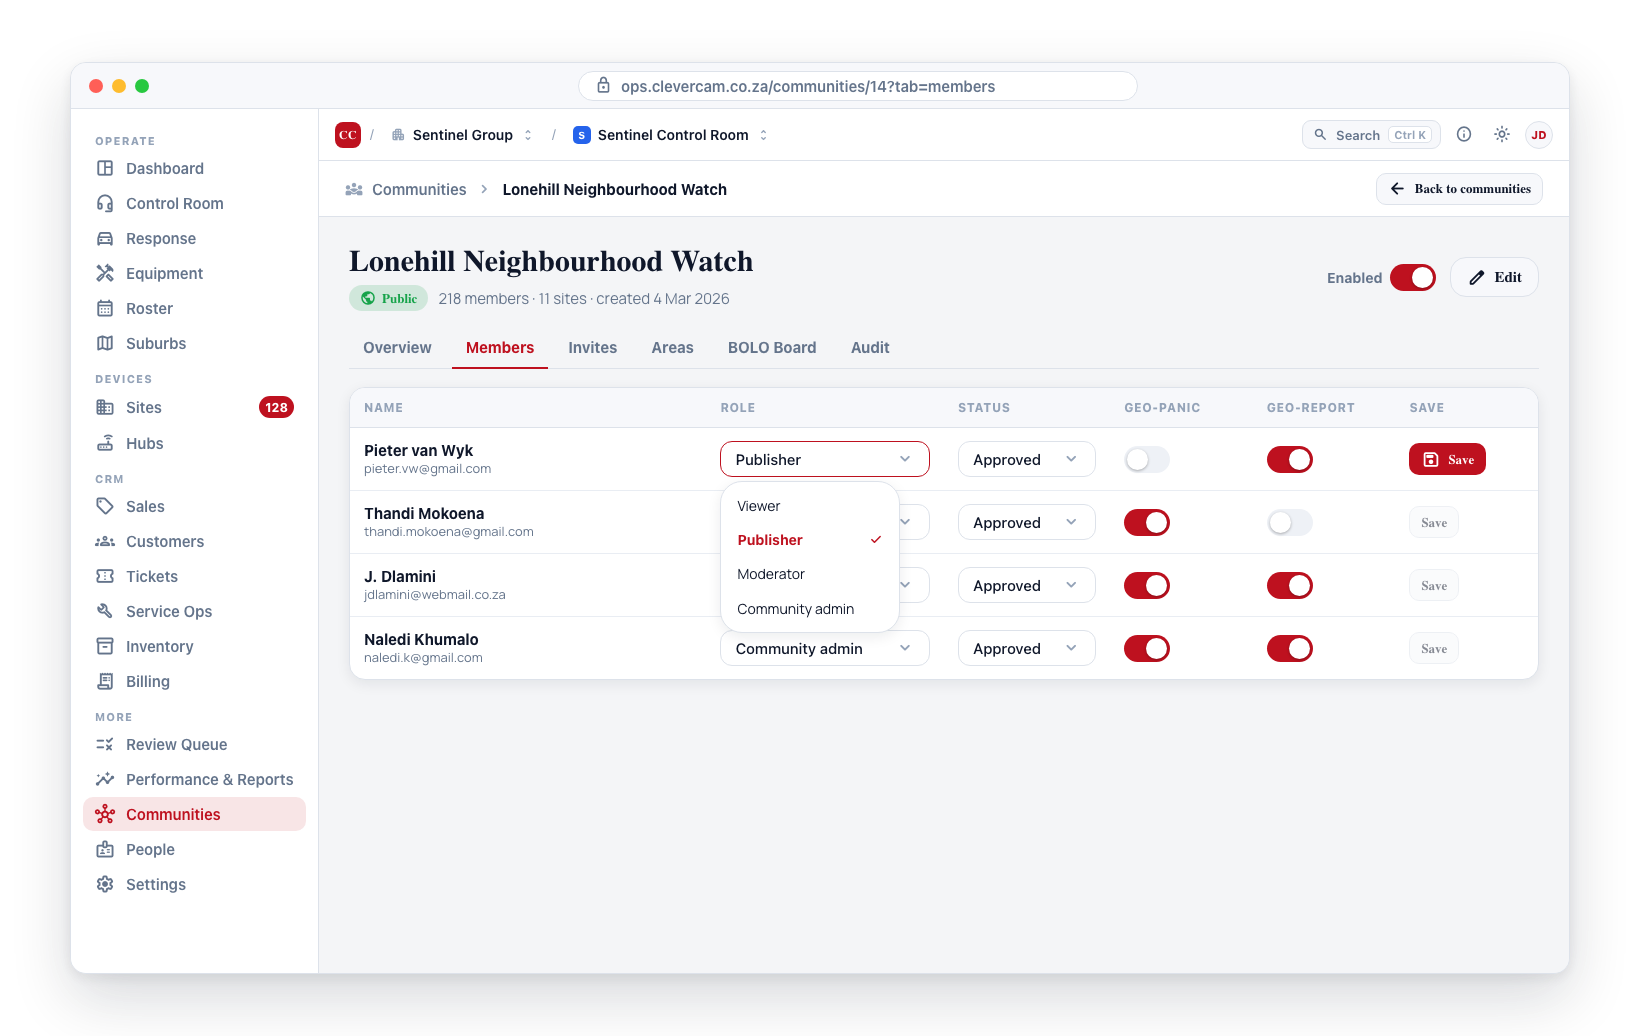
The member's permissions update immediately, and the change is recorded in the community audit log.
Geo-Panic and Geo-Report Permissions
These permissions are set per membership and per invite, not at the community level:
- Geo-panic — When enabled, the member can raise a panic alert tied to their current location, which is routed to the community's control room.
- Geo-report — When enabled, the member can submit a geo-located incident report to the community's control room.
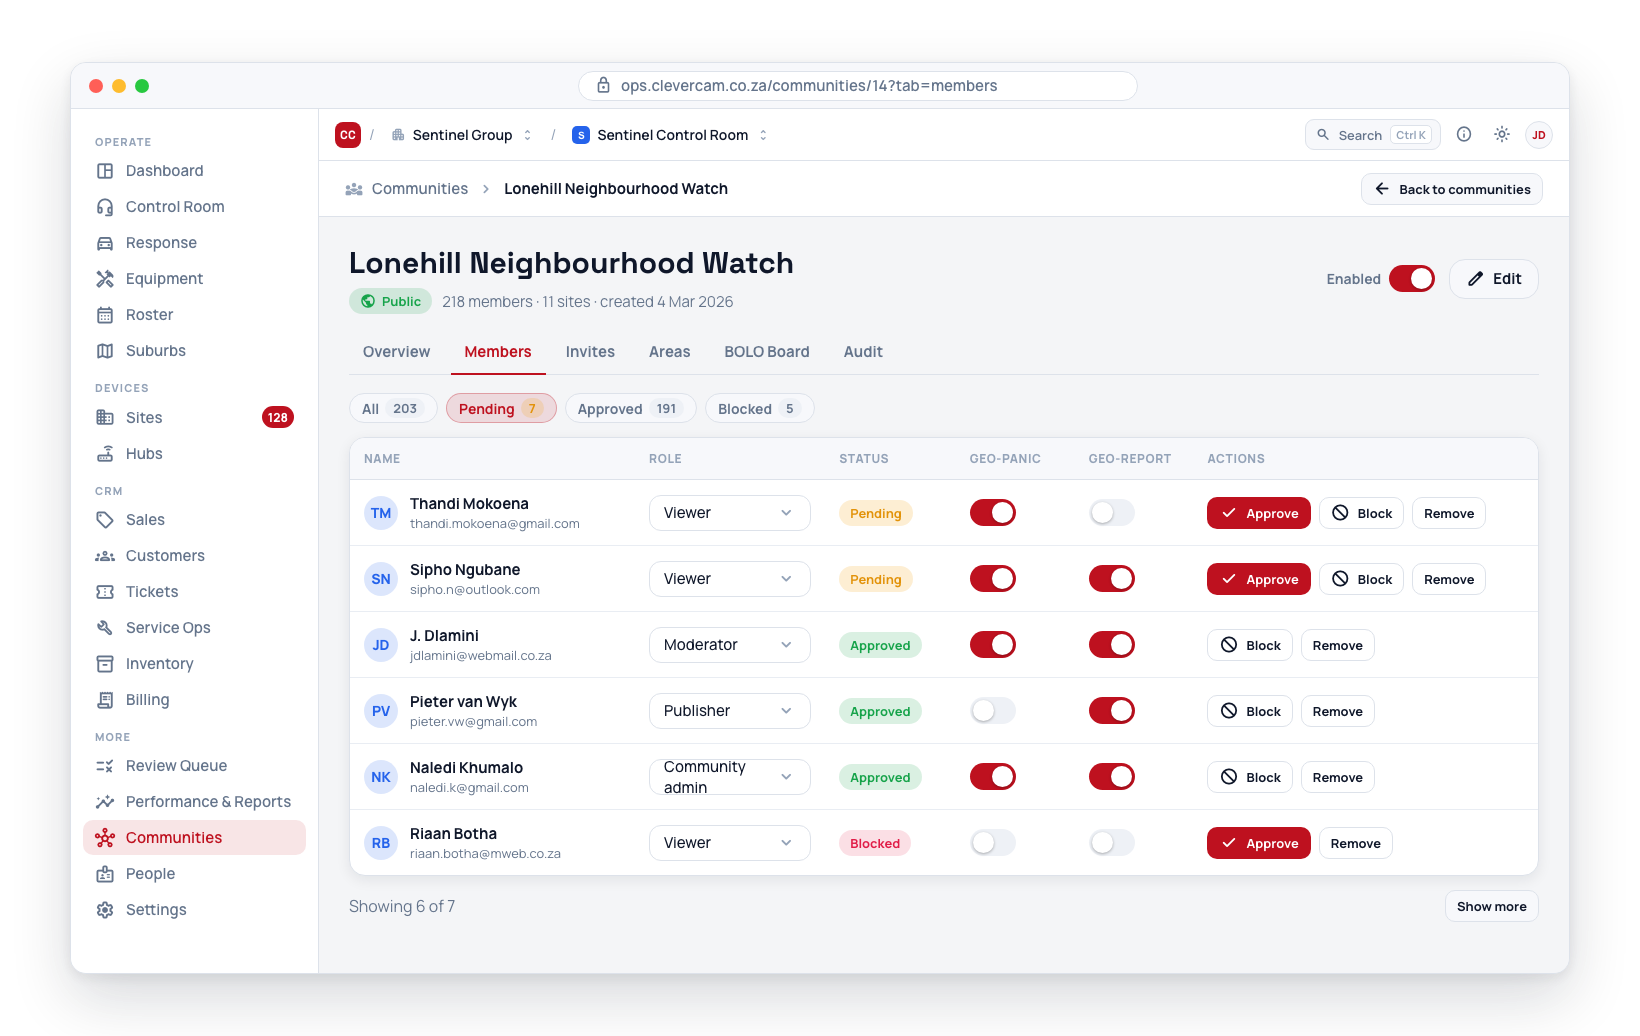
When creating an invite, toggle geo-panic and geo-report access to set the default for anyone joining via that invite. After a member has joined, community admins can adjust those toggles on the member's record directly.
Geo-panic is a powerful feature. Only enable it for members where it provides clear value. False panic alerts can cause unnecessary alarm and mobilise response resources unnecessarily.