Response Units
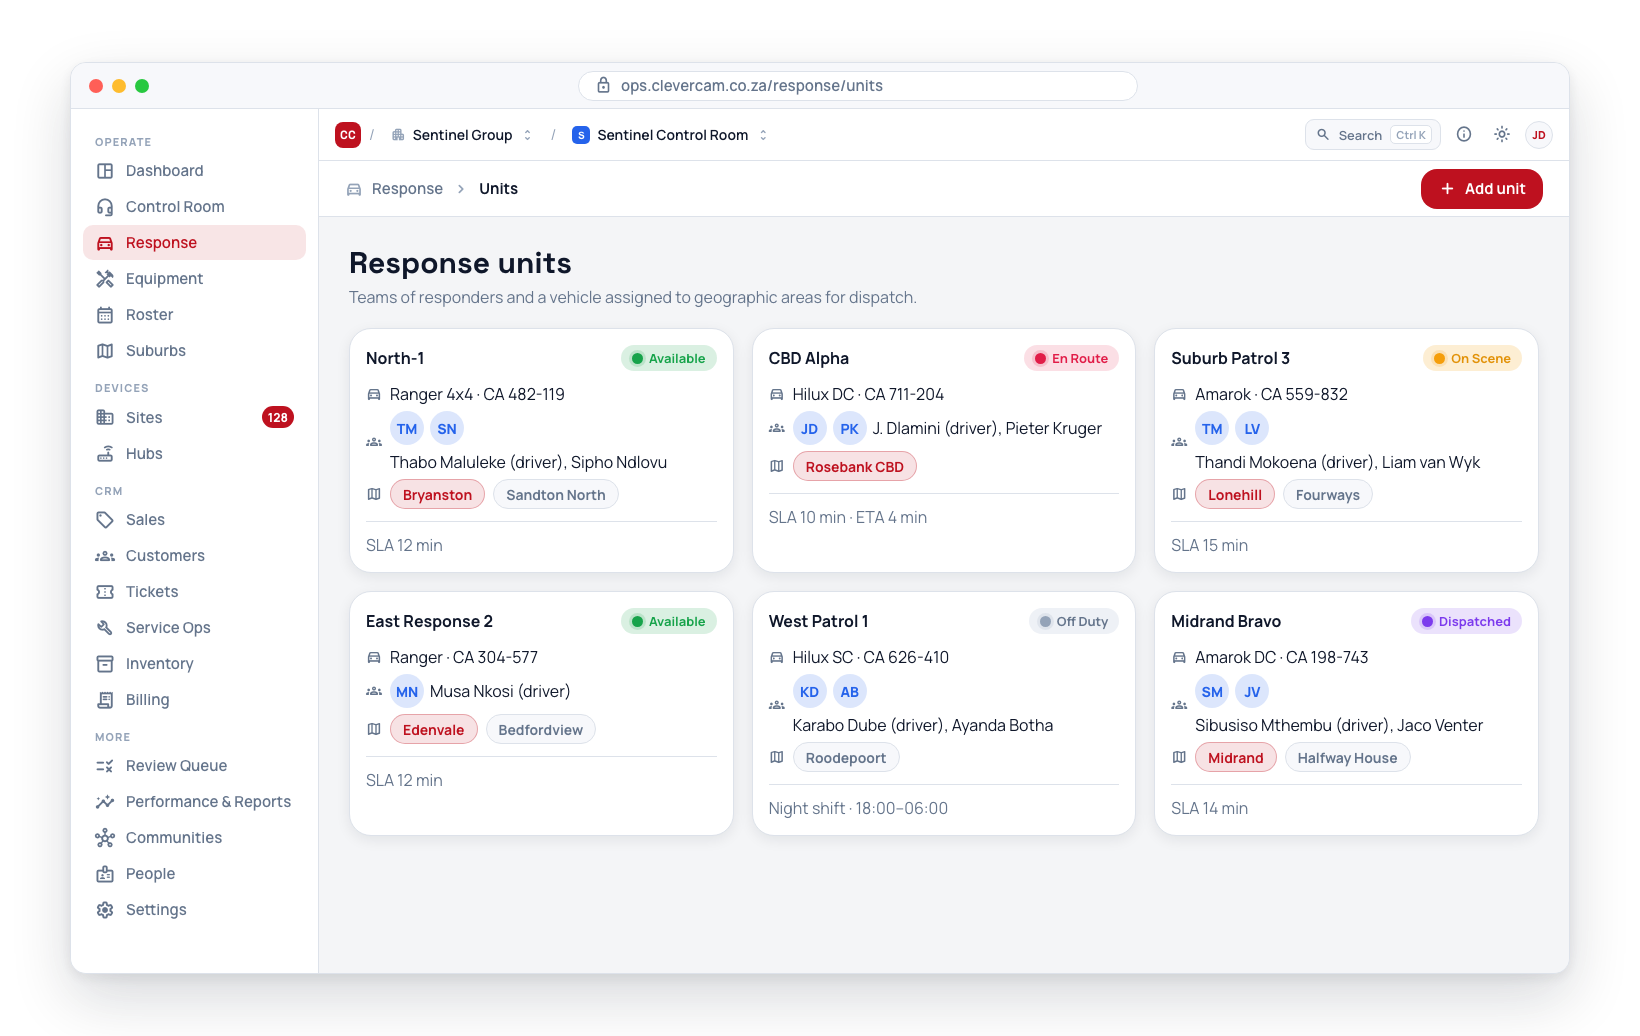
Response units are the core dispatch entity in CleverOps. A unit is a team made up of one or more responders and a vehicle, assigned to cover a geographic suburb. When an event occurs at a site, CleverOps determines which unit to dispatch based on the site's suburb and the unit's current status and location. Managing your units effectively is key to fast response times and good SLA compliance.
Understanding Unit Structure
A response unit brings together:
- Regular crew -- The people who belong to the unit (e.g. Romeo 1 is these three responders). A person belongs to one unit.
- Vehicle -- The vehicle the unit uses when dispatched (its live position comes from the vehicle's tracker)
- Home branch -- The dispatch domain the unit belongs to (see Branches)
- Suburbs -- The geographic zones (suburbs) the unit covers, in priority order
Belonging to a unit and being on duty are two different things. A unit comes online automatically when its first member is clocked on — by a controller on this screen or on CleverCommand's Units board, or by the responder signing in via the app — and goes offline automatically when its last member clocks off. There is no unit-level start/stop button.
The Response page opens on an Overview tab. It leads with an operations map built from real data — each branch, the suburbs it contains, and the units (vehicle + crew) homed there, each unit showing the suburbs it covers — followed by status cards summarising every part of the operation. The Units tab is the full list.
When an event is dispatched, the system matches the event's site suburb to units assigned to that suburb, considers each unit's availability and location, and sends out the dispatch assignment.
See It in Action (Simulated Control Room)
If you are new to units, click the See it in action button under the intro sentence in the Response page header. It opens a short simulated control-room walkthrough that shows what happens with the parts you register here once operators take over in CleverCommand:
- Shift change -- The night crew clocks out; vehicles stay parked with their units while the day crew waits in the unassigned pool.
- Crewing -- The operator drags responders into units; the first responder in becomes the driver.
- Start shift -- Units go Available and appear on the control room's dispatch map.
- Dispatch -- An alarm comes in, the picker ranks the nearest unit (live GPS where a tracker is linked), and one click sends the crew -- their phones get the push and the unit flips to En Route.
Step through with Back / Next, or Replay to start over. The walkthrough uses built-in sample data only -- nothing you see in it is saved, and it never touches your real units. The actual crewing and dispatching happens in CleverCommand.
Viewing Units
- Navigate to Response in the sidebar and click the Units tab.
- The units page shows two sub-tabs:
- On duty -- Units currently online and dispatchable (shows count)
- All -- Every unit registered under your company (shows count)
Units are displayed as a board of rows, one per unit — like a roster. Each row shows the unit's identity on the left (name, status pill, vehicle, branch, suburbs, duty window) and its people as chips:
- Solid green chip -- A member on duty right now. A phone icon means they clocked on themselves via the CleverResponder app; a person icon means a controller put them on. Drivers are marked. The × on the chip clocks them off.
- Dashed chip -- A regular member who is off duty. Tap the play button (or drag the chip onto the unit) to clock them on. If they are currently on duty on another unit, the chip says so, and clocking them on here asks for confirmation before moving them.
- Blue chip -- A guest: someone on duty on this unit who is not one of its regulars (relief from another unit). Guests never change the regulars list.
- Amber chip -- A member still on past the unit's expected shift end. Nothing is closed automatically — the chip stays amber until a controller clocks them off or leaves them on deliberately.
- + Crew on… -- Clock any responder onto this unit, including guests.
A Due to start strip appears above the board when off-duty regulars are due on shift soon (their unit's duty window opens within 2 hours, or opened recently and they have not clocked on). Tap a chip, or drag it onto the unit, to clock them on — the strip only suggests, it never crews anyone by itself.
- Vehicle -- The assigned vehicle (if any) shows an amber Idle 5w chip when that vehicle has gone quiet (see below)
If a unit's assigned vehicle has recorded no vehicle check, trip, or fuel log for 3 weeks or more, an amber Idle 5w chip appears next to the vehicle on the card. It flags an assignment that may be out of date — the vehicle may have been swapped or retired without the unit being updated. Confirm the unit is still using that vehicle, or reassign it via Edit. Vehicles that have never recorded any fleet activity are not flagged. See Vehicles → Stale Assignment Signal for the full explanation.
Unit Statuses
Units move through a defined set of statuses during their operational day:
| Status | Meaning |
|---|---|
| Off Duty | The unit is not currently working and is not available for dispatch. |
| Available | The unit is on duty and ready to be dispatched. |
| Dispatched | The unit has been assigned to an event and is preparing to respond. |
| En Route | The unit is travelling to the event site. |
| On Scene | The unit has arrived at the event site. |
| Returning | The unit is heading back from the event site. |
The typical progression is: Available -> Dispatched -> En Route -> On Scene -> Returning -> Available. Operators in CleverCommand update these statuses as the response progresses. Off Duty ↔ Available is automatic: the first member clocking on brings the unit to Available, and the last member clocking off returns it to Off Duty. A unit whose crew empties during a call-out stays online (the row shows a red "No crew on an active call-out" warning) and settles to Off Duty when the dispatch hands it back.
Creating a Response Unit
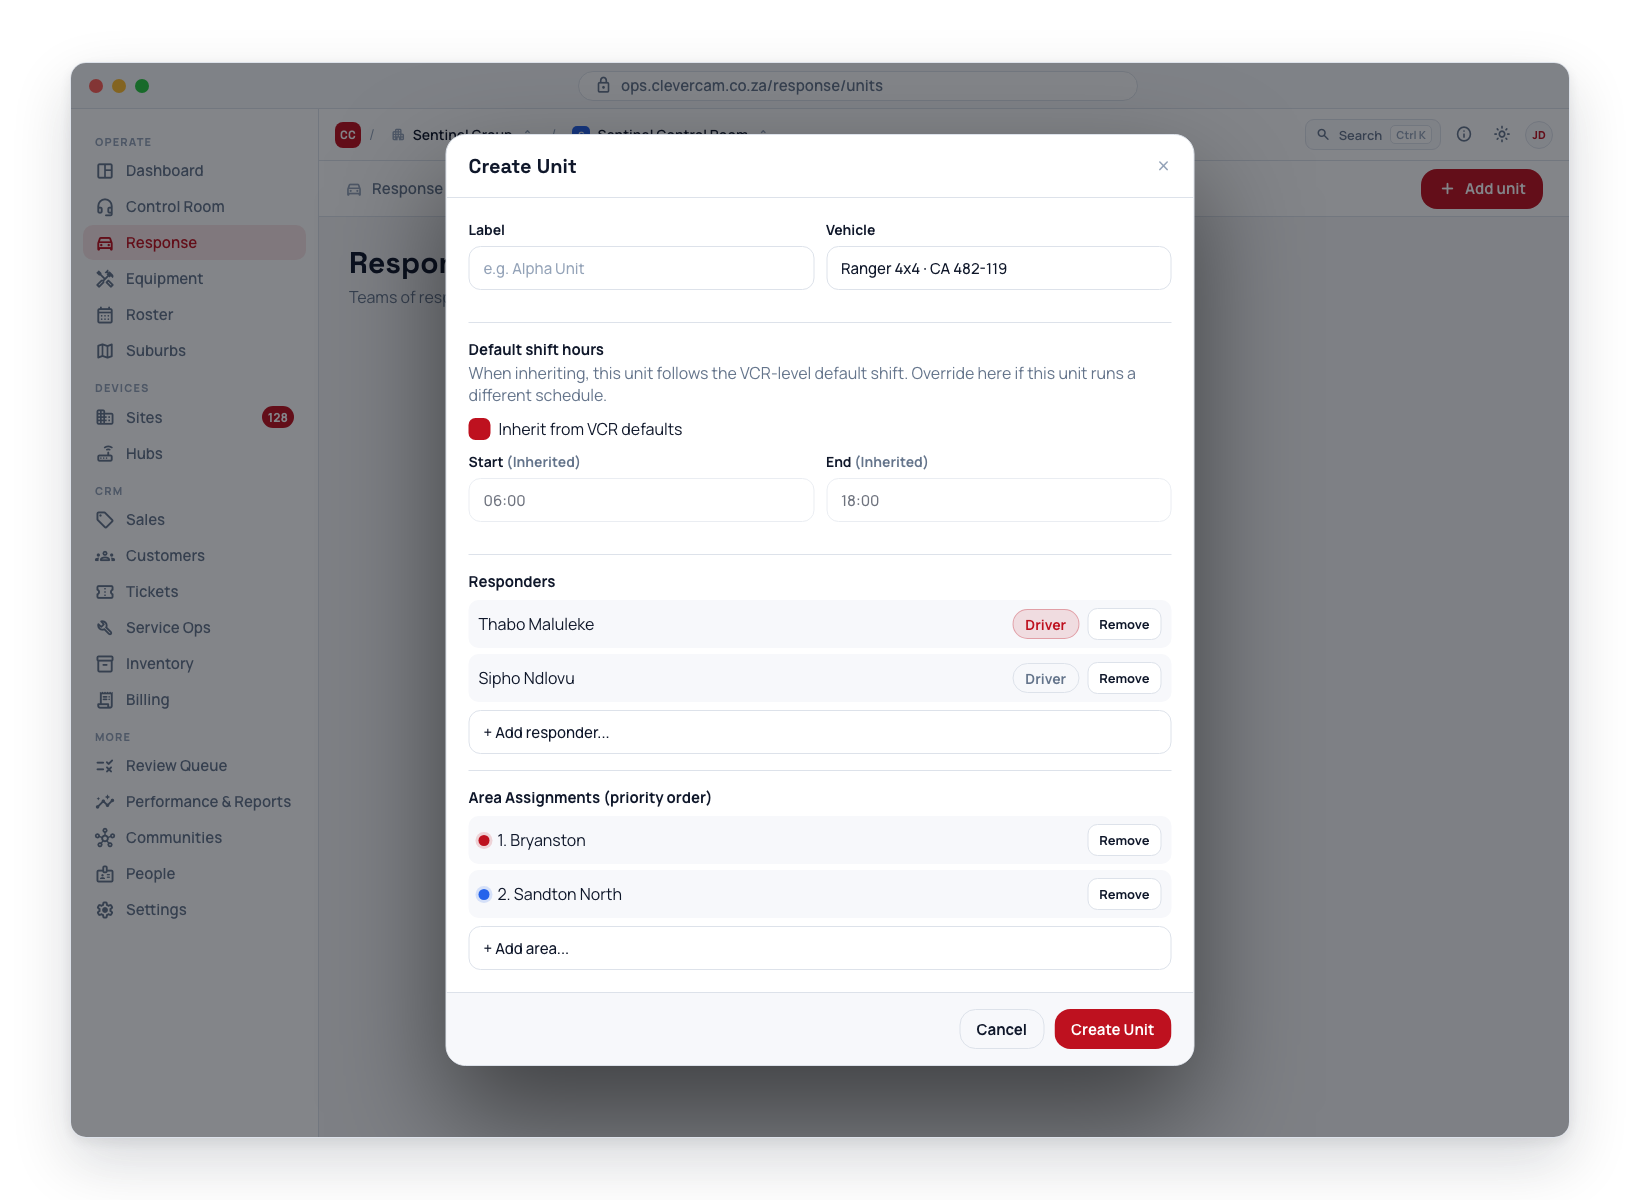
- Navigate to Response and click the Units tab.
- Click Add unit. (When no units exist yet, the empty state offers the same Add unit button.)
- Enter the unit details:
- Unit name -- A clear, recognisable name
- Assign vehicle -- Select the vehicle this unit will use. The list offers the same vehicles CleverCommand does: active vehicles that are not hidden by a tag with Units switched off (see Controlling what the control room sees). When you edit a unit whose vehicle has since been hidden or deactivated, that vehicle stays in the list marked (hidden in Command) or (inactive) so saving doesn't silently drop it.
- Duty hours -- Either inherit the control room clock or override per unit (see Duty Hours)
- Regular crew -- Select the people who belong to this unit (with the option to mark a default driver). Anyone with CleverResponder access under People is offered here — the same list CleverCommand crews from. This is membership only — nobody is clocked on by saving, and the picker only offers people who don't already belong to another unit.
- Assign suburbs -- Select one or more geographic suburbs this unit covers, with priority ordering
- Click Save to create the unit. New units start off duty; they come online when the first member is clocked on.
Use a consistent naming convention for your units to make them easy to identify during dispatch. For example, include the suburb name or a numbered callsign: "North-1", "CBD Alpha", "Suburb Patrol 3".
Duty Hours
Each unit has a duty window describing when it is normally available. It does not clock anyone on or off on its own -- duty always starts and ends with a person (a controller clocking a member on/off, or the member signing in or out via the app).
What the window does drive:
-
The Due to start strip on the Units board — off-duty regulars whose unit's window opens soon are suggested for one-tap clock-on.
-
The expected shift end stamped on each clock-on. Past it, the member's chip turns amber (overdue) here and on CleverCommand's Units board, and stays amber until a controller acts — running past the window never clocks anyone off by itself. The one automatic clock-off is a safety cap: a shift that has been running for 16 hours straight is ended by the server, so a forgotten shift cannot run forever. Short of that cap, a responder stays on shift and crewed for their whole shift even if the app sits untouched in a pocket between call-outs.
-
CleverCommand's unit strip shows an "Off duty in 40m" pill counting down to the resolved end, and lets a controller set a once-off End shift early at… override for that unit.
-
Dispatch Copilot treats a unit whose duty window has already passed as unavailable for every event, and penalises a recommendation whose projected finish time would run past the window.
Leave the window unset (the default for most control rooms) and neither applies -- the unit is never gated by duty hours.
Inheritance
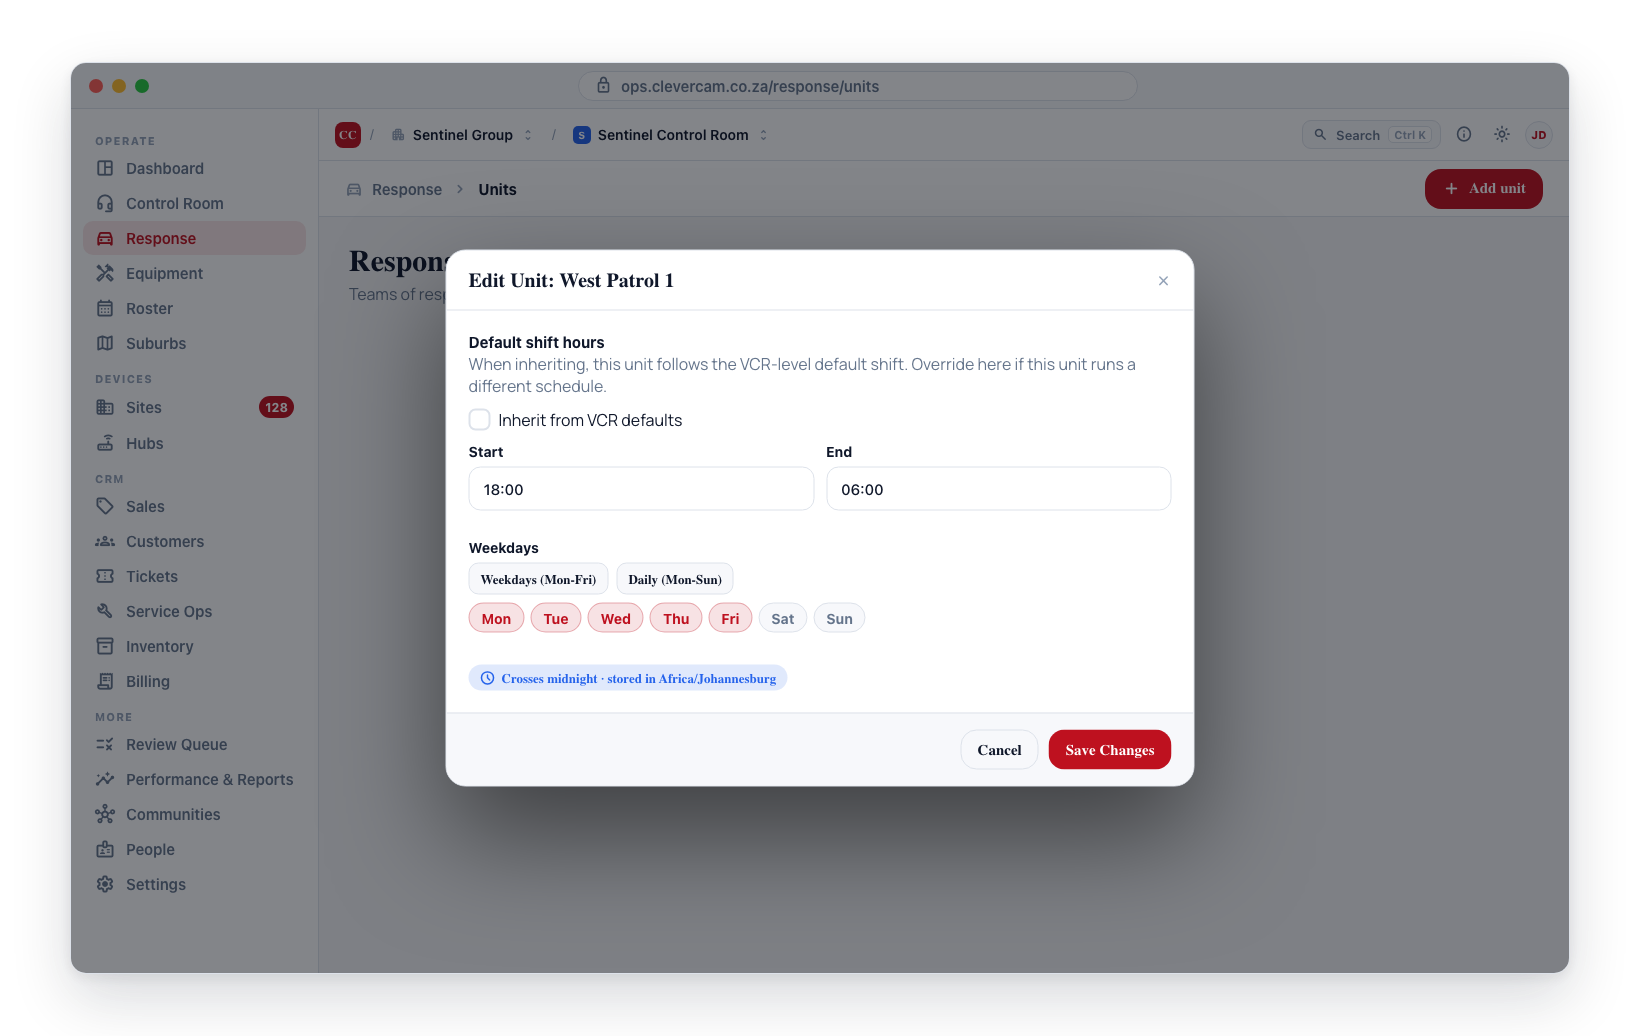
A unit can either inherit the control room clock or override it with its own values. Inheritance is the default for new units.
- Inherit control room clock -- The unit follows the duty window and days set on the Control room clock card under Settings → General. Both controls render with an "Inherited" badge so it is clear they are read-only.
- Override per unit -- Untick the inherit toggle to enter unit-specific values. Use this when a particular unit runs different hours (e.g. a dedicated night unit while the rest of the fleet runs days).
When you save a unit with Inherit control room clock turned on, the unit's own duty window and days are stored as NULL so it always picks up the latest control-room values, even if they change later.
Fields
- Duty window -- One time window holding both ends of the unit's duty, 24-hour, e.g.
06:00to18:00. It shows how long the window runs and flags Crosses midnight when the end is earlier than the start --18:00 → 06:00is a night unit, and that is correct rather than an error. - Weekdays -- The days the unit is on duty. Use the Weekdays (Mon-Fri) preset for a standard 5-day week or Daily (Mon-Sun) for round-the-clock coverage. Click the day chips to fine-tune. On a day that isn't selected, the unit reads as already off duty.
Duty times are read in the control room's configured timezone, set on the Control room clock. South African control rooms default to Africa/Johannesburg.
Duty hours gate dispatch for a response unit. Planning guard shifts -- patterns, posts, coverage demand and open-shift offers -- is the Roster module, a separate surface with its own data.
Editing a Unit
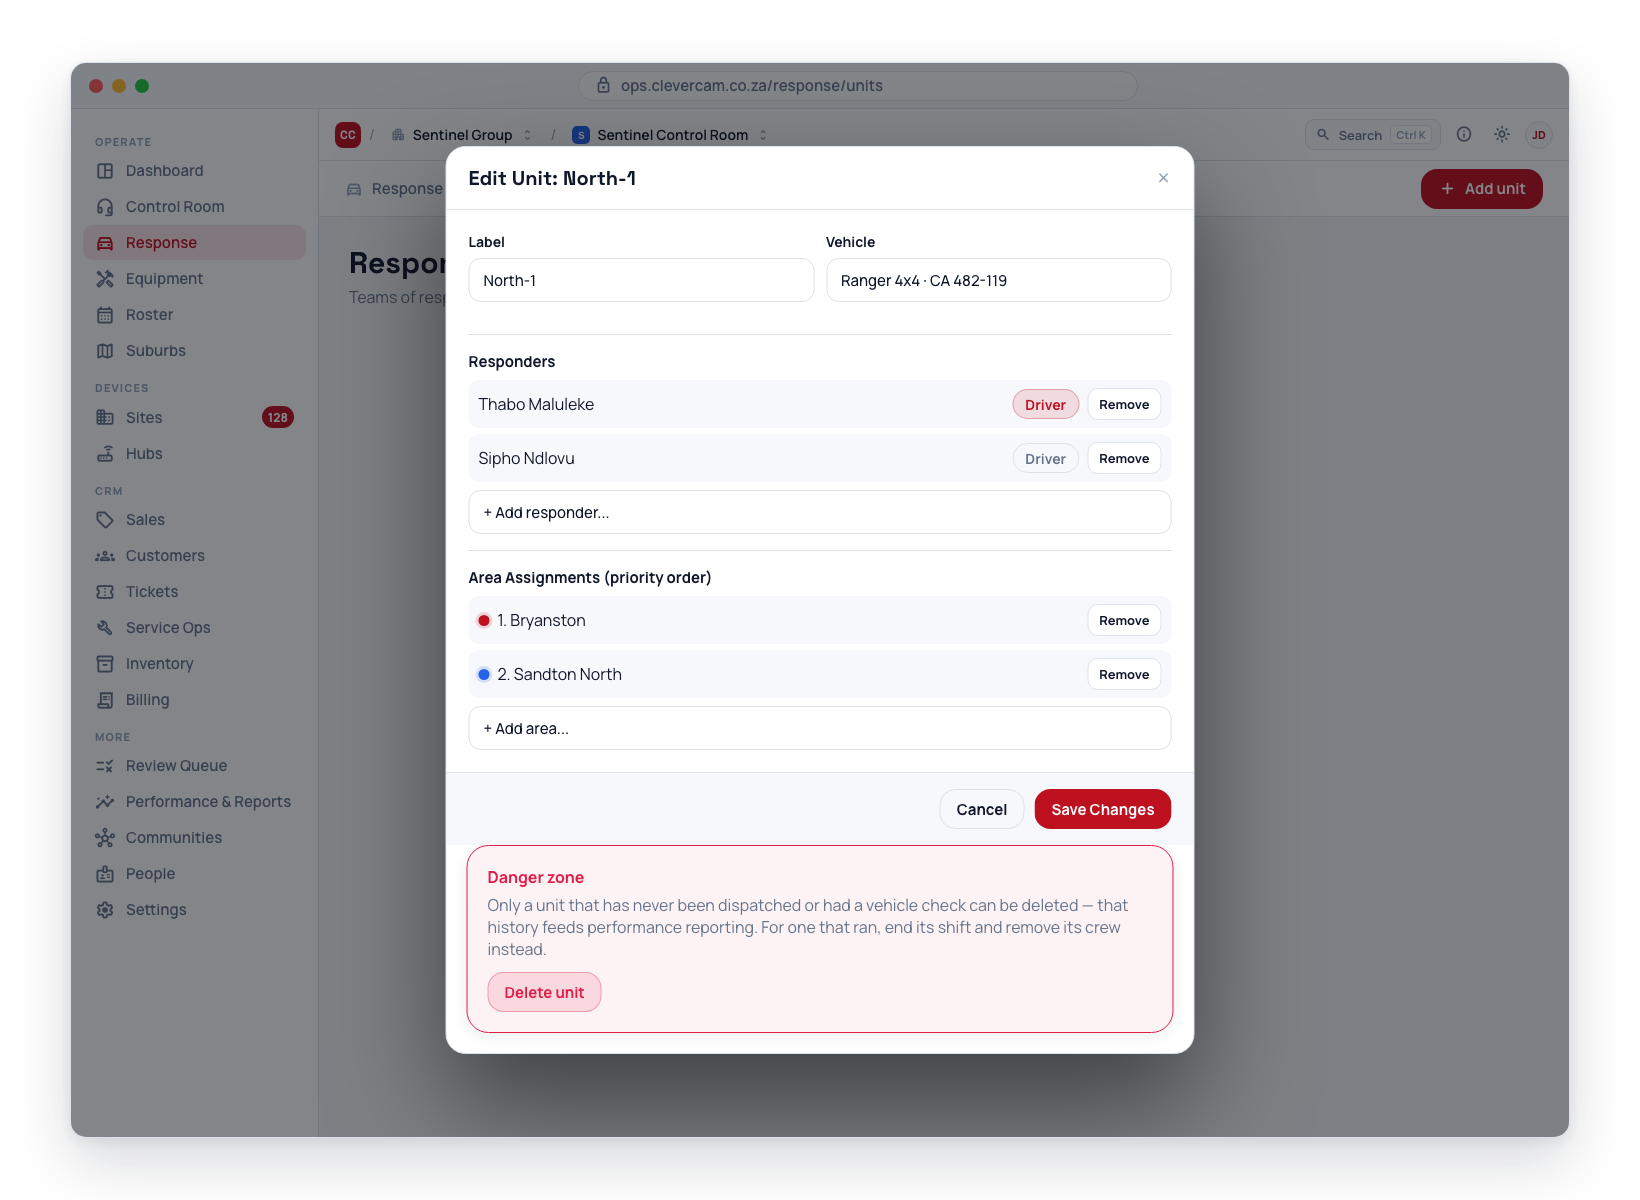
- Click on the unit name in the list.
- Update the responders, vehicle, suburb assignment, or other details.
- Click Save to apply changes.
Saving only rewrites the parts of the unit you actually changed — renaming a unit or swapping its vehicle leaves the regular crew and suburb assignments untouched.
Regular crew is membership, not duty
The Regular crew list in the edit dialog is who belongs to the unit. Changing it never clocks anyone on or off:
- Removing a regular takes them off the unit's row on the board; if they are on duty at that moment they stay on duty (as a guest) until clocked off.
- Adding a regular makes them appear as a dashed chip on the unit's row, ready for one-tap clock-on. People who already belong to another unit are not offered — a person has one regular unit. They can still work on this unit as a guest via the board's + Crew on… or a drag.
- Default driver marks who is normally the driver; each clock-on copies it onto that shift.
On-duty time itself is stored as a join/leave history, because responder performance reporting attributes each dispatch to whoever was actually clocked on at the time. Clocking off never deletes anything — past shifts and the dispatches ridden on them stay in reporting.
Deleting a Unit
Open the unit (click its card) and use Delete unit in the Danger zone at the bottom of the dialog. It removes the unit after a confirmation prompt, along with its responder and suburb assignments. There is no delete button on the card itself.
Only units with no operational history can be deleted. If the unit has ever been dispatched or has vehicle inspection records, CleverOps blocks the delete with a message — that history feeds responder performance reporting and the vehicle's inspection history. To retire a unit like that, clock its crew off and remove its regulars; it then sits off duty under the All tab.
How Unit Status Changes
Off Duty ↔ Available is derived from crew — clocking members on and off is the only way a unit comes online or goes offline. The dispatch statuses (Dispatched, En Route, On Scene, Returning) are managed by operators in CleverCommand as part of the dispatch workflow, exactly as before.
On CleverCommand's Units board the same rules apply: dragging a responder onto a unit is the clock-on, dragging them off (or the unit-level Clock crew off button) is the clock-off, and members past their expected shift end carry an amber Overdue badge there too. Each crew card shows since HH:MM — when that person's stint on the unit started.
For a shift change use the card's ⇄ hand over button (it appears on hover when somebody is in the unassigned pool): pick who is taking over and the outgoing person's stint closes on the same instant the incoming one opens — no minutes with nobody on the unit and no minutes with both on it, and a driver hands the driving over with the seat. Doing the same as two drags works, but leaves a small gap that the Roster's Attendance → Timeline will show as exactly that.
That Timeline (Roster → Attendance) is where these stints are read back: one lane per unit, one bar per person, a dot at every changeover saying whether the vehicle check was done. See Roster → Attendance → Timeline.
On Duty vs. All Units View
- On duty -- Shows only units that are currently online. This is the operational view for seeing what resources are dispatchable right now.
- All -- Shows every unit, including those off duty (with their regulars ready for one-tap clock-on). Use this view for crewing, administration and planning.
Suburb Assignment
A unit's suburb assignment determines which events it can be dispatched to:
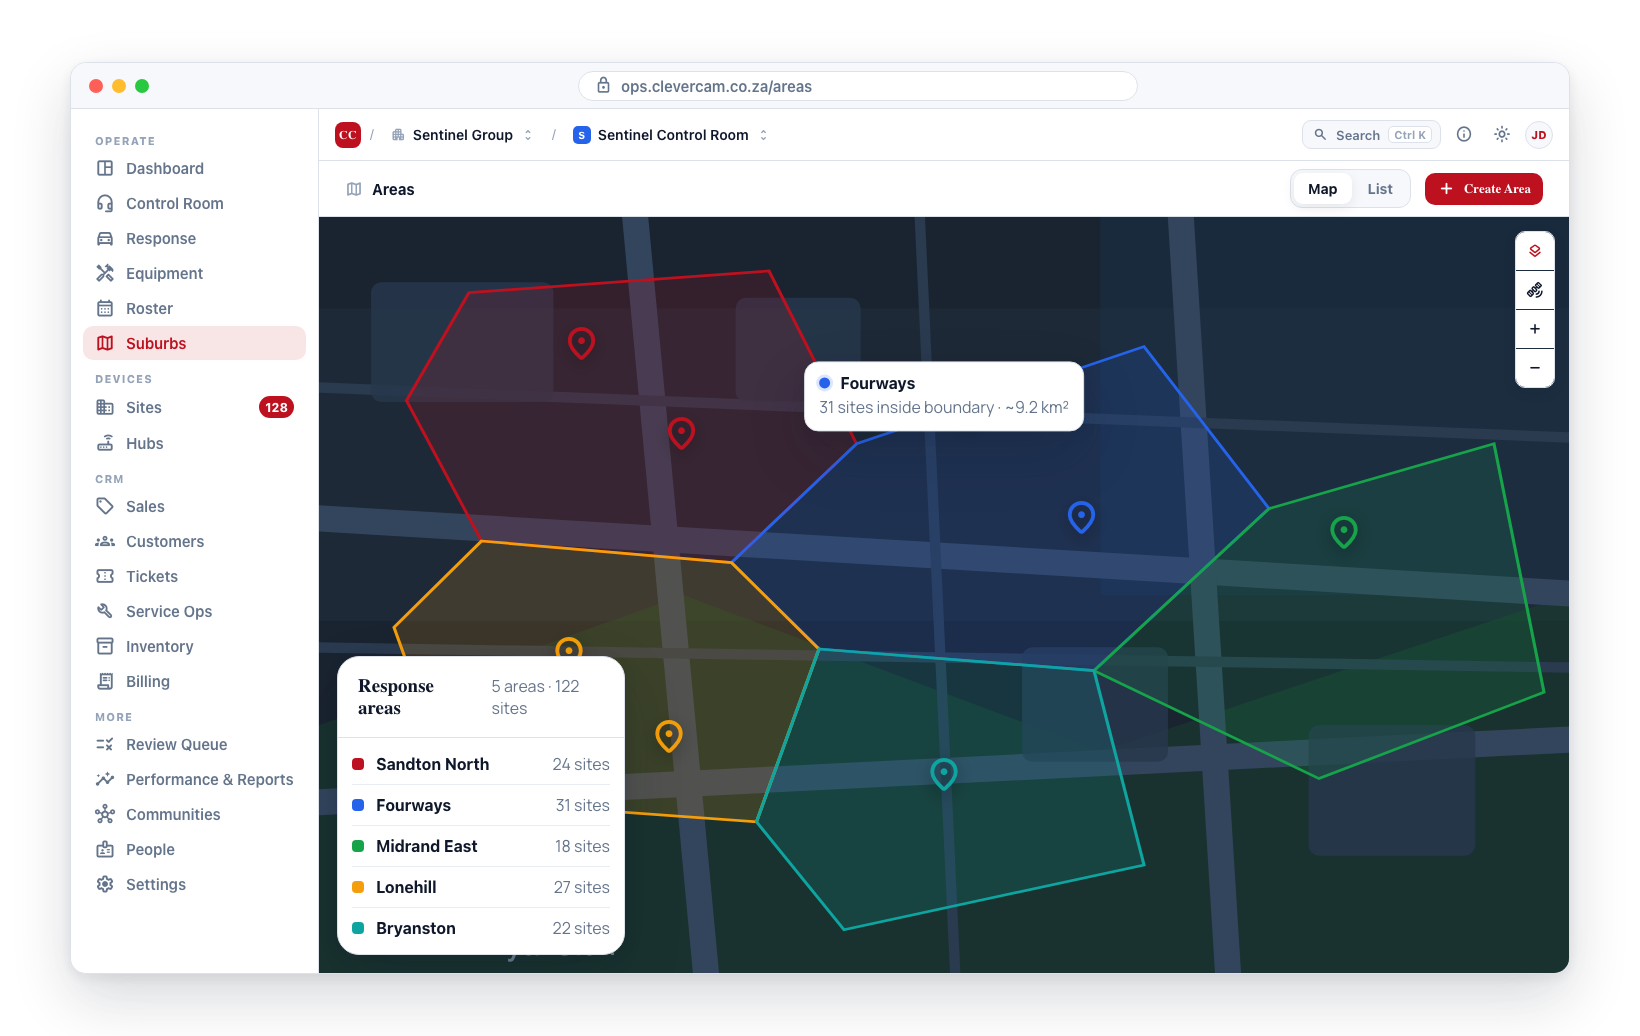
- Events at sites in Suburb A will be dispatched to units assigned to Suburb A.
- A unit can be assigned to multiple suburbs with a priority order.
- If no units are available in an event's suburb, the dispatch system may escalate or notify an operator for manual assignment.
Priority order and CleverCommand's P/S tags
The order of the suburb list in the unit dialog is the unit's coverage preference:
- The suburb in position 1 is the unit's primary patrol suburb.
- Every suburb after it is a backup (secondary) suburb, ranked in the order listed.
CleverCommand's Units board shows the same assignment as P / S tags: the priority-1 suburb carries the P tag and every backup suburb an S tag (a unit tagged in CleverCommand can carry more than one P). Retagging suburbs on that board moves them between the two tiers without disturbing the backup order you arranged here. The dispatch recommender uses the tiers when ranking units — units covering the event's suburb rank ahead of out-of-suburb units, and primary coverage ahead of backup coverage — and the CleverResponder app uses the same order to pick which suburb badge a call-out gets when patrol suburbs overlap.
Saving the unit dialog only rewrites the suburb list when you actually changed it — editing other unit fields (label, vehicle, shift hours) leaves the assignment untouched.
Make sure every suburb with active sites has at least one response unit assigned. A suburb with no units means events in that suburb cannot be automatically dispatched.
Suburb Watch and Pre-dispatch
A unit's suburb assignment also powers Suburb Watch in the CleverResponder app. When an emergency alarm reaches the control room at a site inside one of the unit's suburbs, the on-shift crew gets an automatic heads-up in their Suburbs feed and a push notification — separate from, and ahead of, any formal dispatch. Only emergency alarms are surfaced; non-emergency signals such as power failures, offline devices, and low-battery notices are excluded. (See CleverResponder → Suburb Watch.)
Mobile panics (CleverAlert's Location Panic feature) reach Suburb Watch the same way even though they have no site — the panic's live GPS coordinates at the moment it's sent are checked against each unit's suburb boundary, and a matching entry is tagged Mobile panic.
By default this heads-up is read-only — the crew can see it but takes no action. The Edit Unit dialog has an Suburb Watch section with a single toggle:
- Allow pre-dispatch from suburb heads-up — When on, this unit's crew can tap Pre-dispatch — I'm responding on a suburb heads-up to signal the control room that they are self-mobilising. This is a soft signal logged on the event timeline; it does not create a formal dispatch and does not move the unit through the dispatch workflow. When off (the default), the crew still receives the heads-up but cannot pre-dispatch.
Leave Allow pre-dispatch off for new recruits so a heads-up is never mistaken for a real dispatch — they still see every in-suburb emergency, they just can't act on it. Turn it on for experienced units you trust to judge when to start moving before the control room formally rolls them.
Best Practices
- Always have backup -- Assign at least two units to high-activity suburbs so dispatch is not blocked when one unit is already responding.
- Keep the regulars accurate -- When each unit's regular crew reflects reality, shift change is one tap per person from the Due to start strip, and the overdue nags mean stale shifts get noticed instead of running forever.
- Review unit composition -- Periodically check that units have the right number of regulars and that vehicles are in good condition.
- Monitor unit status -- During active operations, keep an eye on unit statuses to identify bottlenecks (e.g., too many units On Scene, not enough Available).