Dashboard Overview
The Home tab is your primary command center in CleverAlert. It gives you an at-a-glance summary of everything happening across your security system -- from the status of your camera groups to active events that need attention, upcoming schedule changes, and the health of your hubs. Every time you open the app, the Home tab is where you land.
If every site you belong to is a Panic App site (a panic-button-only service set up by your security company), the Home tab shows a stripped panic-only layout instead of the sections below — just the header with the emergency/panic button and a short reassurance. There are no cameras, groups, or schedules, and the Devices and Events tabs are hidden from the bottom bar. The Devices and Events tabs are hidden in the same way for community-only users (people whose sites only participate in communities, with no devices of their own).
Onboarding card
A newly created site opens with an Onboarding card at the top of Home: "Welcome to your Clevercam site. Your next step is to connect your cameras." Tap Click here to connect to open the camera setup flow, or tap the × in the card's top corner to dismiss it once you're set up. Dismissing is permanent for that site.
The card only appears when there is genuinely something to connect:
- Your site has a camera hub (CCU) linked — the card shows until you dismiss it.
- Your site is alarm-panel only — a third-party panel reporting through a communicator, with no CleverCam camera hub. The card is never shown, because there are no cameras to add.
- No hub is linked to your site yet — the card is not shown. Your security company links the hub first; the card appears once one is in place.
Dashboard Layout
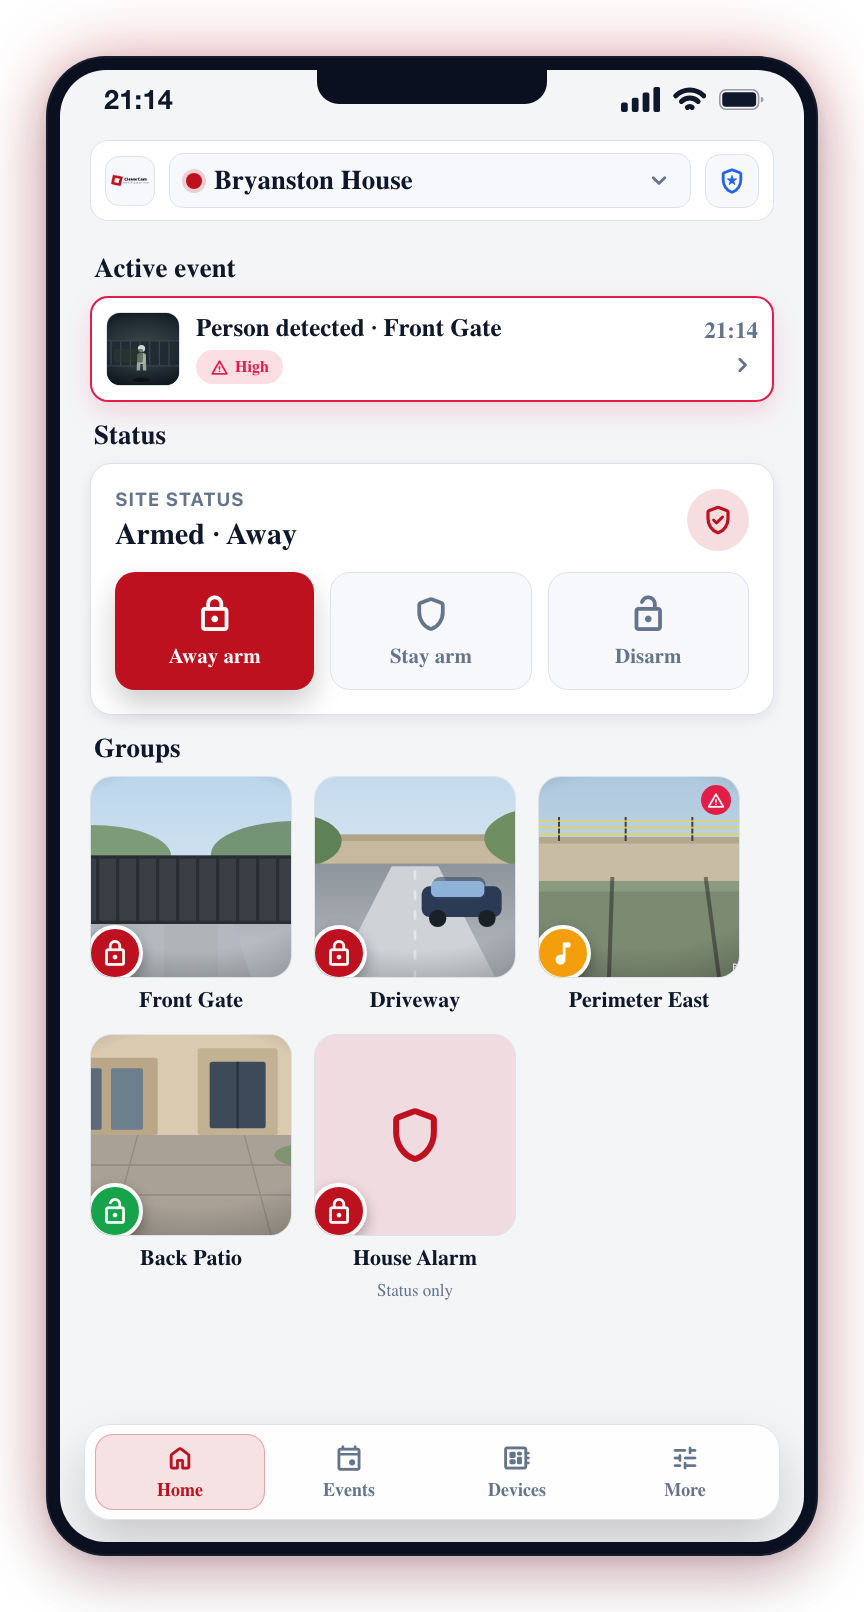
The Home screen is organized into the following sections, displayed vertically from top to bottom:
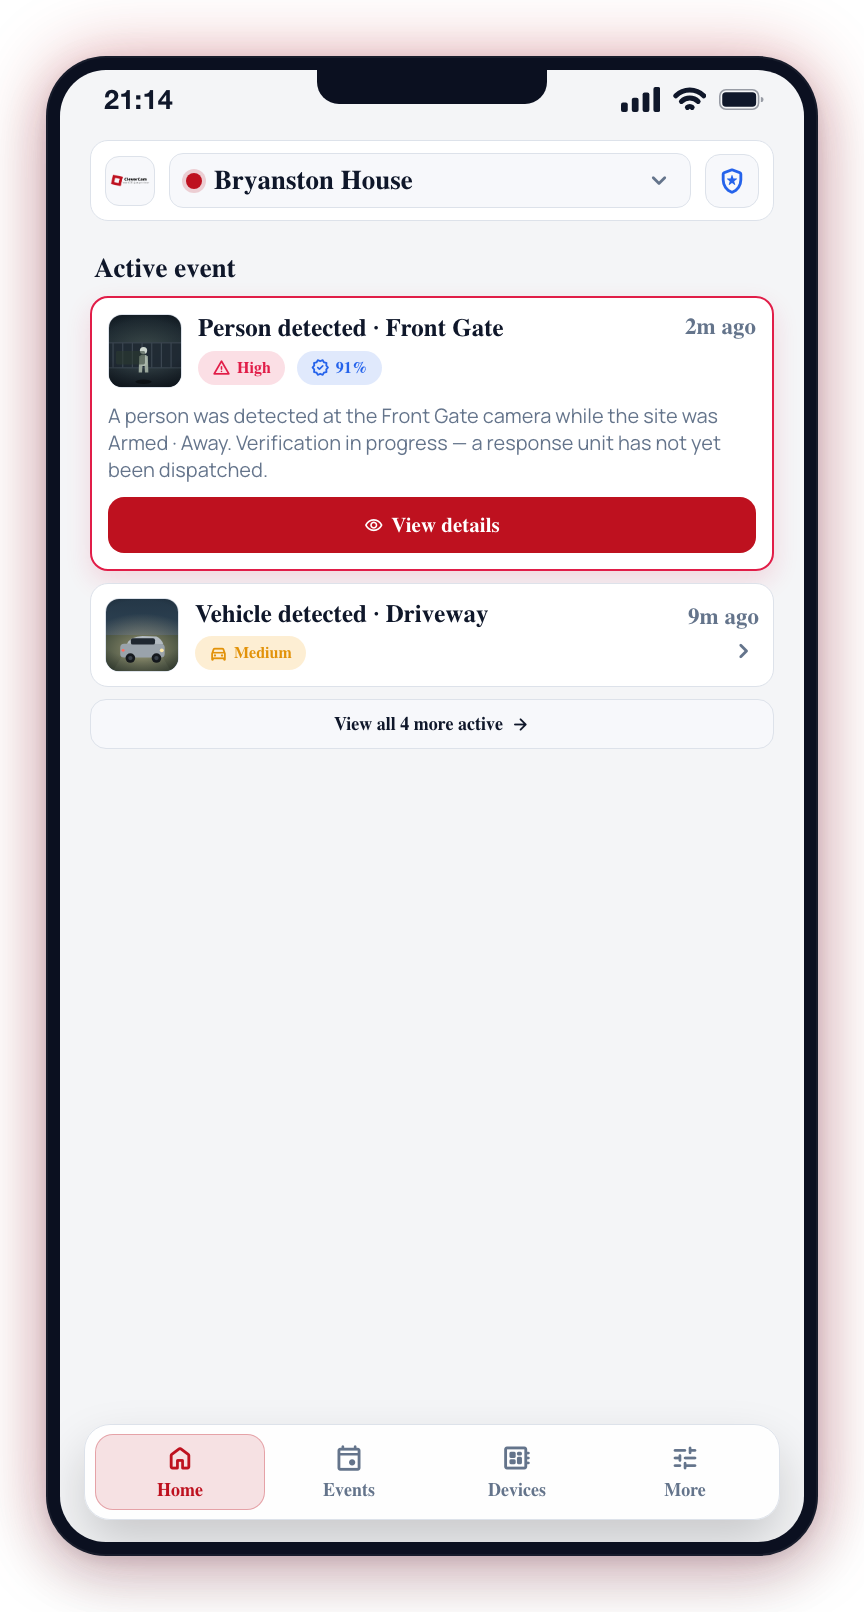
1. Active Events
At the top, a feed of active events shows any detections that require your attention. Each event card displays the camera name, detection type, timestamp, and confidence level. Tap an event to see its full details. See Active Events for more details.
2. Site arm tiles (Away arm / Stay arm / Disarm)
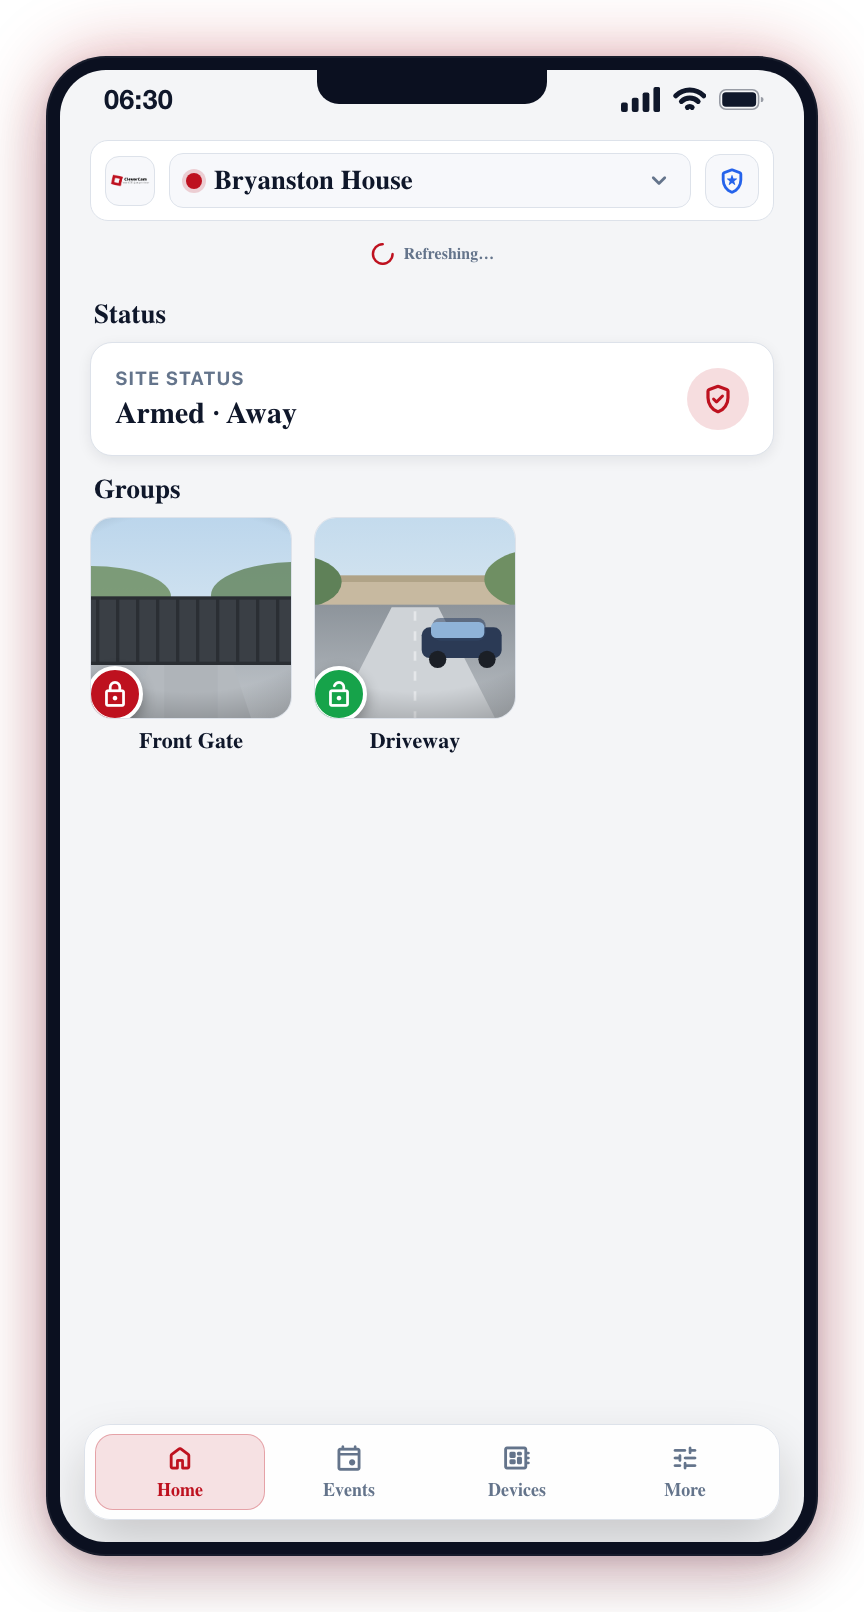
Below the active events, under a Site status heading, sits the site arm card — three tiles that always sit in the same places, so you can arm or disarm by position without reading:
- Away arm (left, lock icon) — arms everything on the site. The tile fills red while the site is away-armed.
- Stay arm (middle, shield icon) — sends a stay arm to every alarm area that supports it. Areas with more than one stay profile are skipped with a note to pick the profile from that area's group card; camera groups have no stay mode and are left untouched. The tile fills amber while a stay arm is active, and its label reads "Part arm" when only some areas are armed (mixed state) — the tap still always means "stay arm the site". On a site with no stay-capable areas, tapping it simply tells you so.
- Disarm (right, open-lock icon) — disarms everything. The tile fills green while the site is disarmed.
All three tiles stay tappable in every state. Long-press Away arm or Disarm to schedule the action for later instead of sending it now (the hint under the tiles reads "Hold Away or Disarm to schedule").
- An "Arm options" button — opens a bottom sheet with Away arm, Schedule arm, and Schedule disarm. The sheet also notes that the Stay arm tile arms every stay-capable area — tap a group on Home to stay arm just one.
- Attribution line — at the foot of the card, "Armed by <name> · <time>" answers "did anyone arm last night?" without opening the event feed.
Alarm areas reported by your panels appear as group cards in the Groups section below, where each can be armed or disarmed individually.
Arming the Whole Site
The Away arm tile (or Away arm in the Arm options sheet) arms everything at once. What it actually sends depends on what your site has:
- Camera hub only -- the arm command goes to your camera hub. There is no alarm panel involved, so nothing waits on a panel to confirm and you will not be asked to check one.
- Alarm panel (or panel plus cameras) -- the command also fans out to every controllable alarm area. Each area shows a spinning ring while its panel works through the command; panels handle one area at a time, so a multi-area site can take a few seconds per area.
You get one confirmation when the command has been sent ("Site is arming..." / "Site is disarming..."). If a panel never reports back, that area's ring clears and a separate warning tells you the command was sent but the status is not confirmed -- check the panel keypad in that case. Areas on monitor-only communicators are skipped entirely, because CleverAlert cannot send them commands.
3. Groups
Camera groups are displayed as color-coded cards:
- Red (lock icon) -- Armed and actively monitoring.
- Yellow (music note icon) -- Chime mode active.
- Green (open lock icon) -- Disarmed.
Tap any group card to quickly arm or disarm it. See Groups for more details.
When the site has no groups yet, the empty message matches what your site actually has:
- A site with a camera hub reads "Add a camera to create a group."
- An alarm-panel-only site reads "No alarm areas yet — Areas your alarm panel reports will appear here."
- A site with no devices at all reads "Connect a hub to get started."
4. Favorites
Cameras, zones, alarm areas, triggers, and emergency shortcuts that you have starred appear here as quick-access tiles. Cameras display as larger cards with status indicators; zones, alarm areas, triggers, and emergency shortcuts display as compact cards with live state indicators.
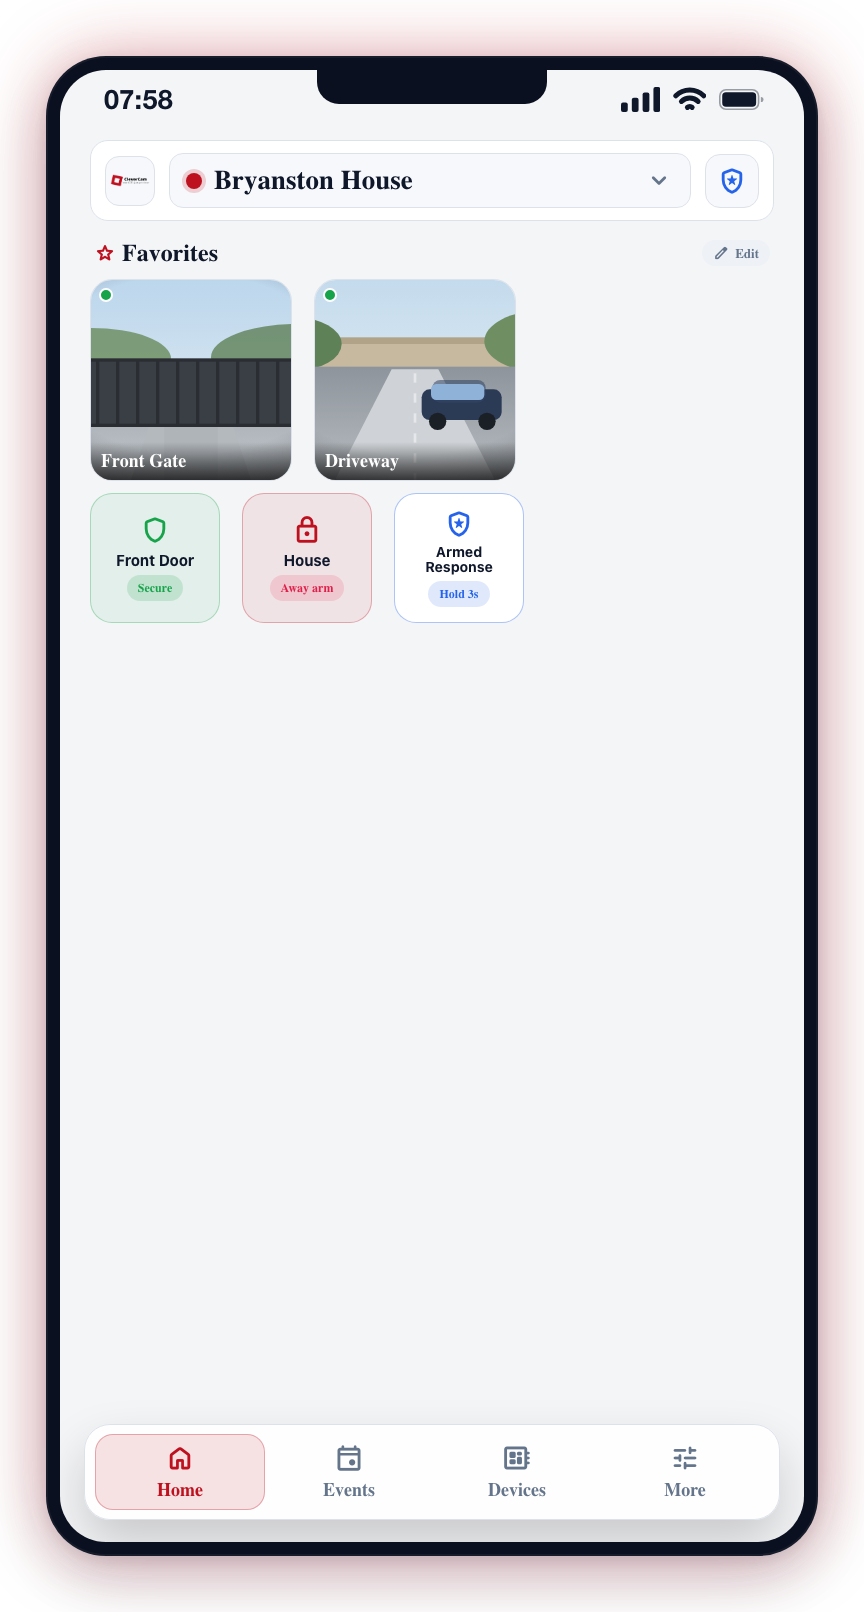
Favorites are linked to your account, so they appear on all your devices. Changes show up instantly -- no app restart needed.
Adding favorites:
- Cameras, zones, alarm areas, triggers: open the Devices tab and tap the star icon on the item you want to favorite.
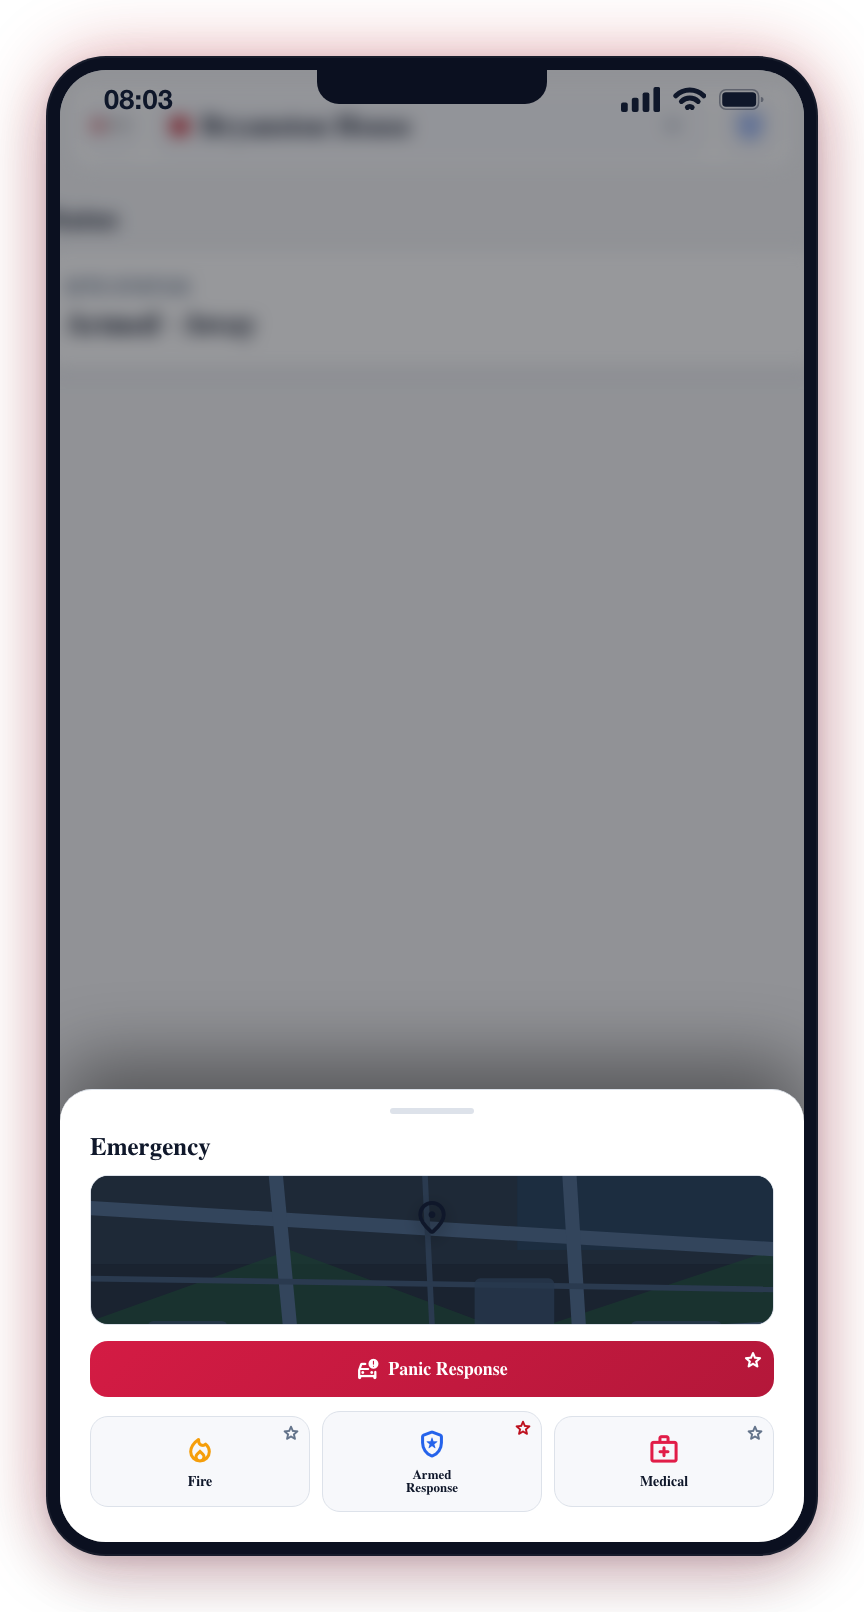
- Emergency shortcuts (Panic, Fire, Armed Response, Medical): open the Emergency panel (the emergency button in the app header — it is available on every tab) and tap the star in the corner of the emergency button you want on your home screen. The Panic Response button at the top of the panel can be favorited the same way as the smaller Fire, Armed Response, and Medical tiles below it.
What tiles can do: Each favorite tile reflects the capabilities of its own hub. A zone or trigger tile for a device that does not support remote control will display the current state for information only -- there is no tappable action on that tile. Tiles only show an interactive action when the underlying hub can actually carry it out. This means you will not tap a tile and get no response -- if a tile looks tappable, it will do something.
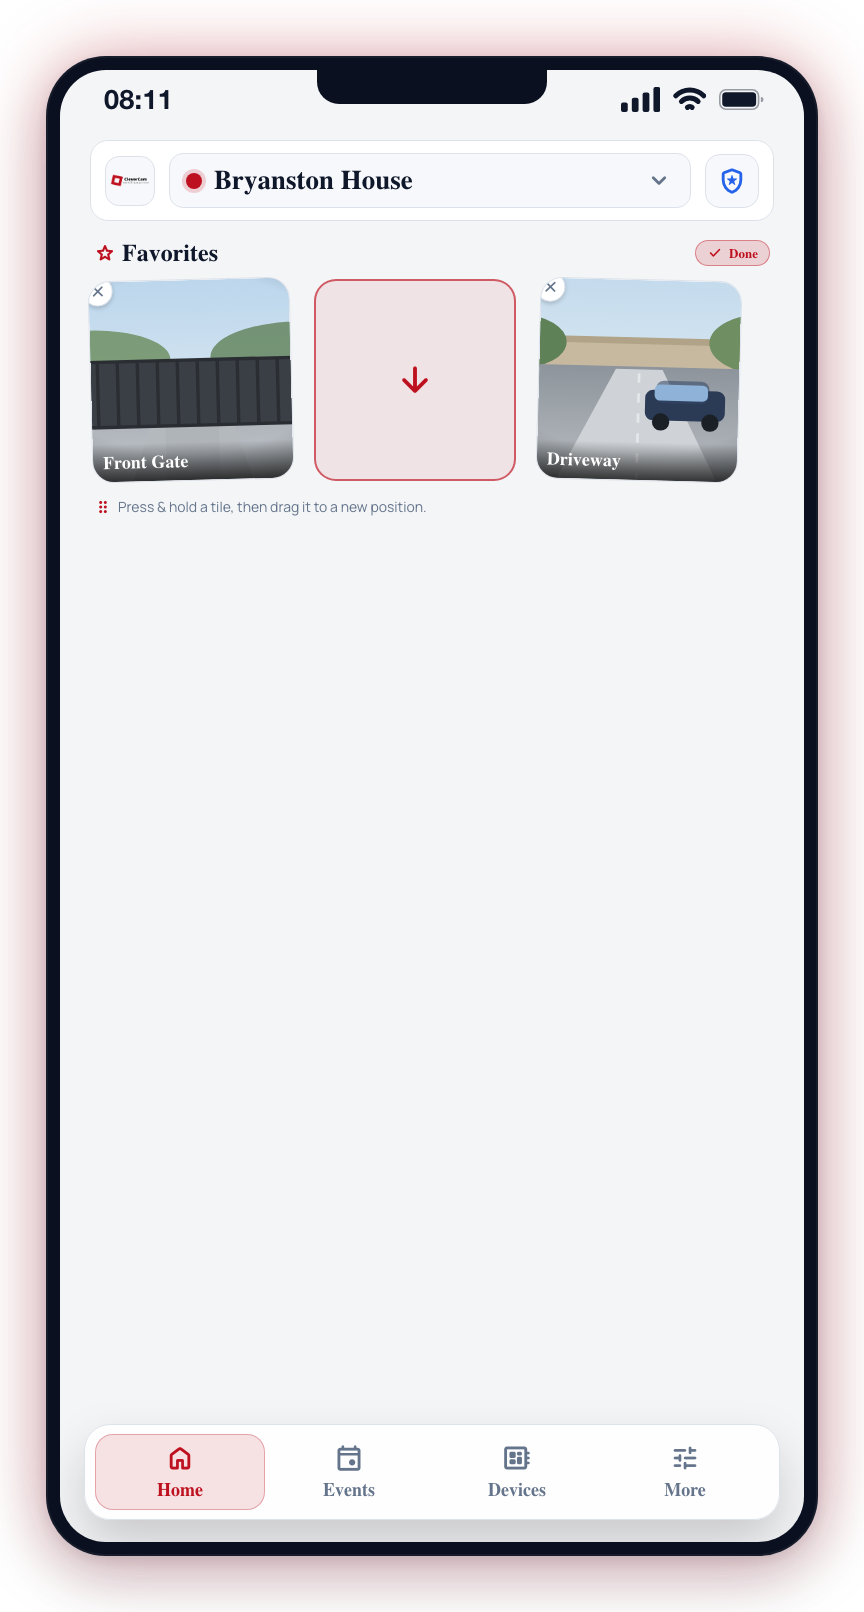
Reordering favorites: tap Edit in the top-right of the Favorites section to enter reorder mode. Tiles start wiggling and taps on them are disabled so you do not accidentally trigger anything while rearranging. Press and hold any tile briefly, then drag it to a new position -- a dashed slot shows exactly where it will land before you release. Tap Done to exit reorder mode. (The Edit button only appears when you have two or more favorites.)
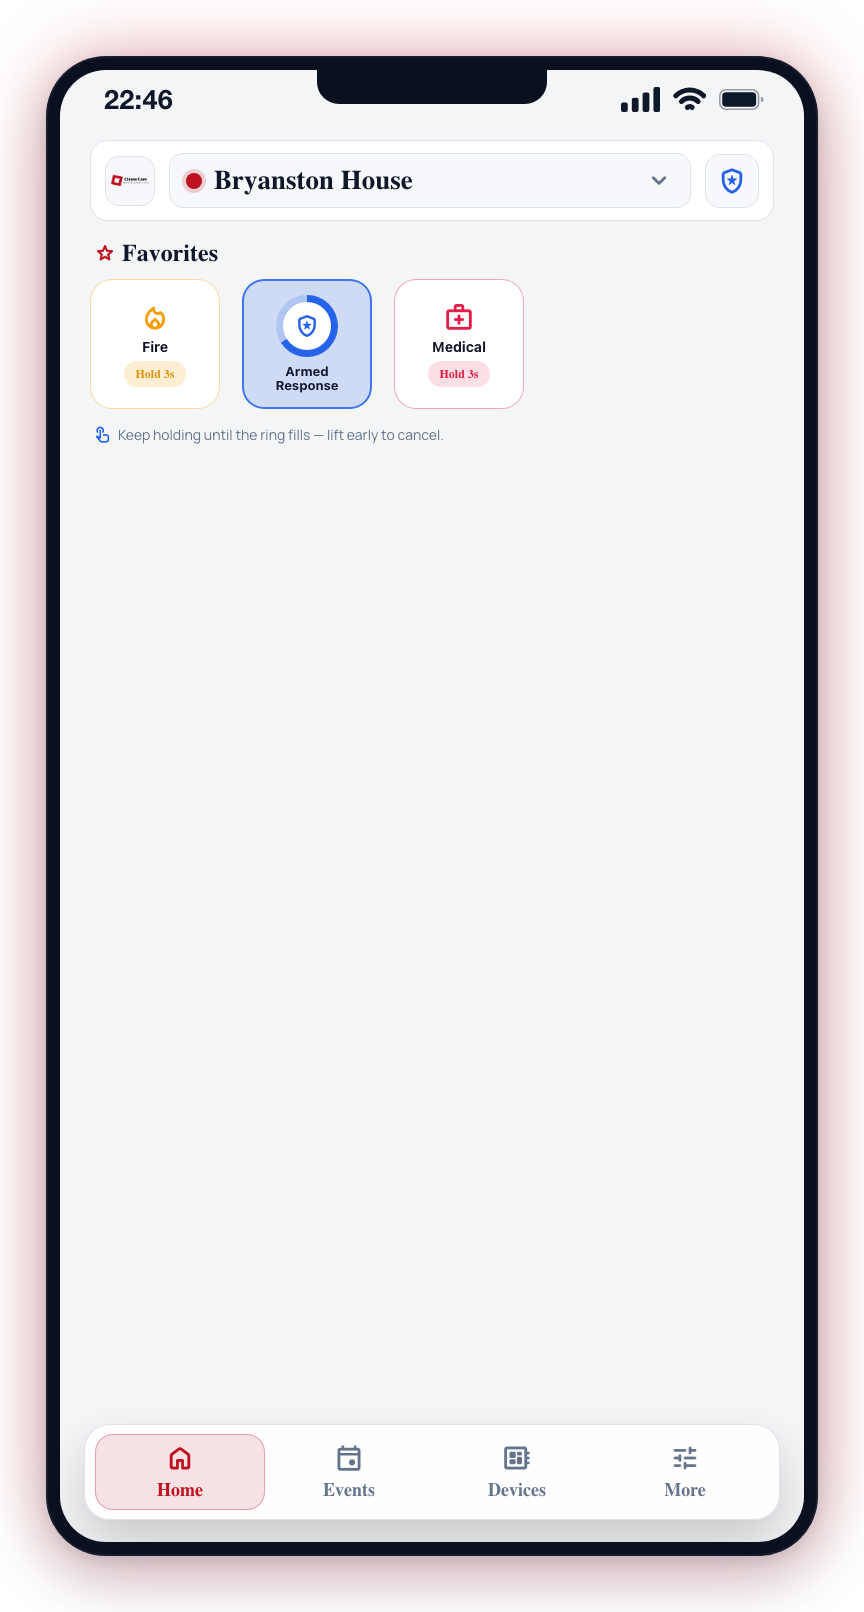
Triggering an emergency from Home: for safety, emergency favorites on the home screen require a 3-second press-and-hold (a progress ring fills around the icon). Lifting early cancels the action. This prevents accidental pocket-taps from dispatching emergency services. The same shortcuts in the Emergency panel remain single-tap. Emergency tiles cannot fire while in reorder mode -- tap Done first.
5. Schedules
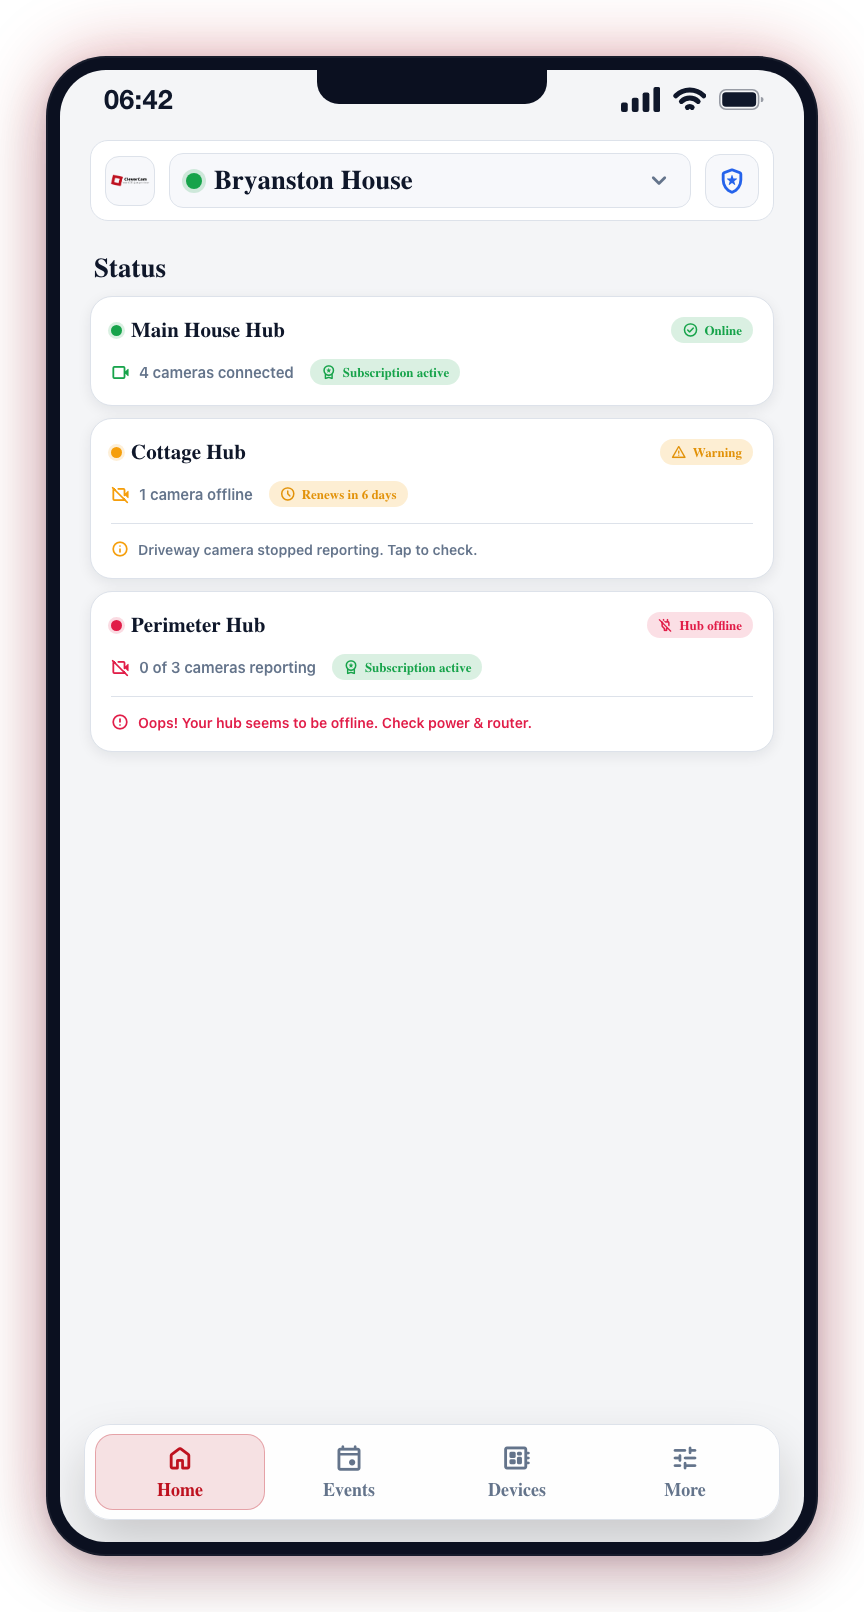
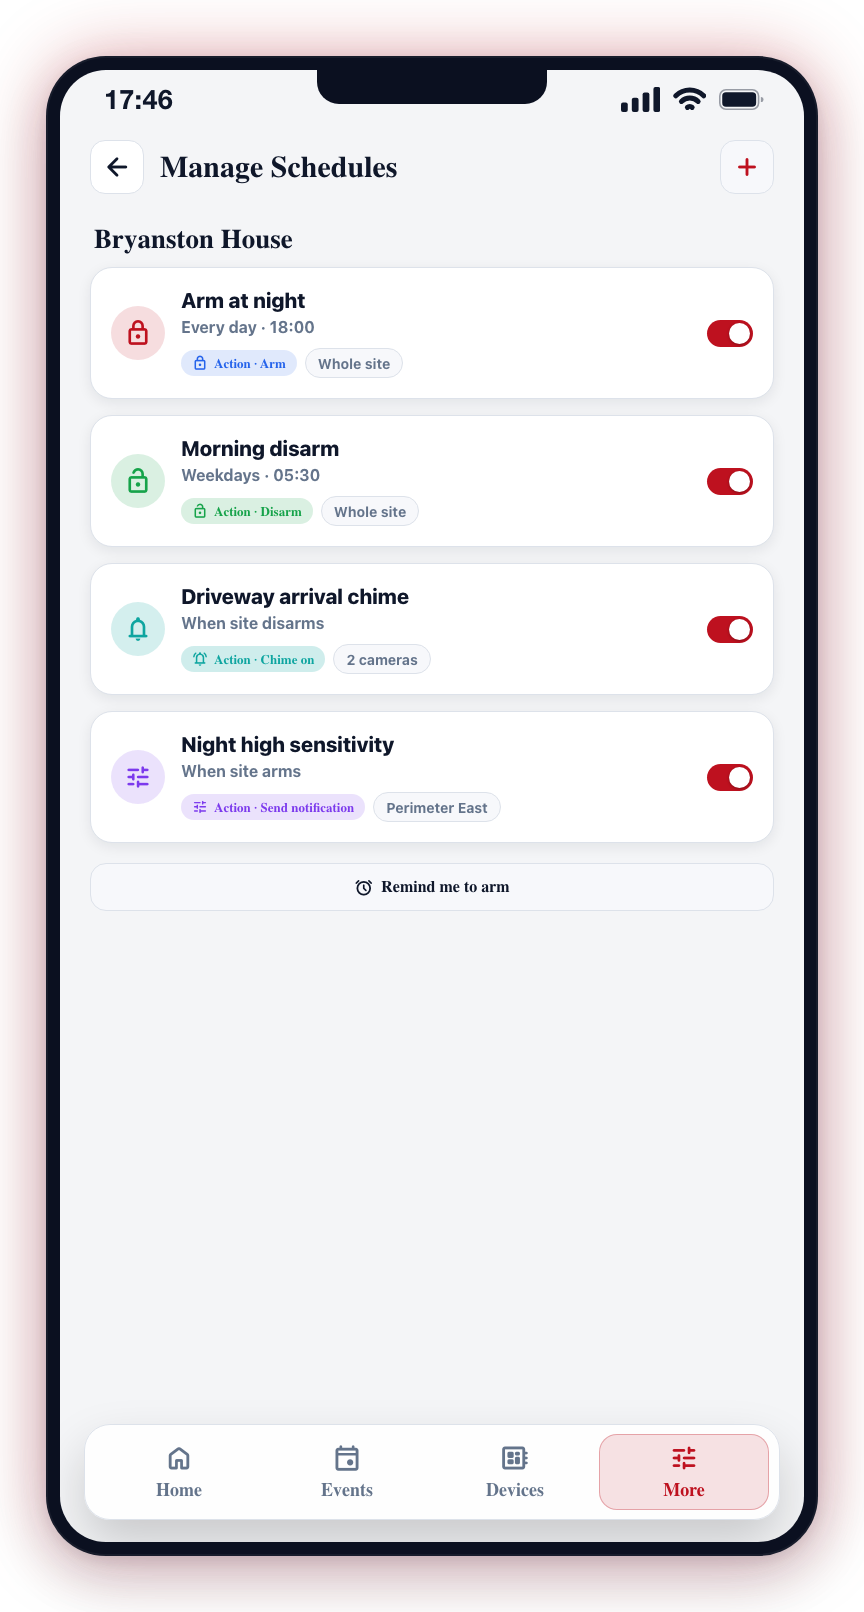
Upcoming schedule changes are shown at the bottom for quick reference. See Schedules Overview for details on schedule management.
6. Service visits
When your security company has a technician visit booked for your site, an upcoming service visit card appears on Home. It's read-only — a heads-up so no-one is caught off guard when a technician arrives.
- Within the next 24 hours (or while a visit is happening), the card is pinned near the top with a highlighted border. Further out than 24 hours, it sits lower down as a quiet single card.
- The card shows what the visit is for, when it's scheduled, and the technician's first name when one is assigned. How the time is phrased depends on how firm it is: an exact booking reads "Tomorrow at 10:00", an estimated one reads "Tomorrow, around 10:00 (estimated)", and a morning/afternoon/evening booking just says "Tomorrow morning" — techs don't always know the precise time, and the app is upfront about that rather than showing a made-up o'clock.
- On the day, it follows the technician live: "Technician on the way · ETA ~20 min" → "Technician on site" → "Visit complete".
- If your company has confirmed the appointment or a reschedule has been requested, a small Confirmed or Reschedule requested chip is shown.
The card only appears when there's an actual upcoming visit, and only for people connected to that site. You'll also get a push reminder before a booked visit — see Push Notifications.
Today the card is informational. Confirming or requesting a reschedule from inside the app is a later addition — for now those happen from the link in the reminder email/SMS your company sends.
7. Late to close
If your security company uses Late to close for your site and the premises is still open past its scheduled closing time, a Late to close card is pinned near the top of Home once the keyholders have been notified. It reads "Still open past closing time" with the scheduled closing time, and stays for as long as the site is open.
- Tap Respond to open the response page inside the app. The options are the same ones the WhatsApp/SMS link offers: I'll close within 30 / 60 / 120 minutes, It's already armed / closed, Report a technical fault, Please phone me, or Send help.
- Once you have said you're closing later, the card reads "Closing later — noted" with the time you gave, and the button becomes Change my answer.
- The card disappears the moment the site is armed, or when the control room takes the late close over.
None of the buttons arm or disarm the panel — they only tell your control room what is happening. The same notice also arrives as a push notification; tapping it opens the same response page (see Push Notifications).
8. Feedback card
Every so often Home asks one question: "How likely are you to recommend CleverCam to a friend or colleague?" It is how CleverCam keeps track of whether the app is getting better or worse for the people who use it.
The card only appears once your account is more than 30 days old, and then at most once every 6 months — answering it puts it away for the next 180 days. It sits in the lower part of Home, below the news carousel.
- Tap a number from 1 (Least likely) to 10 (Most likely).
- A "Thanks! Any comments?" dialog opens showing the score you gave. Type a comment if you have one and tap Send, or tap Skip to send the score on its own.
- The card disappears and a "Thanks for the feedback!" message confirms it was saved.
Your score and comment go to CleverCam only — they are not published anywhere.
Being asked for a public review
If you gave a 9 or a 10, one more thing follows straight after your score is saved: the app asks you for a public review. A public review helps a great deal, so this is where we ask for one — and only a 9 or a 10 is ever asked. Any other score ends at the thank-you message.
What you are asked about depends on which app you use:
- Your security company's branded app (the white-label apps) only ever shows your phone's own store rating sheet — the small "Enjoying the app? Tap a star to rate it" pop-up from the App Store on iPhone or Google Play on Android. It rates that branded app, you never leave the app, and Not Now closes it.
- The main CleverAlert app takes turns between three places, one per ask: the same store rating sheet, "Rate us on Google?" and "Review us on Facebook?". For Google and Facebook, tap Yes, rate us / Yes, review us to open that review page in your browser (or the Google Maps / Facebook app), where you leave the review under your own account — or No thanks to close it. Nothing else happens.
A few things are deliberate:
- One place per ask, taking turns. You are never asked about two places at once. The next time you rate (six months later at the earliest) it is the next place's turn.
- Never a page you have already opened. Once you have tapped Yes and been taken to the Google or the Facebook page, the app does not ask you about that page again. Tapping No thanks is not permanent — that page can come round again on a later rating, after the others have had their turn.
- The store rating sheet belongs to your phone, not to the app. iPhone and Android decide whether it actually appears — an iPhone shows it at most three times a year, and not at all if you have switched off In-App Ratings & Reviews in your App Store settings — so after a 9 or 10 you may sometimes see nothing. The app puts no question of its own in front of it, and it is never told whether you left a rating.
- CleverCam's Google and Facebook pages are for the main CleverAlert app only. A white-label app never sends you there.
Pull to Refresh
To manually refresh all dashboard data:
- Scroll to the top of the Home screen.
- Pull down with your finger.
- Release to trigger a refresh.
- All sections will reload with the latest data from your site.
Get in the habit of checking the Home tab when you first open the app each day. The group badge colors give you an instant visual indicator of your system status -- red lock badges mean the group is armed and actively monitoring.
The dashboard updates automatically when events are received via push notification. You can also pull to refresh at any time to force an update.