Assets
Vehicles, firearms and trackers each have their own tab because each one carries things nothing else does — fuel and odometer readings, SAPS licences, live GPS telemetry. Assets is the tab for everything else: fire extinguishers, gate motors, electric fence energisers, radios, guard kit, safes, K9s, panic buttons, and anything else your control room wants on a register.
Rather than waiting for CleverCam to build a tab per equipment type, you define the categories yourself. A category says what an asset of that kind records and how it gets inspected, and every asset you register against it inherits both.
Assets is an optional module. If you don't see the tab, ask CleverCam to enable it for your control room. The register has its own pair of capabilities — assets are not fleet: Manage assets (the Asset manager role) runs everything on the tab, while Inspect assets (the Asset inspector role) can read the register and run inspections but not change it. Company owners always qualify.
How it fits together
- An asset category is the type you define — "Fire extinguisher", "Gate motor", "K9". It carries a code prefix, a set of custom fields, an inspection checklist and an inspection frequency.
- An asset is one instance of a category — a specific extinguisher on a specific wall, with its own code (
FE-0001), its own field values and its own inspection history. - An inspection is one run of a category's checklist against one asset. It is scored, it passes or fails, and a pass books the next one automatically.
Categories are configured in Settings → Asset categories. The register itself lives in Equipment → Assets.
Setting up categories
Go to Settings → Asset categories.
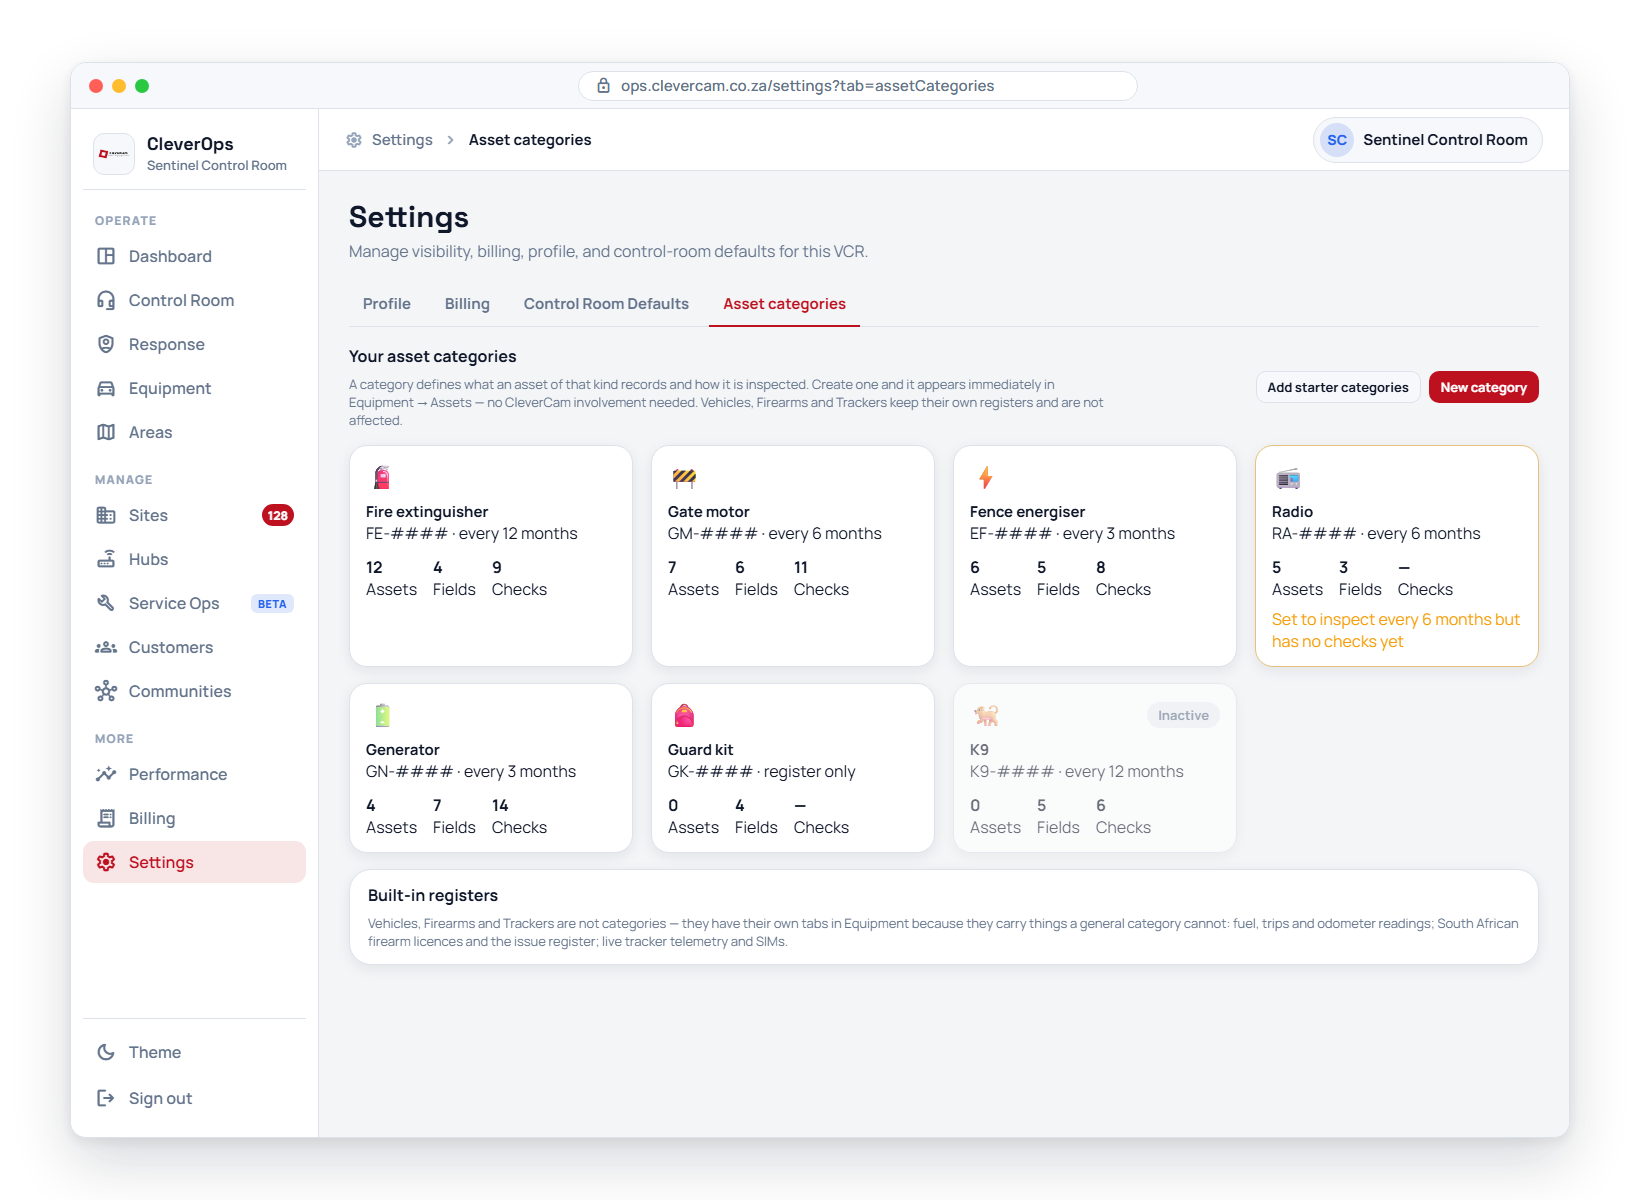
The starter pack
On an empty catalogue, click Install starter pack. It creates eleven categories a South African security company typically has, each with real fields and a working checklist:
Fire extinguisher · Gate motor · Fence energiser · CCTV camera · Alarm panel · Generator / UPS · Two-way radio · Guard kit · Safe / strongroom · K9 · Panic button
Everything in the pack is fully editable — rename a category, change its fields, rewrite its checks, delete the ones you don't need. Installing again later only adds categories you don't already have; it never overwrites your edits.
Creating a category yourself
- Click New category.
- Enter a name and a code prefix (e.g.
FE). Assets in this category are numberedFE-0001,FE-0002and so on. - Pick an icon — it identifies the category throughout the register.
- Click Create category. The editor then opens its three sections.
Identity & cadence
- Frequency — how often assets in this category are inspected: weekly, every 2 weeks, monthly, quarterly, every 6 months, annually, or never (a register-only category with no inspections).
- Pass threshold — the weighted score an inspection needs to pass. Leave it at 100% to require every check to pass.
- Auto-schedule the next inspection — a passing inspection books the next one at the frequency above. A failed inspection deliberately does not reschedule: the asset stays overdue until someone passes it.
- Require a signature — the inspector signs off before the run can close.
- Enforce check order — checks must be answered top to bottom.
- Allow inspection without scanning the tag — turn this off to force a QR scan, so an inspection proves someone physically stood in front of the asset.
- Active — inactive categories stay on existing assets but can't be chosen for new ones.
Custom fields
The fields captured on every asset in this category. Six types: Text, Number, Date, Date & time, Yes / no, and Pick from a list (enter the options as a comma-separated list). Mark a field Required to make it mandatory when registering an asset.
Inspection checklist
Each check is one line item, with four settings that decide how it behaves in the field:
- Answer — Pass / fail, Pass / fail / N/A, a numeric reading, a text answer, or a pick list.
- Note and Photo — each can be Not required, When defective, or Always. When defective is the useful default: a passing check is a single tap with nothing to fill in, and the moment it fails the inspector is required to say what's wrong. Evidence gets captured exactly where it matters and nowhere else.
- Critical — if this check fails, the whole inspection fails, whatever the score. Use it for the things that genuinely mean the equipment is unsafe or not working: a pressure gauge in the red, an alarm panel that doesn't report to the control room, a gate motor whose safety beams don't stop it.
- Skippable — the inspector may skip the check. Skipped items are excluded from the score entirely, so skipping can neither help nor hurt the result.
Edits apply to the next inspection. Runs already completed keep the wording they were answered against, so history stays honest when you rewrite a checklist.
The asset register
Go to Equipment → Assets.
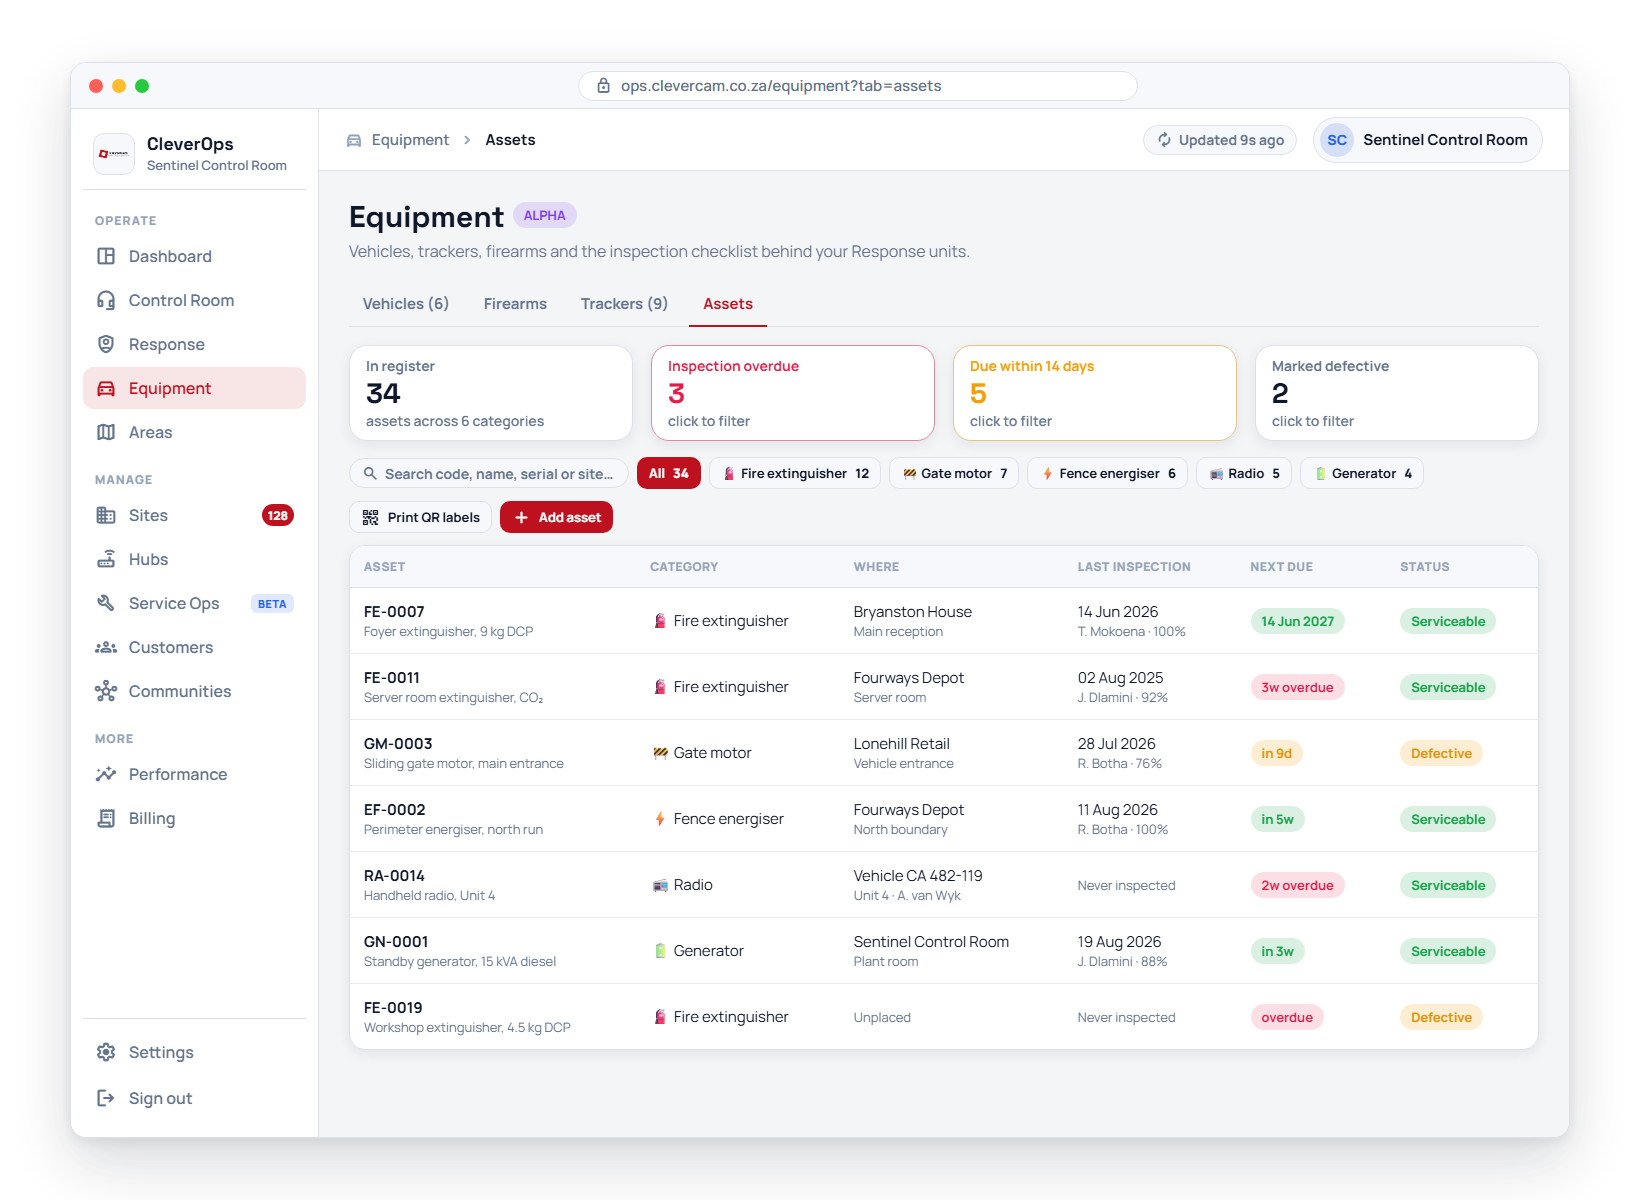
Four tiles across the top summarise the register, and three of them are also filters — click one to narrow the list, click it again to clear:
- In register — total assets
- Inspection overdue — past their due date
- Due within 14 days
- Marked defective
Below them, a search box (code, name, serial, site or category) and a chip per category. Each row shows the asset code and name, its category, where it is, its last inspection result and score, when the next one is due, and its status.
Registering an asset
-
Click Add asset.
-
Choose the category first — the form fills in from there, showing the code the asset will get, how often it will be inspected, and the category's own fields.
-
Give it a name / description and a serial number if it has one.
-
Say where it lives — five options, in the order a security company actually uses them:
- At our branch — the office, control room or yard the branch runs from. This is the default, because most of a control room's own equipment lives on its own property. If you have branches set up, pick which one; if you don't, leave it as is and the asset is simply recorded at your office.
- On a vehicle — mounted in or carried by a fleet vehicle. A fire extinguisher, first-aid kit or jump pack in a response vehicle belongs here, not at a "site".
- At a customer site — installed on a monitored property. Search for the site.
- Issued to a person — carried by a guard, responder or technician. This is where radios and guard kit go.
- Not deployed — in the box, awaiting installation or issue.
Whichever you pick, Where exactly takes the detail — "reception wall, next to the fire door", "boot, driver-side bracket". Changing the kind of home clears that note, since it described the old one.
An asset is in exactly one of these places at a time; the database enforces it, so the register can never show two conflicting locations for the same thing.
-
Fill in the category's fields. Required ones are marked with an asterisk and are named explicitly if you try to save without them.
-
Click Register asset. It gets the next code in its category and its workspace opens.
Branches
Branch here is the same branch the rest of CleverOps uses — the one you already split responders, technicians and units by, set up under Areas → Branches. That is deliberate: a branch is defined by resources not being shared across it, its own vehicles and its own crew, and equipment is one of those resources. There is no separate list of premises to maintain.
Only branches you have named appear. The catch-all branch used for routing is not a place, so it is never offered. Control rooms that run from one office have no named branches at all and simply never see the picker — their assets are recorded as being at the office.
Don't confuse this with customer sites, which are the monitored properties on the Sites page — someone else's premises, and the third option in the list.
Printing QR labels
Every asset gets a QR tag when you register it. Stick the printed tag on the equipment and anyone can scan it to pull the asset up — no hunting through the register for the right extinguisher.
A batch: click Print QR labels above the register. It prints a label for every asset currently showing, so filter first — by category, by status, or with the search box — and the button follows that filter. The label count appears on the button when a filter is active.
A single tag: open the asset and click Print tag in its header. Useful when a label gets damaged or an asset is added on its own.
Either way a dialog opens where you choose:
- Label size — three sizes matched to common A4 label sheets: 24 per sheet (63.5 × 33.9 mm, Avery L7159), 14 per sheet (99.1 × 38.1 mm, Avery L7163), or 8 per sheet (99.1 × 67.7 mm, Avery L7165). A preview of the first label updates as you change it, so you can see whether a long asset name still fits before committing a sheet of adhesive labels.
- Show cut guides — a dashed outline around each label. Leave it on for plain paper, turn it off when printing onto pre-cut label stock.
- Print your control room's name on each label — worth having when the asset sits on a customer's premises.
- Skip used labels — start at position 3, 7, or wherever, so a part-used sheet can go back through the printer instead of being thrown away.
Then click Print. Your browser's print dialog opens — choose your printer, or pick Save as PDF as the destination if you want a file to send to a print shop.
What the QR contains
An asset's QR encodes a link back to that asset in CleverOps. Scanning it with any phone camera opens the asset's workspace (you'll be asked to sign in if you aren't already). That means a guard or technician standing at a fire extinguisher can pull up its inspection history, its details and its next due date without knowing its code.
The asset workspace
Click any row to open it. The header shows the asset, its status and an Inspect now button; below it a banner tells you when the next inspection is due. Three tabs:
- Details — the category's fields (click Edit to change them), a Where it lives card with a Move button for when an asset changes hands or vehicles, plus the QR tag, registration date and a status picker: In service, Defective, In repair, Retired, Lost / stolen.
- Inspections — every completed run, newest first. Click one to expand it and see each check, its answer, and any note the inspector left.
- Notes — free text about the asset.
Deleting an asset removes its inspection history with it. If the asset still exists but is out of service, set its status to Retired instead — that keeps the record.
Running an inspection
Click Inspect now on an asset whose category has a checklist.
A progress bar tracks how many checks are answered and shows the running score against the threshold the category requires. For each check, tap Pass or Fail (plus N/A or Skip where the category allows them).
Failing a check does two things. If its note or photo rule is When defective, the evidence box appears immediately and the run can't be submitted until it's filled in — with any canned defect notes offered as one-tap chips. If the check is Critical, the run is called out as failed there and then, whatever the rest of the score says.
On submit:
- The score is calculated as the weighted share of decided checks that passed. Skipped and N/A checks are excluded from both sides.
- The run passes if the score meets the category's threshold and no critical check failed.
- A pass books the next inspection at the category's frequency, and clears a Defective flag a previous inspection set.
- A failure marks the asset Defective and leaves the existing due date alone, so it reads as overdue until it passes.
A failed inspection never resurrects an asset you retired or wrote off by hand — only a status a previous inspection set is cleared automatically.
In the field (CleverTech)
Staff holding the Asset manager or Asset inspector role get an Assets section in the CleverTech app: the same register, searchable and filterable by category, with Scan tag to jump to an asset from its printed label and the same inspection runner — one tap to pass, evidence demanded on a fail, critical checks called out immediately, scored by the same engine on submit. Field runs record whether the tag was actually scanned and where the phone was standing, and categories with Allow inspection without scanning the tag switched off refuse to start until the asset's own tag is scanned. See CleverTech staff surfaces.
What this does not replace
Vehicles, firearms and trackers are not asset categories and don't appear in this register. They keep their own tabs because they carry specifics a general category cannot: fuel logs, trips and odometer history; South African firearm licences and the issue register; live tracker telemetry and SIM provisioning. Asset categories are for everything those three don't cover.