Add Camera
Adding a camera to your Clever Hub is the first step to bringing a new camera into your security system. CleverAlert has a single interactive setup wizard that handles both automatic network discovery and manual stream entry from the same screens -- you do not need to choose between "wizard" and "manual" up front.
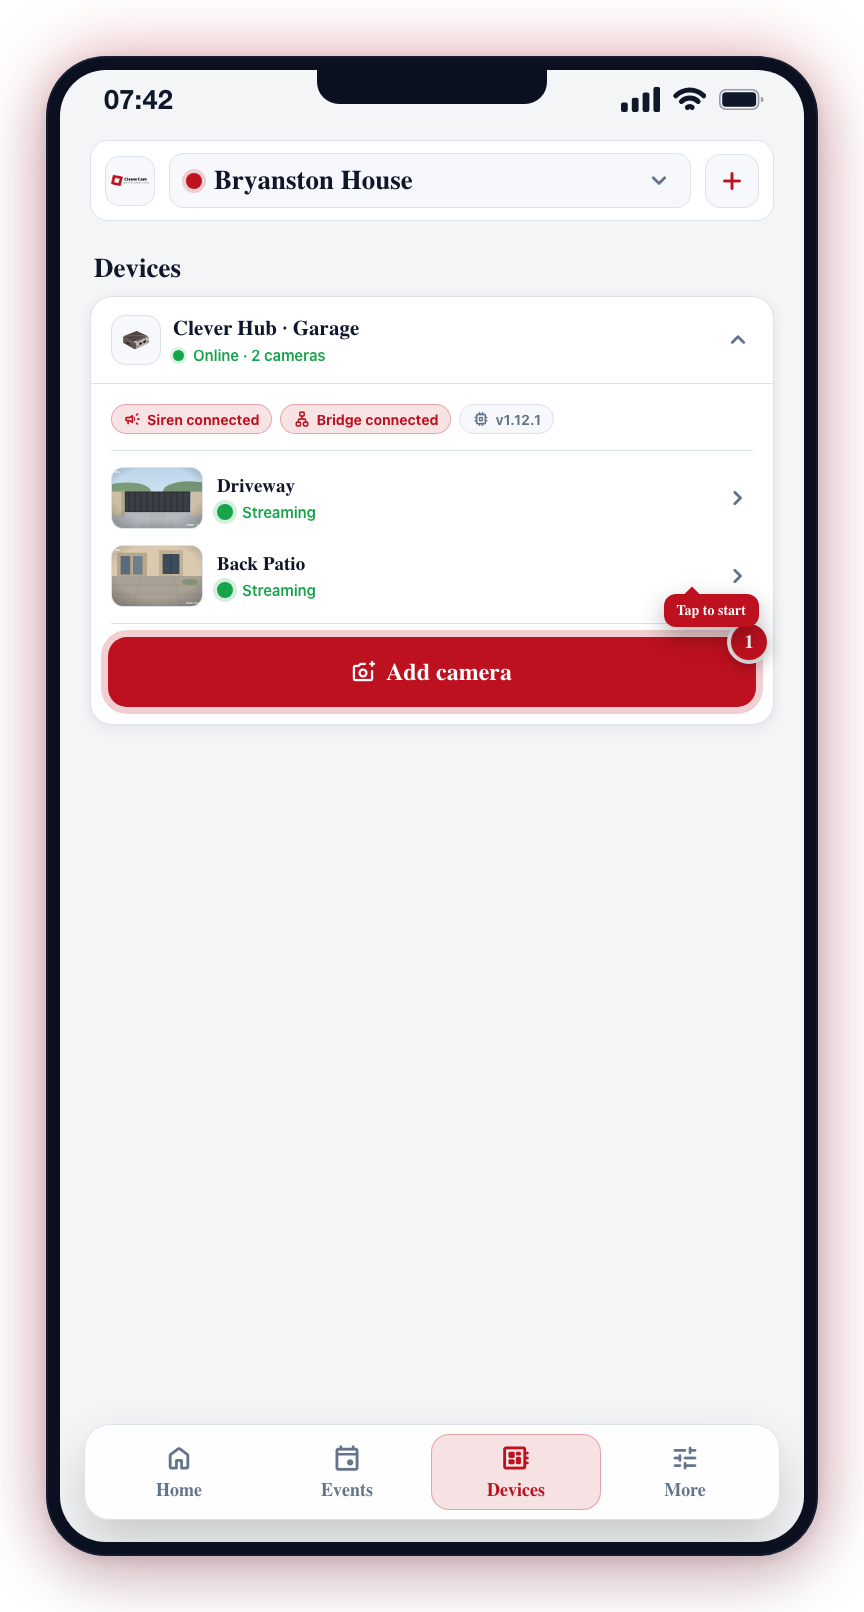
On the Devices tab, open your Clever Hub and tap Add camera.
Prerequisites
Before adding a camera, ensure:
- The camera is powered on and connected to the same local network as the Clever Hub.
- You have the camera's username and password (most cameras require them, though some factory-default Dahua models ship with no password).
- The Clever Hub is online and shows a green status in the Devices tab.
Dahua Direct hubs
A Dahua Direct hub has no hardware on site — the cameras, or a Dahua recorder (XVR / NVR), connect straight to CleverCam over the internet — so there is no network to scan. Tapping Add camera and choosing a Dahua Direct hub opens its Cameras screen instead of the wizard. The same screen opens from the hub's page, under Cameras on this device.
It lists everything that has connected to the hub:
- A recorder shows every channel it has: the name the recorder gives it, whether a camera is on it (Camera connected, Camera not connected or No camera), whether it is Analog or an IP camera (with its address and model), and — for a monitored one — what it is monitored as in CleverCam.
- A camera connecting by itself shows its own name, model, serial and network address, and whether it is Online.
To add cameras:
- Tick them. Select every channel with a camera ticks all of a recorder's cameras at once.
- Under each ticked camera, give it a Camera name, choose its Group, and choose whether it Detects People or People and vehicles.
- Tap Add in the bar at the bottom.
Monitoring starts within a minute; nothing needs doing on the camera or recorder. To stop monitoring a camera, tap the bin next to it — this deletes the camera the same way as deleting it from its own page, and it can be added again later.
The Device login at the top is the admin username and password CleverCam logs in to the recorder or cameras with; a camera that connects without a login saved shows Needs its login, and one that rejects it shows Login refused with the reason. How to connect a camera (or a recorder) lists the server address, port and Device ID to enter on the device, each with a copy button. The refresh button at the top asks every device to report again at once.
Only a site admin, a company admin of your security company, or a CleverCam super admin can add or remove cameras or change the login here; everyone else sees the list only. See Dahua Direct setup for the full installer guide.
Hikvision Direct hubs
A Hikvision Direct hub is the Hikvision counterpart: a Hikvision recorder (DVR / NVR) or cameras send their events and pictures straight to CleverCam over the internet, with no hardware on site. Your security company enters the connection settings on the device and adds its cameras in CleverOps. Tapping Add camera and choosing a Hikvision Direct hub opens the hub's page, where the Devices on this hub card lists every device the hub knows about:
- What it is (Recorder, Camera or Thermal camera) and its model, network address and MAC address. A device CleverCam has not heard from yet is shown by its network address.
- Its state: Online, Offline (with when it was last seen), or Not heard from yet (its cameras are set up, but it has not sent anything). A device that sends no timed pictures shows when it was last heard from instead: it only contacts CleverCam when it detects something, so a quiet spell does not mean it is offline.
- How many of its cameras are monitored, when its last event was, and what it sends (Events, Pictures, ISUP).
- Each channel: its number, the name the device gives it, and what it is monitored as, or Not monitored.
A channel appears once the device has sent something from it. If you are allowed to add cameras to the site, an Add button shows next to each channel that is not monitored: tap it, name the camera, and CleverCam starts monitoring it within a minute. Devices CleverCam has not heard from yet, and channels entered by number, are added in CleverOps. The connection settings are never shown in CleverAlert. Live view is not available for Hikvision Direct cameras yet. See Hikvision Direct setup for the full installer guide.
Chatting with the hub instead
Installers working for a security company that has the Chat with the hub feature are offered a choice after picking the hub: Step by step (the wizard below) or Talk to the hub. The chat is also on the hub's own page, under Talk to the hub just below its settings, because it doubles as a troubleshooting tool; opened from there the hub asks what you need instead of starting a camera setup, and the Step by step switch is not offered. In the chat they say what they need and the hub searches the network, signs in to the cameras, shows a picture from each one, adds them, tunes their video for detection, and can go back to a camera that has stopped working. Camera passwords are typed straight into the conversation.
Reading the conversation
The top bar names the hub you are talking to and says what it is doing right now — Live, Thinking…, or the job it is busy with and how long it has been running (for example "Looking for cameras · 0:24"). The hub's messages sit on the left; what you send sits on the right.
- Work cards. Each thing the hub does on the network — looking for cameras, signing in, testing a stream, checking detection, a network report — appears as a card with a running clock and a line of live commentary while it runs, then the outcome when it finishes (how many devices answered, how many cameras signed in, whether the stream plays). Pictures the hub took appear on the card; tap one to see it full screen and swipe between them.
- Options. When the hub asks a question it offers tappable answers under it. The filled one is the answer it expects. Tapping an option sends it as a message; you can always type instead.
- Sending while the hub is busy. You never have to wait. A message sent while a job is running shows up at once with a note that it will be answered when that job is done, and it stays where you sent it in the conversation. One tick means the hub has it; two ticks mean it is in the conversation for good.
- A message that could not be sent stays on screen marked Not sent, with Retry and Discard.
- Long-press any message to copy it. If you scroll up to re-read something, the page does not jump when the hub speaks — a New button appears to take you back down.
When the chat ends, a card says why (finished, closed, timed out with nothing happening, or taken over because someone else started setting up the same hub, naming them) and offers Start a new chat and Step by step.
Asking the hub about the network
Plenty of camera problems are not camera problems. A customer's own router, a second address range, a wireless bridge or a damaged cable all look like a broken camera from where the installer is standing, so the hub can be asked about the network as well:
- A full network report — the speed each network port is linked at, packet loss and jitter for every camera, the gateway and how fast it answers, every hop out to the internet, how long a name lookup takes, the largest packet the path will carry, and a quick speed sample. Ask for this first when something does not add up.
- What is on the wire — every device answering on the network, its address, its manufacturer, and what the hub thinks it is. This is what shows a camera on a range of its own, or a second router handing out its own addresses.
- Ping and trace — loss, average, worst and jitter to one camera, or every hop on the way out.
- Platform Access — whether Hik-Connect / EZVIZ is switched on, which is the single most common reason a Hikvision refuses to stream while the password is perfectly correct. The hub can switch it off for you, and it will ask about cameras it could not identify too, because a rebadged Hikvision is exactly the case that hides it.
The network report takes a few minutes; the rest answer in seconds. Only one network check runs on a hub at a time.
Fixing a camera's clock
When the hub reads a Hikvision or Dahua camera's settings it tells a wrong clock and a wrong time zone apart. Dahua cameras ship set to Beijing time, six hours ahead of South Africa, so the time they show and stamp on recordings is wrong even while the clock itself keeps good time; the hub calls that a time-zone problem rather than a clock that is hours out.
Ask the hub to fix a camera's time and, once you tap yes, it does the whole job on Hikvision and Dahua cameras and recorders: it sets the site's time zone, switches daylight saving off (South Africa has none), sets the clock from the hub's own time, turns on automatic time (NTP) so the camera stays right, and reads the clock back to show it took. Other brands do not let the hub change their clock; the hub says so and tells you where to change it on the camera.
This is for the security company's own staff, not for site owners — if you manage your own cameras you will see the wizard below, which does the same job with you driving. Installers who prefer the wizard can switch to it at any point from Step by step at the top of the chat.
Leaving a chat ends it and frees the hub for the next setup. Anything already added stays.
Starting the wizard
- Open the CleverAlert app, go to the Devices tab, tap the + Add pill at the top of the hub list, and choose to add a camera.
- If you have one online Clever Hub it is picked for you; if you have several, tap the hub you want the camera to belong to. Installers with Chat with the hub then choose between Step by step and Talk to the hub on a sheet; everyone else goes straight into the wizard.
- A hub runs one camera setup at a time. If someone else is already setting up cameras on it (step by step or in a chat, in CleverAlert or CleverOps), the app says who and since when before it starts: Take over ends their session and tells them who took over; Leave it leaves the hub to them. The chat asks the same before it opens.
A progress bar at the top of every step shows where you are in the flow: Pick a hub → Scanning / Add manually → Authenticate → Choose streams → Review & configure → Saving → Done.
Step 1: Pick a hub (skipped if only one)
Shows every online hub on the current site. Tap a hub card to start, or tap Add a camera manually at the bottom to skip the scan and enter the stream address directly (useful when you already know it).
Step 2: Scanning
The hub probes your network and lists every camera it finds. The hub first tries manufacturer-specific connection methods for well-known camera brands. If that does not work, it falls back to the industry-standard ONVIF method.
Pick up where you left off
If the hub signed in to cameras on this site in the last 48 hours that were never added (a setup that was closed before saving, or one another installer started), a Pick up where you left off card appears at the top of the scan. It says how many cameras, when, and who signed them in. The cameras whose channels are already on the hub are left out.
- Carry on with these N goes straight to Choose streams with those cameras signed in, using the username and password that worked last time and the hub's pictures from then. There is no waiting for the scan and no password to type again.
- Not now hides the card; the scan carries on as normal and every camera is signed in again the usual way.
Scan phase checklist
A NETWORK SCAN card at the top tracks progress through the discovery phases:
- Starting session
- Ping sweep
- Device lookup
- ONVIF discovery
- Probing camera ports
- Gathering camera details
Each phase is marked pending (outlined circle), running (spinner), or complete (green check). A pulsing bar under the header gives a visual signal that the scan is running. The elapsed seconds counter in the header shows how long the scan has been running.
Discovered camera chips
Each camera card can show several labels at once:
- RTSP (primary colour) -- The camera exposes an open video port and is ready for template-based connection.
- ONVIF fallback (green) -- The camera supports the ONVIF standard, which the hub will use as a backup connection method.
- Different subnet (orange) -- The camera is not on the same network segment as the hub and may not be reachable.
- Already added -- This camera is already saved to your site. The card is disabled.
Add an IP or RTSP the scan missed
Below the discovered list, tap Can't find your camera? Add by IP or RTSP to open a popup. Opening the form as a popup -- rather than expanding it inline -- means newly discovered cameras streaming into the list above don't shove your typing around. The popup gives you two paths:
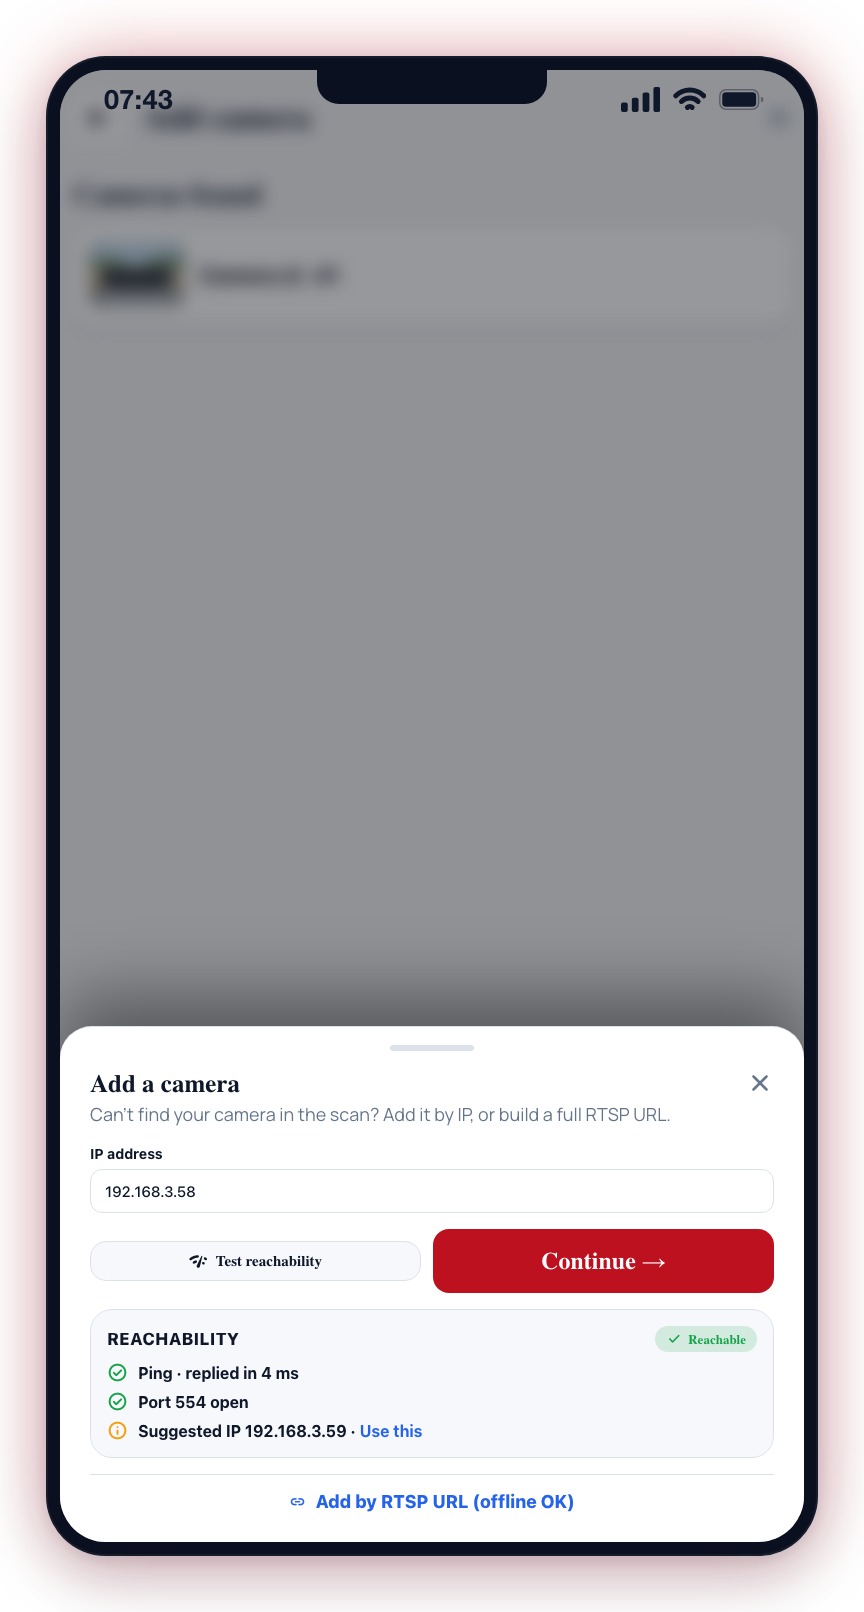
- Add by IP. Type an IP address and tap Continue →. The camera is added to the list pre-selected so you can proceed without restarting the scan. Tap Test reachability first to run an optional, non-blocking connectivity check (ping, port check, stream handshake) -- the hub reports each step with OK / fail / warn / info status, a plain-English summary, and -- if it can -- a suggested IP you can swap in with one tap. Reachability is informational; it never blocks the Add action.
- Add by RTSP URL (offline OK). Closes the popup and routes you to the manual-add screen below, where you can build or paste a full RTSP URL. Use this for cameras the LAN scan can't reach -- offline cameras you're installing now, NVR sub-streams, or cameras on non-standard ports.
Footer
- Select the cameras you want to set up and tap Continue.
- Tap Rescan to start the scan over.
Step 3a: Authenticate (discovered cameras)
Enter a username (defaults to admin) and password, then tap Authenticate. The password field is not masked so you can easily spot typos when working on-site. Spaces before or after the username and password are removed before they are sent, so a password pasted with a trailing space still works (a space in the middle of a password is kept).
Reuse credentials from this site
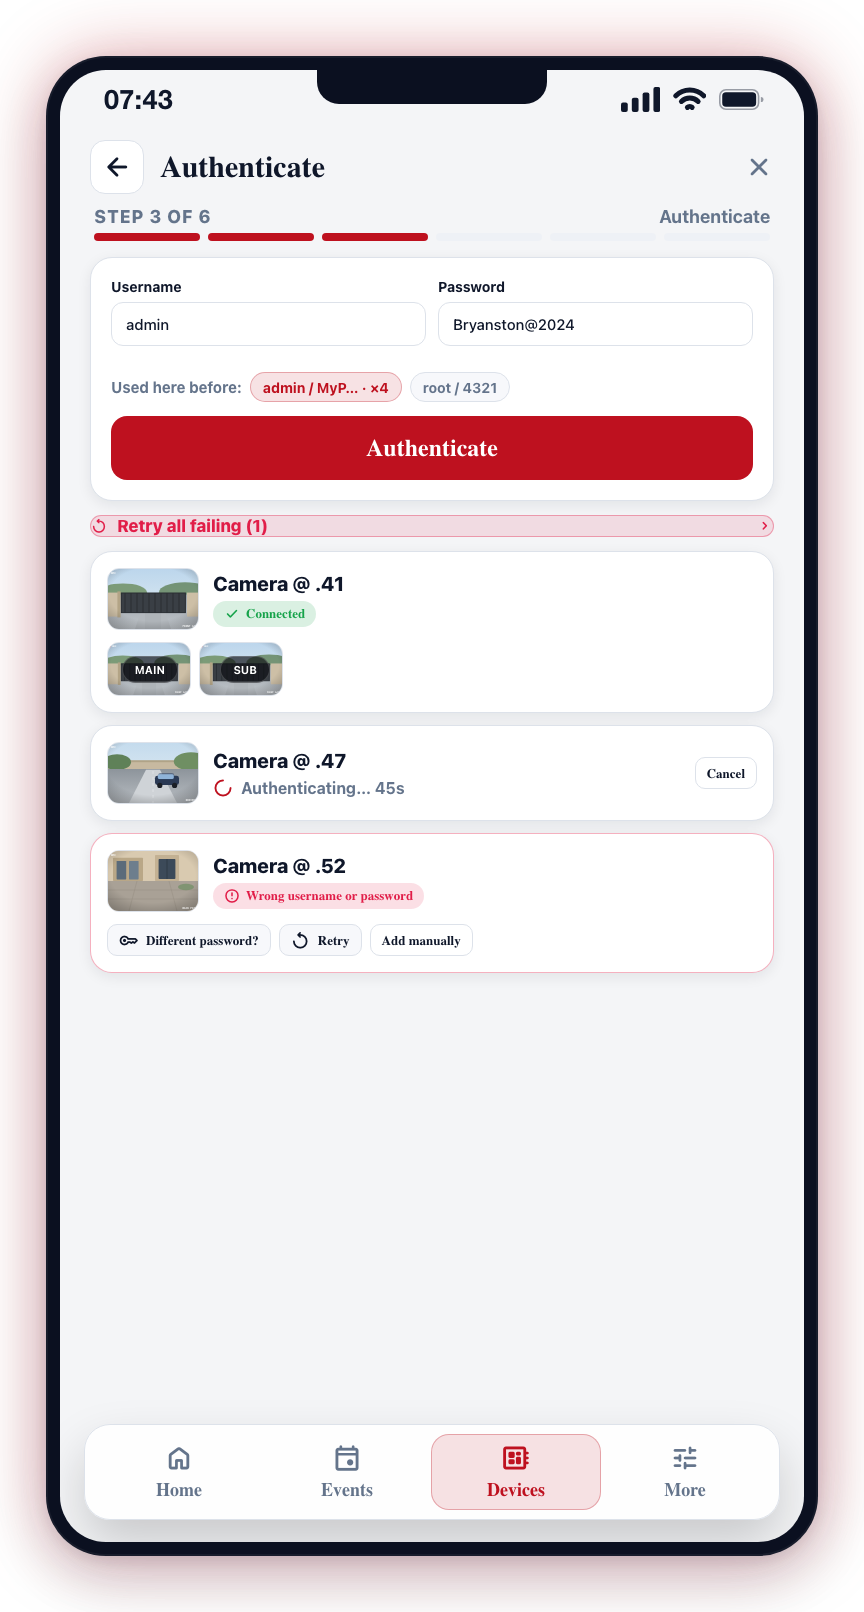
If you have already added cameras to this site, the top of the Authenticate section shows previously used credentials as chips (e.g., admin / MyPass · ×4). Tap one to fill both fields at once.
In-progress feedback
Each in-progress camera card shows:
- A spinning status icon and Connecting · followed by the hub's own progress line (for example Connecting · Listing the Hikvision's channels…)
- A live countdown (e.g.,
45s) for the hub's current step. It starts again every time the hub reports progress, which it does every few seconds while it works, so a recorder with many channels can take a few minutes without the camera being called timed out - checking… in place of the countdown, with Lost touch with the hub for a moment — still checking…, when the phone stops hearing the hub (common on a site's patchy mobile data). The app reconnects and keeps reading the hub's saved results, so a camera the hub signs in to while the phone was not listening still turns Connected. It is only called timed out after 7 minutes
- A Cancel button that stops the authentication attempt for that camera immediately
Retry all failing
If one or more cameras fail, a red Retry all failing bar appears above the device list showing the failing count. Tap it to re-attempt authentication for every failed camera in one go (useful after fixing an incorrect password).
Once a camera authenticates successfully, the credentials that worked are saved for it. You can safely change the master username or password to retry other cameras -- the already-connected ones keep the credentials they authenticated with, and those are what get saved when you finish the wizard.
Per-camera result
Each camera card shows one of:
- Connected -- The hub fetched the camera's streams and is ready to save. A thumbnail strip appears showing one snapshot per stream, each labeled MAIN or SUB so you can visually confirm you have the right camera before proceeding. A camera counts as connected as soon as the hub has a working video stream from it, even if the camera refuses the hub's ONVIF sign-in. Many Uniview cameras answer the video stream with the password but reject ONVIF. If the live update from the hub is missed, the app picks the result up from the hub's saved results within a few seconds, so the card does not stay on Connecting once the hub has pictures, and those pictures count when you save: a camera is only saved once the hub has seen a frame from it, and the hub's own record of that frame is enough.
- Failed -- A red banner explains whether the failure was a credentials problem ("Wrong username or password") or a reachability problem ("Camera unreachable"). If the phone itself had no internet when you tapped Authenticate (often because it is on the camera Wi-Fi), the banner says This phone is offline instead: the hub never got the request, so switch to mobile data and tap Retry. Options for a failed camera:
- Different password for this camera? -- Tap to expand a per-camera credentials section. Inside, you'll find quick-pick chips for any credential pairs already known to work elsewhere on this site -- tap one to fill both fields, or type a fresh username and password by hand. Anything you set here overrides the master credentials for this camera only on the next retry. Other already-authenticated cameras are not affected.
- Retry -- Re-send credentials with the per-device override (or the master credentials if you cleared the override).
- Add this camera manually -- Opens the manual entry screen, where you can build or paste an RTSP URL for cameras that simply will not connect through automatic methods.
The hub tries both Uniview stream layouts. Some Uniview NVRs (for example the NVR304 series) reject /media/video2 even with the right password, but serve every channel on /unicast/c<channel>/s1/live. The hub reports Wrong username or password only when neither layout accepts the password.
Step 3b: Add camera manually (alternative to Authenticate)
Reached by tapping Add a camera manually on the hub-select step, Add by RTSP URL (offline OK) in the scan-screen popup, or Add this camera manually on the auth-failure card. Two modes are available at the top of the screen:
Guided mode (default)
Guided mode is a step-by-step stream address editor -- each piece of the stream address (username, password, host, port, path) has its own field. A PREVIEW card below shows the complete address as you type.
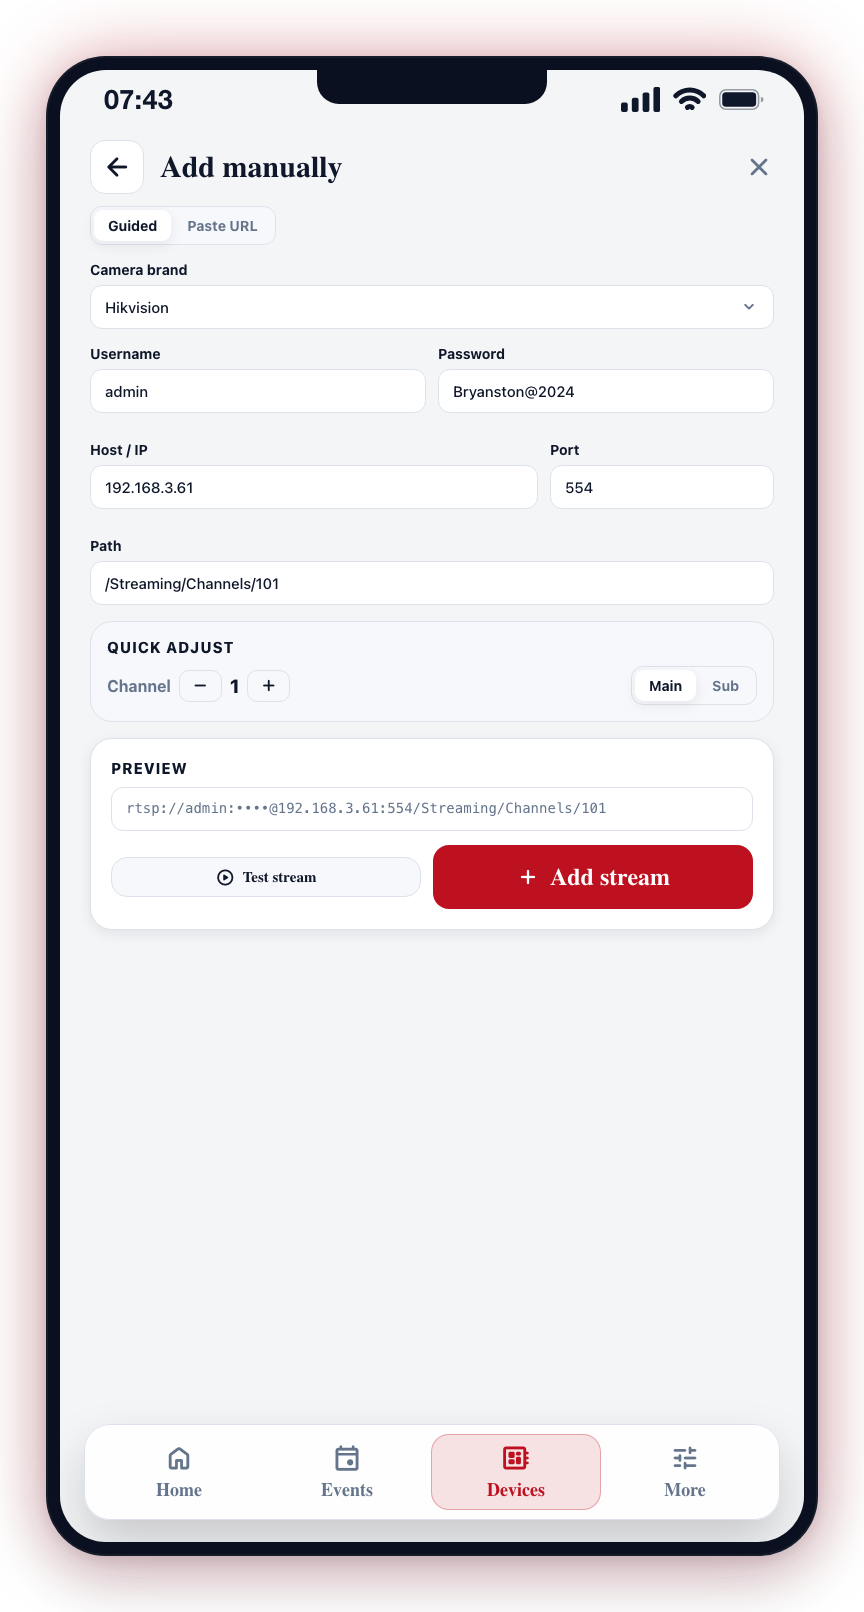
- Pick your camera brand from the picker at the top. The picker opens a styled list with all supported brands -- Dahua, Hikvision, Tiandy, Imou, Ezviz, Uniview, and Provision -- plus an Other / unknown option that leaves the path field as-is. Selecting a brand fills in the correct path for that manufacturer; your username, password, host, and port are not changed.
- Edit the username, password, host / IP, and port fields inline.
- The path field spans the full width below and can be edited to match whatever your camera expects -- useful for cameras that use a non-standard path.
- The QUICK ADJUST row provides a channel number stepper and a Sub / Main toggle. Tapping these automatically updates the path for that channel and stream type, so you do not need to edit the address text by hand.
The PREVIEW card reflects every edit live so you can verify the full address before testing or adding. Two buttons sit inside the preview card itself — Test stream and Add stream (see below) — so you act on the URL you can see.
Paste URL mode
For cases where you already have the full stream address from your camera's documentation.
- Switch the mode toggle at the top to Paste URL.
- Paste the address (must start with
rtsp://). Include the username and password in the URL itself (the form has no separate credential fields in this mode -- everything lives in the RTSP string).
Test and Add (two independent buttons)
Inside the preview card, two side-by-side buttons let you test and add independently:
- Test stream -- The hub runs a six-stage probe of your RTSP URL and streams the results back to the screen as each stage completes. You see Subnet → Ping → Port → RTSP auth → Frame capture → Snapshot upload, each marked pass / warn / fail in real time. On success a thumbnail of the captured frame appears below the steps; on failure the card pinpoints exactly which stage caught the problem (e.g. "RTSP auth: 401 Unauthorized" tells you the password is wrong before you spend time on routing). You can keep editing fields, or tap Add stream, while the test is still in flight -- it never blocks.
- Add stream -- Commits the current URL to the wizard's stream list right away, regardless of whether you tested it. Use this for cameras you can't reach right now (offline cameras you're installing, networks the hub isn't on yet) -- the camera tile gets a placeholder thumbnail so you can finish the wizard, and the real snapshot fills in the next time the hub successfully streams from it. If a Test completes successfully after you've already pressed Add, the placeholder is replaced with the real captured frame automatically.
After at least one stream is added, a green banner shows how many streams are ready and the Continue (N) button at the bottom advances to Choose streams. The form keeps your last entry intact after each Add — common workflow on a multi-channel NVR is to add channel 1, bump the channel stepper to 2, tap Add again, etc. Same-URL re-adds are deduplicated, so accidental double-taps are harmless.
Hikvision: Platform Access primer
When Hikvision (or a Hik-OEM rebadge like Herospeed / Ruijie) is selected as the brand, or when a pasted URL targets /Streaming/Channels/..., an orange info banner appears explaining how to disable Platform Access / HikCentral / Hik-Connect / EZVIZ via the camera's web UI. Many Hikvision firmwares silently block RTSP while platform access is enabled, and this is the most common cause of "Hikvision camera looks online but won't stream". The banner is informational — it never blocks the Test or Add buttons, and it's separate from the active platform-access detection that fires on auth failure (see Step 3a).
Step 4: Choose streams
Select which of the discovered streams you want to save. Labels, groups, and detection classes are configured on the next step -- this step is purely about selecting which streams to include.
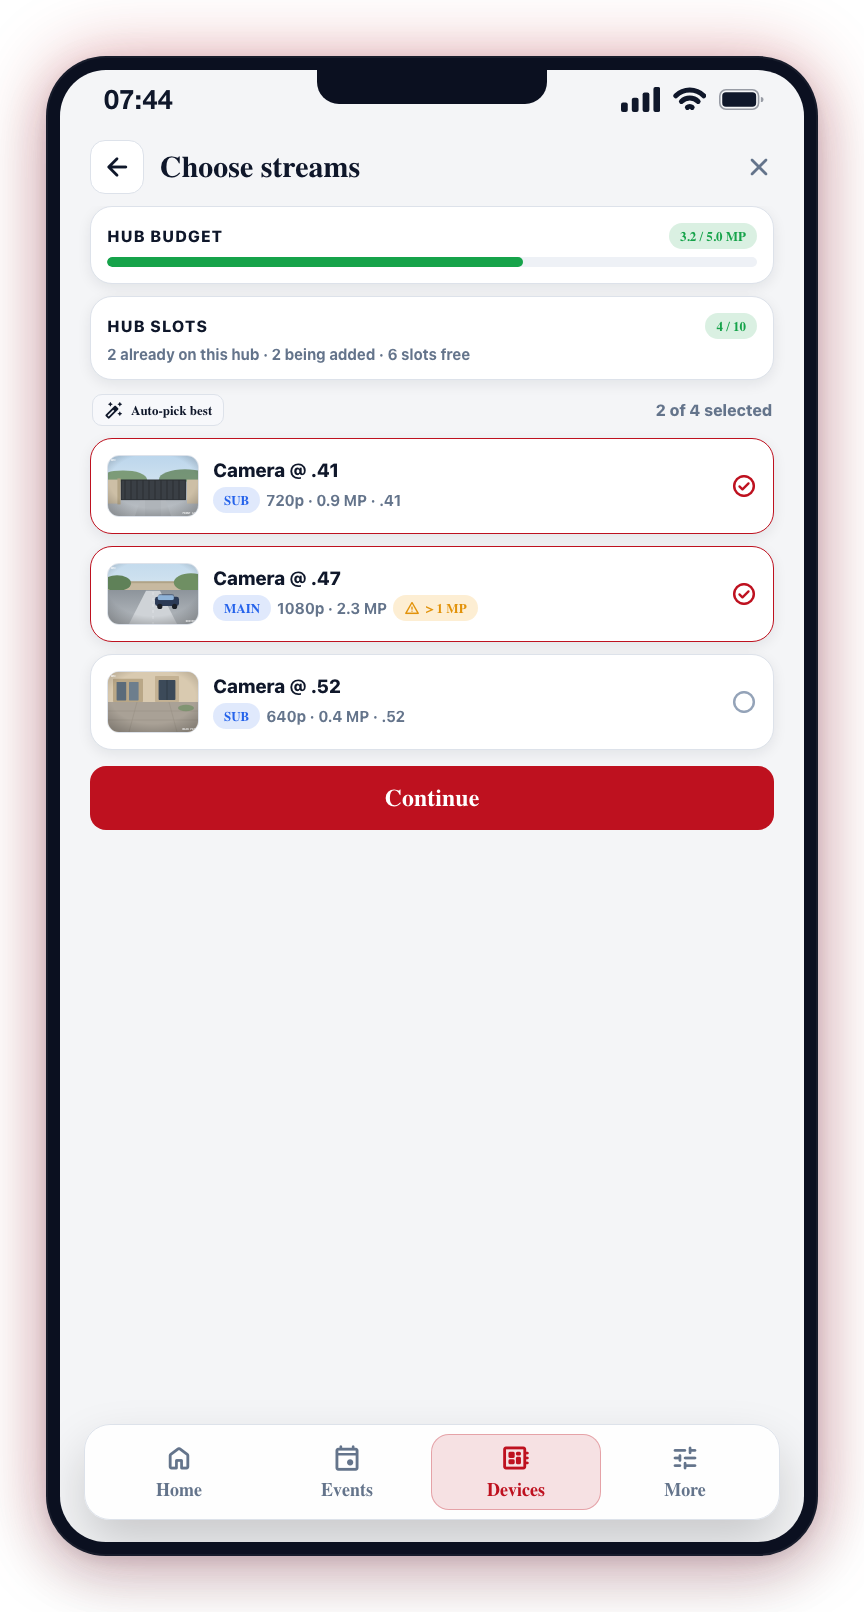
Hub budget bar
A HUB BUDGET card at the top shows a live total of the video quality (in megapixels) used by your current selection against the 5 MP hub budget:
- Green -- Under 80% of the budget.
- Amber -- 80--100% of the budget.
- Red -- Over budget. The Continue button is disabled until you bring the total back under 5 MP.
Each individual stream over 1 MP gets a warning badge -- detection quality suffers when a single stream exceeds 1 MP, so switching that camera to its lower-resolution Sub stream is almost always the right move.
Hub slots (hard 10-stream limit)
Directly below the budget bar, a HUB SLOTS card tracks how many of the hub's 10 camera slots are in use. Unlike the budget warning (which is advisory), the slot count is a hard limit -- the Clever Hub supports a maximum of 10 camera streams at once.
- The card reads
X / 10, broken out asN already on this hub · M being added · K slot(s) free. - Green while free slots remain, amber on the last slot, red at or over 10.
- The wizard will not allow you to select more cameras than the hub can support. The Continue and Save buttons are disabled with a message explaining how many cameras to deselect.
- The count is re-checked right before saving, so if another administrator added cameras while you were in the wizard, you will get a clear message rather than a silent failure.
Stream badges
Every stream card shows:
- MAIN / SUB badge -- indicates whether this is the camera's main (high resolution) or sub (lower resolution) stream.
- Resolution and megapixel count.
- The camera's IP address.
- A thumbnail if the camera provides one.
Auto-pick best
An Auto-pick best button at the top of the list automatically selects the best stream for each camera: the main stream when it fits within 1 MP, falling back to the sub stream when the main stream is too large. Tapping it again after manual edits resets back to the recommended selection.
Selection counter
A running "X of Y selected" counter sits next to the Auto-pick button so you always know how much of the hub's capacity you have committed.
Step 5: Review & configure
Once streams are selected, each camera gets its own card where you finalise the settings before saving.
Per-stream editor
For every selected stream, you can set:
- Camera name (required) -- A freeform name for the camera. Pre-filled with the camera's channel title when available. An empty name is highlighted and blocks saving.
- Group (required) -- Every camera must belong to a group so schedules, arming, and event routing work correctly. The first group on your site is pre-selected; change it if the camera belongs elsewhere. You can also create a new group here.
- Detection class (required) -- Pre-selected to Person by default. Choose Person + Vehicle if vehicles should also trigger detections.
- Person -- Detect people only.
- Person + Vehicle -- Detect people and vehicles.
- Privacy mask (optional) -- Tap Add privacy mask to open the full-screen shape editor. Draw adjustable shapes over any areas you want excluded from detection (see Privacy Masking). The button becomes Privacy mask ✓ after you set one; tap the clear button (✕) next to it to remove the mask.
Apply to all selected
The APPLY TO ALL SELECTED card at the top lets you set a group or detection class across every selected camera at once -- useful when adding a batch of cameras that all belong to the same area (e.g., "Driveway").
Recommended changes
The Clever Hub checks each camera's settings when you arrive on this step and may suggest RECOMMENDED CHANGES -- for example:
- Lower the stream resolution to improve detection performance
- Switch to a more compatible video format
- Adjust frame interval for faster event response
Tap Apply N changes to let the hub push these settings to the camera automatically. A confirmation banner reports how many changes succeeded. Tap the refresh icon to re-run the check at any time.
Platform Access (Hikvision)
If the hub detects Hikvision's "Platform Access" cloud feature on a camera, an orange banner appears with a Disable now button. We strongly recommend disabling this -- it routes your footage through Hikvision's servers and is not needed for local detection. The banner changes to "Disabled" when the hub confirms the change.
System notes
Informational banners at the bottom of each camera card cover things the hub wants you to know but cannot fix automatically -- such as an unsupported camera brand, clock drift, or an unusual network state.
Save
Tap Save N cameras to commit. The button stays disabled until every selected camera has a name, a group, and a detection class assigned. A message above the footer lists exactly what is still missing (e.g., "Still missing: 2 names, 1 group"). The privacy mask is optional and never blocks saving.
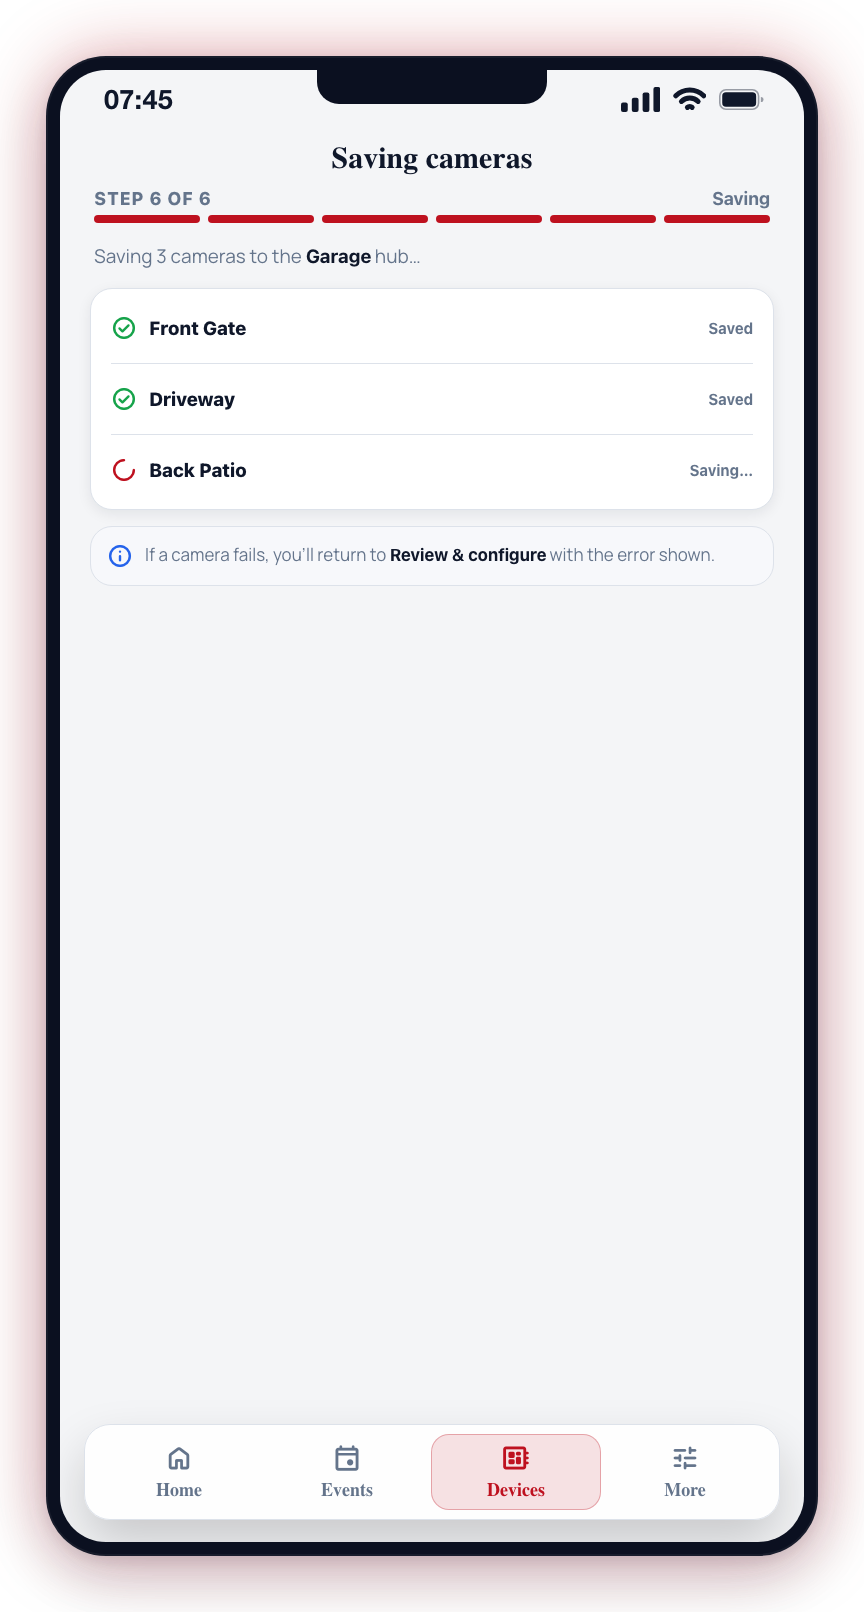
Step 6: Saving
A progress list shows each camera as it is saved -- a spinner while it is in progress, a green check when it is done, and a red cross if something went wrong. If any camera fails, the wizard returns to the Review & configure step with the error shown so you can fix and re-save.
Step 7: Done
A green check confirms how many cameras were added. Tap Review camera (single) or Review cameras (multiple) to close the wizard and return to the Devices list, or tap Add more to start the process again for the same hub.
Robustness features
- Connection keepalive. The app stays in contact with the hub while you work, so a slow network will not drop your session. If the hub stops responding for more than 90 seconds, a warning banner appears; after 5 minutes of silence the app shows Session expired, and clears it again by itself if the hub answers after all.
- Leaving the app mid-setup. You can switch to another app, for example to look up a camera password, and come back. The hub holds your session for 15 minutes, and when you return the app checks with the hub and carries on where you were. Only if the hub has already ended the session do you see Session expired, with Restart to begin a new scan. A camera sign-in that was still running while you were away may show as timed out; tap its retry.
- Someone else takes the hub over. If another installer starts setting up cameras on the same hub and chooses Take over, your session ends and the app says who took over, instead of a plain Session expired.
- Hub-offline banner. If your hub goes offline mid-wizard, a red banner appears to let you know.
- Per-camera timeout. Each authentication attempt waits up to 60 seconds; a live countdown shows remaining time and a Cancel button lets you stop early.
- Cancel on back. Going back or closing the page asks for confirmation before releasing the session.
If a camera fails during authentication, the failure banner tells you whether it's a credentials problem or a reachability problem. For credentials, expand Different password for this camera? and either pick a quick-pick chip from credentials known to work elsewhere on the site, or type a fresh username and password and tap Retry. For reachability, the hub couldn't see the camera at all -- check the PoE switch, network cable, and that the camera is on the same subnet as the hub. If retries don't help, tap Add this camera manually to enter the RTSP URL by hand.
The camera must be on the same local network as the Clever Hub for both discovery and streaming. The hub connects to cameras over the local network, not over the internet.
Cameras added by the wizard are set up with sensible default detection settings -- intrusion detection with the class you chose, full alarms for high-confidence detections, guard tour alerts for medium-confidence detections, and no action for tamper events, sirens, or chimes. You can fine-tune detection, event routing, chimes, tamper detection, and guard tours from the camera page after it is saved -- see Detection Routing.